You can migrate a lightweight server—such as a Tencent Cloud Simple Application Server, Huawei Cloud HECS instance, or AWS Lightsail instance—to Alibaba Cloud Simple Application Server (SAS) by using Server Migration Center (SMC).
Alibaba Cloud Simple Application Server is a lightweight cloud server designed for quick deployment, security management, and monitoring. What is Simple Application Server?
If Alibaba Cloud Simple Application Server does not meet your requirements, migrate to an ECS instance instead. Migrate servers to Elastic Compute Service (ECS).
Limits
SMC does not support migrating Alibaba Cloud ECS instances to Alibaba Cloud Simple Application Server.
Use the SCP command and Data Transmission Service (DTS) to migrate ECS-hosted website applications to Simple Application Server. Migrate ECS instances to Simple Application Server.
SMC does not support migrations between Alibaba Cloud Simple Application Server instances.
To migrate data between Alibaba Cloud Simple Application Server instances, see Migrate data between Simple Application Servers.
Cross-OS migration is not supported. Windows sources can only migrate to Windows destinations, and Linux to Linux.
The source lightweight server can have at most one data disk attached.
Dry runs are not supported. The migration skips the dry run step and proceeds directly.
Migration impact
Review the following before you start.
Impact item | Description |
Migrated data directories | During the migration, SMC automatically generates a disk partition structure on the destination that closely matches the source server's structure. You can adjust the partition structure of the destination disk, including its partition size, order, transfer method, and LVM configurations. By default, all disks are migrated:
|
Intermediate instance | Do not interfere with the intermediate instance. Do not stop, start, restart, or release the intermediate instance, or change its billing method during migration. The intermediate instance is automatically released after migration. Note
|
IP address | The IP address changes after the migration, potentially causing service interruptions. Perform the migration during off-peak hours. If your services involve IP address configurations, you must update the domain name resolution and ICP filing after the migration. Note If a domain name is mapped to the source server, remap it to the new instance's public IP address. Add a website resolution. |
Underlying hardware | The underlying hardware changes after the migration. This may invalidate certain application licenses that are bound to specific hardware. Review your license agreements. |
Performance impact | The migration process consumes server resources, including CPU, memory, disk I/O, and network bandwidth. |
Data consistency |
Preparations
You have completed preparing for server migration.
Familiarize yourself with the SMC client, migration principles, billing, workflow, and feedback channels. Migration guide.
Create a destination Simple Application Server that matches your source server in OS type and storage capacity. If you have not created a Simple Application Server, see Create a Simple Application Server.
WarningAfter migration, all existing data on the destination Simple Application Server instance is purged. Source server data is not affected. If your Simple Application Server instance contains important data, back up the data first.
Operating system consistency: The source and destination must run the same OS type (Windows to Windows, Linux to Linux).
Data disk count and capacity requirements:
The destination must have at least as many data disks as the source (maximum one). If the destination lacks a data disk, attach one: Attach a data disk and Partition and format a data disk.
Destination disk capacity must be greater than or equal to source disk capacity. To use a smaller disk, ensure it has at least the actual used capacity of the source disk. Expand undersized disks first: Expand a data disk.
Migration procedure
Step 1: Import the migration source
A migration source is the server to migrate, such as an on-premises server, VM, or cloud host from another provider. SMC supports multiple import methods. How to choose a migration source import method?
Import migration source with one-click command line (recommended)
The source server must have public network access. If the source server is behind a firewall, see What are the SMC service domains? to obtain the SMC endpoints and ports, and then add them to your firewall allowlist.
If your source server cannot access the public network or you want to use a private network for a faster migration, see private network migration.
-
Go to the Server Migration page in the SMC console.
On the Server Migration page, click Import Source Servers.
Configure the parameters as prompted and copy the activation code command. The following table describes the parameters.
Parameter
Description
Workgroup (Optional)
This parameter applies only to batch migrations for creating cloud server images. If you are migrating a single server, skip this parameter.
You can add multiple migration sources to the same workgroup for easier management. For migration sources in a workgroup, you must enable automatic incremental synchronization during migration. Batch server migration.
If you have not created a workgroup, click Create a New Workgroup.
Migration Source Type
Physical servers/VMs/Cloud servers of other cloud platforms
Import Method
Select Use CLI to Import Server.
This method generates a script command with an activation code. Run this command on the source server to import it.
Migration Source Quota
The number of migration sources that can be activated by the activation code. Valid values: 1 to 1,000. Default value: 200.
Validity Period
The validity period of the activation code, in days. Valid values: 1 to 90. Default value: 90.
Activation Code
Generate the activation code and copy the command.
Click Generate.
Based on the operating system of the source server, click the Linux Shell or Windows PowerShell tab.
Click Copy to copy the activation code command.
Log on to the source server and run the copied command with administrator privileges to import it.
Linux source server
Log on to the Linux source server.
Paste and run the copied command with administrator privileges to import the migration source.

If a message similar to
Import Source Server [s-bp18x8751kgz2oyh****] Successfully!is displayed, it indicates a successful import.
Windows source server
Log on to the Windows source server.
Open Windows PowerShell with administrator privileges.
Paste and run the copied command to import the migration source.

If a message similar to
Import Source Server [s-bp19rlidl3mwuptc****] Successfully!is displayed, it indicates a successful import.If the command fails to run, see What do I do if a command fails to run when I import a Windows migration source by using the command line?.
On the Server Migration page of the SMC console, check the status of the migration source in the Real-time Migration Status column.
If the status is Migration SourceOnline, the import was successful.
If the status is anything else, the import failed. Troubleshoot the issue using the following methods and then import the migration source again.
Troubleshoot the issue based on the error message in the console or by checking the SMC client log file. The default installation directories of the SMC client are:
Windows source server: C:\smc.
Linux source server: /smc.
For information about common issues and solutions, see SMC FAQ and Troubleshooting.
Import migration source using the SMC client
The SMC client must run on the source server. By default, public network access is enabled. If the source server is behind a firewall, see What are the SMC service domains? to obtain the SMC endpoints and ports, and then add them to your firewall allowlist.
If your source server cannot access the public network or you want to use a private network for a faster migration, see private network migration.
-
Go to the Server Migration page in the SMC console.
On the Server Migration page, click Import Source Servers.
On the Import Source Servers page, configure the parameters as described in the following table.
Parameter
Description
Migration Source Type
Physical servers/VMs/Cloud servers of other cloud platforms.
Import Method
Select Use Client to Import Server.
You must manually download and install the SMC client on the source server.
Description
In the Description section, follow the prompts to download, install, and activate the SMC client that matches the operating system (Linux or Windows) and architecture (32-bit or 64-bit) of your source server.
Click Generate and copy the activation code.
You must enter the activation code when you install the client.
Import the migration source.
ImportantDo not close the SMC client during the migration. Otherwise, the migration source will lose its connection to the SMC console and the migration will fail.
Windows source server
Use a remote connection tool that supports file transfer, such as WinSCP, to upload the SMC client to the Windows source server.
On the Windows source server, use the system's built-in decompression tool or a third-party tool to decompress the SMC client package.
In the folder for the SMC client version that matches your server's system, double-click the go2aliyun_client.exe application.
When prompted for administrator privileges, click OK.
Obtain an activation code or an AccessKey pair.
(Recommended) Obtain an activation code: In the Description section of the SMC console, click Generate and copy the activation code.
Obtain an AccessKey pair: An AccessKey pair consists of an AccessKey ID and an AccessKey secret. If you have not created one, see Create an AccessKey pair.
Follow the prompt and enter the values for the activation code,
access_access_token_idandaccess_token_code, and pressEnter.If a message similar to
Import Source Server [s-bp18x8751kgz2oyh****] Successfully!is displayed, it indicates a successful import.
Linux source server
Use a remote connection tool that supports file transfer, such as WinSCP, to upload the SMC client to the Linux source server, or run the command provided in the import instructions to download the SMC client directly on the source server.
Remotely connect to the Linux source server and decompress the SMC client package.
The following command uses the
Linux 64-bit General-purpose Editionas an example. If you use a different version of the SMC client, replace the package name in the command with the name of the file you downloaded.tar -zxvf go2aliyun_client.tar.gzNoteThe Linux 64-bit ARM Edition supports the g6r general-purpose instance family and the c6r compute-optimized instance family. Enterprise-level Arm-based compute instance families.
(Optional) Exclude files or directories from the migration.
ImportantIf you enable block replication for the migration, you cannot exclude files or directories.
Obtain an activation code or an AccessKey pair.
(Recommended) Obtain an activation code: In the Description section of the SMC console, click Generate and copy the activation code.
Obtain an AccessKey pair: An AccessKey pair consists of an AccessKey ID and an AccessKey secret. If you have not created one, see Create an AccessKey pair.
In the SMC client directory, run the following commands to start the SMC client.
The go2aliyun_client2.6.5_linux_x86_64 directory is used as an example. The directory name varies based on the client version. Make sure to replace it with the name of the directory created after you download and decompress the package.
cd go2aliyun_client2.6.5_linux_x86_64
sudo chmod +x go2aliyun_client
sudo ./go2aliyun_client
Enter the activation code or AccessKey pair as prompted. The following example shows how to enter an activation code:

After you enter the activation code or AccessKey pair, the following prompts may appear:
If a snapshot driver is not installed on the source system, the SMC client prompts you to install one. You can choose whether to install it based on your migration plan.
If you plan to enable block replication when you create the migration task, enter
yesto automatically install the snapshot driver.If you do not plan to enable block replication, enter
no.
ImportantIf the snapshot driver fails to install, do not enable block replication when you create the migration task. Otherwise, the migration will fail.

Most mainstream source systems have rsync installed by default. If rsync is not installed, the SMC client prompts you to install it. Enter
yesto automatically install rsync, as shown in the following figure.
If SELinux is enabled on the source system, the SMC client prompts you to disable it. Enter
yesto automatically disable SELinux, as shown in the following figure.
If a message similar to
Import Source Server [s-bp11npxndknsycqj****] Successfully!is displayed, it indicates a successful import.NoteIf the import fails, troubleshoot the issue based on the displayed message. Then, run the following commands in sequence to exit the background process and import the migration source again. For information about common issues and solutions, see SMC FAQ and Troubleshooting.
sudo ./go2aliyun_client --abort
sudo ./go2aliyun_client
On the Server Migration page of the SMC console, check the status of the migration source in the Real-time Migration Status column.
If the status is Migration SourceOnline, the import was successful.
If the status is anything else, the import failed. Troubleshoot the issue using the following methods and then import the migration source again.
Troubleshoot the issue based on the error message in the console or by checking the SMC client log file. The default installation directories of the SMC client are:
Windows source server: C:\smc.
Linux source server: /smc.
For information about common issues and solutions, see SMC FAQ and Troubleshooting.
Step 2: Configure migration
-
In the Actions column of the migration source that you want to manage, click Start Migration.
Configure the parameters and click Start Migration.
Configure basic parameters.
Parameter
Description
Destination Type
Select Simple Application Server.
Target Region (required)
The region of your destination Simple Application Server. Regions and zones.
Destination Instance (required)
Select a Simple Application Server instance as the destination.
The destination instance must match the source server in storage capacity and OS type.
ImportantDo not stop, start, restart, or release the destination instance during migration.
If the destination instance has fewer data disks than the source, not all source data disks will be migrated.
If the destination disk is smaller than the source disk, expand it first. Expand a data disk.
Execution Method
Select how to run the migration task:
Migrate Now: Starts the migration immediately after you create the migration job. By default, Migrate Now is selected.
Migrate Later: Schedules the migration job to start automatically at a specified time.
NoteThe earliest you can schedule the job is 10 minutes from the current time.
Create Only: Creates the migration job but does not start it. You must manually start it later by clicking Start Migration Job in the Actions column.
Network Type
Migration data is transferred to the intermediate instance over the public network. This mode requires the source server to have public internet access. You can choose whether to specify a Virtual Private Cloud (VPC) and vSwitch.
Specify a VPC and vSwitch: The migration job creates an intermediate instance in the VPC and vSwitch that you specify.
Do not specify a VPC and vSwitch: The migration job creates an intermediate instance in a new VPC and vSwitch that are automatically created by the system.
You can also adjust the disk partition structure. Parameters are described in the following table.
Parameter
Description
Modify Disk Partition
Select whether to adjust the disk partition structure based on your requirements. Only SMC client versions 2.8.0 and later support this feature. SMC Client User Guide.
Disabled: The disk information of the source instance is not shown. SMC automatically reads the source disk information and generates a disk layout. After migration, the destination disk partition structure matches the automatically generated layout by default.
Enabled: The disk information of the source instance is displayed. SMC automatically reads the source disk information to generate a disk layout. You can adjust the destination disk partition structure, including the partition size and order, transfer method, and whether to enable LVM.
Configure disks
System Disk: The size of the destination system disk, in GiB. Valid values: 20 to 2,048.
The destination system disk size must exceed the used space on the source system disk. For example, if the source system disk is 400 GiB and 100 GiB of space is used, the destination system disk size must be greater than 100 GiB.
NoteThe default value is the size of the source system disk. Unless you need to reduce the system disk size, we recommend that you do not specify a value smaller than the default.
Data Disk<N>: The size of the destination data disk after migration, in GiB. Valid values: 1 to 32,768.
The
<N>variable represents the data disk number. If you are migrating to a destination instance, N is the data disk ID.The destination data disk size must exceed the used space on the source data disk. For example, if the source data disk is 500 GiB and 100 GiB of space is used, the destination data disk size must be greater than 100 GiB.
If a Data Disk has no mount target, or if all its mount targets are set to not be migrated, the data disk is not migrated.
LVM: Logical Volume Manager (LVM) is a disk partition management system for Linux. LVM offers more flexibility than standard disk partitions and allows for dynamic resizing of disk space.
You can enable LVM based on your requirements. If enabled, the destination disk is automatically rebuilt with an LVM structure.
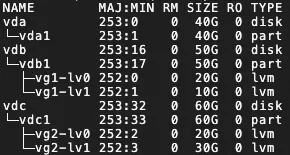
For each destination disk with LVM enabled, the system creates one physical volume (PV) and its corresponding volume group (VG). Within this VG, it creates one logical volume (LV) for each mount target. The VG is named vgX by default (where X is the disk sequence number), and the LVs are named lvX by default (where X is the LV sequence number), as shown in the following example:
 Important
LVM cannot be enabled in the following cases:
The source server runs Windows.
The system disk does not have a boot partition.
If you enable LVM, the feature does not take effect in the following scenarios:
The source server does not support lvm2, or the lvm2 package is not installed.
The source server runs a Debian system with a kernel version of 3.x or earlier and has a disk with an XFS file system mounted.
Configure mount targets
Migrate: Specifies whether to migrate the mount target based on your business requirements.
Enable Block Replication: This option is visible only for SMC client versions before 3.2.0. Block replication improves the stability of the transfer speed and ensures that the destination partition structure is identical to the source, but you cannot modify the partition size. SMC determines whether to support block replication based on the status of the source disk partitions.
If the source partition does not support Block Replication, this option cannot be enabled. File-level replication is used by default, which allows the partition size to be modified.
If the source partition supports Block Replication, this option is enabled by default to perform a partition-level disk migration.
NoteIf the source server runs a Windows operating system, block replication is enabled by default and cannot be disabled.
If LVM is enabled for the disk and the partition size is not a multiple of 4 MiB, block replication does not take effect. File-level replication is used instead.
Set Partition Size: If block replication is disabled, you can set the partition size. The sum of partition sizes cannot exceed the total size of the disk.
Windows operating systems: You cannot adjust the partition size.
Linux operating systems: You can set the partition size based on your requirements, but the sum of partition sizes cannot exceed the disk size.
For SMC client versions earlier than 3.2.0, ensure that block replication is disabled.
NoteIf the disk sizes of the destination instance do not match the source disks, you cannot create the job. In this case, the system automatically adjusts the mount target locations to meet the disk size requirements. If the requirements are still not met after the adjustment, resolve the issue as prompted on the UI.
You can also manually drag and drop mount targets to meet the disk size requirements. However, you cannot move boot or system partitions. To do this, perform the following steps:
Hover the pointer over the
 icon next to the mount target.
Drag the mount target to another disk.
(Conditionally required) To configure network mode, compression ratio, and other advanced parameters, click Advanced Settings.
Parameter
Description
Migration Job Name
Name of the migration task.
Job Description
Description of the migration task.
Transmission Speed Limit
Limits the data transfer speed, in Mbit/s. If Compression Ratio is set to a value greater than 0, the actual network transfer speed for the compressed data is lower than the speed displayed in Real-time Migration Status.
Compression Ratio
Sets the data compression level for migration.
In environments with limited bandwidth, a higher compression ratio can increase data transfer speed.
In environments with high bandwidth, we recommend that you do not compress data to reduce CPU usage on the source server.
Valid values: 0 to 10. The default value is 7. A value of 0 indicates that data is not compressed.
Checksum Verification
This feature is disabled by default. Enabling it enhances data consistency checks but may decrease transfer speed.
SSL encrypted transfer
The default value is Auto-Select. SSL encryption for data transfer improves security and data integrity.
Tag
Add tags (key-value pairs) to the migration job for easier searching and management. Use tags to manage migration sources and jobs. Implement fine-grained permission management by using tags.
NoteYou can add a maximum of 20 tags to a single migration job.
Report diagnostic logs
Automatically uploads SMC client logs to the SMC server for diagnostic analysis. This helps troubleshoot issues if a migration error occurs. This feature is enabled by default.
SMC client logs are typically stored in the
/smc/go2aliyun_client*/Logsdirectory within the installation path.
-
In the dialog box that appears, read the notes and click Got It.
On the Server Migration page, monitor the real-time migration status.
Migration duration depends on the source data size and network bandwidth. Wait for the task to complete.
NoteSpeed: The amount of uncompressed migration data transferred per second. If the Compression Ratio for the migration job is greater than 0, the displayed speed is higher than the actual network transfer speed of the compressed data.
Time Remaining for Synchronization: Calculated as (Total Data Volume - Transferred Data Volume) / Speed.
If the transfer speed is too slow, consider temporarily increasing the fixed bandwidth of the source and destination servers. Estimate migration time and test transfer speed.
(Optional) To view migration details, follow these steps.
Verify migration results
References
The public IP address changes after migration. If a domain name was bound to the original server, rebind and resolve it on the new server. Register and resolve a domain name.
Use the SCP command and Data Transmission Service (DTS) to migrate ECS-hosted website applications to Simple Application Server. Migrate ECS instances to Simple Application Server.
To migrate data between Alibaba Cloud Simple Application Server instances, see Migrate data between Simple Application Servers.