This topic describes how to migrate web applications from an ECS instance to a Simple Application Server.
Prerequisites
-
Create a Simple Application Server that uses the same operating system as your ECS instance. For more information, see Create a Simple Application Server.
Note-
If your Simple Application Server has a different operating system from the ECS instance, you can reset the system. For more information, see Reset system.
-
Simple Application Server offers a more limited selection of system images than the public images available for ECS. During migration, you can choose a similar operating system version. For example, if your ECS instance uses a CentOS 7.X public image, you can use a CentOS 7.3 or CentOS 7.6 system image for the Simple Application Server.
-
-
Set a password for the Simple Application Server. For more information, see Set or reset a server password.
-
Enable the required ports in the firewall. For more information, see Firewall settings.
In this example, you must enable port 3306 (the default port for MySQL), port 8888 (the default port for aaPanel), and port 888 (the default port for the phpMyAdmin database management tool).
WarningUsing default ports can expose your server to attacks. We recommend disabling these ports after use or changing them to custom port numbers.
Background
In this scenario, you migrate a WordPress website from an ECS instance with an LNMP environment to a Simple Application Server. The goal is to ensure the website remains operational with complete data integrity after the migration. The following tables list the servers and tools used for this migration.
-
Server details
ECS instance
Simple Application Server
-
Image: CentOS 7.8 public image.
-
Runtime environment and application: A WordPress website is deployed in an LNMP environment.
The application versions are as follows:
-
Nginx: 1.16.1
-
MySQL: 5.7.28
-
PHP: 7.0.33
-
WordPress: 5.1.10
NoteThis topic does not describe how to build an LNMP environment or deploy a WordPress website on an ECS instance. For more information, see Manually build a WordPress website (CentOS 7).
-
Image: CentOS 7.6.
-
-
Migration tools
Tool
Description
aaPanel Free Edition
You will use aaPanel, a server management panel, to set up an LNMP environment on the Simple Application Server that matches the environment on the source ECS instance.
scp command
This command is used to remotely copy files based on the SSH protocol. The web application (excluding database data) on the ECS instance will be copied to the simple application server by using the scp command.
Alibaba Cloud Data Transmission Service (DTS)
You will use Alibaba Cloud Data Transmission Service (DTS) to migrate the WordPress website's database from the ECS instance to the database on the Simple Application Server. For more information, see What is Data Transmission Service (DTS)?.
Notes
-
Create snapshots to back up data.
For more information, see the following topics:
-
ECS instance: Manually create a single snapshot.
-
simple application server: Create a snapshot.
WarningCreate snapshots for both the ECS instance and the simple application server. If a migration failure causes data issues, you can use the snapshots to restore the cloud disks.
-
-
Ensure that the runtime environment versions on both servers are identical.
Some websites have strict requirements for their runtime environment version. If the versions on the source and target servers do not match, the website may not work correctly after migration. Therefore, you must identify the exact version of the runtime environment on your ECS instance. For example, if you have an LNMP environment, identify the versions of Nginx, MySQL, and PHP, and then deploy the same versions on the simple application server.
-
Check your network connectivity.
You must ensure that both the ECS instance and the simple application server have public network access. If you are migrating data across international regions, note that an unstable network can slow down the migration.
Post-migration impacts
|
Item |
Description |
|
Licensed applications on the server |
The ECS instance and Simple Application Server are in different virtual private clouds (VPCs). Therefore, the underlying hardware changes during migration, which may invalidate application licenses that are bound to the hardware. You are responsible for checking your licenses after the migration. |
|
Public IP address |
The Simple Application Server has a different public IP address than the source ECS instance. If you have a domain name associated with the ECS instance, you must update the DNS records to point the domain name to the new public IP address. |
Step 1: Install and configure aaPanel
This tutorial shows how to use aaPanel to configure a server runtime environment on a Simple Application Server that matches the environment on the ECS instance.
For a real-world migration, you must manually configure the runtime environment on the Simple Application Server to match the environment on the ECS instance.
-
Connect to your Simple Application Server in the console.
For more information, see Connect to a Linux server.
- Run the following command to switch to the
rootuser:sudo su root -
Install aaPanel.
Go to the aaPanel website to get an installation package for your operating system. In this example, the Simple Application Server runs CentOS 7.6. Run the following command to install the free edition of aaPanel.
yum install -y wget && wget -O install.sh http://www.aapanel.com/script/install_6.0_en.sh && bash install.sh aapanelThe following output indicates a successful installation. Save the aaPanel Internet Address, aaPanel Internal Address, username, and password.
================================================================== Congratulations! Installed successfully! ================================================================== aaPanel Internet Address: https://8.218.XX.XX:7800/d55e4627 aaPanel Internal Address: https://172.19.XX.XX:7800/d55e4627 username: k6tzrhwj password: d2ae**** Warning: If you cannot access the panel, release the following port (7800|888|80|443|20|21) in the security group ================================================================== Time consumed: 1 Minute! -
On your local computer, access the aaPanel Internet Address from a browser, and then log in to aaPanel with the username and password.
After you log in to aaPanel, you also need to log in to your aaPanel account. If you do not have a aaPanel account, you must register one first. Follow the on-screen instructions to complete the process.
-
In aaPanel, set up a runtime environment that matches the one on the ECS instance.
-
In the left-side navigation pane, click App Store.
-
In the App Sort section, click Deployment.
-
In the list of software, find the following applications and click Install in the Operation column for each.
-
Nginx
Click Install, select version
nginx 1.16, then click Submit. -
MySQL
Click Install, select version
mysql 5.7, then click Submit. -
PHP-7.0
Click Install, keep the default settings, then click Submit.
-
phpMyAdmin
Click Install, select version
phpmyadmin 4.9, then click Submit.
The installation may take some time.
-
-
-
In aaPanel, add website information.
-
In the left-side navigation pane, click Website.
-
On the PHP Project tab, click Add Site.
-
In the Add Site dialog box, on the Create Site tab, configure the parameters, then click Submit.
The following table describes the main parameters. For parameters that are not listed, use the default values.
Parameter
Description
Example
Domain name
-
If you have bound a domain name to the Simple Application Server and completed DNS resolution, enter the domain name.
-
If you have not yet bound a domain name, you can enter the server's public IP address for testing. After the migration is complete, bind and resolve a domain name to the server, and then update this setting.
This example uses the server's public IP address for testing.
Description
A description of the website. This parameter is optional.
In this example, set this to
server-B.Website Path
The root directory of the website. The default root directory in aaPanel is /www/wwwroot.
In this example, set this to /www/wwwroot/wordpress.
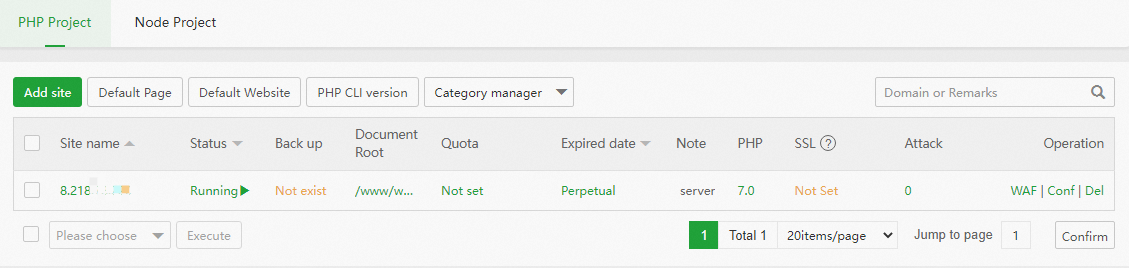
After the site is added, the result is shown in the following figure.
-
-
-
In aaPanel, configure the MySQL database.
-
In the left-side navigation pane, click Databases.
-
On the Database Manager page, change the root password.
-
Click Root password.
-
Enter a custom password in the Root password field, then click Submit.
In this example, the password is set to
Test@123.ImportantStore your password securely. A leaked password can expose your server to security risks.
-
-
On the Database Manager page, click phpMyAdmin.
-
On the phpMyAdmin page, enter the username and password for the MySQL
rootuser, then click Run. -
In the top menu bar, click SQL. Enter the following commands and click Run.
To migrate database data, you need a MySQL user with remote connection permissions. Create this user on the MySQL database on the Simple Application Server.
-- Switch to the mysql database. use mysql; -- In this example, the username for remote connections is testUser and the password is Test@123. create user 'testUser'@'%' IDENTIFIED BY 'Test@123'; -- Grant remote connection privileges to testUser. grant all privileges on *.* to 'testUser'@'%' with grant option; -- Apply the privilege changes. flush privileges; -
In the top menu bar, click SQL. Enter the following commands and click Run.
To allow the WordPress website to connect to the database after migration, create a database and user on the Simple Application Server with credentials identical to those on the ECS instance.
In this example, the MySQL database for the WordPress website on the ECS instance is named
wordpress, the username isuser, and the password isPASSword123..-- Create the wordpress database. create database wordpress; -- Create a new user named user with the password PASSword123. create user 'user'@'localhost' identified by 'PASSword123.'; -- Grant all privileges on the wordpress database to the user. grant all privileges on wordpress.* to 'user'@'localhost' identified by 'PASSword123.'; -- Apply the privilege changes. flush privileges;
-
-
In aaPanel, configure the firewall.
-
In the left-side navigation pane, click Security.
-
In the Firewall section, add a rule to allow traffic on the default MySQL port, 3306.
The following figure shows the required configuration.

-
Click Open.
-
Step 2: Configure the ECS instance
Before you use DTS to migrate database data, complete the following configurations on your ECS instance.
-
Configure the security group.
To migrate data, you must open the required port in the security group of your ECS instance. In this example, both the ECS instance and the Simple Application Server have a MySQL database installed. Therefore, you must open port 3306, the default port for MySQL, in the security group of the ECS instance. For more information, see Add a security group rule.
-
Configure MySQL.
For data migration, you must create a MySQL user with remote connection permissions on the ECS instance.
-
Connect to the ECS instance.
For more information, see Connection methods overview.
-
Run the following command to log on to the MySQL database.
mysql -uroot -p -
At the Enter password: prompt, enter the password for the MySQL
rootuser.Enter the password for your MySQL database.
NoteFor data security purposes, no output is returned when you enter a password. You need only to enter the correct password and then press the Enter key.
-
Run the following command to use the
wordpressdatabase.The
wordpressdatabase is the database for the WordPress website.use wordpress; -
Run the following command to create a database user for remote connection.
In this example, the username is
testUserand the password isTest@123.ImportantThe password used in this example is for demonstration purposes only. To prevent security risks, set a strong password and keep it confidential.
create user 'testUser'@'%' IDENTIFIED BY 'Test@123'; - Run the following commands in sequence to grant the remote connection permissions to the
testUseruser.- Grant the remote connection permissions.
grant all privileges on *.* to 'testUser'@'%' with grant option; - Make the configuration immediately take effect.
flush privileges;
- Grant the remote connection permissions.
- Run the following command to exit MySQL:
\q;
-
Step 3: Copy website files using scp
-
Confirm the simple application server information.
To remotely copy website files using the scp command, you need the server's public IP address and destination path. First, confirm the following information for the simple application server:
-
Public IP address.
To find the public IP address, see View server information on the server card.
-
Website root directory.
In this example, the simple application server's website root directory is /www/wwwroot/wordpress.
-
-
Connect to the ECS instance.
For more information, see Connection methods.
-
Run the following command to use scp to migrate the web application from the ECS instance to the simple application server.
scp -r /usr/share/nginx/html/wordpress/* root@<public IP address of the simple application server>:/www/wwwroot/wordpressThe parameters in the scp command are described as follows:
-
-r: Recursively copies the entire directory. To copy a single file, remove the-roption. -
/usr/share/nginx/html/wordpress/*: All files (/*) in the website's source directory on the ECS instance. -
root@<public IP address of the simple application server>: The username and public IP address of the target simple application server. -
/www/wwwroot/wordpress: The destination path on the simple application server.
-
-
When prompted with
root@<public IP address of the simple application server>'s password:, enter the password for the simple application server.NoteFor data security purposes, no output is returned when you enter a password. You need only to enter the correct password and then press the Enter key.
The scp command encrypts data during transmission, which can slow the transfer. Wait for the copy to complete.
Step 4: Migrate database data using DTS
- Log on to the DTS console.
-
In the left-side navigation pane, click Data Migration, and then click Create Task in the upper-left corner.
-
Configure the data migration task.
The following section describes the key parameters. Use the default settings for other parameters.
-
Task Name: Enter a name for the task. For example,
test-swas-01. -
Source Database (information about the ECS instance):
Parameter
Configuration example
Database Type
Select MySQL.
Access Method
Select Self-managed Database on ECS.
Instance Region
The region of the ECS instance. For example, China (Hangzhou).
Replicate Data Across Alibaba Cloud Accounts
In this example, select No.
ECS Instance ID
Select the ID of your ECS instance.
Port Number
The default value is
3306.Database Account
Enter a database account that has remote connection permissions. For example,
testUser.Database Password
Test@123
ImportantThe password in this example is for demonstration only. To prevent security risks, use a strong password and keep it confidential.
-
Destination Database (information about the Simple Application Server):
Parameter
Configuration example
Database Type
Select MySQL.
Access Method
Select Public IP Address.
Instance Region
The region of the Simple Application Server. For example, China (Hangzhou).
Domain Name or IP
The public IP address of the Simple Application Server.
Port Number
The default value is
3306.Database Account
Enter a database account that has remote connection permissions. For example,
testUser.Database Password
Test@123
ImportantThe password in this example is for demonstration only. To prevent security risks, use a strong password and keep it confidential.
-
-
After you configure the parameters, click Test Connectivity and Proceed to verify that DTS can connect to the MySQL databases on both servers.
-
In the CIDR Blocks of DTS Servers dialog box, click Test Connectivity and Proceed.
-
In the Configure Objects and Advanced Settings wizard, configure the required parameters and click Next: Advanced Settings.
The following list describes the key parameters. For more information, see Data Migration Guide.
-
Task Stages: Select Schema Migration, Full Data Migration, or Incremental Data Migration based on your business requirements.
-
Source Objects: In the Source Objects section, select Select All and click the
 icon.
icon.
After you complete the configuration, set Conflict resolution for existing tables to Ignore and continue, and set Case sensitivity for target object names to DTS default policy. In the Selected objects section, confirm that the sys and wordpress databases are selected.
-
-
In the Advanced Configuration wizard, keep the default settings and click Next: Save Task Settings and Precheck.
Wait for the precheck to complete. If the precheck fails, click View Details next to Failed, resolve the issue based on the error message, and then rerun the precheck.
-
After the precheck passes, click Next: Purchase Instance. A successful precheck means all six checks have passed: source database connectivity, destination database connectivity, source database permissions, destination database permissions, storage engine check, and source database version check.
-
On the Purchase page, select Data Transmission Service (Pay-as-you-go) Service Terms, and then click Buy and Start.
Data migration is free for this example. However, in practice, charges are based on your usage and the prices displayed on the page. For more information about DTS billing, see billing overview.
After you start the migration task, wait for it to complete. You can view the status of the task in the migration task list. When the progress of both Schema Migration and Full Data Migration reaches 100% and the task status changes to Completed, the data migration is complete.
Step 5: Verify data migration
-
From your local computer, use a browser to log in to the aaPanel of the simple application server.
-
Check the WordPress website files.
-
In the left navigation pane of aaPanel, click Site.
-
On the PHP Project page, click the website's path in the Document Root column.
In this example, the document root path is
/www/wwwroot/wordpress.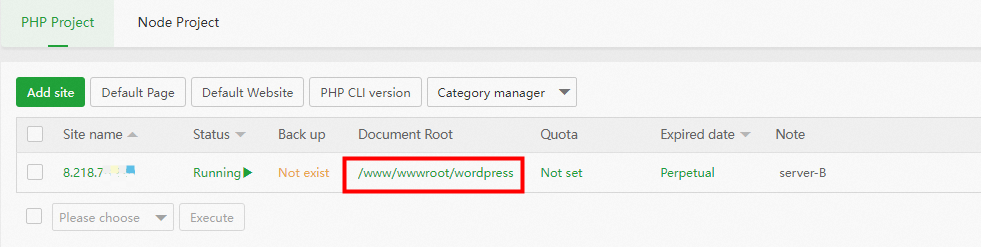
Verify that the WordPress core files, such as
wp-config.php,wp-settings.php, andwp-login.php, are present in the /www/wwwroot/wordpress directory. Their presence confirms that the website files migrated successfully.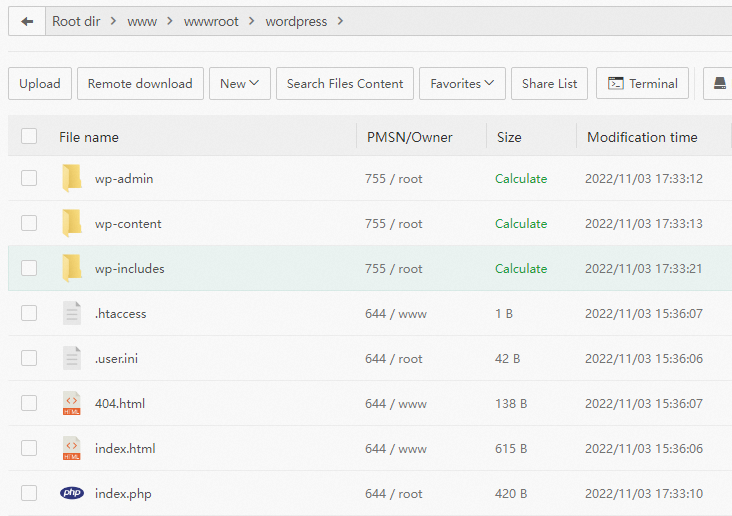
-
Check for issues with the website application.
Verify that the website application on the simple application server is identical to the one on the ECS instance, based on your business requirements. For example, a symbolic link to the wp-config.php file on the ECS instance becomes a regular file after migration, which may have incorrect file permissions. You must then adjust the file permissions for the wp-config.php file on the simple application server.
To manage files in aaPanel, perform the following steps:
-
Hover over the file and click Permission.

-
In the Set permission dialog box, configure the file permissions and click OK.
Configure the permissions based on your business requirements. This example grants full permissions to the wp-config.php file. Set the owner to root, set the permission to
777by selecting the read, write, and execute checkboxes for the owner, group, and public, and then select Apply to subdirectory.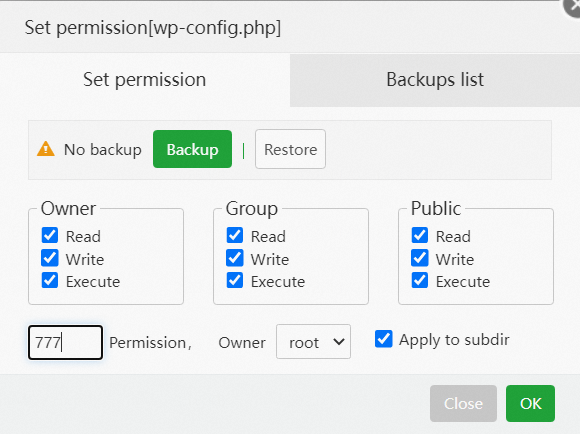
-
-
-
Check the WordPress website's database information.
-
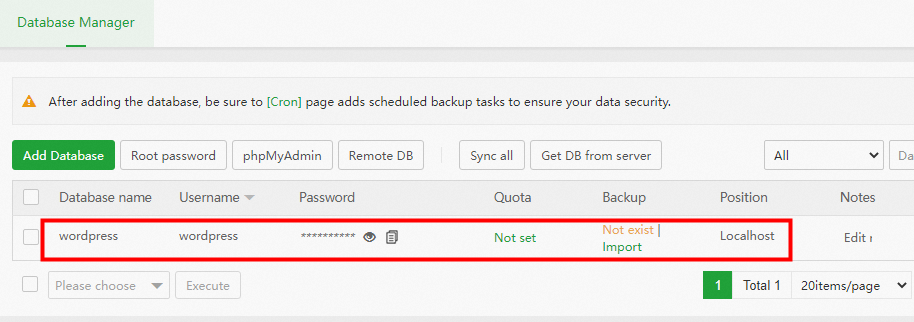
In the left navigation pane of aaPanel, click Databases.
-
Click Get DB from server.
This displays the WordPress database information from the simple application server. If aaPanel fails to retrieve the database password, click reset to set a new one.
-
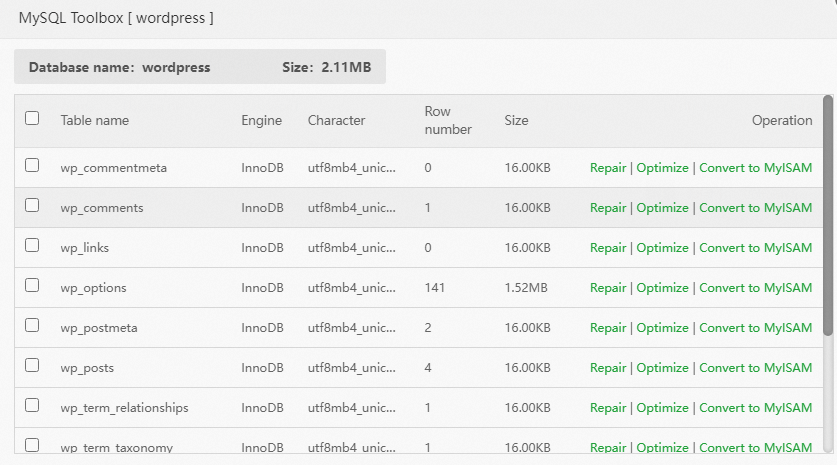
In the Operation column, click Tools to view the table data in the WordPress database.
Verify that the table data on the simple application server is identical to the data on the ECS instance.
-
-
From your local computer, access
http://<public IP address of the simple application server>in a browser to test the WordPress website.-
If the WordPress website loads correctly and displays the same data as before the migration, the migration is successful. Displaying the default Hello world! post confirms a successful data migration.
-
If the WordPress website fails to load and displays a "Warning: require_once(/www/wwwroot/wordpress/wp-config.php): failed to open stream: Permission denied in /www/wwwroot/wordpress/wp-load.php on line 37" error, you must set the appropriate permissions for the specified file. For instructions, see Check for issues with the website application.
Warning: require_once(/www/wwwroot/wordpress/wp-config.php): failed to open stream: Permission denied in /www/wwwroot/wordpress/wp-load.php on line 37
Fatal error: require_once(): Failed opening required '/www/wwwroot/wordpress/wp-config.php' (include_path='.:/www/server/php/70/lib/php') in /www/wwwroot/wordpress/wp-load.php on line 37
-
Related operations
After the migration, the instance is replaced and its public IP address changes. If you previously bound a domain name to the source instance, you must rebind the domain name to the new instance and update the DNS records. For more information, see Register and resolve a domain name.