This topic explains how to set up LDAP (Lightweight Directory Access Protocol) to allow Alibaba Cloud Disk Enterprise Edition to sync the organization chart and users from LDAP. Once set up, users can log on to Alibaba Cloud Disk Enterprise Edition using their LDAP accounts, streamlining the management of users and teams on the cloud disk.
Notes
Only super administrators or cloud disk administrators can enable this feature.
Prerequisites
You have activated and purchased Cloud Drive for Enterprises.
An LDAP server is deployed. The server address, port number, and Base DN information are required for connecting to the LDAP server.
The LDAP server is accessible over the Internet.
Procedure
If you encounter any issues during the operation, please contact us.
Step 1: Enable LDAP configuration and configure LDAP information
Enable LDAP configuration.
Log in to Alibaba Cloud Disk Enterprise Edition and navigate to the Management Console.
In the left-side navigation pane, select Exclusive Logon Configuration > LDAP Configuration, and activate the LDAP Configuration switch.
Configure server connection information.
On the LDAP configuration page, enter the server connection details.
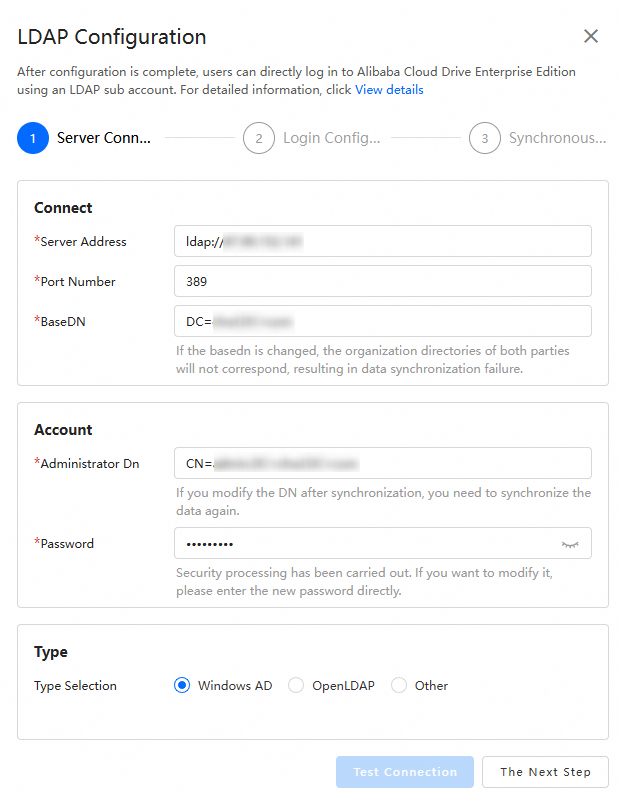 Below is a description of the parameters.
Parameter
Example Value
Description
Server Address
ldap://120.XX.XX.XXThe LDAP server address must start with
Idap://. The specific format is as follows:IP address:
Idap://120.XX.XX.XXDomain name:
Idap://www.exmple.com
Port Number
389
The default port number is 389. If it has been modified, enter the modified port number.
BaseDN
DC=chwl,DC=comIndicates that only organizational units and users within this directory range can be synchronized to Alibaba Cloud Disk Enterprise Edition. If you obtain BaseDN in a Windows AD environment, see Appendix: Obtain server connection information in a Windows environment.
ImportantThis item must be filled in carefully. Do not change it arbitrarily after adding it. When Alibaba Cloud Disk Enterprise Edition synchronizes data with LDAP (or AD), if the BaseDN changes, the organizational structure directories on both sides will not correspond, resulting in data synchronization failure.
Administrator DN
CN=admin,DC=chwl,DC=comYou need to enter the full DN (Distinguished Name) of the administrator here. The administrator must have permission to access all organizational units and users under the BaseDN. If you obtain the administrator DN in a Windows AD environment, see Appendix 2: Obtain the administrator DN.
Password
*****
Enter the login password of the administrator account in LDAP. The Alibaba Cloud Disk Enterprise Edition server will log on to the LDAP system through this administrator account to read user information and complete synchronization and logon functions.
Type
Windows AD
There are three options: Windows AD, OpenLDAP, and Other. Please select according to the type you are using. Other refers to any server using the LDAP protocol.
Click Test Connection. The interface will display a Connection Successful message.
If the test fails, verify the parameter settings and check if the server address and port are not blocked by a firewall.
Click Next.
Configure logon information.
On the LDAP configuration page, input the logon details.

The following table describes the parameters.
Parameter
Example Value
Description
Logon Username Field
sAMAccountName
This field is used as the account name when users log on. It is consistent with the field in the LDAP attribute editor.
Display Name Field
displayName
This field is used as the display name in the user's cloud disk. It is consistent with the field in the LDAP attribute editor.
Click Next.
(Optional) Configure synchronization options.
Skip this step if LDAP synchronization is not required. Without enabling synchronization, any LDAP user within the organization scope can log on to the enterprise cloud disk, and an account will be automatically created without an organization chart.
To import users and the organization chart from LDAP, enable the synchronization feature and follow these steps:
On the synchronization configuration page, activate the Synchronization Configuration switch and set up the synchronization details.

The parameters are described below.
NoteTo synchronize LDAP organizations and users, configure both teams and users.
For LDAP organizations only, configure teams.
For LDAP users only, configure users.
Parameter
Example Value
Description
Team Object Classes
organizationalUnitAbbreviated as OU, it is an AD container that can contain users, groups, computers, and other organizational units. It is the smallest scope or unit to which group policy settings or delegated management permissions can be assigned. Group is not supported.
User Object Classes
UserYou can enter
organizationalPerson,inetOrgPerson, orUser.organizationalPersonprovides basic organization-related attributes.inetOrgPersonprovides all the attributes oforganizationalPersonand adds attributes related to Internet communication.Usercontains a specific set of attributes that are customized for user accounts of specific applications or organizations.
Synchronization Time Settings
Automatic Synchronization
The synchronization time settings are as follows:
Manual Synchronization: Manually synchronize organizations or users to the cloud disk. When you use manual synchronization, if the original data is updated, the changes may not be synchronized to the cloud disk. In this case, you need to manually perform the synchronization operation again. For example, in an enterprise personnel management scenario, if there are new employees, these changes may not be reflected in the service in a timely manner, resulting in new employees being unable to log on to the cloud disk.
Automatic Synchronization: Synchronize organizations or users to the cloud disk according to the specified synchronization frequency and time. You can set the synchronization frequency to daily, weekly, or monthly, and specify any o'clock time of a day as the synchronization time.
Once synchronization is complete, the Import Results will appear. Should the import fail, the Import Results will display the reason for the failure.
In the Last Synchronization Information area, you can view the Last Synchronization Time and Last Synchronization Status. Click on Details to the right to view the last synchronization details.

Step 2: Use LDAP to log on
Log on to the Alibaba Cloud Disk Enterprise Edition logon page. Click the AD/LDAP tab.

You can now log on to Cloud Drive for Enterprises by using your LDAP account and password.
Appendix: Obtain server connection information in a Windows environment
Appendix 1: Obtain BaseDN
In the LDAP domain controller, navigate to Active Directory Users and Computers.
Access the properties of the root directory you want to synchronize. For instance, to synchronize all units and users under chwl to PDS.
Right-click the chwl properties and navigate to the Attribute Editor.
Locate the
distinguishedNameattribute, double-click to open the String Attribute Editor, and copy the valueDC=chwl,DC=com.
Appendix 2: Obtain the administrator DN
In the LDAP domain controller, navigate to Active Directory Users and Computers.
Locate the administrator account, which has permission to access all organizational units and users under the BaseDN, right-click it, and choose Properties. Then navigate to the Attribute Editor.
Locate the
distinguishedNameattribute, double-click it to open the String Attribute Editor, and retrieve the Value. For instance:CN=admin,DC=chwl,DC=com.