Joining the mount target of a Server Message Block (SMB) file system to an Active Directory (AD) domain lets you use AD to authenticate and control user access to the SMB file system. To use an AD identity to mount an SMB file system, you must register a service principal for the file system in the AD domain, create a keytab file, and upload the file to the NAS console. Then enable the access control list (ACL) feature for the SMB file system.
Prerequisites
An SMB file system must be created. For more information, see Create an SMB file system.
Step 1: Create a keytab file
Create a keytab file in one of the following ways:
Automatically create a keytab file
Log on to the Elastic Compute Service (ECS) instance where you will install Active Directory Domain Services (AD DS) and DNS.
Run the following command in PowerShell or PowerShell ISE to download the script.
Invoke-WebRequest https://nas-client-tools.oss-cn-hangzhou.aliyuncs.com/windows_client/alinas_smb_windows_inspection.ps1 -OutFile alinas_smb_windows_inspection.ps1Modify the encryption method in the alinas_smb_windows_inspection.ps1 script to -crypto RC4-HMAC-NT (for Windows Server 2025 only).
This step applies only to Windows Server 2025 environments. If you use another version, skip to Step 4.
Use Notepad to open the downloaded alinas_smb_windows_inspection.ps1 file.
notepad .\alinas_smb_windows_inspection.ps1Find the line that contains -crypto (usually line 791 in the script).
Change the encryption method from
-crypto Allto-crypto RC4-HMAC-NT.Before modification:
$command = "ktpass -princ cifs/$MountAddress@$domainFullUpper -ptype KRB5_NT_PRINCIPAL -mapuser $SetspnNas@$domainFull -crypto All -out c:\nas-mount-target.keytab -pass tHePaSsWoRd123"After modification:
$command = "ktpass -princ cifs/$MountAddress@$domainFullUpper -ptype KRB5_NT_PRINCIPAL -mapuser $SetspnNas@$domainFull -crypto RC4-HMAC-NT -out c:\nas-mount-target.keytab -pass tHePaSsWoRd123"Press Ctrl+S to save and close the file.
Run the following command to automatically install AD DS and DNS, and create a keytab file.
.\alinas_smb_windows_inspection.ps1 -MountAddress file-system-id.region.nas.aliyuncs.com -ConfigAD $true -Userdomain "example.com" -Username "administrator" -Password "password"The following list describes the required parameters. Replace the values of these parameters with your actual values.
file-system-id.region.nas.aliyuncs.com is the mount target of the SMB file system. On the File System List page, obtain the mount target from the Mount Target column by clicking the icon next to the file system.
example.com: The name of the AD domain that you want to create.
administrator: The name of the AD service account.
password: The logon password for the AD service account.
The first time you start the AD domain after AD DS is installed, the Windows AD server automatically restarts. After the Windows AD server restarts, the system runs the preceding script again to create a keytab file.
Manually configure a keytab file
Install and enable AD DS and DNS.
Log on to the ECS instance on which the AD controller resides.
Open the Command Prompt and run the following command to create an AD service account for the SMB file system.
dsadd user CN=<Name of the AD service account>,DC=<AD domain name>,DC=com
  -samid <Name of the AD service account>
  -display <Description of the AD service account>
  -pwd <Password of the AD service account>
  -pwdneverexpires yes
Sample command:
dsadd user CN=alinas,DC=EXAMPLE,DC=com -samid alinas -display "Alibaba Cloud NAS Service Account" -pwd tHeRd123**** -pwdneverexpires yesIf the logon account is a standard account, an administrator must configure the read and write permissions on ServicePrincipalName before you create a service account for the SMB file system. Command syntax:
dsacls "CN=<Name of the AD service account>,DC=<AD domain name>,DC=com" /I:T /G "<Name of the AD service account>:RPWP;servicePrincipalName"Example command:
dsacls "CN=alinas,DC=cdbptest01,DC=com" /I:T /G "alinas:RPWP;servicePrincipalName"RPis the read permission, andWPis the write permission.Run the following command to register a service principal for the mount target of the SMB file system and add the service principal to AD:
Run the command
setspn -S cifs/<Mount target of the SMB protocol NAS file system> <Name of the AD service account>Sample command
setspn -S cifs/****-****.cn-hangzhou.nas.aliyuncs.com alinasNoteThe mount target format is
file-system-id.region.nas.aliyuncs.com. Replace this with your actual mount target. To obtain the mount target, go to the File System List page in the File Storage NAS console, find the file system, and click Manage. The mount target is displayed on the Mount Usage page.Do not append the mount directory to the mount target. For example, do not use
file-system-id.region.nas.aliyuncs.com/myshare.
Sample command output
If output similar to the following is displayed, the service principal for the SMB file system has been added.

Check the setspn configuration on the Windows AD server or a Windows client.
Run the command
setspn alinasIf the command output contains the mount target of the SMB file system, the setspn configuration is correct.

On the AD domain server, open the Command Prompt. Then, run the following command to create a keytab file for the mount target of the SMB file system:
For Windows Server 2022 and earlier
ktpass
  -princ cifs/<Mount target of the SMB file system>@<AD domain>
  -ptype KRB5_NT_PRINCIPAL
  -crypto All
  -out <Path of the keytab file>
  -pass <Password of the AD service account>
Sample command:
ktpass -princ cifs/****-****.cn-hangzhou.nas.aliyuncs.com@EXAMPLE.com -ptype KRB5_NT_PRINCIPAL -crypto All -out c:\nas-mount-target.keytab -pass tHeP****d123For Windows Server 2025
Because Windows Server 2025 does not support Data Encryption Standard (DES), you must change the -crypto ALL parameter to -crypto RC4-HMAC-NT when you create the keytab file.
ktpass
  -princ cifs/<Mount target of the SMB file system>@<AD domain>
  -ptype KRB5_NT_PRINCIPAL
  -crypto RC4-HMAC-NT
  -out <Path of the keytab file>
  -pass <Password of the AD service account>
Sample command:
ktpass -princ cifs/****-****.cn-hangzhou.nas.aliyuncs.com@EXAMPLE.com -ptype KRB5_NT_PRINCIPAL -crypto RC4-HMAC-NT -out c:\nas-mount-target.keytab -pass tHeP****d123
For more information about how to verify the correctness of the keytab file, see How do I verify the correctness of a keytab file?
For more information about how to download the keytab file to a local server, see Use Workbench to upload, download, or manage files on ECS instances.
Step 2: Upload the keytab file
In the NAS console, upload the keytab file for the AD service account that you created for the SMB file system.
Log on to the NAS console.
In the navigation pane on the left, choose .
On the File System List page, click the ID of the file system that you want to manage or click Manage in the Actions column.
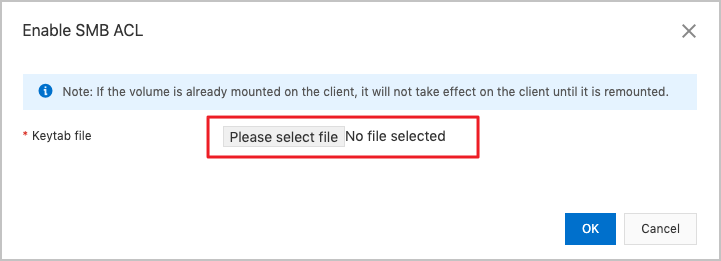
On the Access Control tab, enable SMB ACL.
In the Enable SMB ACL dialog box, upload the keytab file for the AD service account and click OK.
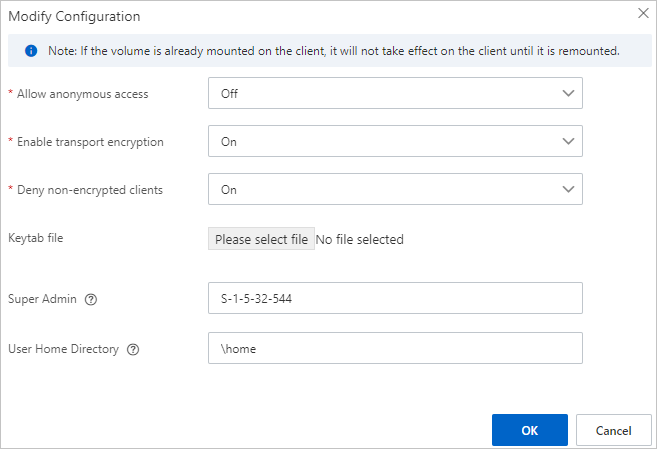
On the Access Control tab, click Modify Configuration.
In the Modify Configuration dialog box, configure the parameters. The following table describes the parameters.
 Important
The encryption-in-transit feature can be enabled only on operating systems that support SMB 3.0 or later. For more information about which operating systems support SMB 3.0 or later, see Client operating systems that support SMB 3.0 and later.
Parameter
Description
Allow anonymous access
Specifies whether to allow anonymous access to the file system. Valid values:
Yes: An account that belongs to the Everyone group can be used to mount the SMB file system based on New Technology LAN Manager (NTLM). ACLs that are configured for files and directories in the SMB file system remain valid.
No (default): Anonymous users are not allowed to access the file system.
Enable transport encryption
Specifies whether to enable the encryption in transit feature for the SMB file system. Valid values:
Yes: enables the encryption in transit feature for the SMB file system.
No (default): disables the encryption in transit feature for the SMB file system.
For more information, see Encryption in transit for SMB file systems.
Deny non-encrypted clients
Specifies the type of client that can access the SMB file system. Valid values:
Yes: Mount the SMB file system by using a client or which the encryption in transit feature is enabled. This means that you can use an AD domain user to mount the SMB file system on a client whose operating system supports the encryption in transit feature.
However, you cannot mount the SMB file system as an anonymous user or by using a client that does not support the encryption in transit feature.
No: Mount the SMB file system from all types of clients. However, the encryption in transit feature can be enabled only if you use an AD domain user to mount the SMB file system on a client whose operating system supports the encryption in transit feature.
Keytab file
Upload the keytab file.
Super Admin
A superuser can manage all files in any folder without the need to modify the existing ACLs. You can configure a user or an audience group as the superuser. When you perform the configuration, the value must be in the system ID (SID) format, for example, S-1-5-32-544. By default, this parameter is left empty.
User Home Directory
The home directory of each user. For example, if the user home directory is \home, the file system automatically creates a directory named \home\A when a user named A logs on. If the \home\A directory already exists, the file system skips this step. By default, this parameter is left empty.
ImportantUser A must have the permissions to create folders in the \home directory. Otherwise, the system cannot create the \home\A directory when User A logs on to the system.
ImportantIf the SMB file system is mounted on a client, you must remount the file system for the new configuration to take effect.
What to do next
After the mount target is joined to the AD domain, use an AD identity to mount and use the SMB file system. For more information, see Mount and use an SMB file system on a Windows client as an AD domain user and Mount and use an SMB file system on a Linux client as an AD domain user.