A workflow breaks down complex tasks into ordered steps to reduce system complexity. In Alibaba Cloud Model Studio, workflows let you combine nodes, such as large models, APIs, and Function Compute, to reduce coding costs.
Console access restrictions: Only users who created Alibaba Cloud Model Studio applications in the Singapore region before April 21, 2025 can access the Application Development tab.
This tab contains the following features: Applications (agent application and workflow application), Components (prompt engineering and plug-in), and Data (knowledge base and application data). These are all preview features. Use them with caution in production environments.
API call restrictions: Only users who created Alibaba Cloud Model Studio applications in the Singapore region before April 21, 2025 can call the application data, knowledge base, and prompt engineering APIs.
Application
Why use a workflow application
A workflow breaks down complex tasks into a sequence of steps to reduce system complexity. Creating a workflow application on Model Studio lets you define the execution order, assign responsibilities, and specify dependencies between steps to automate and optimize the process.
Common use cases for workflow applications include:
Travel planning: You can use a workflow plugin to select parameters, such as a destination, and automatically generate a travel plan that includes flights, accommodations, and attraction recommendations.
Report analysis: For complex datasets, you can combine data processing, analysis, and visualization plugins to generate structured, formatted analysis reports.
Customer support: You can use automated workflows to handle customer inquiries, including issue classification, to improve response speed and accuracy.
Content creation: You can generate content such as articles and marketing copy. Provide a topic and requirements, and the system automatically generates a draft.
Education and training: You can use a workflow to design personalized learning plans with progress tracking and assessments, enabling self-paced learning for students.
Medical consultation: Based on patient-entered symptoms, a workflow can combine multiple analytical tools to generate a preliminary assessment or recommend relevant tests to assist doctors with further diagnosis.
Examples
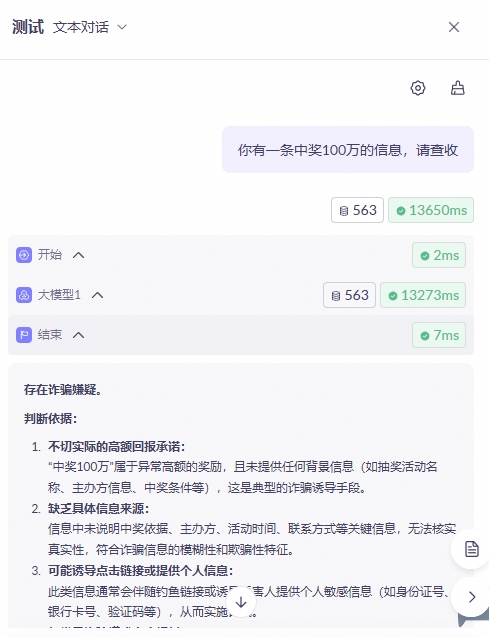
Example 1: Detect scam messages
This example demonstrates how to create a workflow application to determine if a text message is a potential scam. The workflow uses a start node, a large model node, and an end node.
| |
|
|
|
Configuration example:
|
|
|
|
|


 . After the workflow finishes running, view the output.
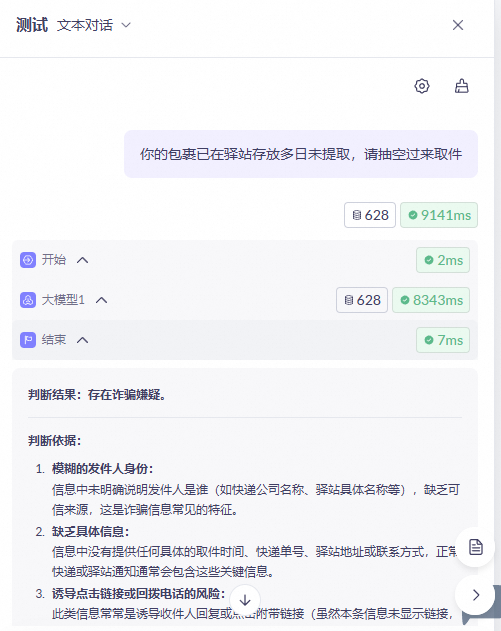
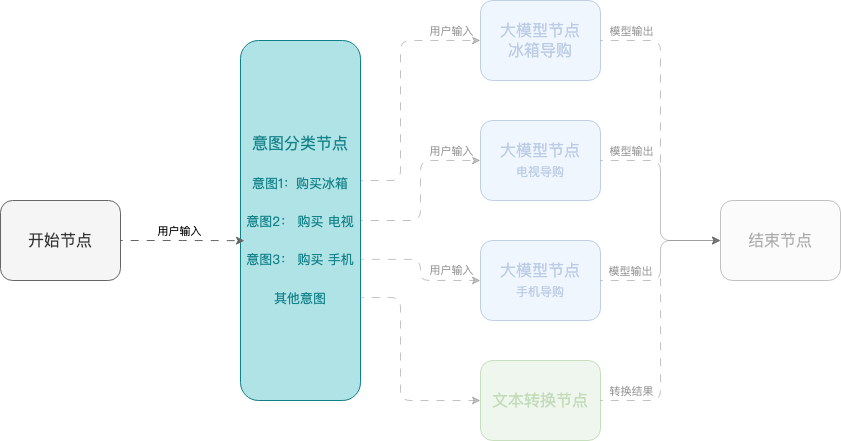
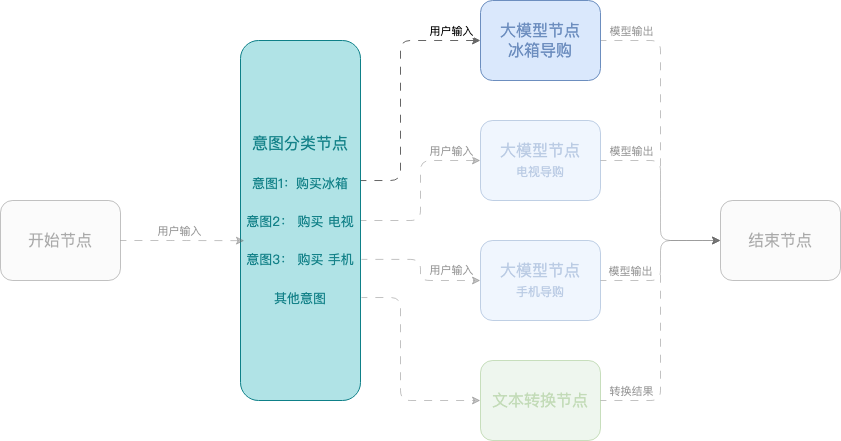
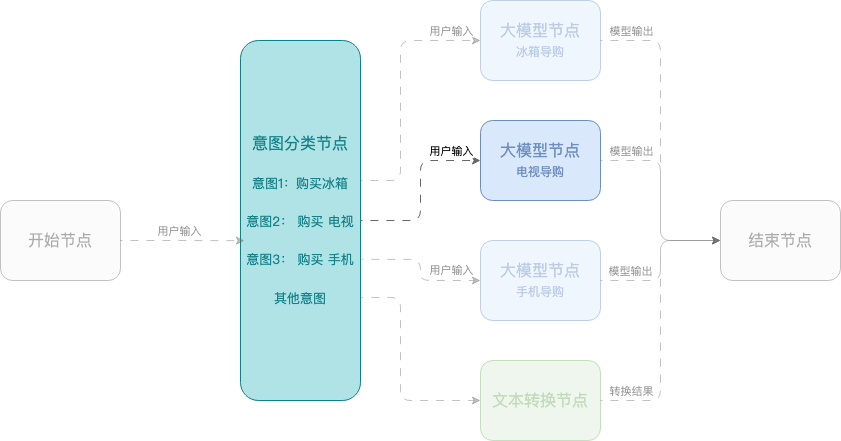
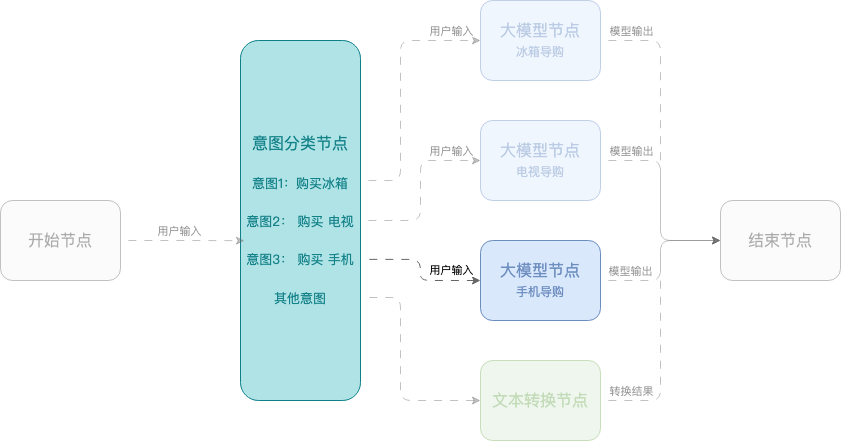
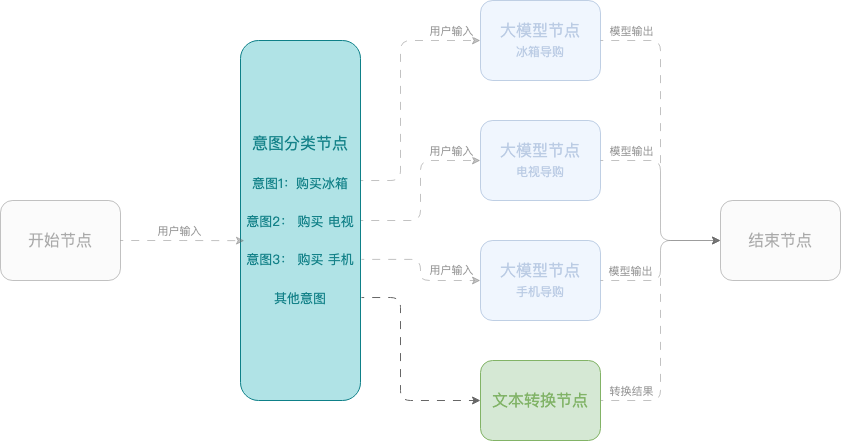
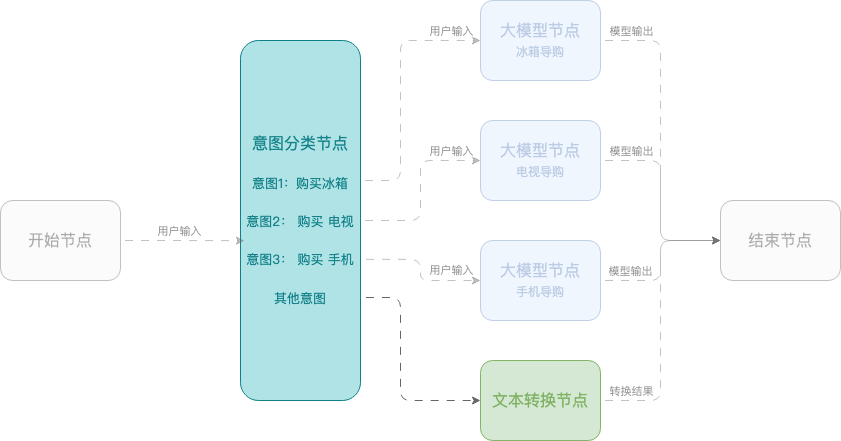
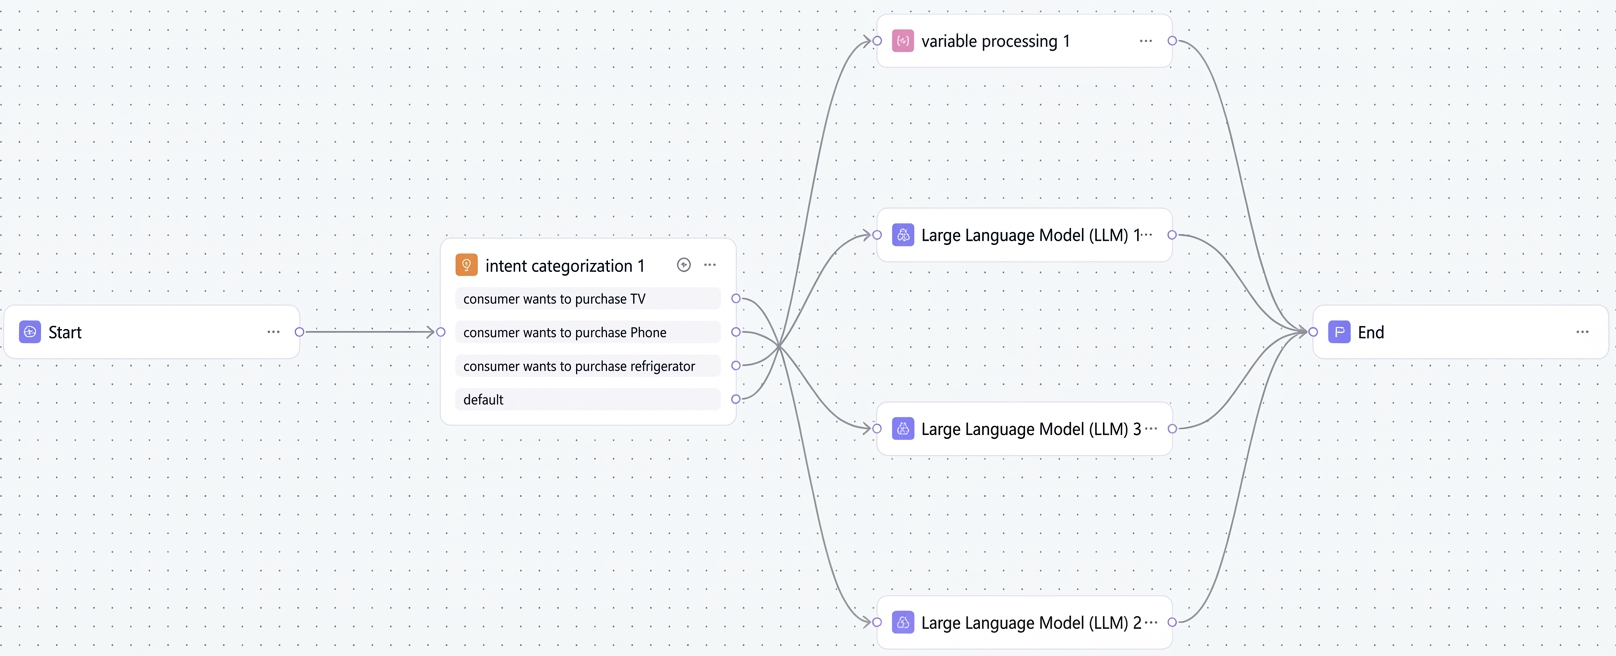
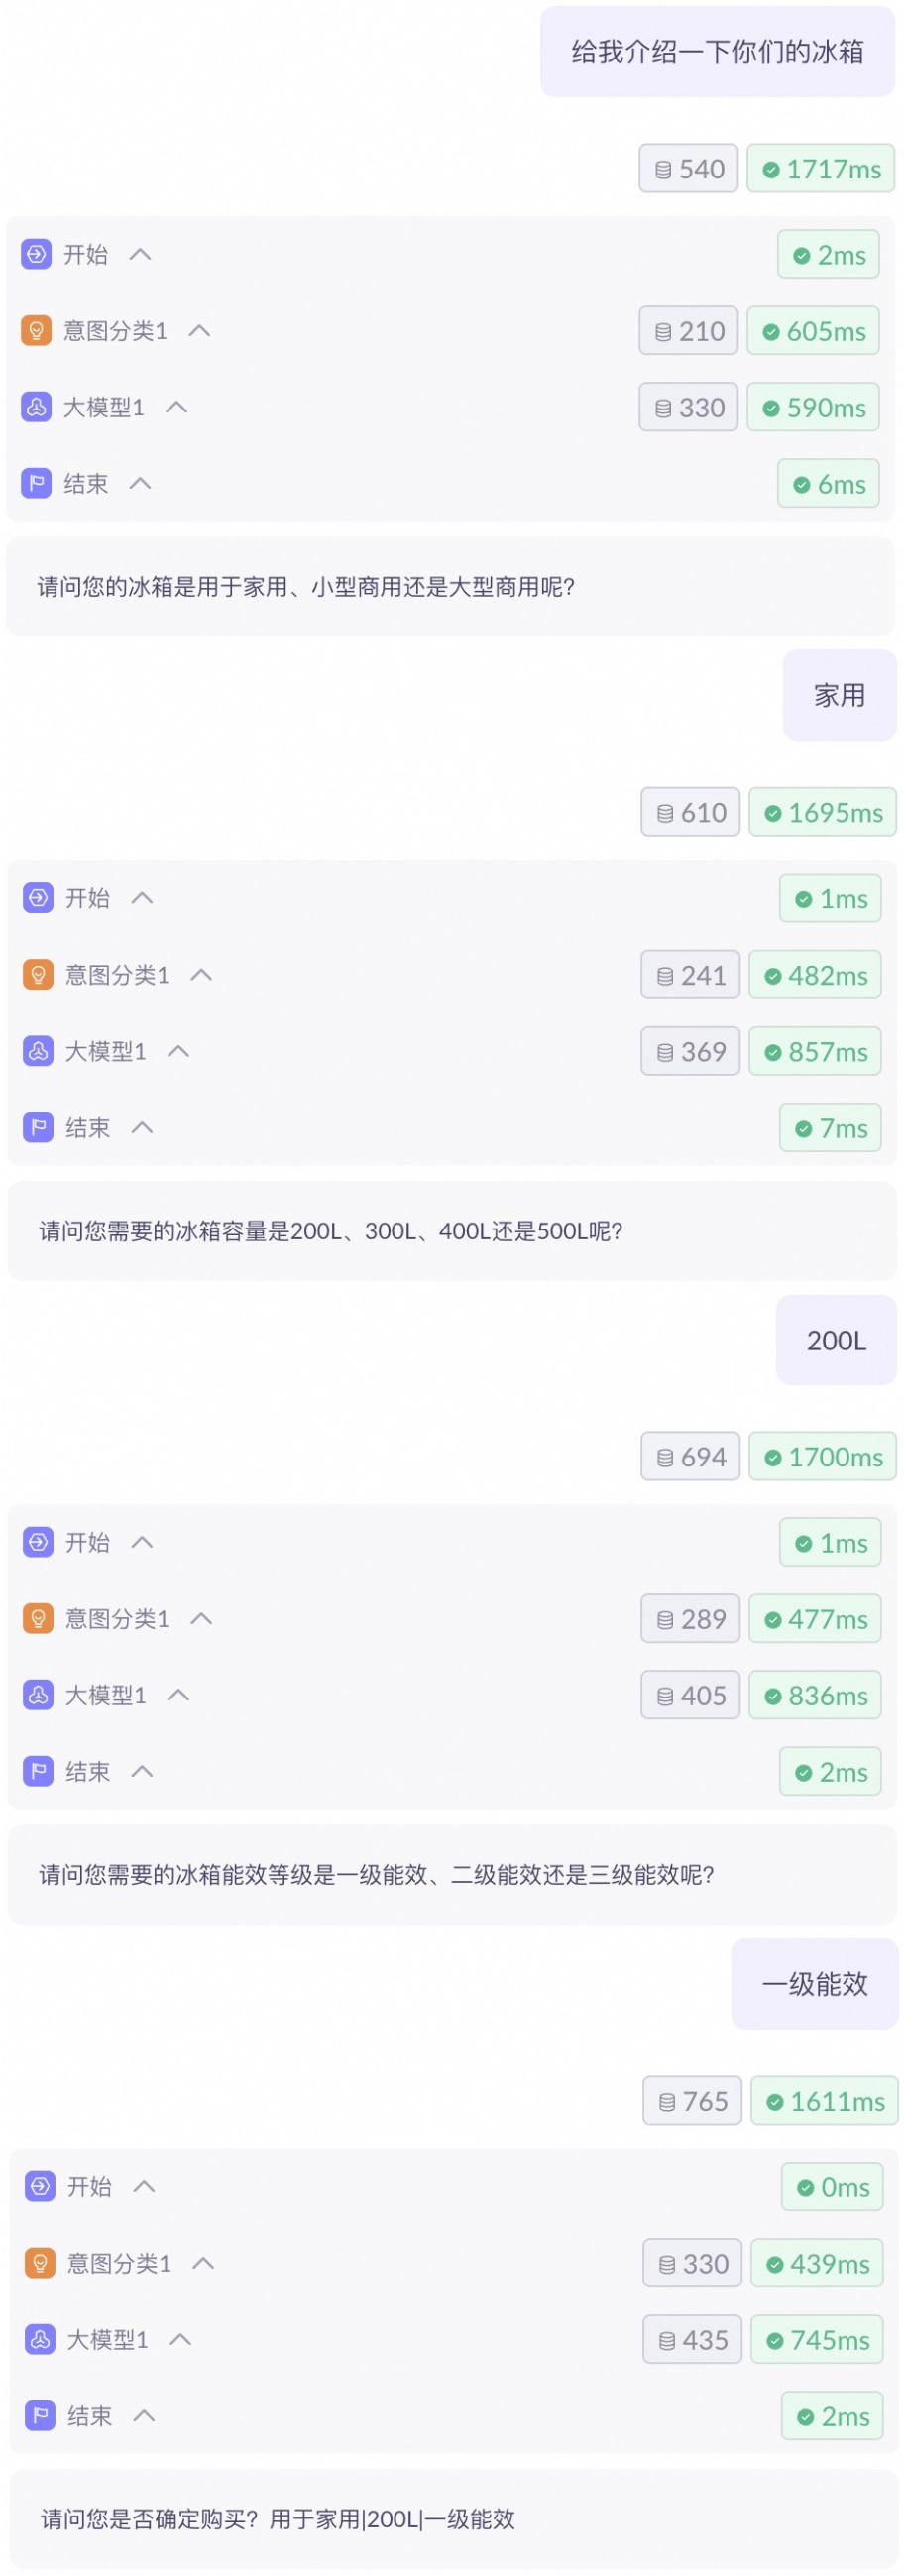
Example 2: Smart shopping assistant
This example shows how to create a smart shopping assistant using a workflow that helps users select mobile phones, TVs, and refrigerators. The workflow uses a start node, an intent classification node, large model nodes, and an end node.
| |
|
|
|
|
|
|
|
|
|
|
|
Configuration example:
|
|
|
Session parameters
A session variable acts as a global variable, storing parameters throughout the workflow's lifecycle to be referenced by any node.
Click the  icon in the upper-right corner of the canvas configuration page.

Node
Nodes are the core functional units of a workflow application. Each node performs a specific task, such as executing an action, triggering a condition, processing data, or directing the workflow. Combine these nodes like building blocks to create automated processes.
Start and end
When to use
When designing a workflow, define the structure and content of the input/output parameters in the start and end nodes.
How to use
Start node
Component
Description
Predefined variables
The workflow provides the following predefined variables to process user input and maintain conversation history:
query: Stores the user's text input.
historyList: Stores conversation history to maintain context in a multi-turn conversation. To use this variable in nodes that support the memory feature (such as large model and intent classification nodes), select Custom Cache.
imageList: Stores user-uploaded images to enable image analysis or multimodal conversation. To use this variable in nodes that support the memory feature (such as large model and intent classification nodes), select Custom Cache.
Custom variables
Custom variables are structured input parameters that you define for a workflow. They receive data from tests or API calls and can be referenced in subsequent nodes. When creating a custom variable, configure the following parameters:
Variable name: Enter a meaningful name. Chinese characters are not supported.
Type: The data type of the variable. Supported types are String, Boolean, Number, Object, Array (of String, Boolean, Number, or Object), and File.
Description: Briefly describe what the variable does and when to use it.
End node
Component
Description
Output mode
Text Output: Suitable for unstructured content. In the input box, you can enter fixed content or type
/to reference variables, which determines the final result returned to the user. You can source variables from the output of any workflow node or from session variables. Properly mapping output variables allows you to control the workflow's data flow and ensure an accurate and complete final response.JSON Output: Suitable for outputting structured content in JSON format. You can define variable names and enter text or reference variables.
Streaming output
The Streaming Output switch applies only to Text Output mode.
When enabled, responses from large model and application component nodes are streamed token by token. When disabled, a full response is returned after it is completely generated.
Large model
Why use it
This node is the intelligent core of your workflow. It can understand language, generate text, analyze images, and engage in multi-turn conversations. You can use it to write copy, summarize text, or even analyze image content (using Qwen-VL models).
Features
Supports both single-input processing and batch processing of large datasets.
You can configure different large models, such as Qwen-Plus, so you can choose the right model based on performance, latency, or other requirements.
Node parameter configuration
Parameter
Description
Mode selection
Single Mode: Calls the large model once.
Batch Mode: The node runs multiple times, sequentially assigning an item from a list to a batch variable in each run. This process stops when all list items are processed or the configured maximum batch runs is reached.
Batch Configuration:
Maximum Number of Batches (Range: 1–100; default for standard users: 100): The maximum number of times the batch process will run.
NoteThe number of batch runs depends on the minimum length of the input arrays. If no input variable is configured, the number of runs is determined by the configured batch count.
Number of Parallel Runs (Range: 1–10): Sets the concurrency limit for batch processing. A setting of 1 executes all tasks serially.
Model configuration
Select a suitable large model and adjust its parameters. The available models are listed on the UI.
For a detailed introduction to the models, see the model list.
For information on the API call rate limits for each model, see rate limiting.
Parameter configuration
Temperature: Controls the diversity of the generated content. A higher temperature value increases the randomness of the generated text, producing more unique outputs, while a lower value makes the content more conservative and consistent.
This configuration is not currently supported for DeepSeek R1 series models.
Maximum Reply Length: Limits the maximum length (in tokens) of the text generated by the model, not including the prompt. This limit varies by model.
The following parameters are available only when a Qwen-VL model is selected:
Model Input Parameters: For
vlImageUrl, you can reference a variable or input an image URL.Image Source:
Image set: The model treats each uploaded image independently, selecting the most relevant one to answer the user's question.
A single image can be passed directly. For example:
https://****.com/****.jpg.Multiple images can be passed as a list. For example:
["URL","URL","URL"].Video frames: The model considers the uploaded images to be from the same video and understands them sequentially as a whole. You must provide a minimum of 4 video frames.
System prompt
Provides system-level instructions to the model. You can use it to define the model's role, task, or output format. For example: "You are a math expert who specializes in solving math problems. Please output the problem-solving process and result in the correct format."
User prompt
The user's input to the model, such as a request or instruction. You can configure a prompt template or insert variables. The model uses this input to generate a response.
Memory
Memory is the context the model retains across multiple turns in a conversation.
Current node cache: Uses the output of this node as context. The model will only remember context generated within this node.
memory rounds: The number of conversation rounds to remember. One input and its corresponding output constitute one round.
Custom cache: Uses a specified context variable as the context.
Context variable: Select the source of the context.
Output variable
The name of the variable that stores the processing result of this node. Subsequent nodes can use this variable to access this node's result.
DeepSeek R1 series models support outputting the Deep Thinking process (
reasoningContent).Retry on failure
If disabled, the node stops executing when an error occurs.
If enabled, the node re-executes on error, according to the configured number of retries and interval.
maximum retries: The maximum number of retry attempts when a request fails.
retry interval: The time interval between each retry attempt, in milliseconds.
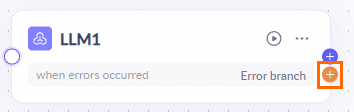
Exception handling
If disabled, the node handles errors using the system's default error handling mechanism.
If enabled, the node executes custom processing logic according to the configuration when an error occurs.
Default value: The content in
resultis output when an exception occurs.exception branch: If an exception occurs, this branch is executed. You must configure its processing flow.
Return results
This feature is deprecated.
This option applies only to API calls and determines whether the node's content is output. To learn more about the purpose of this component, see Application calling.
NoteTo integrate applications via API, see Application calling.
Knowledge base
Definition
The knowledge base node implements retrieval-augmented generation (RAG). It retrieves relevant chunks from a specified knowledge base based on the input, and passes the results as context to a downstream large model node. This process addresses common problems with large models, such as outdated knowledge, inability to access private data, and hallucinations.
Input configuration
Defines the criteria for querying the knowledge base.
Parameter
Description
content
The text used to query the knowledge base. You can enter text directly or type
/in the editor to select and reference an output variable from an upstream node.imageList
The images used to query the knowledge base. You can enter a publicly accessible image URL, such as
https://xxx.xxx.com/xxx/xxx.jpeg, or type/in the editor to select and reference an output variable from an upstream node.Knowledge base selection method
Selection method
Applicable scenarios
Configuration
Select Fixed Knowledge Base
Each call uses the same, pre-selected knowledge base.
Select a specific knowledge base from the drop-down list. You can add three types of knowledge bases: documents, tables, and images.
Dynamic Import
The output of an upstream node dynamically determines which knowledge bases to use.
Configure the
CodeListvariable. You can specify a list of knowledge bases by referencing a variable or by direct input.Knowledge base invocation method
This setting defines the trigger logic for the knowledge base. The default method is always invoke.
Invocation method
Description
Parameters
always invoke
Performs a knowledge base retrieval for each user input. This method is suitable for high-frequency question-and-answer scenarios.
None
intelligent invoke
The agent determines whether to query the knowledge base based on the user's input and its description. This is suitable for flexible conversational scenarios.
Knowledge Base Description (Required)
legacy invocation
Results from document, table, and image knowledge bases are recalled together. A single topK parameter controls the number of recalled chunks, and does not support separate debugging for each type.
topK (Range: 1–50, Default: 10)
Parameter descriptions:
Knowledge base description: Describes the content of the knowledge base and the conditions under which its data can be used for a response. Supports text input or entering
/to insert a variable.topK: The maximum number of chunks to recall from each knowledge base. The actual number of recalled chunks depends on matching results and may be less than the topK value.
Debug recall results
This feature is supported only in always invoke and intelligent invoke modes. Click the Debug button next to a document, table, or image type to test the recall results for that knowledge base. Use the results to fine-tune your configuration. When you are done, click Save in the upper-right corner to apply the configuration to the current application.
Knowledge base filtering
This feature is disabled by default. When enabled, the system uses a large model to intelligently filter the recalled results from documents and tables, improving the final output quality. This feature is suitable for scenarios that require high answer precision or need to filter out irrelevant information.
Node output
The knowledge base node outputs a structured object containing a
resultobject:Field
Type
Description
result
Object
Contains all information returned from the current query.
result.chunkList
Array<Object>
An array of recalled chunks. This array is empty if the query returns no results.
result.chunkList[ ].content
String
The original content of the recalled knowledge base chunk.
result.chunkList[ ].title
String
The title of the document to which the chunk belongs.
result.chunkList[ ].documentName
String
The name of the document where the recalled chunk is located.
result.chunkList[ ].score
Number
The similarity score of the knowledge base chunk. A higher score indicates a better match.
result.chunkList[ ].id
String
The chunk ID.
result.chunkList[ ].dataId
String
The document ID.
result.chunkList[ ].docUrl
String
The source file download link.
result.chunkList[ ].knowledgeBaseId
String
The knowledge base ID.
result.chunkList[ ].nid
String
The identifier for the original text.
result.chunkList[ ].images
Array<String>
A list of images.
result.chunkList[ ].pageNumber
Array<Number>
An array of page numbers.
result.rewriteQuery
String
The rewritten user query.
API
To ensure the API node can access the target service, add the Model Studio service IP addresses (47.93.216.17, 39.105.109.77, 60.205.180.248, and 59.110.152.173) to the allowlist of the inbound rules in your target server's security group or firewall.
Definition
Calls a custom API service using the POST, GET, PUT, PATCH, or DELETE method and outputs the API call result.
Parameter configuration
Parameter
Description
API address
The request URL for the API.
Request method:
POST: Submits data to the server to create a new resource.
GET: Retrieves a resource without modifying data on the server.
PUT: Updates a specified resource or creates a new resource on the server.
PATCH: Partially updates a resource on the server.
DELETE: Deletes a specified resource from the server.
URL: Enter the full API address in the input field. You can enter the address directly or use a variable to reference a value from previous nodes. For example,
https://dashscope.aliyuncs.com/compatible-mode/v1/files.
Header settings
Specifies the HTTP request headers, such as Content-Type and Authorization. You can enter values directly or reference them from previous nodes.
Parameter settings
Query parameters in the request URL. You can enter values directly or reference them from previous nodes.
For example,
limitinhttps://dashscope.aliyuncs.com/compatible-mode/v1/files?limit=5.Body settings
Select the correct type based on the API's requirements.
none: No request body. Suitable for GET requests.
form-data: Form data, used for file uploads or key-value pairs.
raw: Raw text, such as JSON or XML.
JSON: An automatically formatted JSON object.
Timeout setting (s)
The maximum time to wait for a response. If a response is not received within this time, the request times out.
Retry on failure
If disabled, the node stops executing when an error occurs.
If enabled, the node retries the request according to the configured maximum retries and retry interval when an error occurs.
Maximum retries: The maximum number of times to retry a failed request.
Retry interval: The interval between retries, in milliseconds.
Exception handling
If disabled, the node uses the default error handling mechanism when an error occurs.
If enabled, the node executes custom logic when an error occurs.
Default value: Outputs the content of
resultwhen an exception occurs.Exception branch: Proceeds to the exception branch if an exception occurs. You must configure the processing flow for this branch.
Output
Stores the API response in a specified variable for use by subsequent nodes.
NoteFor details on integrating applications with an API, see application integration.
Plugin
Definition
You can add a plugin node to your workflow application to perform more complex tasks. Model Studio offers a range of official plugins, such as Quark Search, Calculator, and a Python code interpreter. You can also create custom plugins to meet specific needs.
See Plugin overview.
Prerequisites
To use an official or third-party plugin, you must first request its activation. For detailed instructions, see Plugin overview.
If you want to reference a custom plugin, you need to create a custom plugin first.
Parameter configuration
Parameter
Description
Input
Specifies the content for the node to process. The variables change depending on the selected plugin. When you select a plugin, its built-in variables load automatically.
You can go to the Official plugins or Custom plugins page, click a plugin card, and view how to configure its variables.
Output
The output variable that contains the node's processing result. Subsequent nodes use this variable to access the result.
Retry on failure
If disabled, the node stops executing when an error occurs.
If enabled, the node retries execution based on the configured number of retries and interval when an error occurs.
Maximum retries: The maximum number of retry attempts when a request fails.
Retry interval: The time interval between each retry, in milliseconds.
Exception handling
If disabled, the node uses the system's default error handling mechanism.
If enabled, the node executes custom logic when an error occurs.
Default value: Outputs the content of
resultwhen an exception occurs.Exception branch: Executes this branch if an exception occurs. You must configure the processing flow for the branch.
Function Compute
Definition
Calls a custom service on Alibaba Cloud Function Compute.
Parameter configuration
ImportantThe default timeout for a Function Compute node is 60 seconds and cannot be changed.
Parameter
Description
Input
The input variable that this node processes. You can reference variables from upstream nodes or enter values directly.
Region
Select the region where your Function Compute service is located: Singapore, Kuala Lumpur, or Indonesia (Jakarta).
Service configuration
Select the Function Compute service to invoke. You must first create a function.
The Alibaba Cloud account that creates the Function Compute service must be the same as the account you use to log in to Model Studio (Bailian), or it must belong to the same Alibaba Cloud root account.
Output
The variable that stores the node's output. Subsequent nodes can reference this variable.
Script
Definition
Uses a script to transform input into a specific template or output format. This involves parsing, transforming, and formatting the data for consistency and readability.
Parameter configuration
Parameter
Description
input
Accepts a fixed value, or a reference to a variable from an upstream node or a session variable.
code
Defines the core logic for the node. Both JavaScript and Python are supported.
Get input: Use the built-in
paramsobject to access input parameters in the formatparams.<variable_name>. For example,params.input1.Return output: The
mainhandler function mustreturna dictionary or object. The key-value pairs of this object become the node's output.
output
The dictionary returned by the
returnstatement in the code serves as the output of this node.For example, if you return
{'result': 'Processing successful'}, downstream nodes can access the string "Processing successful" by usingnode_name.result.retry on failure
If disabled, the node stops executing when an error occurs.
If enabled, the node retries execution according to the configured maximum retries and retry interval.
maximum retries: The maximum number of retry attempts after a failure.
retry interval: The interval between retries, in milliseconds.
exception handling
If disabled, the node uses the system's default error handling mechanism.
If enabled, the node executes custom logic when an error occurs.
Default value: Outputs the content of
resultwhen an exception occurs.exception branch: Routes execution to a separate, user-configured branch if an exception occurs.
Condition
Definition
The condition node adds branching logic to a workflow. When a variable meets a specified condition, the workflow follows the corresponding downstream link. The node supports
AND/ORconfigurations and evaluates conditions sequentially from top to bottom.Parameter configuration
Parameter
Description
conditional branch
Enter the conditional expressions.
Conditions in different groups are joined by
OR, while conditions within the same group are joined byAND.else
The default output when no defined conditions are met.
Intent classification
Definition
Intelligently matches user input with a predefined intent based on its description, and then routes to the corresponding link.
Parameter configuration
Parameter
Description
input variable
Specifies the input variable to be classified. You can enter a value directly, or use a variable from a preceding node or a session variable.
model selection
Supports Qwen-Plus and the intent classification model.
intent classification
Define the intents for the model to classify. The model matches the input to an intent based on its description and then routes to the corresponding link. For example: "For calculating math problems" or "For answering weather-related questions".
Other intent
This branch executes when the model determines that the input does not match any of the defined intents.
intent mode
single-select mode: The large model selects the single best-matching intent from the available configurations.
multi-select mode: The large model selects all matching intents from the available configurations.
reasoning mode
fast mode: This mode improves processing speed by avoiding complex reasoning steps, making it suitable for simple scenarios.
quality mode: This mode uses step-by-step reasoning to achieve more accurate classification.
memory
Refers to the model's ability to remember conversation history in multi-turn conversations, which serves as the context.
node-local cache: Uses the output of this node as context. The model's memory is limited to the context generated by this node.
memory turns: The number of conversation turns to remember. One input and its corresponding output constitute one turn.
custom cache: Uses the content of a specified context variable as the context.
context variable: Specifies the source of the context.
prompt
Provides additional instructions or constraints for the intent classification model. You can add examples or define constraints to help the model's classification results better match your requirements.
In this example, providing specific classification examples guides the model to classify the "delivery time query" as an "Order inquiry" intent, while the constraints limit the classification scope to exclude other irrelevant questions.
output
The variable that stores the node's output. Downstream nodes can use this variable to access the result.
NoteRunning this node consumes tokens. The number of tokens consumed is displayed at runtime.
Flow output
Definition
The flow output node outputs specified content at any point in a workflow. This differs from the final output, which is returned only after the workflow completes.
The flow output node is useful in the following scenarios:
Split large outputs: If a workflow generates a large amount of output, you can insert a flow output node to split the content into two parts. One part is output by the flow output node and the other by the end node.
Retrieve intermediate information: Insert this node at key points in a workflow to output information such as variable values or process status. This helps you track progress and troubleshoot issues.
Provide feedback during long operations: To avoid leaving users without feedback, you can insert a flow output node to display temporary messages. This is useful during time-consuming operations like calling external APIs, performing complex calculations, or processing data in batches. By providing status updates such as "Loading data, please wait..." or "Your request is being processed. Please do not close this window.", you let users know the system is working, not frozen or unresponsive.
Parameter configuration
Parameter
Description
Output content
Enter fixed content or type
/to reference variables from preceding nodes or session variables.Streaming output
When enabled, content from a large model is streamed to the conversation token by token. When disabled, the entire response is generated first and then output at once.
Variable processing
Definition
Used to transform and process text content, such as by extracting specific content or converting formats. This node also supports template mode.
Parameter configuration
Parameter
Description
Output mode
Text output: Converts the input to text. In the editor, you can either enter the content directly or insert variables from upstream nodes or session variables.
JSON output: Formats the input variables as a JSON object.
Group aggregation: Determines which values are returned from a group according to a specified strategy. You can return either the first or the last non-empty value from each group.
Output variable
Specifies the variable to store the node's output for use by subsequent nodes.
Return result
This feature is being deprecated.
Applicable only to API calls, this parameter determines whether the node's output is returned. See application call.
Parameter extraction
Definition
Extracts structured parameters from text using a model.
Parameter configuration
Parameter
Description
Input
The text to extract parameters from.
Model selection
Specifies the model used to extract parameters. Choose the one that best suits your business needs.
Parameters to extract
The model extracts parameters from the input based on the name, type, and description you provide.
Prompt
Additional instructions to guide the model during parameter extraction.
Memory
Memory provides conversational context, helping the model remember previous interactions in multi-turn scenarios.
Cache in this node: Uses the output of this node as context. The model only remembers context from this node.
Memory turns: The number of conversation turns to remember. One turn consists of one input and its corresponding output.
Custom cache: Uses a specified context variable to provide context.
Context variable: Select the source of the context.
Output
Contains the parameters extracted by the model. Subsequent nodes can reference this output as a variable.
Agent group
Definition
An agent group contains multiple sub-agents. Based on task requirements, the decision model within the group automatically plans the execution flow, schedules sub-agents, and coordinates them to complete the task. Use this node if you need to complete a large project but are unsure how to design the specific workflow. By breaking down a complex task into sub-tasks that different agents process in parallel, you can improve task execution speed.
Parameter configuration
Parameter
Description
Input
Specifies the content that the node will process. You can reference variables from a previous node.
Model selection
Select a decision model.
Group name
Enter a custom name for the agent group.
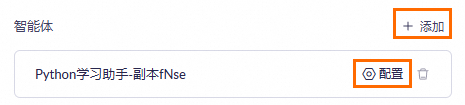
Agents
Specifies the sub-agents within the agent group. Only published agent applications can be added.
After adding a sub-agent, click Configure to describe its function. This description helps the decision model determine which sub-agent to invoke for the current task.
Output variable
Specifies the variable for storing the output of this node. This variable can be referenced by subsequent nodes.
Create agent
Definition
Creates a new agent exclusively for the orchestration canvas.
Parameter configuration
Parameter
Description
Input
The content to be processed by this node. You can reference variables from preceding nodes.
Agent name
A custom name for the agent.
Model selection
The large model used by the agent.
Prompt
Use natural language to define the agent's role and tasks.
Knowledge base
Select a knowledge base for the agent.
Plugin
Enables the agent to call official or custom plugins to extend its capabilities.
Output variable
The variable that stores the node's output for use in subsequent nodes.
Multimodal generation
Definition
The multimodal generation node uses Alibaba Cloud multimodal models to generate image, video, or audio content based on the configured prompts and parameters. Use this node for content creation, marketing asset production, short video generation, and voice-over synthesis.
Model selection
Model selection
Select a multimodal generation model from the drop-down list. Models are categorized by function:
Model type
Supported models
Features
Image generation
Qwen-Image
Excels at rendering complex Chinese and English text.
Wan 2.6-image-generation
Generates and edits images from text instructions, supporting both image editing and mixed text-and-image modes.
Qwen-Image-Plus
Excels at rendering complex Chinese and English text.
Z-Image-Turbo
A lightweight text-to-image model that quickly generates high-quality images. It supports bilingual rendering (Chinese and English), complex semantic understanding, and multiple styles and themes.
Wan 2.2-text-to-image-Plus
The Pro edition of Wan 2.2, with comprehensive improvements in creativity, stability, and photorealism.
Wan 2.2-text-to-image-Flash
The Flash edition of Wan 2.2, with comprehensive improvements in creativity, stability, and photorealism.
Video generation
Wan 2.6-text-to-video
Wan 2.6. Features multi-shot storytelling capabilities and supports both automatic voice-overs and custom audio file inputs.
Wan 2.6-image-to-video
Wan 2.6. Features multi-shot storytelling capabilities and supports both automatic voice-overs and custom audio file inputs.
Wan 2.5-text-to-video-Preview
Wan 2.5 preview. Supports automatic voice-overs and custom audio file inputs.
Wan 2.5-image-to-video-Preview
Wan 2.5 preview. Supports automatic voice-overs and custom audio file inputs.
Wan 2.2-text-to-video-Plus
The Pro edition of Wan 2.2. Offers more accurate instruction understanding, stable and smooth motion generation, and richer details in the output.
Wan 2.2-image-to-video-Plus
The Pro edition of Wan 2.2, offering more accurate instruction understanding, controllable camera movement, and consistent visuals. It also features comprehensive improvements in stability, success rate, and content richness.
Wan 2.2-image-to-video-Flash
The Flash edition of Wan 2.2, delivering ultra-fast generation, more accurate instruction understanding and camera control, consistent visuals, and comprehensive improvements in stability and success rate.
Audio generation
Qwen3-TTS-Flash
Supports mixed-language text input and streaming audio output.
The list of available models is subject to change. Refer to the UI for the most current options. For model invocation pricing, see Model Invocation Billing.
Configuration parameters vary by model. The panel shows only the settings relevant to your selection.
Image generation
After you select an image generation model, configure the following parameters. The available parameters vary by model; refer to the UI for the specific options.
Parameter
Required
Description
Positive prompt
Yes
Describes the content, style, composition, and other elements of the target image. You can enter text directly or type
/to insert an output variable from an upstream node.Negative prompt
No
Describes content that you do not want in the image, such as blurriness or watermarks. You can enter text directly or type
/to insert an output variable from an upstream node.Size/Resolution
Yes
The dimensions of the image.
prompt_extend
No
If enabled, the system uses a large model to intelligently rewrite the input prompt. This feature applies only to the positive prompt. It significantly improves results for shorter prompts but adds 3-4 seconds of latency.
Add Watermark
No
Controls whether to add an Alibaba Cloud watermark to the generated image. This feature is disabled by default.
Reference image
No
Upload a reference image to guide the style or content of the generated image. You can pass a File-type variable from the start node or a public URL.
Number of Images
No
The number of images to generate in a single request. The default value is 1.
Intelligent prompt rewriting
No
If enabled, a large model intelligently rewrites the input prompt. This feature applies only to the positive prompt. It significantly improves results for shorter prompts but increases the image generation time.
enable_interleave
No
Disabled (default): Image editing mode. Edits, performs style transfer, or generates consistent subjects using 1 to 4 input images.
Enabled: Mixed text-and-image output mode. Generates a single content block containing both text and images, based on an image or plain text.
Random seed
No
Controls randomness in the generated output (default: 1234). Using the same seed value and prompt produces similar images.
Intelligent Thinking
No
If enabled, the large model performs reasoning and prompt rewriting. This can improve the generation quality but also increases the generation time.
Video generation
After you select a video generation model, configure the following parameters. The available parameters vary by model; refer to the UI for the specific options.
Parameter
Required
Description
Positive prompt
Yes
Describes the scene, actions, style, and other elements of the target video. You can enter text directly or type
/to insert an output variable from an upstream node.Negative prompt
No
Describes content that you do not want in the video, such as blurriness or watermarks. You can enter text directly or type
/to insert an output variable from an upstream node.Resolution
Yes
The video resolution. The available options vary by model.
Video Duration
Yes
The duration of the generated video. The available options vary by model.
Random seed
Yes
Controls randomness in the generated output. Using the same seed value and prompt produces similar videos.
Intelligent Expansion
No
If enabled, the system uses a large model to intelligently rewrite the input prompt to improve the video generation quality. This feature applies only to the positive prompt.
Smart Multi-shot
No
If enabled, the model generates a multi-shot video.
Generate Audio
No
If enabled, you can add a voice-over by providing a public audio file URL.
Reference image
Yes (image-to-video models only)
Specifies a reference image to serve as the video's first frame. The model generates the video based on this image. You can pass a File-type variable from the start node or a public URL.
Audio generation
Parameter
Required
Description
Text for Synthesis
Yes
The text content to convert to speech. You can enter text directly or type
/to insert an output variable from an upstream node.Language Type
No
The language for the synthesized speech (default: Chinese). Supported languages: Chinese, English, German, Italian, Portuguese, Spanish, Japanese, Korean, French, and Russian.
Voice
No
The voice for the synthesized speech. For a list of supported voices, see Real-time Speech Synthesis - Qwen.
Node output
After the multimodal generation node runs, it outputs the following variables:
Parameter
Type
Description
Example
output
Object
The complete output object, containing the task status, execution time, and results.
-
output.task_status
String
The task status, such as "SUCCEEDED" or "FAILED".
SUCCEEDED
output.submit_time
String
The task submission time, in YYYY-MM-DD HH:mm:ss.SSS format.
2026-01-22 10:54:44.200
output.end_time
String
The task end time, in YYYY-MM-DD HH:mm:ss.SSS format.
2026-01-22 10:54:51.685
output.task_id
String
The unique identifier for the task.
e36c2221-b7fd-xxxx
output.scheduled_time
String
The task scheduled time, in YYYY-MM-DD HH:mm:ss.SSS format.
2026-01-22 10:54:44.251
output.results
Array<Object>
An array of generation results, containing metadata for the generated assets.
-
output.results[].orig_prompt
String
The original prompt entered by the user.
a cute cat sitting on a windowsill
output.results[].actual_prompt
String
The prompt used for generation after model expansion.
a cute white cat with fluffy, soft fur...
output.results[].url
String
The URL of the generated file.
https://dashscope-result...
usage
Object
Model usage statistics.
-
usage.image_count
Number
The number of generated images (image generation mode).
1
urls
Array<String>
An array of URLs for the generated files. Use these URLs to access or download the output.
["https://dashscope-result..."]
Test application
After you configure the workflow, you can use the test feature to verify that it runs as expected. Click the Test button in the upper-right corner to open the test panel. The test panel offers multiple test modes for different use cases.
Text conversation
Text conversation is the default test mode. It preserves the conversation history and supports continuous, multi-turn conversations.
From the drop-down list at the top of the test panel, select text conversation mode (selected by default). If the workflow contains custom variables, enter their values in the parameter configuration area.
In the input box, enter your test content (text and file attachments are supported), and then click the Send button or press Enter to run the test.
Review the test results. You can click a node to view its detailed input and output, or switch the output format between Text and JSON.
To continue the conversation, enter your next turn in the input box and send it. To start a new conversation, click the Clear All button.
Text generation
The text generation mode is for single-turn interactions. Each test is independent, and the conversation history is not preserved.
Checklist
The checklist lists the required configurations for your workflow.
To view the checklist, click the  icon in the upper-right corner of the canvas configuration page.

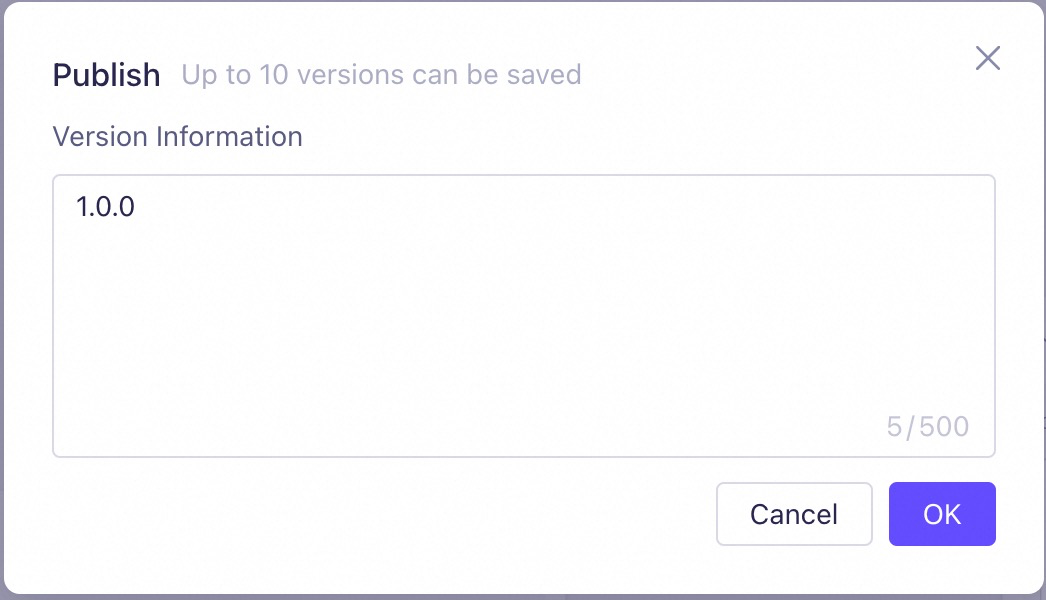
Release an application
Once an application is released, you can call it via an API or share it as a web page with RAM users in the same main account. To do so, click the Publish button in the upper-right corner of the agent application management page.
Call via API
On the Publish Channel tab of your workflow application, click View API next to API to learn how to call the agent application by using an API.
Note: You must replace YOUR_API_KEY with your API key to call the API.

For FAQs and information about API calls, see the following topics:
For invocation methods (HTTP/SDK), see Application call.
For details on API call parameters, see Application call parameter information.
For details on passing parameters, see Parameter passing for applications.
To resolve errors returned by API calls, see Error codes.
The application itself has no concurrency limit; instead, the limit is determined by the models it calls. See the Model Studio console.
Currently, you cannot call the Xiyan service from a workflow. Instead, use an API node to call a custom API service.
The timeout for API calls is 600 seconds and cannot be changed. If a timeout may occur, consider the following solutions:
Use asynchronous mode: In this mode, the system returns a task ID. You can then use the task ID to query the result, which avoids the synchronous timeout limit.
Split the task: Break down the task into multiple steps, or process batch data in smaller chunks to prevent a single execution from timing out.
Import or export a workflow
Import or export a Model Studio workflow
Click the
 icon at the top of the workflow page and select Export DSL or Import Model Studio DSL.
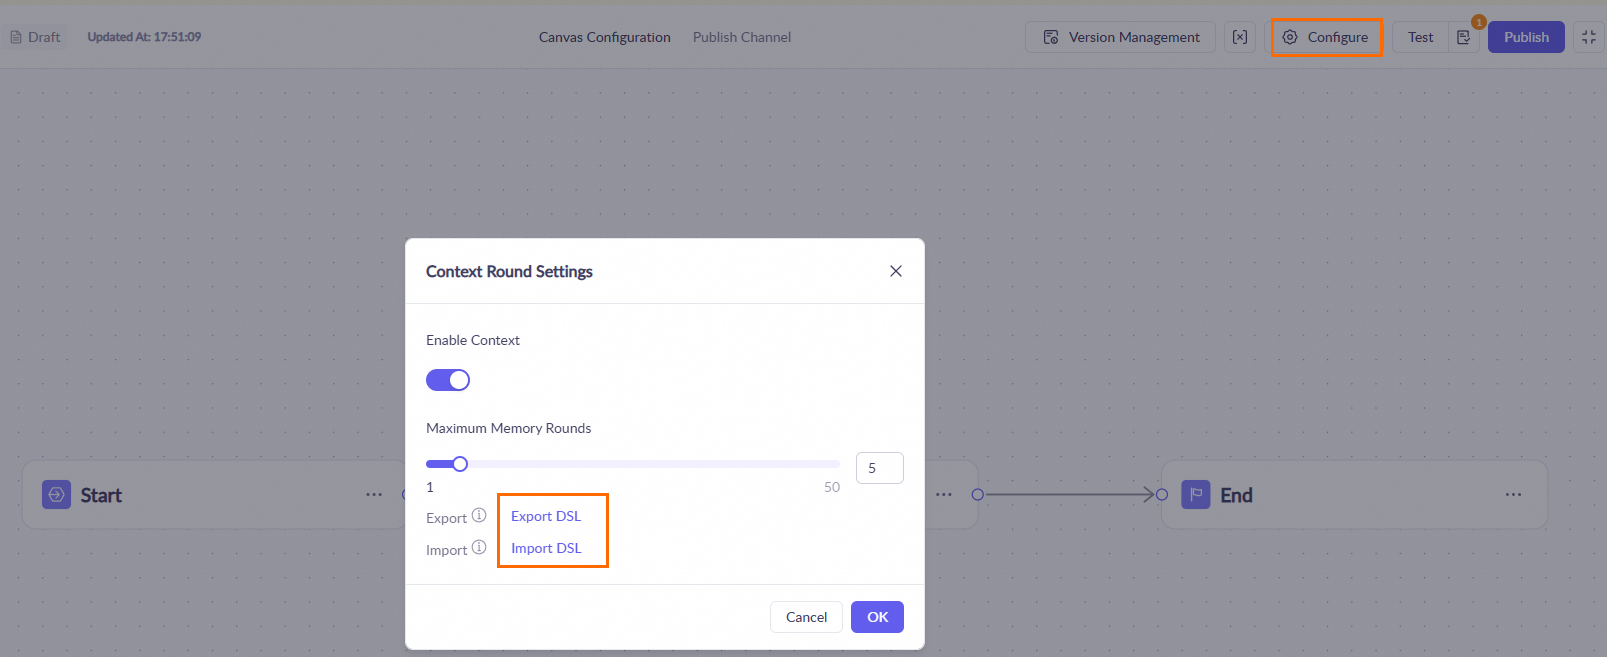
Import a Dify workflow
Model Studio supports one-click import of Dify workflows for easy migration and reuse.
Click the
icon at the top of the workflow page and select Import Dify DSL.
Adjust the parameters for each node.
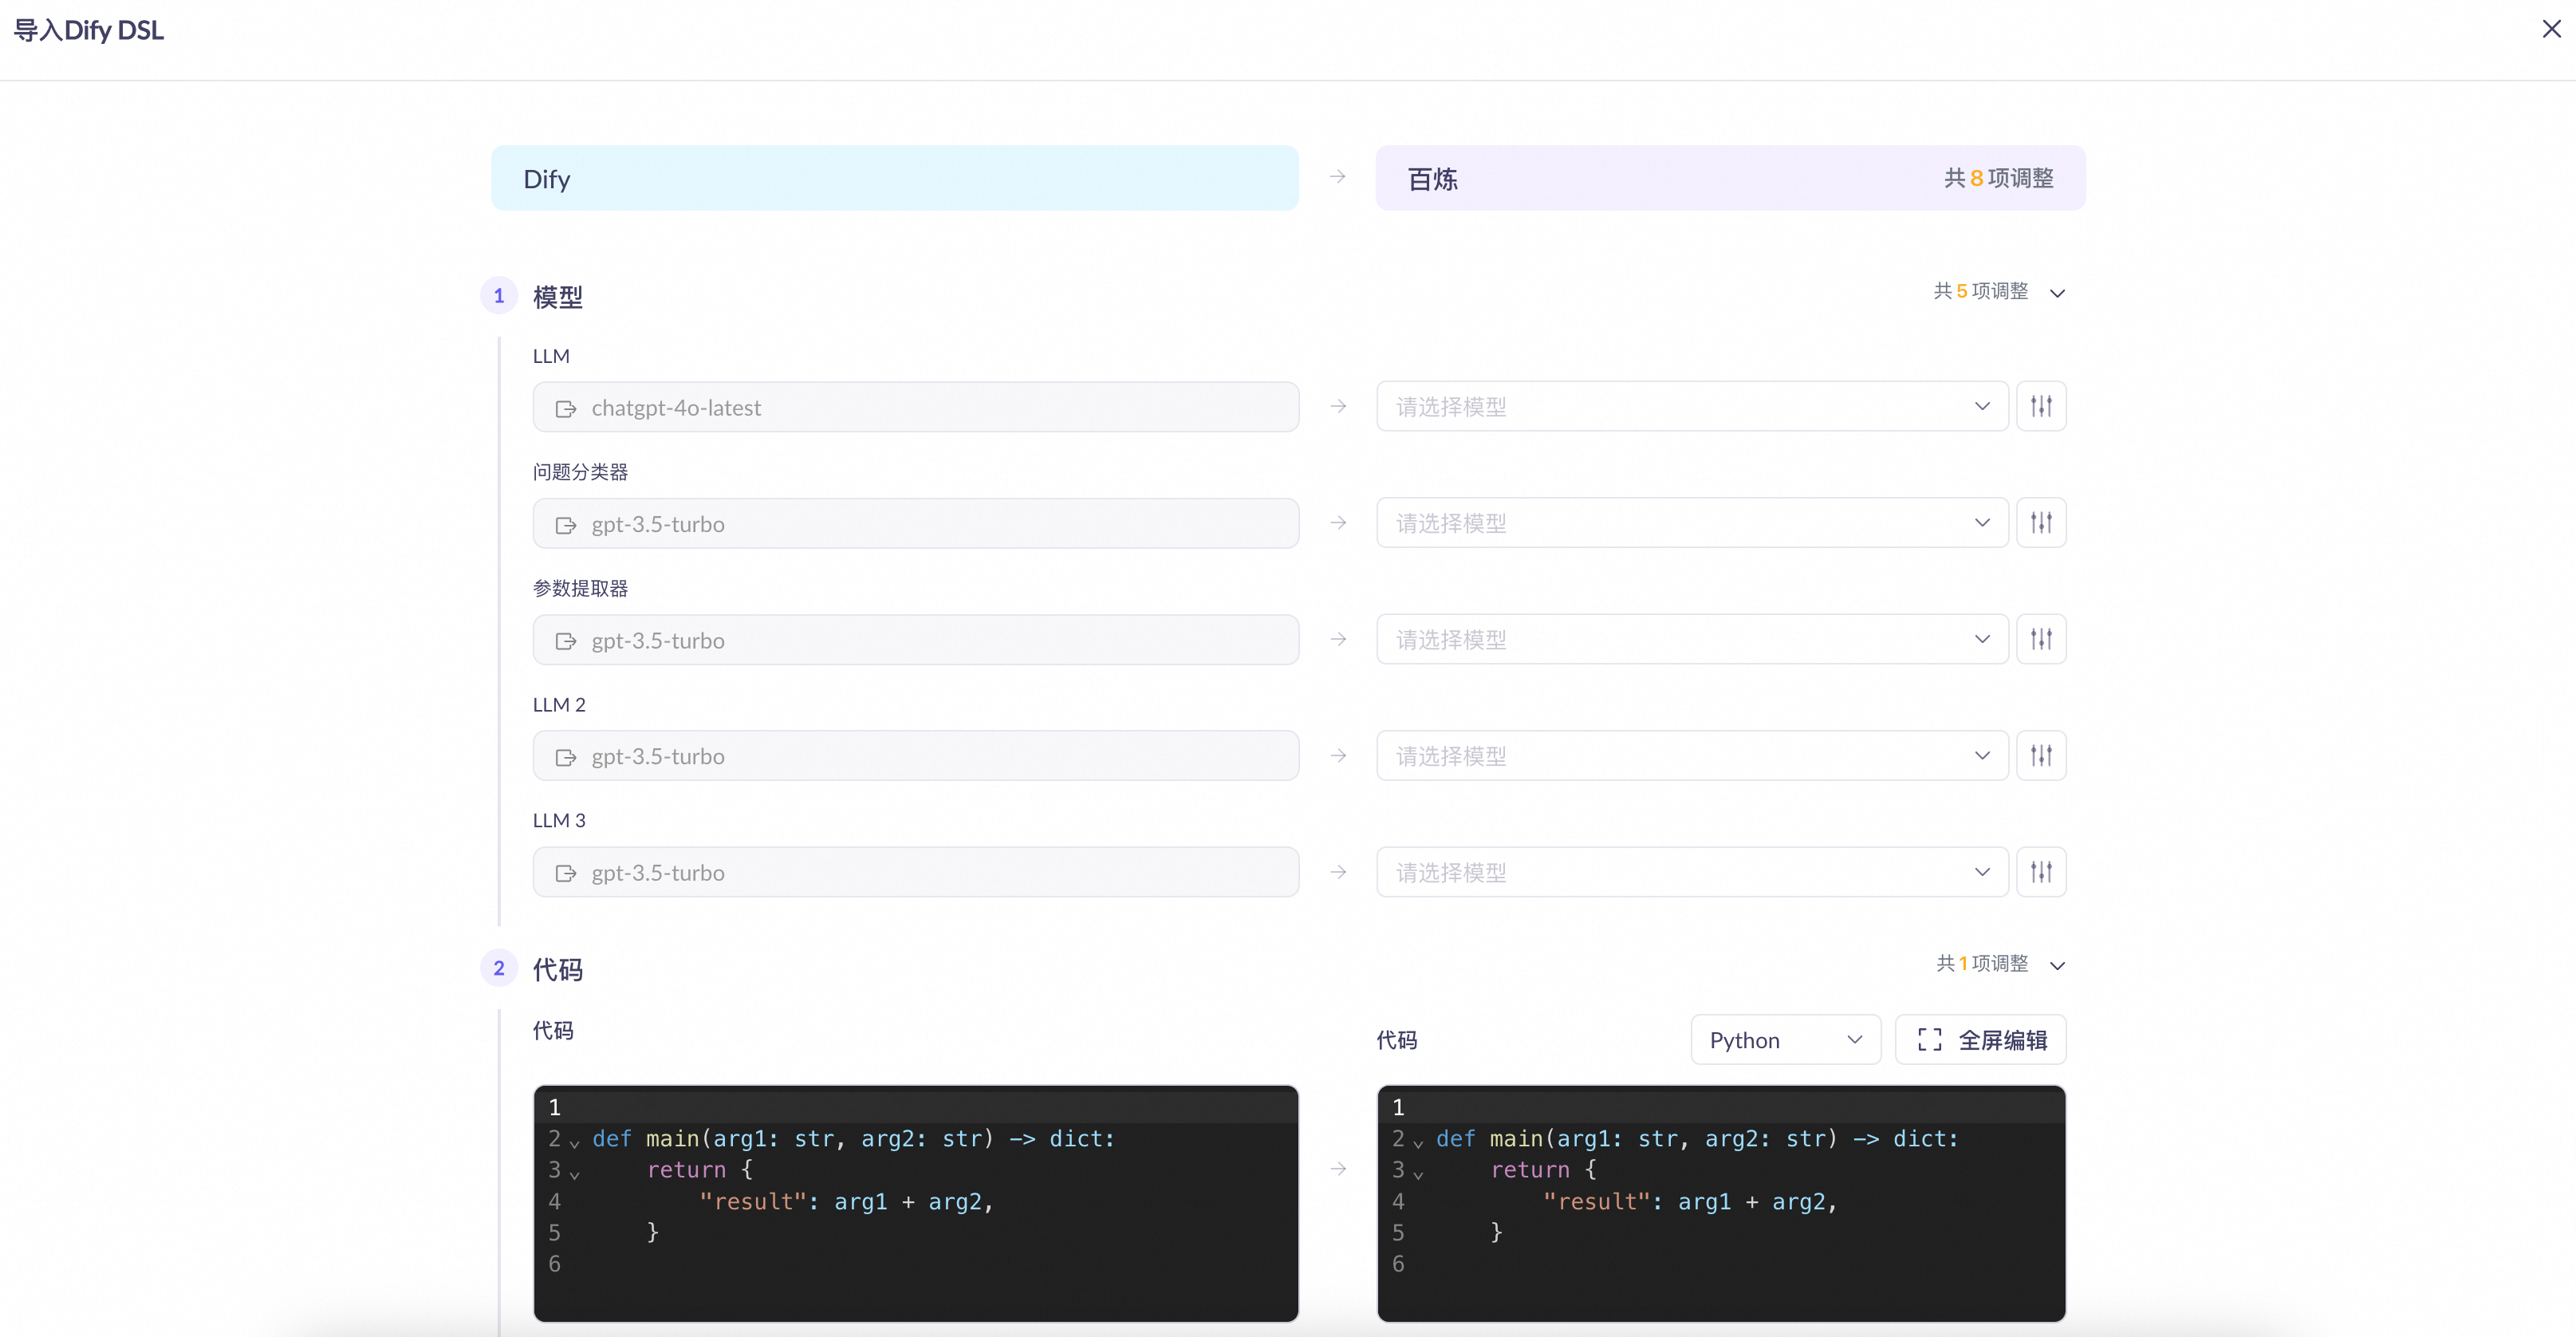
The node compatibility details are as follows:
Dify node
Mapped Model Studio node
Compatibility
start
start
sys.querymaps toquery.sys.dialogue_countmaps tomaximum memory turns.
LLM
LLM
model: Model Studio clears the model field for unsupported models, requiring you to select one manually. Supported models are fully compatible.
prompt: Dify's System prompt maps to the main prompt in Model Studio, while its User prompt maps to the user prompt.
vision capability: Fully compatible.
context: Model Studio incorporates the raw fields from Dify's context directly into its system prompt.
knowledge retrieval
knowledge base
input: Model Studio consistently uses the
contentfield as the input.knowledge base: Model Studio clears this field after import. You must manually associate a knowledge base in Model Studio.
retrieval settings: Dify's
Top-kparameter maps tonumber of retrieved fragments.
Direct Reply
output node
Fully compatible.
agent
None
Only the name is retained. You must click the node and select a specific Model Studio node as a replacement.
Question Classifier
intent classification
Model Studio clears the model field for unsupported models, requiring you to select one manually. Supported models are fully compatible.
Iteration
batch processing
input: Maps to Batch Array.
output variable: Maps to Output Variable.
loop
loop
Fully compatible.
code execution
script
Model Studio distinguishes between Python and JavaScript scripts.
Template Transform
None
Not compatible. Model Studio generates a custom node.
Variable Aggregator
Variable Processing
Maps to the Aggregate Groups output mode of the Variable Processing node.
Document Extractor
None
Not compatible. Model Studio generates a custom node.
Variable Assignment
Variable Settings
Fully compatible.
Parameter Extractor
parameter extraction
Model Studio does not support inference mode. Other features are fully compatible.
HTTP request
API
Fully compatible, but you must re-authenticate.
List Operation
None
Not compatible. Model Studio generates a custom node.
Tool
plugin, MCP
Not compatible. Model Studio generates a custom node.
comment
None
Not compatible.
end
end
If a Dify workflow contains multiple end nodes, Model Studio converts them into a single Variable Processing node and a single end node.
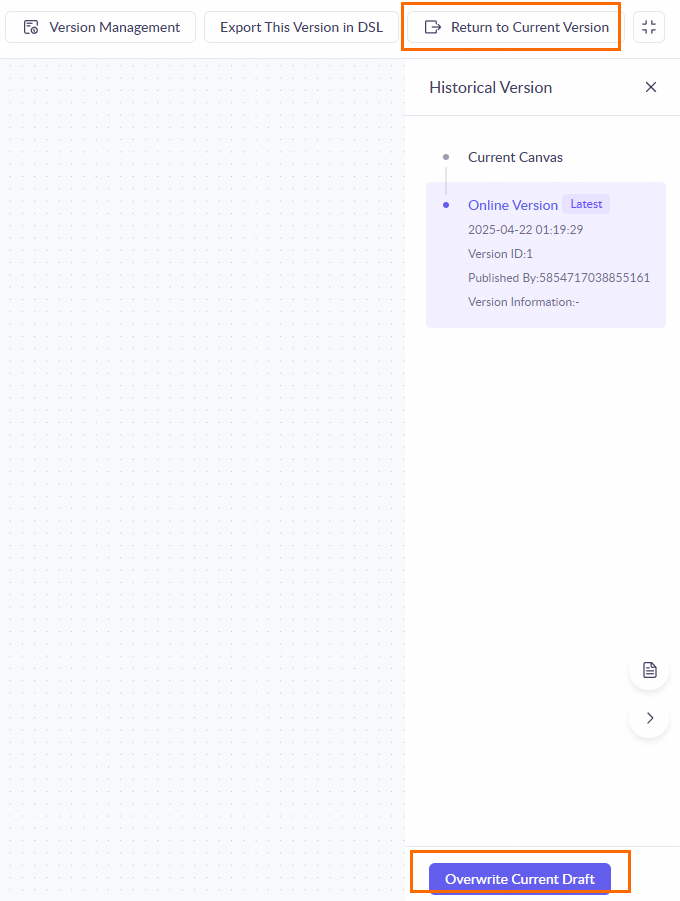
Manage workflow versions
|
|
|
|
|
|
Delete and copy workflow applications
In My Applications, find a published application card and click the |
|
 icon to delete the application, copy its workflow, or modify its application name.
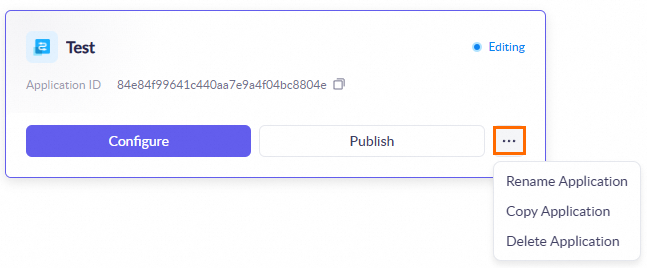
FAQ
Workflow applications
How do I write the results of a workflow run to a database?
Use a script conversion node to write the output from the previous node to a database.
How do I upload files when building a workflow application in Model Studio?
Add an API node to your workflow application to upload files.
How do I upload images?
Use a VL model and pass the image URL as a parameter.
Can I use an asynchronous task API within a workflow application?
The timeout for a workflow application is 600 seconds. Avoid using an asynchronous task API within a workflow.
How can I call the Model Studio workflow API from a frontend application and receive a streaming output?
Frontend calls are not currently supported.
Why can't I import a standalone .yaml file into a Model Studio workflow?
Model Studio does not support importing standalone .yaml files. You must provide a compressed package that includes an MD5 file. We recommend regenerating the MD5 if you encounter issues.
Can variable names in Model Studio workflows be in Chinese?
No, variable names cannot contain Chinese characters.
How is conversation history stored?
Workflow applications store data for only one month. You must save your own conversation history. The
session_idis valid for one hour.
Nodes
Why does my intent classification node fail when context is enabled?
If you enable context for an intent classification node, the variable that you pass to it must be a list.
Why does my API node fail when I use streaming output?
The API node within a workflow does not support streaming output. However, streaming output is supported by the underlying HTTP API.
How do I speed up a slow conditional node?
Check your workflow configuration: Ensure each node, especially the conditional node, is configured correctly. Avoid unnecessarily complex calculations or data processing to reduce response time.
Optimize script logic: If the conditional logic involves a custom script, optimize the script by reducing unnecessary loops or redundant data processing to improve performance.
Run batch tests: Measure the average response time of your workflow to identify performance bottlenecks under specific conditions.
How do I stream the reasoning process from a large model node?
You need to add a text conversion node after the large model node, configure the
reasoning_contentvariable, and enable Result Return. The end node must receive the result.How can I customize the output parameters of a large model node?
Use a script node to process the output: Add a script node after the large model node to process its output, convert it to your desired format, or add extra parameters.
Configure a batch node: If you are using a large model node within a batch node, you can select the output of the large model node as the final output in the batch node's configuration. The steps are as follows:
Add a large model node to the batch node.
In the batch node configuration, select the output of the large model node as the final output
resultList.
Why does my API node return no result or fail to pass parameters?
Verify that your API key and Base URL are correct. Ensure that the input parameters are configured correctly, and adjust the field input types if necessary. Use Model Observation to view model usage details.
How do I resolve issues when accessing Excel data from a knowledge base?
You cannot directly access local files. Use MCP to access local resources. You must manually process the output from a knowledge base node. We recommend adding a large model node to convert the output to a table format before passing it to a script node for further processing.