To build a knowledge base, import your source data.
-
Console restrictions: Only International Edition users who created applications before April 21, 2025 can access the Application Development tab, as shown in the following figure.
This tab contains the following features: Applications (agent application and workflow application), Components (prompt engineering and plug-in), and Data (knowledge base and application data). These are all preview features. Use them with caution in production environments.

-
API call limits: Only International Edition users who created applications before April 21, 2025, can call the application data, knowledge base, and prompt engineering APIs.
Procedures
Import local files
-
Go to the File tab.
-
Under Category in the left-side navigation pane, select an existing category or click the
 icon to create a new one.
Model Studio uses categories to manage imported files.
-
Click Import Data to open the Import Data page. Select Upload Local File as the import method.
The platform does not support importing JSON, CSV, or YAML files directly. Convert these files to the XLSX or XLS format before importing.
-
For Parsing Method, select Default Settings or Custom Settings (Custom Settings lets you configure parsing rules for different formats to improve parsing results).
Configure the parsing strategy based on your requirements. If you are unsure, we recommend keeping the default settings.
-
Digital Parsing: This method does not support parsing illustrations and charts in files.
-
Intelligent document parsing: The parser identifies and extracts text from illustrations in a file, and then generates text summaries. These summaries, along with other non-image content, are segmented, converted into vectors, and used for knowledge base retrieval.
-
LLM parsing: Agent applications using models from the model list let users ask questions about the content of illustrations and charts in files. If you need to recognize and understand illustrations and charts in your files, select LLM Parsing.
-
Qwen-VL parsing: This method supports only image formats. You can select a Qwen-VL model and pass in a prompt to specify the layout, elements, and content that the model should recognize. Other features are consistent with LLM parsing.


How to ensure illustrations from files display correctly in Model Studio application responses
-
-
(Optional) Configure Tags for the file.
When you call an application using an API, you can specify tags in the
tagsrequest parameter. The application then filters files based on these tags during knowledge base retrieval to improve search efficiency. For an agent application, you can set tags in the console when you debug the knowledge base. -
Click Confirm. The system begins parsing and importing the file. You can track the task progress on the page.
The file is converted into a format that Model Studio can process. This process may take several hours during peak usage.
-
After the import is complete, click Details to the right of the file to view the imported file.
After a file is imported into Model Studio, it is stored as an independent copy that is unlinked from the original data in platform-provided storage. Currently, this storage is free and has no capacity limit.
You can view only files imported within the last 90 days. After this period, the imported files are no longer viewable, but they are not deleted.
Imported files are available only to users in the current workspace. Model Studio does not use them for any commercial purposes or make them public.
Import local tables
-
Go to the Table tab.
-
In the Table list on the left, select an existing data table or click the
icon to create a new data table.Model Studio uses data tables to manage imported data.
New data table
-
Enter a Table Name. Then, choose either Upload Excel Directly or Custom Header.
-
Upload Excel file: Model Studio automatically identifies the table header in the uploaded file. It then uses this header to create the data table schema and imports the remaining content as data records.
-
Custom header: Column Name and Type are required. Description is optional.
Important-
The schema of a data table, including its column names, descriptions, and types, cannot be modified after it is created.
-
The schema of the uploaded file must exactly match that of the target data table, including the number and names of the columns. Otherwise, the import will fail. For example, if the target data table has 2 columns, you must configure 2 fields here, and the column names must match. You can add or remove fields by clicking Add Field or Delete in the Actions column.
-
To help the model understand the meaning of each field, provide a clear, natural-language description. For example, for an
agefield, add a description such as "The user's age". -
If you set a field type to
image_url, ensure the link is a publicly accessible image URL. The knowledge base uses this link to retrieve the image and generate a vector index for scenarios such as image search.Example
image_urlformat: https://example.com/downloads/pic.jpgWhen you create a knowledge base, fields of the
image_urltype are used to generate an image index. Model Studio accesses the target image, extracts its features, and then converts the features into a vector using image embedding. During a knowledge base search, this vector is compared with the vector of a user-uploaded image to measure similarity.
-
-
-
Click the
 icon to select and upload a file in XLSX or XLS format.
The file must contain a table header, or the import will fail.
The platform does not support importing JSON, CSV, or YAML files directly. Convert these files to the XLSX or XLS format before importing.
-
Click OK to start the import. After the import is complete, the new data table appears in the Table navigation tree on the left.
Existing data table
-
In the Table list on the left, select the target data table, and then click Import Data.
-
Select an import type: Upload and Overwrite or Incremental Upload.
Click Download Template to get a file that contains only the table header. You can add data to this file and then upload it using either the overwrite or incremental method.
-
Click the
icon to select and upload a file in XLSX or XLS format.The file must contain a table header that matches the schema of the current data table. Otherwise, the import will fail.
The platform does not support importing JSON, CSV, or YAML files directly. Convert these files to the XLSX or XLS format before importing.
-
Import OSS files
-
Go to the Files tab.
-
In the left navigation pane, under Category, select an existing category or click the
icon to create a new one.Model Studio uses categories to manage imported files.
-
Click Import Data to open the Import Data page. For the import method, select OSS.
When you import data from OSS to Model Studio for the first time, you must follow the on-screen prompts to grant authorization and add the
bailian-datahub-accesstag to the target bucket to grant Model Studio access. For instructions, see Configure file import from OSS.Buckets that use the Archive, Cold Archive, or Deep Cold Archive storage classes are not supported.
Model Studio cannot access files in the root directory of a bucket. You must select an existing subdirectory or create a new one for Model Studio to access.
Buckets with content encryption and private buckets are supported.
To use a bucket with hotlink protection enabled, you must add the
*.console.aliyun.comdomain to the Referer whitelist. For instructions, see Hotlink protection. -
For Parsing Method, you can select Default Settings or Custom Settings. The Custom Settings option lets you configure parsing rules for different file formats to improve parsing results.
Configure the parsing strategy based on your requirements. If you are unsure, we recommend keeping the default settings.
-
Digital Parsing: Does not parse illustrations and charts in files.
-
Intelligent document parsing: Extracts text from illustrations and generates summaries. This content, combined with the rest of the file, is then chunked, vectorized, and used for knowledge base retrieval.
-
LLM parsing: Enables an agent application to answer questions about illustrations and charts in your files. For visually rich documents, select LLM Parsing.
-
Qwen-VL parsing: Supports only image formats. You can select a Qwen-VL model and provide a prompt to guide the model to recognize specific layouts, elements, and content. Other features are consistent with LLM parsing.
How to display illustrations from files in application responses
-
-
(Optional) Configure Tags for the file.
When you call an application via API, you can specify tags in the
tagsrequest parameter. The application then filters relevant files based on these tags during knowledge base retrieval to improve retrieval efficiency. For an agent application, you can set tags in the console by navigating to . -
Click Confirm. The file parsing and import process begins. You can monitor the task progress on the page.
Model Studio converts the files into a format that it can process. This process may take several hours during peak usage.
-
After the import is complete, click Details to the right of the file to view the imported file.
Model Studio stores each imported file as an independent replica in free platform storage, unlinked from your original data. Currently, no capacity limit applies.
Only users within the current workspace can access imported files. Model Studio will not use them for commercial purposes or make them public.
Next steps
More
Import files from OSS
To import files from OSS for the first time, you must authorize Model Studio to access your OSS resources. The authorization process differs for an Alibaba Cloud account and a RAM user.
Alibaba Cloud account
-
Click Authorize Now.

-
In the dialog box that appears, click Confirm Authorization. This action automatically creates a service-linked role for OSS, which grants Model Studio access to your OSS resources.
Authorization usually completes in seconds but can be delayed during peak hours.
What do I do if I receive the "The request failed. Try again or contact the administrator. Error code: 10041495" error?

-
Add the
bailian-datahub-accesstag to the target OSS bucket.Model Studio can access only buckets that have this tag.
-
Go to the OSS console. In the left-side navigation pane, click bucket list, and then find the target bucket.
-
Hover over the
 icon for the bucket and click Modify (if no tags are set) or Go to Edit.
 -
On the bucket tags page, click Create Tag (if no tags are set) or Settings.
-
Click Tag. Add a tag with the key
bailian-datahub-accessand the valueread, and then click Save.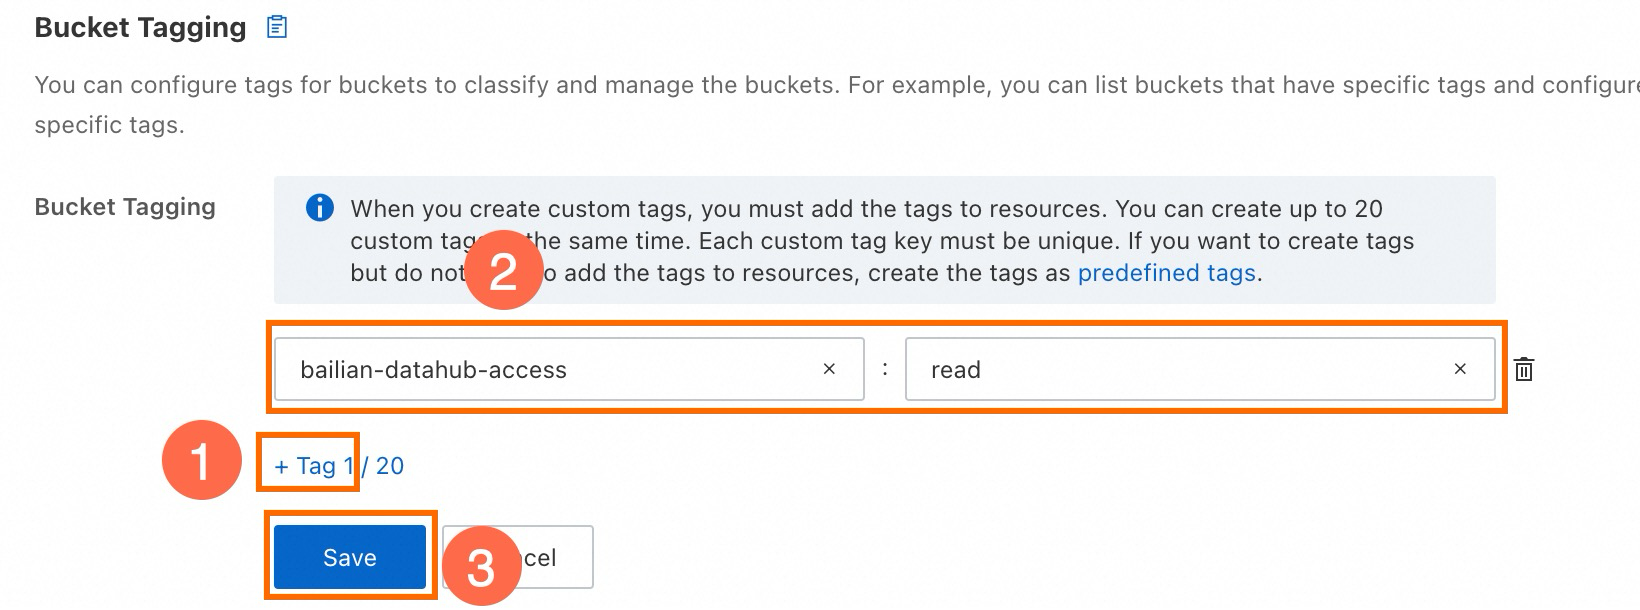
-
-
Return to the Import Data page, reselect the target bucket, and retry the import.
Important: Model Studio does not support accessing files in the root directory of a bucket. You must select an existing subdirectory or create a new one for Model Studio to access.
RAM user
-
Click Authorize Now.
-
In the dialog box that appears, click Confirm Authorization. If the message Authorization failed or The current user does not have the permission to create a service-linked role appears, you must first grant the RAM user permission to create a service-linked role.
-
Alibaba Cloud account required: Log on to the RAM console. In the left-side navigation pane, choose , and then click Create Policy.
-
Click the Script Editor tab. Copy the following JSON policy and paste it into the editor, and then click OK.
{
    "Action": [
        "ram:CreateServiceLinkedRole"
    ],
    "Resource": "*",
    "Effect": "Allow",
    "Condition": {
        "StringEquals": {
            "ram:ServiceName": "datahub.sfm.aliyuncs.com"
        }
    }
}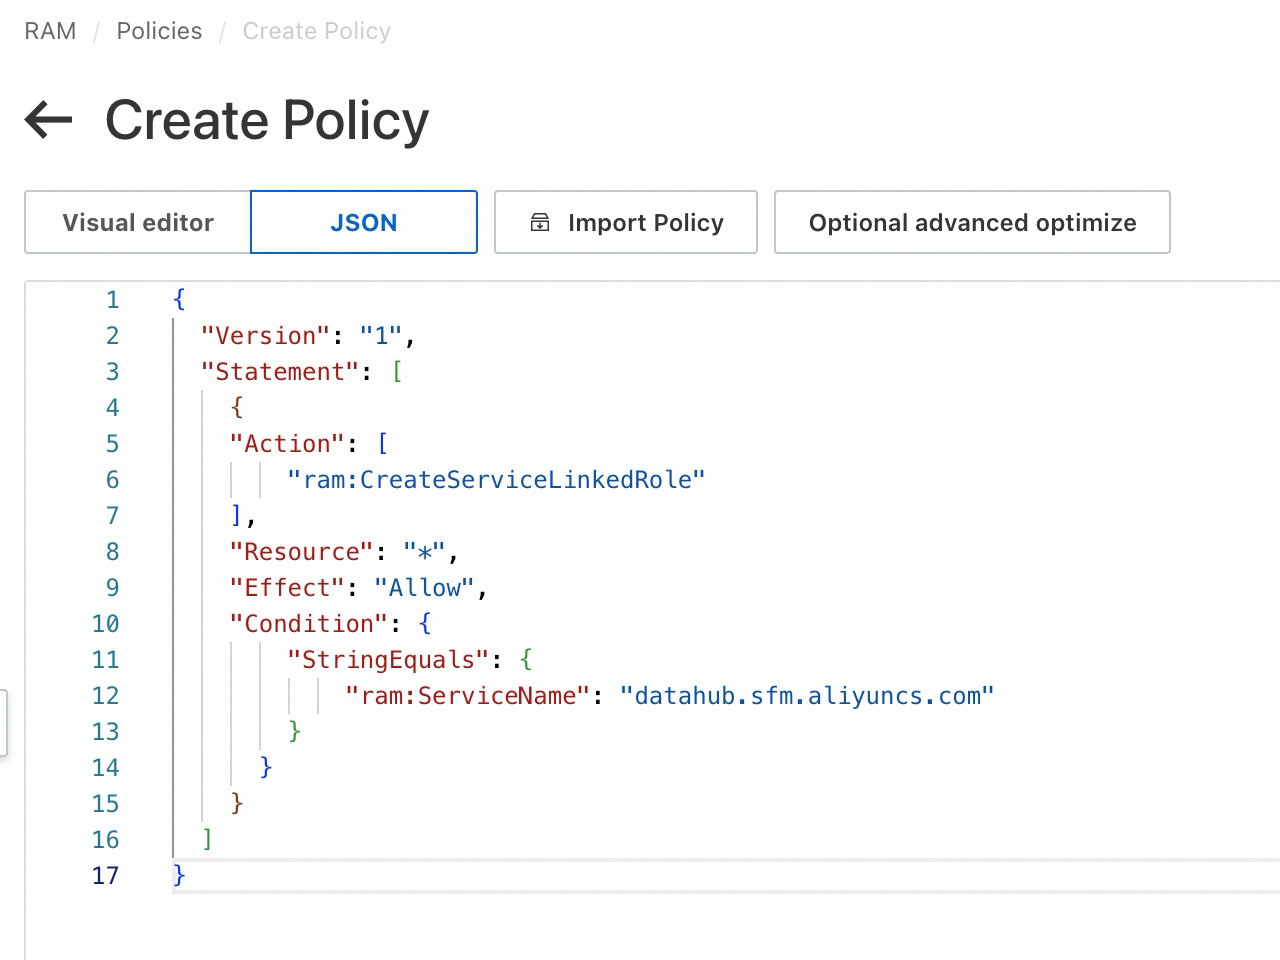
-
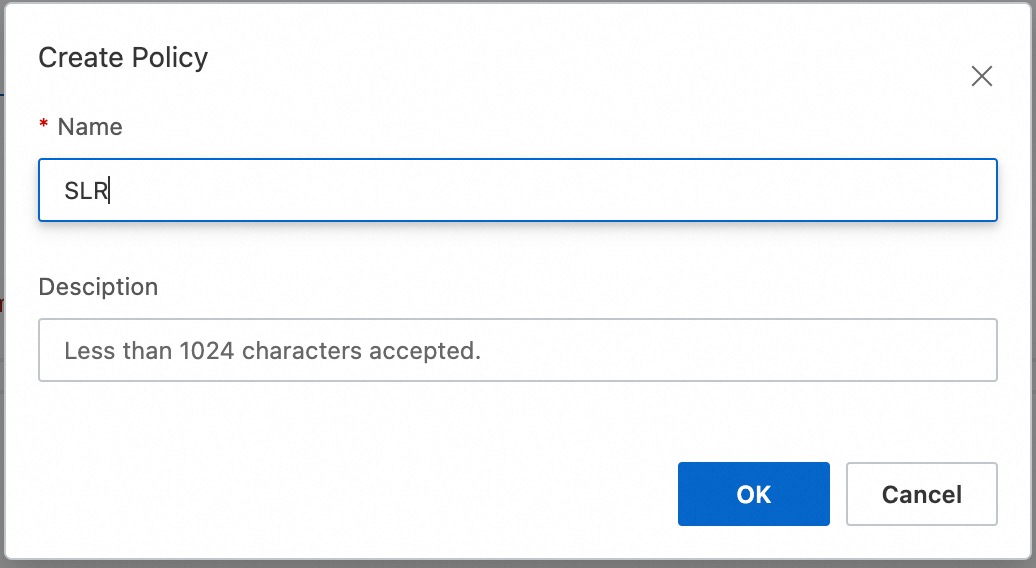
Enter a name for the policy and click OK.
-
In the left-side navigation pane, choose . Find the RAM user to authorize, and then click Add Permission in the Actions column.
-
Select the policy that you just created (under custom policy), and then click OK. The RAM user can now create service-linked roles.

-
-
Authorize the RAM user to access OSS through Model Studio.
-
Return to the Import Data page and click Authorize Now.
-
In the dialog box that appears, click Confirm Authorization. This action automatically creates the required service-linked role for OSS.
Authorization usually completes in seconds but can be delayed during peak hours.
What do I do if I receive the "The request failed. Try again or contact the administrator. Error code: 10041495" error?
-
-
Add the
bailian-datahub-accesstag to the target OSS bucket.Model Studio can access only buckets that have this tag.
-
Go to the OSS console. In the left-side navigation pane, click bucket list, and then find the target bucket.
-
Hover over the
icon for the bucket and click Modify (if no tags are set) or Go to Edit. -
On the bucket tags page, click Create Tag (if no tags are set) or Settings.
-
Click Tag. Add a tag with the key
bailian-datahub-accessand the valueread, and then click Save.
-
-
Return to the Import Data page, reselect the target bucket, and retry the import.
Important: Model Studio does not support accessing files in the root directory of a bucket. You must select an existing subdirectory or create a new one for Model Studio to access.
Quotas and limits
For details on supported data formats and capacity, see knowledge base quotas and limits.