This tutorial provides a concrete example to demonstrate how to use the key features of Realtime Compute for Apache Flink for batch processing.
Features
Realtime Compute for Apache Flink provides the following key features to support Flink batch processing:
Job development map: On the Drafts tab of the SQL Editor page, you can create a batch draft, which you then deploy and execute as a batch deployment.
Deployment management: On the Deployments page, you can directly deploy JAR or Python batch deployments. Select BATCH from the drop-down list at the top to view the deployed batch deployments. Expand a target batch deployment to view its list of job instances. Typically, different job instances of a batch deployment share the same processing logic but use different parameters, such as the date of the data that is processed.
Data query: On the Scripts tab of the SQL Editor page, you can run DDL statements or short queries for quick data management and exploration. These short queries run in a pre-created Flink session, enabling low-latency execution of simple queries by reusing resources.
Data management: On the Catalogs page, you can create and view catalogs, including the databases and tables they contain. You can also view them on the Catalogs tab of the SQL Editor page to improve development efficiency.
Task orchestration (Public Preview): On the Workflows page, you can use a visual interface to define a workflow that orchestrates dependencies among batch deployments. You can trigger the workflow manually or schedule it to run periodically.
Manage resource queues: On the Queue Management page, you can partition resources within a workspace to prevent resource contention between stream and batch deployments, and among deployments with different priorities.
Prerequisites
You have created a Realtime Compute for Apache Flink workspace. For more information, see Activate Realtime Compute for Apache Flink.
You have activated Object Storage Service (OSS). For more information, see Console quick start. The storage class of the OSS bucket must be Standard. For more information, see Storage classes.
This tutorial uses Apache Paimon to store data and requires Ververica Runtime (VVR) 8.0.5 or later.
Example scenario
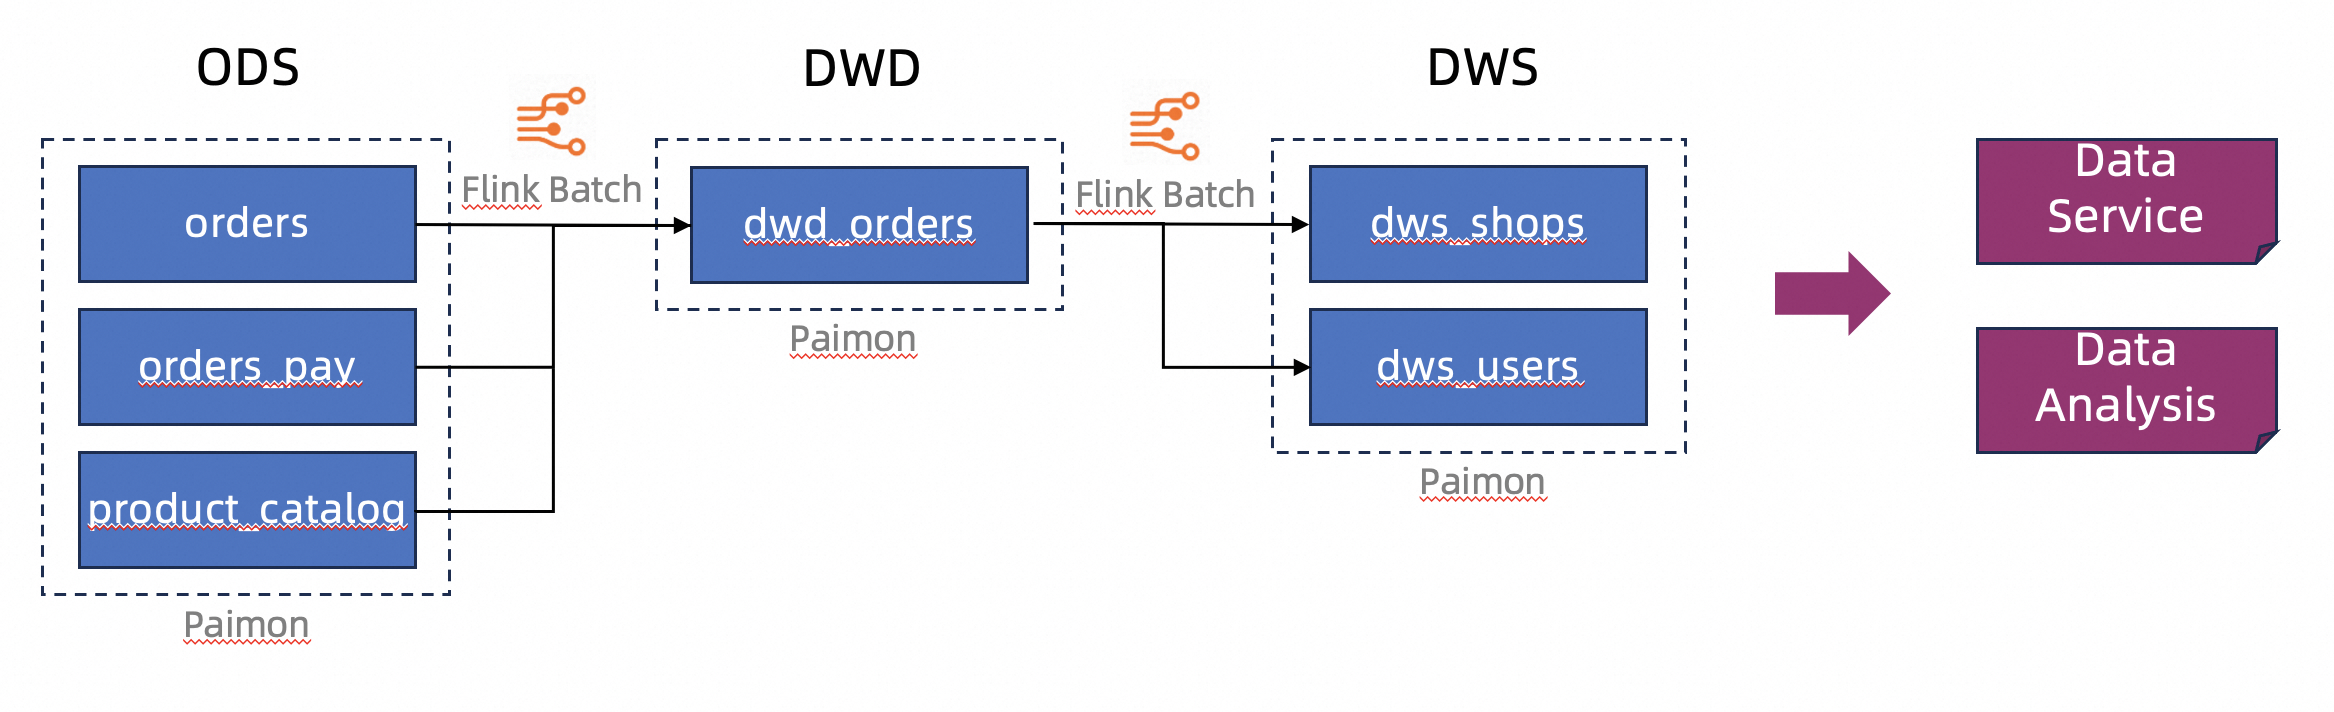
This tutorial uses an e-commerce platform as an example, where data is stored in the Apache Paimon lakehouse format. It simulates a data warehouse structure with multiple layers: Operational Data Store (ODS), Data Warehouse Detail (DWD), and Data Warehouse Service (DWS). You will use Flink's batch processing capabilities to process and clean data before writing it to Paimon tables to build a layered data structure.
Preparations
Create a script.
On the Scripts tab, you can create a catalog containing databases and tables, and insert sample data into the tables.
Create a Paimon catalog.
In the editor on the Scripts tab, enter the following SQL statement.
CREATE CATALOG `my_catalog` WITH (
  'type' = 'paimon',
  'metastore' = 'filesystem',
  'warehouse' = '<warehouse>',
  'fs.oss.endpoint' = '<fs.oss.endpoint>',
  'fs.oss.accessKeyId' = '<fs.oss.accessKeyId>',
  'fs.oss.accessKeySecret' = '<fs.oss.accessKeySecret>'
);
The following table describes the parameters.
Parameter
Description
Required
Remarks
type
The type of the catalog.
Yes
Set the value to
paimon.metastore
The type of metastore.
Yes
In this tutorial, set the value to
filesystem. For more information about other types, see Manage Paimon Catalogs.warehouse
The directory of the data warehouse in Object Storage Service (OSS).
Yes
The format is
oss://<bucket>/<object>, where:bucket: The name of your OSS bucket.object: the path where your data is stored.
You can find the bucket and object path in the OSS console.
fs.oss.endpoint
The endpoint of Object Storage Service (OSS).
No
Required if the OSS bucket specified by
warehouseis in a different region from your Flink workspace, or if it belongs to a different Alibaba Cloud account.For more information, see Regions and endpoints.
fs.oss.accessKeyId
The AccessKey ID of an Alibaba Cloud account or a RAM user that has read and write permissions on the OSS bucket.
No
Required if the OSS bucket specified by
warehouseis in a different region from your Flink workspace, or if it belongs to a different Alibaba Cloud account. For information about how to obtain an AccessKey pair, see Create an AccessKey pair.fs.oss.accessKeySecret
The AccessKey secret that corresponds to the AccessKey ID.
No
Select the code and click Run on the left.
The message
The following statement has been executed successfully!indicates that the catalog was created successfully. You can now view the catalog on the Catalogs page or on the Catalogs tab of the SQL Editor page.
Procedure
Step 1: Create ODS tables and insert test data
To simplify this tutorial, we insert test data directly into the ODS tables to populate the subsequent DWD and DWS tables. In a production environment, you typically use Flink stream processing to read data from external sources and write it to the data lake as the ODS layer. For more information, see Get started with Paimon: Basic features.
In the editor on the Scripts tab, enter the following SQL statements and click Run on the left.
CREATE DATABASE `my_catalog`.`order_dw`; USE `my_catalog`.`order_dw`; CREATE TABLE orders ( order_id BIGINT, user_id STRING, shop_id BIGINT, product_id BIGINT, buy_fee BIGINT, create_time TIMESTAMP, update_time TIMESTAMP, state INT ); CREATE TABLE orders_pay ( pay_id BIGINT, order_id BIGINT, pay_platform INT, create_time TIMESTAMP ); CREATE TABLE product_catalog ( product_id BIGINT, catalog_name STRING ); -- Insert test data INSERT INTO orders VALUES (100001, 'user_001', 12345, 1, 5000, TO_TIMESTAMP('2023-02-15 16:40:56'), TO_TIMESTAMP('2023-02-15 18:42:56'), 1), (100002, 'user_002', 12346, 2, 4000, TO_TIMESTAMP('2023-02-15 15:40:56'), TO_TIMESTAMP('2023-02-15 18:42:56'), 1), (100003, 'user_003', 12347, 3, 3000, TO_TIMESTAMP('2023-02-15 14:40:56'), TO_TIMESTAMP('2023-02-15 18:42:56'), 1), (100004, 'user_001', 12347, 4, 2000, TO_TIMESTAMP('2023-02-15 13:40:56'), TO_TIMESTAMP('2023-02-15 18:42:56'), 1), (100005, 'user_002', 12348, 5, 1000, TO_TIMESTAMP('2023-02-15 12:40:56'), TO_TIMESTAMP('2023-02-15 18:42:56'), 1), (100006, 'user_001', 12348, 1, 1000, TO_TIMESTAMP('2023-02-15 11:40:56'), TO_TIMESTAMP('2023-02-15 18:42:56'), 1), (100007, 'user_003', 12347, 4, 2000, TO_TIMESTAMP('2023-02-15 10:40:56'), TO_TIMESTAMP('2023-02-15 18:42:56'), 1); INSERT INTO orders_pay VALUES (2001, 100001, 1, TO_TIMESTAMP('2023-02-15 17:40:56')), (2002, 100002, 1, TO_TIMESTAMP('2023-02-15 17:40:56')), (2003, 100003, 0, TO_TIMESTAMP('2023-02-15 17:40:56')), (2004, 100004, 0, TO_TIMESTAMP('2023-02-15 17:40:56')), (2005, 100005, 0, TO_TIMESTAMP('2023-02-15 18:40:56')), (2006, 100006, 0, TO_TIMESTAMP('2023-02-15 18:40:56')), (2007, 100007, 0, TO_TIMESTAMP('2023-02-15 18:40:56')); INSERT INTO product_catalog VALUES (1, 'phone_aaa'), (2, 'phone_bbb'), (3, 'phone_ccc'), (4, 'phone_ddd'), (5, 'phone_eee');NoteThe tables created in this tutorial are Paimon append-only tables, which do not have primary keys. They offer better batch write performance than primary key tables but do not support key-based update operations.
The execution result will contain multiple sub-tabs, and the message
The following statement has been executed successfully!indicates that the corresponding DDL statement has been executed successfully.DML statements such as INSERT return a JobId, which indicates that a Flink job is running in the Flink session. Click Flink UI on the left of the Results tab to view the execution status of these SQL statements. Wait a few seconds for them to complete.
Explore the ODS table data.
In the editor on the Scripts tab, enter the following SQL statements and click Run on the left.
SELECT count(*) as order_count FROM `my_catalog`.`order_dw`.`orders`;
SELECT count(*) as pay_count FROM `my_catalog`.`order_dw`.`orders_pay`;
SELECT * FROM `my_catalog`.`order_dw`.`product_catalog`;
These SQL statements also run in the Flink session. You can view the results on their respective results pages.
The
order_countfor the orders table is 7. Thepay_countfor the orders_pay table is 7. The product_catalog table contains 5 records withproduct_idfrom 1 to 5 andcatalog_namevalues of phone_aaa, phone_bbb, phone_ccc, phone_ddd, and phone_eee, respectively.
Step 2: Create DWD and DWS tables
In the editor on the Scripts tab, enter the following SQL statements and click Run on the left.
USE `my_catalog`.`order_dw`;

CREATE TABLE dwd_orders (
    order_id BIGINT,
    order_user_id STRING,
    order_shop_id BIGINT,
    order_product_id BIGINT,
    order_product_catalog_name STRING,
    order_fee BIGINT,
    order_create_time TIMESTAMP,
    order_update_time TIMESTAMP,
    order_state INT,
    pay_id BIGINT,
    pay_platform INT COMMENT 'platform 0: phone, 1: pc',
    pay_create_time TIMESTAMP
) WITH (
    'sink.parallelism' = '2'
);

CREATE TABLE dws_users (
    user_id STRING,
    ds STRING,
    total_fee BIGINT COMMENT 'Total amount paid on the current day'
) WITH (
    'sink.parallelism' = '2'
);

CREATE TABLE dws_shops (
    shop_id BIGINT,
    ds STRING,
    total_fee BIGINT COMMENT 'Total amount paid on the current day'
) WITH (
    'sink.parallelism' = '2'
);The tables created here are also Paimon append-only tables. When a Paimon table is used as a Flink sink, Flink does not automatically infer parallelism. You must explicitly set the parallelism to avoid potential errors.
Step 3: Create and deploy DWD and DWS deployments
Create and deploy the DWD deployment.
Create the DWD table update deployment.
On the page, create a blank batch draft named
dwd_orders. We recommend selecting an engine version with the recommended tag. Use the default Flink SQL dialect. Copy the following SQL statement into the editor. Because the DWD table is a Paimon append-only table, use anINSERT OVERWRITEstatement to overwrite the entire table.INSERT OVERWRITE my_catalog.order_dw.dwd_orders SELECT o.order_id, o.user_id, o.shop_id, o.product_id, c.catalog_name, o.buy_fee, o.create_time, o.update_time, o.state, p.pay_id, p.pay_platform, p.create_time FROM my_catalog.order_dw.orders as o, my_catalog.order_dw.product_catalog as c, my_catalog.order_dw.orders_pay as p WHERE o.product_id = c.product_id AND o.order_id = p.order_idIn the upper-right corner of the page, click Deploy, and then click OK to deploy the
dwd_ordersdeployment.
Create and deploy the DWS deployments.
Create the DWS table update deployments.
Following the same steps as for creating the DWD table update deployment, create two batch drafts named
dws_shopsanddws_users. Copy the following SQL statements into their respective editors.INSERT OVERWRITE my_catalog.order_dw.dws_shops SELECT order_shop_id, DATE_FORMAT(pay_create_time, 'yyyyMMdd') as ds, SUM(order_fee) as total_fee FROM my_catalog.order_dw.dwd_orders WHERE pay_id IS NOT NULL AND order_fee IS NOT NULL GROUP BY order_shop_id, DATE_FORMAT(pay_create_time, 'yyyyMMdd');INSERT OVERWRITE my_catalog.order_dw.dws_users SELECT order_user_id, DATE_FORMAT(pay_create_time, 'yyyyMMdd') as ds, SUM(order_fee) as total_fee FROM my_catalog.order_dw.dwd_orders WHERE pay_id IS NOT NULL AND order_fee IS NOT NULL GROUP BY order_user_id, DATE_FORMAT(pay_create_time, 'yyyyMMdd');In the upper-right corner of the page, click Deploy, and then click OK to deploy the
dws_shopsanddws_usersdeployments.
Step 4: Start and view DWD and DWS deployments
Start the DWD deployment and view its data.
Go to the page. Select BATCH from the drop-down list. Find the
dwd_ordersdeployment and click Start in the Actions column.A job instance with the STARTING state appears in the list of batch job instances.
When the status of the job instance changes to FINISHED, the data processing is complete.
Explore the data results.
In the editor on the Scripts tab, enter the following SQL statement and click Run on the left to query the data in the DWD table.
SELECT * FROM `my_catalog`.`order_dw`.`dwd_orders`;The result is shown in the following figure.

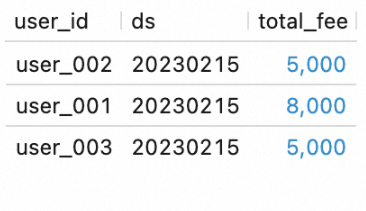
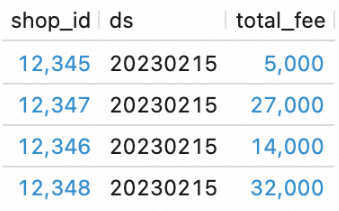
Start the DWS deployments and view their data.
On the page, select BATCH from the drop-down list. Find the
dws_shopsanddws_usersdeployments and click Start in the Actions column for each.In the editor on the Scripts tab, enter the following SQL statements and click Run on the left to query the data in the DWS tables.
SELECT * FROM `my_catalog`.`order_dw`.`dws_shops`;
SELECT * FROM `my_catalog`.`order_dw`.`dws_users`;
The results are shown in the following figures.

Step 5: Build a batch pipeline with task orchestration
In this step, you will orchestrate the deployments into a workflow, which allows them to be triggered together and run in sequence.
Create a workflow.
In the left-side navigation pane, choose , and then click Create Workflow.
In the panel that appears, enter
wf_ordersfor the name. Keep the scheduling type as the default (Manual Scheduling), selectdefault-queuefor the Resource Queue, and then click Create to open the workflow editor.Edit the workflow.
Click the initial node, name it
v_dwd_orders, and select thedwd_ordersdeployment for it.Click Add Task to create a node named
v_dws_shops. Select thedws_shopsdeployment for it and setv_dwd_ordersas the upstream node.Click Add Task again to create a node named
v_dws_users. Select thedws_usersdeployment for it and setv_dwd_ordersas the upstream node.In the upper-right corner, click Save and then OK.
Manually trigger the workflow.
NoteYou can also change the workflow to run on a periodic schedule. On the Workflows page, click Edit Workflow to the right of the workflow and change the scheduling mode to Periodic Scheduling. For more information, see Task orchestration (Public Preview).
Before triggering the workflow, insert new data into the ODS tables to verify the workflow's execution results.
In the editor on the Scripts tab, enter the following SQL statements and click Run on the left.
USE `my_catalog`.`order_dw`;

INSERT INTO orders VALUES
(100008, 'user_001', 12346, 1, 10000, TO_TIMESTAMP('2023-02-15 17:40:56'), TO_TIMESTAMP('2023-02-15 18:42:56'), 1),
(100009, 'user_002', 12347, 2, 20000, TO_TIMESTAMP('2023-02-15 18:40:56'), TO_TIMESTAMP('2023-02-15 18:42:56'), 1),
(100010, 'user_003', 12348, 3, 30000, TO_TIMESTAMP('2023-02-15 19:40:56'), TO_TIMESTAMP('2023-02-15 18:42:56'), 1);

INSERT INTO orders_pay VALUES
(2008, 100008, 1, TO_TIMESTAMP('2023-02-15 20:40:56')),
(2009, 100009, 1, TO_TIMESTAMP('2023-02-15 20:40:56')),
(2010, 100010, 1, TO_TIMESTAMP('2023-02-15 20:40:56'));
Click Flink UI on the left of the Results tab to monitor the job status.
On the page, find the workflow created in the previous step, click Execute in the Actions column, and then click OK to trigger the workflow.
Click the workflow name to go to the Workflow Instance List and Details page, where you can view the workflow instance list.
Click the ID of the running workflow instance to go to its execution details page and observe the status of each node. Wait for the entire workflow to complete.
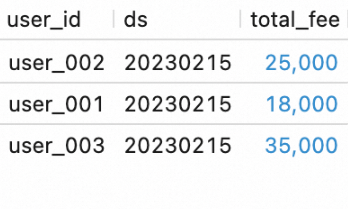
View the workflow execution results.
In the editor on the Scripts tab, enter the following SQL statements and click Run on the left.
SELECT * FROM `my_catalog`.`order_dw`.`dws_shops`;
SELECT * FROM `my_catalog`.`order_dw`.`dws_users`;
View the execution results of the workflow.
You can see that the workflow has processed the new data from the ODS layer and written it into the DWS tables.
Related documents
To learn more about the principles and configuration tuning of Flink batch processing, see Flink batch processing tuning guide.
To build a streaming data lakehouse by using Flink and Paimon, see Build a streaming data lakehouse with Paimon and StarRocks.
In addition to developing Flink jobs in the Realtime Compute for Apache Flink console, you can also develop these jobs locally. For more information, see Develop with the VS Code extension.