After you create a data catalog in DLF, you need to register it in Flink so Flink can access its metadata. This topic describes how to link your Paimon catalog to your Flink environment and manage it.
Before you begin
Version requirements
VVR 8.0.5 or later: Required to create Paimon catalogs and tables.
VVR 11.1 or later: Required to use DLF as metastore.
Storage requirements
Paimon stores data and metadata in OSS. Configure your OSS bucket as follows:
Storage class: Use the Standard storage class. For more information, see Storage class.
Bucket setup: Create a dedicated bucket in the same region as your Flink workspace. Do not reuse the default system bucket to avoid data conflicts.
Access permissions
Ensure the AccessKey pair has read and write permissions on your OSS bucket or DLF directory.Format compatibility
Paimon catalogs support only Paimon format data. Other data lake formats such as Lance or Iceberg are not supported.
Console refresh
After you create or delete a catalog, database, or table, click the refresh button to update the console view.
Paimon version mapping
Apache Paimon version
VVR version
1.3
11.4
1.2
11.2、11.3
1.1
11
1.0
8.0.11
0.9
8.0.7, 8.0.8, 8.0.9, and 8.0.10
0.8
8.0.6
0.7
8.0.5
0.6
8.0.4
0.6
8.0.3
Create a catalog
Paimon catalogs manage metadata using different metastore types. Choose the type that best fits your scenario:
Filesystem catalog: Stores metadata in OSS. Best for simple deployments.
DLF catalog: Stores metadata in Data Lake Formation (DLF). Best for enterprise scenarios with unified metadata management.
Create a Filesystem catalog
Option 1: Use the console (Recommended)
Go to the Catalogs page.
Log on to the Management Portal. Find the target workspace and click Console in the Actions column.
In the left navigation pane, click Catalogs.
Click Create Catalog, select Apache Paimon, and then click Next.
Set
metastoretofilesystemand configure other catalog settings.
Option 2: Use SQL
Run the following command in the SQL editor from Development > Scripts:
CREATE CATALOG `my-catalog` WITH (
  'type' = 'paimon',
  'metastore' = 'filesystem',
  'warehouse' = '<warehouse>',
  'fs.oss.endpoint' = '<fs.oss.endpoint>',
  'fs.oss.accessKeyId' = '<fs.oss.accessKeyId>',
  'fs.oss.accessKeySecret' = '<fs.oss.accessKeySecret>'
);
General parameters
Configuration item
Description
Required
Remarks
my-catalogThe name of the Paimon catalog.
Yes
Enter a custom name.
typeThe type of the catalog.
Yes
Set to
paimon.metastoreThe type of the metastore.
Yes
Valid values:
filesystem: Stores metadata in OSS.dlf: Stores metadata in DLF.
OSS parameters
Configuration item
Description
Required
Remarks
warehouse
The data warehouse directory in OSS.
Yes
The format is
oss://<bucket>/<object>, where:bucket: the name of your OSS bucket.object: the path where your data is stored.
View your bucket and object names in the OSS console.
fs.oss.endpoint
The endpoint of the OSS service.
Yes
If Flink and DLF are in the same region, use the VPC endpoint. Otherwise, use the public network endpoint.
This parameter is required if the OSS bucket specified for warehouse is not in the same region as the Flink workspace, or if you use an OSS bucket that belongs to another Alibaba Cloud account.
For more information, see Regions and Endpoints and Create an AccessKey.
fs.oss.accessKeyId
The AccessKey ID of the Alibaba Cloud account or RAM user that has read and write permissions on OSS.
Yes
fs.oss.accessKeySecret
The AccessKey secret of the Alibaba Cloud account or RAM user that has read and write permissions on OSS.
Yes
Create a DLF catalog
DLF
Go to the DLF console and create a catalog in the same region as your Flink workspace. For more information, see Quickly use DLF.
Register the Paimon catalog in the Development Console.
NoteThis operation only establishes a mapping to the DLF catalog. Creating or deleting this catalog mapping in Flink does not affect the actual data in DLF.
Log on to Realtime Compute for Apache Flink's Management Portal.
Click the name of the target workspace.
Register the catalog using the UI or SQL commands.
UI
In the left navigation pane, click Catalogs.
On the Catalogs page, click Create Catalog.
Select Apache Paimon and click Next.
Set metastore to DLF, select the DLF catalog to associate in the catalog name field, and then click OK. The catalog is registered in Flink.
SQL
In the SQL editor from , run the following SQL statement to register the catalog.
CREATE CATALOG `flink_catalog_name`
WITH (
  'type' = 'paimon',
  'metastore' = 'rest',
  'token.provider' = 'dlf',
  'uri' = 'http://cn-hangzhou-vpc.dlf.aliyuncs.com',
  'warehouse' = 'dlf_test'
);
Parameters:
Parameter
Description
Required
Example
typeThe type of the catalog. Set it to
paimon.Yes
paimon
metastoreThe type of the metastore. Set the value to
rest.Yes
rest
token.providerThe token provider. Set the value to
dlf.Yes
dlf
uriThe URI used to access the DLF REST Catalog Server. The format is
http://[region-id]-vpc.dlf.aliyuncs.com. For more information about region IDs, see Endpoints.Yes
http://cn-hangzhou-vpc.dlf.aliyuncs.com
warehouseThe name of the DLF catalog.
Yes
dlf_test
DLF-Legacy
Go to the DLF console and create a catalog in the same region as your Flink workspace. For more information, see Getting Started.
Register the Paimon catalog in the Development Console.
Option 1: Use the console (Recommended)
Go to the Catalogs page.
Log on to the Management Portal and click Console in the Actions column of the target workspace.
Click Catalogs.
Click Create Catalog. Select Apache Paimon and click Next.
Set metastore to DLF and select the V1.0 DLF catalog to associate from the catalog name drop-down list. Then, configure other catalog settings.
Option 2: Use SQL
Run the following command in the SQL editor from Development > Scripts:
CREATE CATALOG `my-catalog` WITH (
  'type' = 'paimon',
  'metastore' = 'dlf',
  'warehouse' = '<warehouse>',
  'dlf.catalog.id' = '<dlf.catalog.id>',
  'dlf.catalog.accessKeyId' = '<dlf.catalog.accessKeyId>',
  'dlf.catalog.accessKeySecret' = '<dlf.catalog.accessKeySecret>',
  'dlf.catalog.endpoint' = '<dlf.catalog.endpoint>',
  'dlf.catalog.region' = '<dlf.catalog.region>',
  'fs.oss.endpoint' = '<fs.oss.endpoint>',
  'fs.oss.accessKeyId' = '<fs.oss.accessKeyId>',
  'fs.oss.accessKeySecret' = '<fs.oss.accessKeySecret>'
);
The following tables describe the parameters.
General
Configuration item
Description
Required
Remarks
my-catalog
The name of the Paimon catalog.
Yes
Enter a custom name.
type
The type of the catalog.
Yes
The value is fixed to
paimon.metastore
The type of the metastore.
Yes
The value is fixed to
dlf.OSS
Configuration item
Description
Required
Remarks
warehouse
The data warehouse directory in OSS.
Yes
The format is
oss://<bucket>/<object>, where:bucket: the name of your OSS bucket.object: the path where your data is stored.
View your bucket and object names in the OSS console.
fs.oss.endpoint
The endpoint of the OSS service.
Yes
If Flink and DLF are in the same region, use the VPC endpoint. Otherwise, use the public network endpoint.
If you want to store Paimon tables in OSS-HDFS, set the value of the
fs.oss.endpointparameter tocn-<region>.oss-dls.aliyuncs.com, for example,cn-hangzhou.oss-dls.aliyuncs.com.
fs.oss.accessKeyId
The AccessKey ID of the Alibaba Cloud account or RAM user that has read and write permissions on OSS.
Yes
For more information, see Regions and endpoints and Create an AccessKey pair.
fs.oss.accessKeySecret
The AccessKey secret of the Alibaba Cloud account or RAM user that has read and write permissions on OSS.
Yes
DLF
Configuration item
Description
Required
Remarks
dlf.catalog.id
The ID of the DLF data catalog.
Yes
View the ID of the data catalog in the Data Lake Formation console.
dlf.catalog.accessKeyId
The AccessKey ID required to access the DLF service.
Yes
For more information, see Create an AccessKey pair.
dlf.catalog.accessKeySecret
The AccessKey secret required to access the DLF service.
Yes
For more information, see Create an AccessKey pair.
dlf.catalog.endpoint
The endpoint of the DLF service.
Yes
For more information, see Regions and endpoints.
NoteIf Flink and DLF are in the same region, use the VPC endpoint. Otherwise, use the public network endpoint.
dlf.catalog.region
The region where DLF is located.
Yes
For more information, see Regions and endpoints.
NoteMake sure that the region is the same as the one specified for dlf.catalog.endpoint.
Manage databases
Run the following commands in the SQL editor from Development > Scripts.
Create a database
After you register a Paimon catalog, a database named
defaultis automatically created in the catalog. To create additional databases, run the following SQL statements:-- Replace my-catalog with the name of your Paimon catalog. USE CATALOG `my-catalog`; -- Replace my_db with a custom database name in English. CREATE DATABASE `my_db`;Drop a database
ImportantThe
defaultdatabase cannot be deleted from a DLF catalog. However, you can delete it from a Filesystem catalog.-- Replace my-catalog with the name of your Paimon catalog. USE CATALOG `my-catalog`; -- Replace my_db with the name of the database that you want to delete. DROP DATABASE `my_db`; -- Deletes a database only if it contains no tables. DROP DATABASE `my_db` CASCADE; -- Deletes the database and all tables in it.
Manage tables
Create a table
Modify a table schema
Run the following commands in the SQL editor from Development > Scripts.
Operation | Sample code |
Add or modify table properties | |
Temporarily modify table properties | The temporarily modified table properties take effect only for the current SQL job.
|
Rename a table | Important The rename operation in OSS is not atomic. Therefore, if you use OSS to store Apache Paimon table files, exercise caution when you rename an Apache Paimon table. We recommend that you use the OSS-HDFS to ensure the atomicity of file operations. |
Add a new column |
|
Rename a column | Rename the c0 column to c1 in |
Drop a column | Drop the |
Drop a partition | Drop the |
Modify a column comment | Change the comment of the |
Modify column order |
|
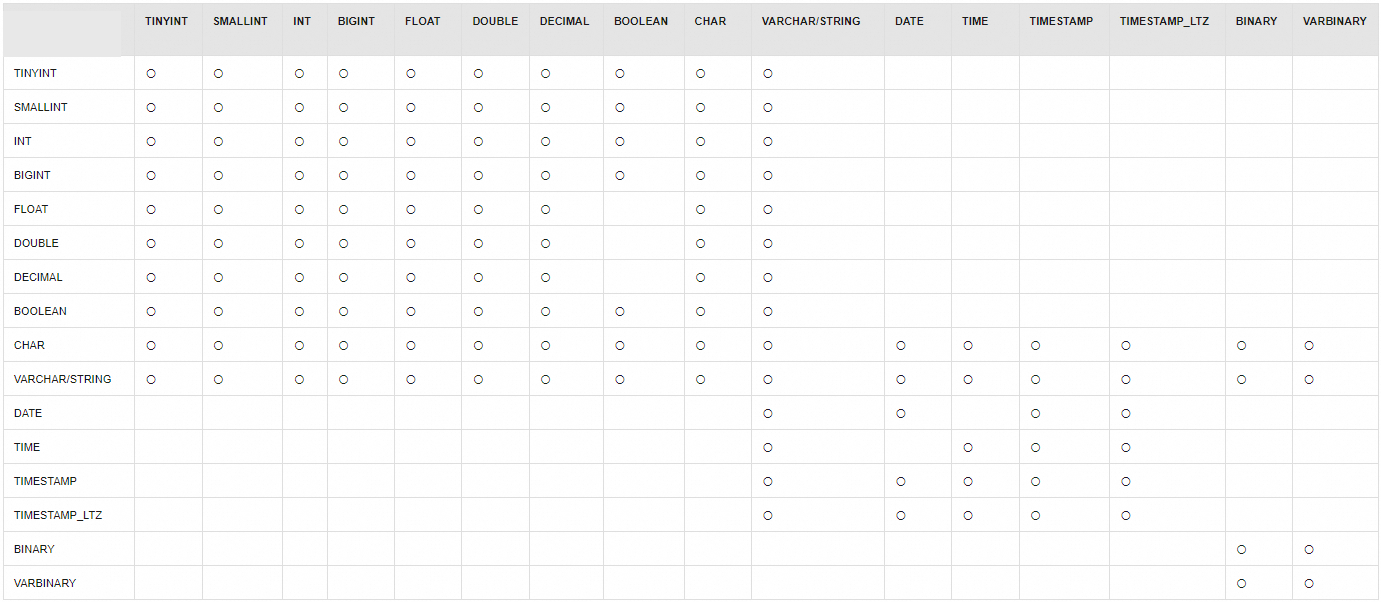
Modify a column type | Change the type of The following table describes the supported column type modifications for Paimon tables. In the figure, 〇 indicates that the type conversion is supported. An empty cell indicates that the type conversion is not supported. |
Drop a table
View or drop a catalog
In the Management Portal, click Console in the Actions column for the target workspace.
On the Catalogs page, view or delete an Apache Paimon catalog.
On the Catalogs page, view the catalog name and type. To view the databases and tables in a catalog, click View in the Actions column.
On the Catalogs page, click Delete in the Actions column for the catalog to delete.
NoteDeleting a Paimon catalog from Flink removes only its definition (metadata) from the Flink environment. The underlying Paimon table data files remain unaffected. You can then re-register the catalog in Flink to regain access to those Paimon tables.
Alternatively, in the SQL editor from Development > Scripts, you can enter
DROP CATALOG <catalog name>;, select the code, and then click Run.