This topic explains how to migrate data from a multi-type index on an Alibaba Cloud Elasticsearch V5.X cluster to a single-type index on an Alibaba Cloud Elasticsearch V6.X cluster. The migration uses the reindex API to convert types on the source cluster, then uses Alibaba Cloud Logstash to transfer the processed data to the destination cluster.
Limits
Alibaba Cloud Elasticsearch network architecture was adjusted in October 2020:
-
Clusters created before October 2020 use the original network architecture.
-
Clusters created in October 2020 or later use the new network architecture.
In the new network architecture, cross-cluster reindex requires PrivateLink to establish private connections between virtual private clouds (VPCs). The following table maps your scenario to the appropriate data migration solution.
| Scenario | Network architecture | Solution |
|---|---|---|
| Migrate between Alibaba Cloud Elasticsearch clusters | Both clusters in the original architecture | Use the reindex API to migrate data between Alibaba Cloud Elasticsearch clusters |
| Migrate between Alibaba Cloud Elasticsearch clusters | One cluster in the original architecture (the other can be in either architecture) | Use NLB and PrivateLink to establish a private connection between Alibaba Cloud Elasticsearch clusters (reindex API) or Use Alibaba Cloud Logstash to migrate data from a self-managed Elasticsearch cluster to an Alibaba Cloud Elasticsearch cluster |
| Migrate from a self-managed Elasticsearch cluster on ECS to Alibaba Cloud Elasticsearch | Alibaba Cloud Elasticsearch in the original architecture | Use the reindex API to migrate data from a self-managed Elasticsearch cluster to an Alibaba Cloud Elasticsearch cluster |
| Migrate from a self-managed Elasticsearch cluster on ECS to Alibaba Cloud Elasticsearch | Alibaba Cloud Elasticsearch in the new architecture | Migrate data from a self-managed Elasticsearch cluster to an Alibaba Cloud Elasticsearch cluster deployed in the new network architecture |
Prerequisites
Before you begin, make sure you have:
-
An Alibaba Cloud Elasticsearch V5.5.3 cluster with a multi-type index (for example, a
twitterindex withtweetandusertypes) and data inserted into the index. For more information, see Create an Alibaba Cloud Elasticsearch cluster. -
An Alibaba Cloud Elasticsearch V6.7.0 cluster in the same VPC as the V5.5.3 cluster
-
An Alibaba Cloud Logstash cluster in the same VPC as the Elasticsearch clusters. For more information, see Create a Logstash cluster.
Step 1: Convert the multi-type index into single-type indexes
Choose one of the following conversion methods based on your data model:
| Method | When to use |
|---|---|
| Combine types | Your application can distinguish document types using a custom field. All documents are merged into one index. |
| Split into separate indexes | Each type maps cleanly to an independent use case, and you want to keep the data separated. |
Method 1: Combine types
This method merges all document types into a single index. A Painless script adds a custom type field to each document to preserve the original type information, and prepends the original _type value to each document's _id to prevent ID collisions across types.
-
Enable Auto Indexing on the Elasticsearch V5.5.3 cluster.
-
Log on to the Elasticsearch console.
-
In the left-side navigation pane, click Elasticsearch Clusters.
-
In the top navigation bar, select a resource group and a region.
-
On the Elasticsearch Clusters page, find the V5.5.3 cluster and click its ID.
-
In the left-side navigation pane, click Cluster Configuration.
-
Click Modify Configuration next to YML File Configuration.
-
In the YML File Configuration panel, set Auto Indexing to Enable.
 > Warning: This operation restarts the cluster. Make sure the restart does not affect your services before proceeding.
 -
Select This operation will restart the cluster. Continue? and click OK.
-
-
Log on to the Kibana console of the V5.5.3 cluster. For more information, see Log on to the Kibana console.
-
In the left-side navigation pane, click Dev Tools.
-
On the Console tab, run the following command to combine all types into a single index:
-
Sets
ctx._idto<original_type>-<original_id>to avoid ID collisions between types. -
Adds a
typefield toctx._sourcewith the original type value, so your application can still filter by type. -
Sets
ctx._typeto"doc"— the single type required by V6.X.
POST _reindex
{
  "source": {
    "index": "twitter"
  },
  "dest": {
    "index": "new1"
  },
  "script": {
    "inline": """
    ctx._id = ctx._type + "-" + ctx._id;
    ctx._source.type = ctx._type;
    ctx._type = "doc";
    """,
    "lang": "painless"
  }
}
The script does the following for each document:
-
-
Run
GET new1/_mappingto verify the mapping of the new index. -
Run the following command to confirm the merged data looks correct:
GET new1/_search
{
  "query": {
    "match_all": {}
  }
}
Method 2: Split into separate indexes
This method creates a dedicated index for each type. Use separate POST _reindex calls — one per type — with "type" specified in source to filter documents.
-
Log on to the Kibana console of the V5.5.3 cluster and open Dev Tools.
-
On the Console tab, run the following commands to split the
twitterindex intotwitter_tweetandtwitter_user:POST _reindex { "source": { "index": "twitter", "type": "tweet", "size": 10000 }, "dest": { "index": "twitter_tweet" } } POST _reindex { "source": { "index": "twitter", "type": "user", "size": 10000 }, "dest": { "index": "twitter_user" } }"size": 10000sets the batch size for each reindex request. -
Run the following commands to verify the data in the new indexes:
GET twitter_tweet/_search
{
  "query": {
    "match_all": {}
  }
}
GET twitter_user/_search { "query": { "match_all": {} } }
Step 2: Use Logstash to migrate data
-
Go to the Logstash Clusters page of the Alibaba Cloud Elasticsearch console.
-
In the top navigation bar, select the region where the Logstash cluster resides.
-
On the Logstash Clusters page, find the cluster and click its ID.
-
In the left-side navigation pane, click Pipelines, then click Create Pipeline.
-
In the Create wizard, enter a pipeline ID and configure the pipeline. The following example reads from the V5.5.3 cluster and writes to the V6.7.0 cluster:
input {
  elasticsearch {
    hosts => ["http://es-cn-0pp1f1y5g000h****.elasticsearch.aliyuncs.com:9200"]
    user => "elastic"
    password => "your_password"
    index => "*"
    docinfo => true
  }
}
filter {
}
output {
  elasticsearch {
    hosts => ["http://es-cn-mp91cbxsm000c****.elasticsearch.aliyuncs.com:9200"]
    user => "elastic"
    password => "your_password"
    index => "test"
  }
}
For details on pipeline configuration syntax, see Logstash configuration files.
-
Click Next to configure pipeline parameters.
WarningSaving pipeline parameters triggers a restart of the Logstash cluster. Make sure the restart does not affect your business before proceeding.
Parameter Description Default Pipeline Workers Number of worker threads that run filter and output plugins in parallel. Increase this value if CPU resources are underutilized or events are backing up. Number of vCPUs Pipeline Batch Size Maximum number of events a single worker thread collects from input plugins before running filter and output plugins. Higher values increase throughput but require more memory. To support a larger batch size, increase the JVM heap size using the LS_HEAP_SIZEvariable.125 Pipeline Batch Delay Wait time (in milliseconds) before assigning a small batch to a pipeline worker. 50 ms Queue Type Internal queue model for buffering events. MEMORY: traditional memory-based queue. PERSISTED: disk-based ACKed queue (persistent). MEMORY Queue Max Bytes Maximum size of the queue. Must be less than your total disk capacity. 1024 MB Queue Checkpoint Writes Maximum number of events written before a checkpoint is enforced when using persistent queues. Set to 0for no limit.1024 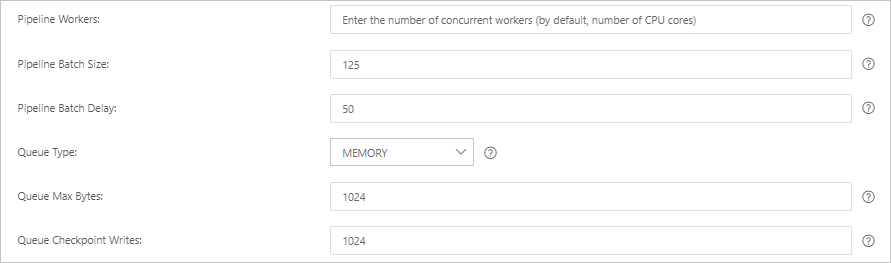
-
Click Save and Deploy to save the configuration and restart the Logstash cluster immediately, or click Save to store the settings without deploying.
-
Save: The settings are stored but do not take effect. To apply them, go to the Pipelines page, find the pipeline, and click Deploy Now in the Actions column.
-
Save and Deploy: The Logstash cluster restarts immediately and the settings take effect.
-
Step 3: Verify the migration results
-
Log on to the Kibana console of the Elasticsearch V6.7.0 cluster. For more information, see Log on to the Kibana console.
-
In the left-side navigation pane, click Dev Tools.
-
On the Console tab, run the following command to list all indexes and confirm the migrated data is present:
GET _cat/indices?v