Use a MaxCompute node in DataWorks to process the ods_user_info_d_odps user information table and ods_raw_log_d_odps access log data to generate user profile data.
Prerequisites
Before you begin, complete the steps in Synchronize data.
-
Basic user information from the MySQL table
ods_user_info_dhas been synchronized to the MaxCompute tableods_user_info_d_odpsusing Data Integration. -
Website access logs from the Object Storage Service (OSS) object
user_log.txthave been synchronized to the MaxCompute tableods_raw_log_d_odpsusing Data Integration.
Objective
You will process the ods_user_info_d_odps and ods_raw_log_d_odps tables in MaxCompute to generate a basic user profile table.
-
Split the log information field in the
ods_raw_log_d_odpstable into multiple fields to generate thedwd_log_info_di_odpsfact table. -
Join the
dwd_log_info_di_odpsfact table with theods_user_info_d_odpstable on the uid field to generate thedws_user_info_all_di_odpsaggregate table. -
The
dws_user_info_all_di_odpstable has many columns and is too large for direct data consumption, so you will refine it into theads_user_info_1d_odpstable.
Go to DataStudio
Log on to the DataWorks console. In the target region, click in the left-side navigation pane. Select a workspace from the drop-down list and click Go to Data Development.
1. Design the workflow
After data synchronization, the data is available in MaxCompute. You can now process it to generate basic user profiles.
-
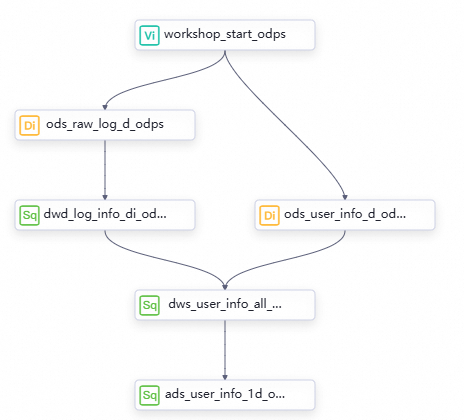
Node hierarchy and logic
On the workflow canvas, click Create Node to create the following nodes.
Node category
Node type
Parameter
(Named after the final output table)
Code logic
MaxCompute
ODPS SQL
dwd_log_info_di_odpsUse built-in functions and user-defined functions (UDFs) to split data from the raw log table
ods_raw_log_d_odpsand write the results to multiple fields in thedwd_log_info_di_odpstable.MaxCompute
ODPS SQL
dws_user_info_all_di_odpsAggregate the basic user information and the preliminarily processed log data into a single table.
MaxCompute
ODPS SQL
ads_user_info_1d_odpsFurther process the data to generate a basic user profile.
-
Workflow directed acyclic graph (DAG)
Design the data processing workflow by dragging node components to the workflow canvas and drawing lines between them to set dependencies.
Step 2: Configure the workflow
Create MaxCompute tables
Create the dwd_log_info_di_odps, dws_user_info_all_di_odps, and ads_user_info_1d_odps tables in advance to store the processed data for each layer. For more information about MaxCompute table operations, see Create and use MaxCompute tables.
-
Go to the table creation page.
On the DataStudio page, open the WorkShop workflow that you created in the data synchronization stage. Right-click MaxCompute and select Create Table.
-
Define the MaxCompute table schemas.
In the Create Table dialog box, enter a table name and click Create. Create three tables named
dwd_log_info_di_odps,dws_user_info_all_di_odps, andads_user_info_1d_odps. Select the DDL method to create the tables. The following sections provide the DDL statements for the three tables. -
Commit the tables to the compute engine.
After you define the table schema, click Commit to Development Environment and then Commit to Production Environment. The system then creates the physical tables in the compute engine projects for the development and production environments.
-
Commit a table to the DataWorks development environment. This creates the table in the MaxCompute engine of the development environment.
-
Commit a table to the DataWorks production environment. This creates the table in the MaxCompute engine of the production environment.
Note-
If you use a workspace in basic mode, you only need to commit the tables to the production environment. For more information about the differences between workspaces in basic mode and standard mode, see Differences between workspace modes.
-
For more information about the relationship between DataWorks and MaxCompute and their corresponding compute engines, see DataWorks On MaxCompute usage notes.
-
-
Dwd_log_info_di_odps table
Double-click the dwd_log_info_di_odps table. On the editing page that opens, click DDL and enter the following statement.
CREATE TABLE IF NOT EXISTS dwd_log_info_di_odps (
 ip STRING COMMENT 'IP address',
 uid STRING COMMENT 'User ID',
 time STRING COMMENT 'Time in the yyyymmddhh:mi:ss format',
 status STRING COMMENT 'Status code returned by the server',
 bytes STRING COMMENT 'Number of bytes returned to the client',
 region STRING COMMENT 'Region, obtained from the IP address',
 method STRING COMMENT 'HTTP request type',
 url STRING COMMENT 'URL',
 protocol STRING COMMENT 'HTTP protocol version',
 referer STRING COMMENT 'Source URL',
 device STRING COMMENT 'Device type',
 identity STRING COMMENT 'Access type: crawler, feed, user, or unknown'
)
PARTITIONED BY (
 dt STRING
)
LIFECYCLE 14;
Dws_user_info_all_di_odps table
Double-click the dws_user_info_all_di_odps table. On the editing page that opens, click DDL and enter the following statement.
CREATE TABLE IF NOT EXISTS dws_user_info_all_di_odps (
 uid STRING COMMENT 'User ID',
 gender STRING COMMENT 'Gender',
 age_range STRING COMMENT 'Age range',
 zodiac STRING COMMENT 'Zodiac sign',
 region STRING COMMENT 'Region, obtained from the IP address',
 device STRING COMMENT 'Device type',
 identity STRING COMMENT 'Access type: crawler, feed, user, or unknown',
 method STRING COMMENT 'HTTP request type',
 url STRING COMMENT 'URL',
 referer STRING COMMENT 'Source URL',
 time STRING COMMENT 'Time in the yyyymmddhh:mi:ss format'
)
PARTITIONED BY (
 dt STRING
)
LIFECYCLE 14;
Ads_user_info_1d_odps table
Double-click the ads_user_info_1d_odps table. On the editing page that opens, click DDL and enter the following statement.
CREATE TABLE IF NOT EXISTS ads_user_info_1d_odps (
 uid STRING COMMENT 'User ID',
 region STRING COMMENT 'Region, obtained from the IP address',
 device STRING COMMENT 'Device type',
 pv BIGINT COMMENT 'Number of page views (PVs)',
 gender STRING COMMENT 'Gender',
 age_range STRING COMMENT 'Age range',
 zodiac STRING COMMENT 'Zodiac sign'
)
PARTITIONED BY (
 dt STRING
)
LIFECYCLE 14;
Create a function (getregion)
The synchronized experimental log data must be parsed into a table by using functions. This tutorial provides a function that resolves IP addresses to regions. Download the required resources to your local computer and upload them to your DataWorks workspace before you register the function.
This function and its sample IP resource are for tutorial purposes only. To map IP addresses to geographical locations in a production environment, you must obtain a professional IP geolocation service.
-
Upload the resource (ip2region.jar).
-
Download the ip2region.jar file.
NoteThe sample
ip2region.jarresource is for tutorial purposes only. -
On the DataStudio page, open the WorkShop workflow. Right-click MaxCompute and choose .
-
Click Upload, select the downloaded ip2region.jar file, and then click Open.
Note-
Select Upload to ODPS.
-
The resource name does not have to match the uploaded file name.
-
-
Click the
 icon in the toolbar to commit the resource to the MaxCompute project in the development environment.
-
-
Register the function (getregion).
-
Go to the function registration page.
On the DataStudio page, open the workflow, right-click MaxCompute, and select Create Function.
-
Enter the function name.
In the Create Function dialog box, enter
getregionfor Function Name and click Create. -
In the Register Function dialog box, configure the parameters.
Parameter
Description
Function Type
Select the function type.
MaxCompute Engine Instance
This parameter is read-only.
Function Name
Displays the function name that you entered.
Owner
Select an owner.
Class Name
Enter
org.alidata.odps.udf.Ip2Region.Resources
Enter
ip2region.jar.Description
Enter "Converts an IP address to a region."
Expression Syntax
Enter
getregion('ip').Parameter Description
Enter "IP address."
-
Click the
icon to commit the function to the compute engine in the development environment.
-
Configure MaxCompute data processing nodes
Each layer's processing logic is implemented by scheduled ODPS SQL. Because the synchronization tasks' output tables were manually added as node outputs, the DataWorks automatic parsing mechanism automatically configures node dependencies based on data lineage.
Dwd_log_info_di_odps node
On the workflow canvas, double-click the dwd_log_info_di_odps node. Use the function you created to write SQL code that processes fields from the ancestor table ods_raw_log_d_odps and writes the output to the dwd_log_info_di_odps table. For a data processing example, see Appendix: Data processing example.
-
Edit the code.
-- Scenario: This SQL statement uses the getregion function to parse the IP addresses in the raw log data. It also uses regular expressions and other methods to split the raw data into analyzable fields and write them to the dwd_log_info_di_odps table. -- This tutorial provides the getregion function, which converts an IP address to a region. -- Notes: -- 1. Before you can use a function in a DataWorks node, you must upload the required resources to DataWorks and then register the function by using those resources in the UI. -- The resource used to register the getregion function in this tutorial is ip2region.jar. -- 2. DataWorks provides scheduling parameters that allow you to write daily incremental data to the corresponding business partition of a target table in a scheduling scenario. -- In a real-world development scenario, you can define code variables in the ${variable_name} format. On the scheduling configuration page, you can assign scheduling parameters to these variables to enable dynamic parameter passing during scheduled runs. INSERT OVERWRITE TABLE dwd_log_info_di_odps PARTITION (dt='${bizdate}') SELECT ip , uid , time , status , bytes , getregion(ip) AS region -- Use the custom UDF to get the region from the IP address. , regexp_substr(request, '(^[^ ]+ )') AS method -- Use a regular expression to split the request into three fields. , regexp_extract(request, '^[^ ]+ (.*) [^ ]+$') AS url , regexp_substr(request, '([^ ]+$)') AS protocol , regexp_extract(referer, '^[^/]+://([^/]+){1}') AS referer -- Use a regular expression to parse the referer and get a more accurate URL. , CASE WHEN TOLOWER(agent) RLIKE 'android' THEN 'android' -- Get the device information and access type from the agent. WHEN TOLOWER(agent) RLIKE 'iphone' THEN 'iphone' WHEN TOLOWER(agent) RLIKE 'ipad' THEN 'ipad' WHEN TOLOWER(agent) RLIKE 'macintosh' THEN 'macintosh' WHEN TOLOWER(agent) RLIKE 'windows phone' THEN 'windows_phone' WHEN TOLOWER(agent) RLIKE 'windows' THEN 'windows_pc' ELSE 'unknown' END AS device , CASE WHEN TOLOWER(agent) RLIKE '(bot|spider|crawler|slurp)' THEN 'crawler' WHEN TOLOWER(agent) RLIKE 'feed' OR regexp_extract(request, '^[^ ]+ (.*) [^ ]+$') RLIKE 'feed' THEN 'feed' WHEN TOLOWER(agent) NOT RLIKE '(bot|spider|crawler|feed|slurp)' AND agent RLIKE '^[Mozilla|Opera]' AND regexp_extract(request, '^[^ ]+ (.*) [^ ]+$') NOT RLIKE 'feed' THEN 'user' ELSE 'unknown' END AS identity FROM ( SELECT SPLIT(col, '##@@')[0] AS ip , SPLIT(col, '##@@')[1] AS uid , SPLIT(col, '##@@')[2] AS time , SPLIT(col, '##@@')[3] AS request , SPLIT(col, '##@@')[4] AS status , SPLIT(col, '##@@')[5] AS bytes , SPLIT(col, '##@@')[6] AS referer , SPLIT(col, '##@@')[7] AS agent FROM ods_raw_log_d_odps WHERE dt ='${bizdate}' ) a; -
Configure scheduling properties.
On the configuration page, click Scheduling Properties on the right to open the Scheduling Settings panel, where you can configure scheduling and node information. For more information, see Node Scheduling Properties. The following parameters can be configured:
Parameter
Settings
Illustration
Scheduling Parameter
In the Scheduling Parameter section, configure the following parameter:
-
Parameter name:
bizdate -
Parameter Value:
$[yyyymmdd-1]
The scheduling parameter pane shows that the bizdate parameter has a value of $[yyyymmdd-1] and its source is Parse from Code. A Preview scheduling parameter button is at the bottom.
Schedule
-
Scheduling period:
Day. -
Scheduling Time:
00:30. -
RUN Attribute: Allows the task to be rerun regardless of its previous success or failure.
Use the default values for other parameters.
NoteThe node runs only after 00:30 every day.
In the Time Properties panel, the instance generation method is T+1 (Next-day generation), the scheduling type is Normal Scheduling, the scheduling cycle is Daily, the scheduled time is set to 00:30, the rerun property is Rerunnable on success or failure, and the effective date is Permanently Effective.
Resource Group
Select the serverless resource group you created in the Prepare the environment step.
In the Resource properties pane, the scheduling resource group is set to User_portraits (use the actual name of your serverless resource group).
Dependencies
The Code Auto-parsing feature automatically sets the
ods_raw_log_d_odpsnode that generates theods_raw_log_d_odpstable as an upstream dependency of the current nodedwd_log_info_di_odps. Set thedwd_log_info_di_odpstable as the node output to allow downstream jobs that query this table to automatically depend on the current node.In the Dependencies pane, Auto-parse dependencies before commit is enabled. The ancestor node is automatically configured as ods_raw_log_d_odps by using Parse from code. The output of the current node can come from system defaults, manual additions, or code parsing.
NoteAncestor node dependency: Click Parse from code. The system parses the table names from the code and uses the output name of the corresponding ancestor node, formatted as
Production_MaxCompute_Project_Name.TableName, as the Output Name of Ancestor Node.Current node output: Click Parse from code. The system parses the table name from the code to generate an output name for the current node, formatted as
Production_MaxCompute_Project_Name.TableName. This output is then available for downstream nodes. -
-
Configure any other required settings, then click the
 Save icon in the toolbar of the node editor.
Configure the dws_user_info_all_di_odps node
On the workflow canvas, double-click the dws_user_info_all_di_odps node. Write SQL code to merge the ancestor tables dwd_log_info_di_odps and ods_user_info_d_odps and write the results to the dws_user_info_all_di_odps table.
-
Edit the code.
-- Scenario: This SQL statement aggregates the processed log data from dwd_log_info_di_odps and the basic user information from ods_user_info_d_odps, and writes the result to the dws_user_info_all_di_odps table. -- Note: DataWorks provides scheduling parameters that allow you to write daily incremental data to the corresponding business partition of a target table in a scheduling scenario. -- In a real-world development scenario, you can define code variables in the ${variable_name} format. On the scheduling configuration page, you can assign scheduling parameters to these variables to enable dynamic parameter passing during scheduled runs. INSERT OVERWRITE TABLE dws_user_info_all_di_odps PARTITION (dt='${bizdate}') SELECT COALESCE(a.uid, b.uid) AS uid , b.gender , b.age_range , b.zodiac , a.region , a.device , a.identity , a.method , a.url , a.referer , a.time FROM ( SELECT * FROM dwd_log_info_di_odps WHERE dt = '${bizdate}' ) a LEFT OUTER JOIN ( SELECT * FROM ods_user_info_d_odps WHERE dt = '${bizdate}' ) b ON a.uid = b.uid; -
Configure scheduling properties.
On the configuration page, click Scheduling Properties on the right to open the Scheduling Settings panel and configure scheduling and node information. For more information, see Node scheduling properties. The configuration items are as follows:
Parameter
Settings
Illustration
Scheduling Parameter
In the Scheduling Parameter section, configure the following parameter:
-
Parameter name:
bizdate -
Parameter Value:
$[yyyymmdd-1]
The scheduling parameter pane shows that the bizdate parameter has a value of $[yyyymmdd-1] and its source is Parse from Code. A Preview scheduling parameter button is at the bottom.
Schedule
-
Scheduling period:
Day. -
Scheduling Time:
00:30. -
RUN Attribute: Allows the task to be rerun regardless of its previous success or failure.
Use the default values for other parameters.
NoteThe node runs only after 00:30 every day.
In the Time properties pane, Instance Generation is set to Generate next day (T+1), Scheduling Type is Normal, Scheduling Cycle is Day, Scheduled Time is set to 00:30, Rerun Policy is Rerun on success or failure, and Effective Date is Permanent.
Resource Group
Select the serverless resource group you created in the Prepare the environment step.
In the Resource properties pane, the scheduling resource group is set to User_portraits (use the actual name of your serverless resource group).
Dependencies
The system automatically parses the code and sets the nodes
dwd_log_info_di_odpsandods_user_info_d_odpsthat output thedwd_log_info_di_odpsandods_user_info_d_odpstables as upstream dependencies for the current nodedws_user_info_all_di_odps. The system also registers the node's output tabledws_user_info_all_di_odpsas the node output, which allows downstream queries on this table to automatically establish a dependency on the current node.The configuration is the same as for the dwd_log_info_di_odps node. The ancestor nodes are automatically configured as ods_user_info_d_odps and dwd_log_info_di_odps by parsing the code. The output of the current node includes dws_user_info_all_di_odps.
NoteAncestor node dependency: Click Parse from code. The system parses the table names from the code and uses the output name of the corresponding ancestor node, formatted as
Production_MaxCompute_Project_Name.TableName, as the Output Name of Ancestor Node.Current node output: Click Parse from code. The system parses the table name from the code to generate an output name for the current node, formatted as
Production_MaxCompute_Project_Name.TableName. This output is then available for downstream nodes. -
-
Configure any other required settings, then click the
Save icon in the toolbar of the node editor.
Configure the ads_user_info_1d_odps node
On the workflow canvas, double-click the ads_user_info_1d_odps node. Write SQL code to process the ancestor table dws_user_info_all_di_odps and write the results to the ads_user_info_1d_odps table.
-
Edit the code.
-- Scenario: This SQL statement further processes the dws_user_info_all_di_odps wide table of user access information to generate basic user profile data and writes the result to the ads_user_info_1d_odps table. -- Note: DataWorks provides scheduling parameters that allow you to write daily incremental data to the corresponding business partition of a target table in a scheduling scenario. -- In a real-world development scenario, you can define code variables in the ${variable_name} format. On the scheduling configuration page, you can assign scheduling parameters to these variables to enable dynamic parameter passing during scheduled runs. INSERT OVERWRITE TABLE ads_user_info_1d_odps PARTITION (dt='${bizdate}') SELECT uid , MAX(region) , MAX(device) , COUNT(0) AS pv , MAX(gender) , MAX(age_range) , MAX(zodiac) FROM dws_user_info_all_di_odps WHERE dt = '${bizdate}' GROUP BY uid; -
Configure scheduling properties.
On the configuration page, click scheduling properties on the right to open the Scheduling Settings panel, where you can configure scheduling and node information. For more information, see Node scheduling properties. The configurations are as follows:
Parameter
Settings
Illustration
Scheduling Parameter
In the Scheduling Parameter section, configure the following parameter:
-
Parameter name:
bizdate -
Parameter Value:
$[yyyymmdd-1]
The scheduling parameter pane shows that the bizdate parameter has a value of $[yyyymmdd-1] and its source is Parse from Code. A Preview scheduling parameter button is at the bottom.
Schedule
-
Scheduling period:
Day. -
Scheduling Time:
00:30. -
RUN Attribute: Allows the task to be rerun regardless of its previous success or failure.
Use the default values for other parameters.
NoteThe node runs only after 00:30 every day.
In the Time properties pane, Instance Generation is set to Generate next day (T+1), Scheduling Type is Normal, Scheduling Cycle is Day, Scheduled Time is set to 00:30, Rerun Policy is Rerun on success or failure, and Effective Date is Permanent.
Resource Group
Select the serverless resource group you created in the Prepare the environment step.
In the Resource properties pane, the scheduling resource group is set to User_portraits (use the actual name of your serverless resource group).
Dependencies
The Auto-Parse Code feature automatically configures node dependencies based on data lineage. It sets the
dws_user_info_all_1d_odpsnode, which produces thedws_user_info_all_1d_odpstable, as the upstream dependency for the currentads_user_info_1d_odpsnode. The node's output is set to the ads_user_info_1d table so that downstream queries to this table automatically create a dependency on the current node.The configuration is the same as for the previous nodes. The ancestor node is automatically configured as dws_user_info_all_di_odps by parsing the code. The output of the current node includes ads_user_info_1d_odps.
NoteAncestor node dependency: Click Parse from code. The system parses the table names from the code and uses the output name of the corresponding ancestor node, formatted as
Production_MaxCompute_Project_Name.TableName, as the Output Name of Ancestor Node.Current node output: Click Parse from code. The system parses the table name from the code to generate an output name for the current node, formatted as
Production_MaxCompute_Project_Name.TableName. This output is then available for downstream nodes. -
-
Configure any other required settings, then click the
Save icon in the toolbar of the node editor.
III. Run the workflow
Run the workflow
-
On the DataStudio page, double-click the
User profile analysis_MaxComputeworkflow under Workflow. After the workflow panel opens, click the icon in the toolbar to run the workflow.
After you run the workflow, the nodes on the panel run sequentially. A green success icon appears next to each node as it completes.
-
Confirm the execution status:
-
View the task run status: A node in the
 state indicates that it ran successfully.
 -
View the task execution logs: Right-click a node and select View Logs to view its logs in the development environment.
-
Verify the result
When all tasks are in the  Succeeded state, query the final result table.
-
In the left navigation pane of the DataStudio page, click
 to open the Ad Hoc Query pane.
 -
Right-click Ad Hoc Query and select Create Node > ODPS SQL.
In the ODPS SQL node, run the following SQL statement to verify the final result table.
// You must update the partition filter to your actual data timestamp. For example, if the task runs on 20230222, the data timestamp is 20230221, which is the day before the task run date. select count(*) from ads_user_info_1d_odps where dt=''; NoteTasks in this tutorial run in DataStudio (the development environment). Therefore, output data is written by default to the specified tables in the workshop2024_01_dev MaxCompute project, which is associated with the development environment.
IV. Deploy the workflow
You must deploy tasks to the production environment so they can be scheduled to run automatically.
Commit to the development environment
On the workflow canvas toolbar, click the  Commit icon to commit all tasks in the workflow. Configure the settings as described below and click Confirm.
In the Commit dialog box, select all nodes (workshop_start_odps, ods_raw_log_d_odps, ods_user_info_d_odps, dwd_log_info_di_odps, and dws_user_info_all_di_odps), enter a Change description (for example, "User profile analysis for MaxCompute"), select the Ignore warnings for inconsistent shelved outputs checkbox, and click Confirm.
Deploy to the production environment
After you commit the workflow, the tasks are available in the development environment. Tasks in the development environment are not automatically scheduled, so you must deploy them to the production environment.
-
On the workflow canvas, click the
 Deploy icon in the toolbar, or on the DataStudio page, click the Deploy button to open the Create Deploy Task page.
 -
Deploy the tasks in a batch, along with the associated resources and functions.
On the Create Deploy Task page, select User Profile Analysis_MaxCompute for the Workflow field. The list displays all items for the deployment, including ODPS SQL nodes, offline sync nodes, the
workshop_start_odpsvirtual node, thegetregionfunction, and theip2region.jarresource. Ensure their status is Check Passed. Select all items, and then click Deploy Selected Items.
Step 5: O&M and scheduling
You can perform a data backfill to reprocess historical data. For more O&M capabilities, see Operation Center.
-
Go to Operation Center.
After the tasks are deployed, click Operation Center in the upper-right corner.
Alternatively, in the workflow editor, click Go to O&M on the toolbar to open the Operation Center page.
-
Perform data backfill for scheduled tasks.
-
In the left navigation pane, click . On the Auto Triggered Task page, click the root node
workshop_start_odps. -
Right-click the
workshop_start_odpsnode and select . -
Select all downstream nodes of the
workshop_start_odpsnode, enter the business date, and then click Determine. You are then redirected to the Backfill Data page.In the DAG view for the scheduled task in Operation Center, right-clicking the workshop_start_odps node opens a context menu with O&M options such as Expand Child Nodes (to view downstream nodes by layer), View Run Log, Rerun, and Rerun Downstream.
-
-
Click Refresh until all SQL tasks run successfully.
To avoid ongoing charges after completing this tutorial, you can either set a Validity Period for the node or Freeze the workflow root node (the virtual node workshop_start_odps).
Next steps
After deployment, you can view the data tables, consume data, and configure data quality monitoring. For more information, see Manage data, API data service, data visualization, and Monitor data quality.
Data processing example
-
Before processing
58.246.10.82##@@2d24d94f14784##@@2014-02-12 13:12:25##@@GET /wp-content/themes/inove/img/feeds.gif HTTP/1.1##@@200##@@2572##@@http://coolshell.cn/articles/10975.html##@@Mozilla/5.0 (Windows NT 6.1; WOW64) AppleWebKit/537.36 (KHTML, like Gecko) Chrome/32.0.1700.107 Safari/537.36 -
After processing
A processed entry is parsed as follows: time is 2014-02-12 13:12:25, status is 200, bytes is 2572, region is China (Shanghai) (converted from the IP address using the getregion function), method is GET, protocol is HTTP/1.1, referer is coolshell.cn, device is windows_pc, and identity is feed.