This tutorial uses a Data Integration batch synchronization task to synchronize basic user information from the MySQL table ods_user_info_d and website access logs from the Object Storage Service (OSS) file user_log.txt to the MaxCompute tables ods_user_info_d_odps and ods_raw_log_d_odps, respectively. This example demonstrates how Data Integration synchronizes data between heterogeneous data sources for data warehousing.
Prerequisites
Ensure you have read the experiment introduction.
Ensure you have prepared the required environment as described in prepare environment.
Objective
Synchronize data from the provided public data source to MaxCompute. This completes the data synchronization step of the business workflow.
Source type | Source data | Source table schema | Destination type | Destination table | Destination table schema |
MySQL | Table: ods_user_info_d Basic user information |
| MaxCompute |
|
|
HttpFile | object: user_log.txt User website access logs | Each row contains a user access record. | MaxCompute |
|
|
The platform provides the test data and data source for this tutorial. You must add the data source to your workspace to access the test data.
This tutorial provides mock data for hands-on practice in DataWorks. You can read this data only in the Data Integration module.
DataStudio
Log on to the DataWorks console. In the top navigation bar, select the desired region. In the left-side navigation pane, choose . On the page that appears, select the desired workspace from the drop-down list and click Go to Data Development.
Step 1: Design a workflow
Design a workflow
Create a workflow.
In DataWorks, you perform data development using components within a workflow. Before you create a node, you must create a workflow. For instructions, see Create a workflow.
Name the workflow
user_profile_analysis_MaxCompute.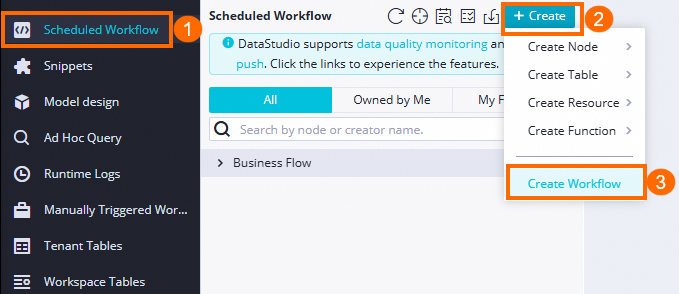
Design the workflow.
After you create the workflow, its canvas opens automatically. On the canvas, click New Node. Design the data synchronization workflow by dragging nodes to the canvas and connecting them to define dependencies. For more information, see Workflow design.
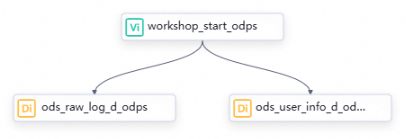
In this tutorial, no data lineage exists between the zero-load node and the batch synchronization nodes. Therefore, define their dependencies by drawing lines on the workflow canvas. For more information about how to configure dependencies, see Guide for configuring scheduling dependencies. The table below describes the type, name, and function of each node.
Category
Type
Name
(Named after the final output table)
Description
General
zero-load node
workshop_start_odpsOrchestrates the user profile analysis workflow, for example, by setting its start time. It clarifies the data flow path in complex workflows. This node is a dry-run task and requires no code editing.
Data integration
batch synchronization
ods_user_info_d_odpsSynchronizes basic user information from MySQL to the MaxCompute table
ods_user_info_d_odps.Data integration
batch synchronization
ods_raw_log_d_odpsSynchronizes user website access logs from OSS to the MaxCompute table
ods_raw_log_d_odps.
Configure scheduling logic
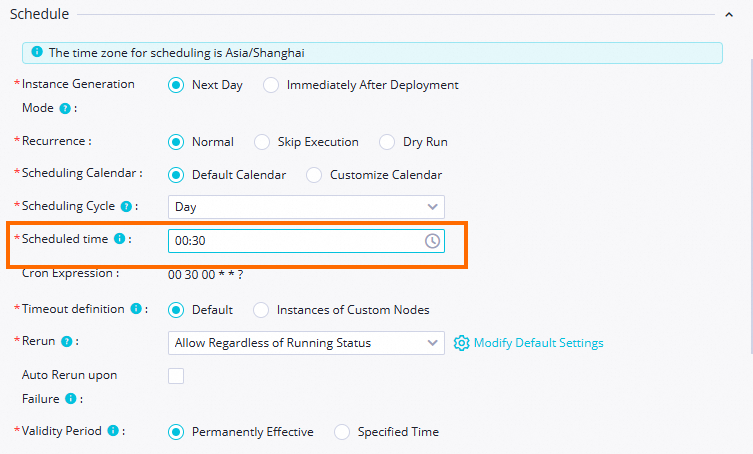
In this tutorial, the workshop_start_odps zero-load node triggers the workflow to run at 00:30 every day. The table below details the key scheduling configurations for this node. You do not need to change the scheduling settings for other nodes. For implementation details, see Advanced time property configurations. For more information about other scheduling configurations, see Overview of task scheduling property configurations.
Configuration | Screenshot | Description |
Scheduling time configuration |
| The scheduling time for the zero-load node is set to 00:30. This node triggers the workflow to run at 00:30 every day. |
Scheduling dependency configuration |
| Because the |
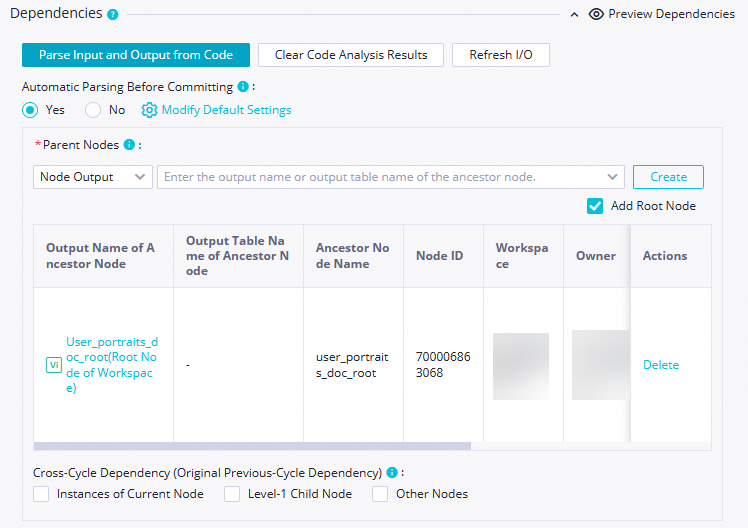
All nodes in DataWorks need to depend on upstream nodes. All tasks in the data synchronization stage depend on the zero-load node workshop_start_odps. In other words, the workshop_start_odps node triggers the data synchronization workflow.
Step 2: Create a synchronization link
Create MaxCompute tables
Before you start, create the destination MaxCompute tables that will store the raw data that Data Integration synchronizes. This tutorial explains how to quickly create them. For more detailed instructions, see Manage MaxCompute tables.
Navigate to the page for creating tables.
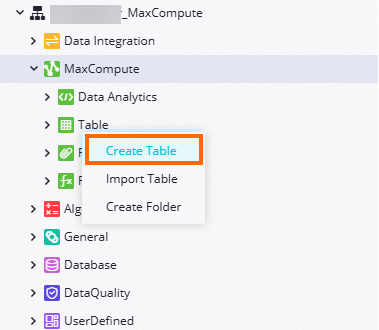
Create the ods_raw_log_d_odps table.
In the Create Table dialog box, enter
ods_raw_log_d_odpsin the Name field. On the table editor page, click DDL, enter the following statement, and then click Generate Table Schema. Click Confirm to overwrite the current schema.CREATE TABLE IF NOT EXISTS ods_raw_log_d_odps ( col STRING ) PARTITIONED BY ( dt STRING ) LIFECYCLE 7;Create the ods_user_info_d_odps table.
In the Create Table dialog box, enter
ods_user_info_d_odpsin the Name field. On the table editor page, click DDL, enter the following statement, and then click Generate Table Schema. Click Confirm to overwrite the current schema.CREATE TABLE IF NOT EXISTS ods_user_info_d_odps ( uid STRING COMMENT 'User ID', gender STRING COMMENT 'Gender', age_range STRING COMMENT 'Age range', zodiac STRING COMMENT 'Zodiac' ) PARTITIONED BY ( dt STRING ) LIFECYCLE 7;Commit and publish the tables.
After you verify that the table information is correct, for each of the
ods_user_info_d_odpsandods_raw_log_d_odpstables, click Commit to Development Environment and then Commit to Production Environment. This operation creates physical tables in the compute engine projects for the development and production environments, as defined in your node configuration.NoteAfter you define a table schema, you must commit the table to both the development and production environments. After the table is successfully committed, you can view it in the corresponding compute engine project.
Commit the table to the DataWorks development environment to create the table in the MaxCompute engine associated with the development environment.
Commit the table to the DataWorks production environment to create the table in the MaxCompute engine associated with the production environment.
Create data sources
This tutorial uses test data from an ApsaraDB for RDS (MySQL) instance and OSS. You must create a MySQL data source named user_behavior_analysis_mysql and an HttpFile data source named user_behavior_analysis_httpfile in your workspace to access the provided test data. The basic information required for the data sources is provided.
Before you configure a Data Integration synchronization task, you can configure the source and destination databases or data warehouses on the Data Source page in DataWorks. This lets you select the data sources by name during task configuration to specify where to read data from and write data to.
The data provided in this tutorial is mock data for hands-on practice in DataWorks and can only be read in the Data Integration module.
The test data for the HttpFile and MySQL data sources that you create in this step is publicly accessible. Ensure that you have configured an Internet NAT Gateway for your DataWorks resource group as described in Step 2. Otherwise, you will receive the following errors when you test network connectivity:
HttpFile:
ErrorMessage:[Connect to dataworks-workshop-2024.oss-cn-shanghai.aliyuncs.com:443 [dataworks-workshop-2024.oss-cn-shanghai.aliyuncs.com/106.14.XX.XX] failed: connect timed out].MySQL:
ErrorMessage:[Exception:Communications link failure The last packet sent successfully to the server was 0 milliseconds ago. The driver has not received any packets from the server.<br><br>ExtraInfo:Resource Group IP:****,detail version info:mysql_all],Root Cause:[connect timed out].
MySQL data source
Create a MySQL data source in your workspace to read the user information stored in the provided MySQL instance. Then, test the network connectivity between the data source and the resource group for data synchronization.
Go to the Data Sources page.
Log on to the DataWorks console. In the top navigation bar, select the desired region. In the left-side navigation pane, choose . On the page that appears, select the desired workspace from the drop-down list and click Go to Management Center.
In the left-side navigation pane of the SettingCenter page, click Data Sources.
Create a MySQL data source.
In Management Center, go to the page and click Add Connection.
In the Add Data Source dialog box, search for and select MySQL.
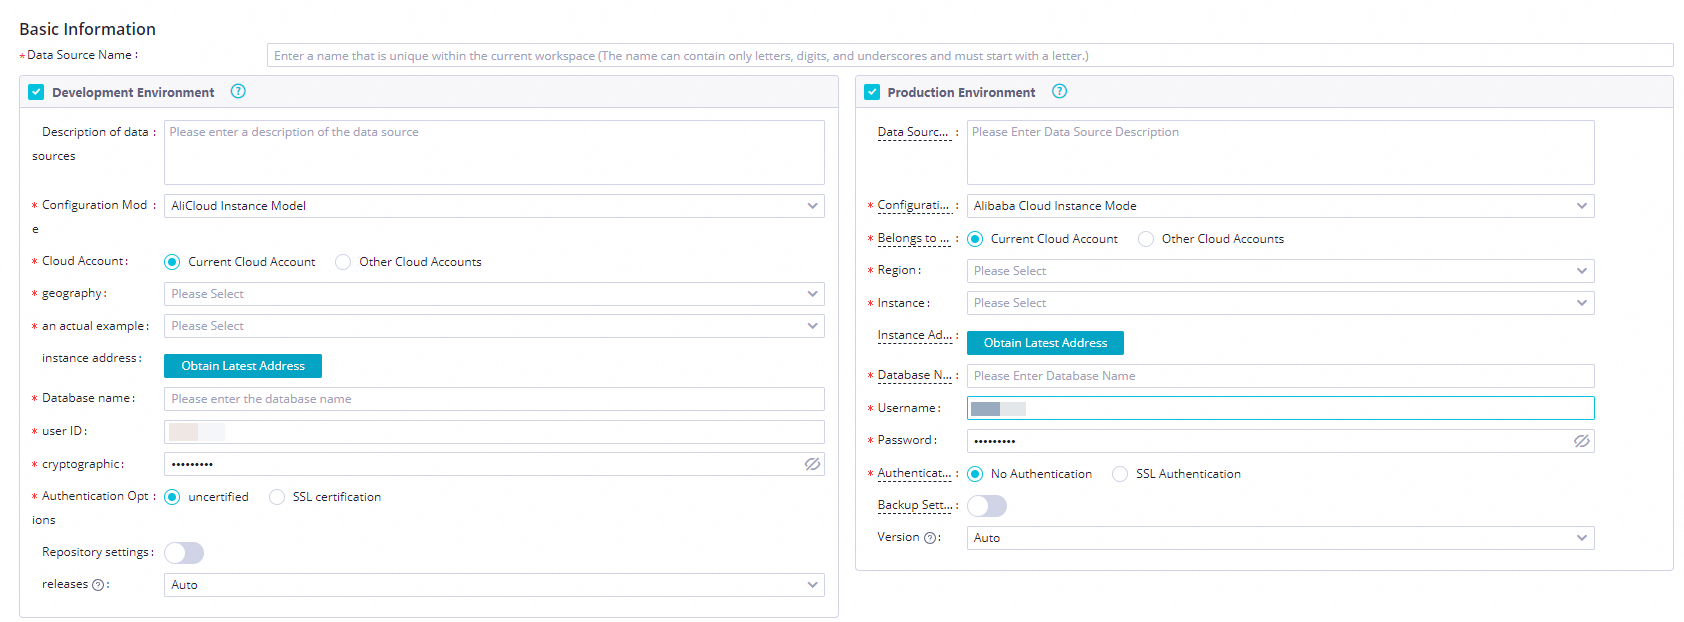
In the Create MySQL Data Source dialog box, configure the parameters.
Parameter
Description
Data source name
Enter user_behavior_analysis_mysql.
Data source description
A dedicated data source for the DataWorks tutorial. It lets you access the provided test data when you configure a batch synchronization task. This data source can only be read in Data Integration and is not supported in other modules.
Configuration mode
Select Connection String Mode.
Environment
Select Development, Production.
NoteYou must create the data source in both the development environment and the production environment. Otherwise, an error occurs when the task runs in the production environment.
Connection address
Host IP address
rm-bp1z69dodhh85z9qa.mysql.rds.aliyuncs.comPort number
3306Database name
workshopUsername
workshopPassword
workshop#2017Authentication method
No authentication.
Connection configuration
In the Connection Configuration section, find the serverless resource group. In the Connected state column, click Test Connectivity to test the network connections for both the development and production environments. Wait for the tests to complete and the status to change to Connectable.
ImportantThe test data for the MySQL data source that you create in this step is publicly accessible. Ensure that you have configured an Internet NAT Gateway for your DataWorks resource group as described in Step 2. Otherwise, you will receive the following error when you test network connectivity:
ErrorMessage:[Exception:Communications link failure The last packet sent successfully to the server was 0 milliseconds ago. The driver has not received any packets from the server.<br><br>ExtraInfo:Resource Group IP:****,detail version info:mysql_all],Root Cause:[connect timed out].
HttpFile data source
Create an HttpFile data source in your workspace to read the test data for user website access stored in OSS. Then, test the network connectivity between the data source and the resource group for data synchronization.
Go to the Data Sources page.
Log on to the DataWorks console. In the top navigation bar, select the desired region. In the left-side navigation pane, choose . On the page that appears, select the desired workspace from the drop-down list and click Go to Management Center.
In the left-side navigation pane of the SettingCenter page, click Data Sources.
Create an HttpFile data source.
In Management Center, go to the page and click Add Connection.
In the Add Connection dialog box, search for and select HttpFile.
In the Create HttpFile Data Source dialog box, configure the parameters. The following table describes the key parameters.
Parameter
Description
Data source name
The name of the data source in your workspace. For this tutorial, enter user_behavior_analysis_httpfile.
Data source description
A dedicated data source for the DataWorks tutorial. It lets you access the provided test data when you configure a batch synchronization task. This data source can only be read in Data Integration and is not supported in other modules.
Environment
Select Development, Production.
NoteYou must create the data source in both the development environment and the production environment. Otherwise, an error occurs when the task runs in the production environment.
URL domain
Enter
https://dataworks-workshop-2024.oss-cn-shanghai.aliyuncs.com.Connection configuration
In the Connection Configuration section, find the serverless resource group. In the Connected state column, click Test Connectivity to test the network connections for both the development and production environments. Wait for the tests to complete and the status to change to Connectable.
ImportantThe test data for the HttpFile data source that you create in this step is publicly accessible. Ensure that you have configured an Internet NAT Gateway for your DataWorks resource group as described in Step 2. Otherwise, you will receive the following error when you test network connectivity:
ErrorMessage:[Connect to dataworks-workshop-2024.oss-cn-shanghai.aliyuncs.com:443 [dataworks-workshop-2024.oss-cn-shanghai.aliyuncs.com/106.14.XX.XX] failed: connect timed out].
Configure user data synchronization
This batch synchronization node synchronizes basic user information data from the MySQL table ods_user_info_d provided in the use case to the MaxCompute table ods_user_info_d_odps.
Double-click the batch synchronization node
ods_user_info_d_odpsto open the node editing page.Network and resource configuration.
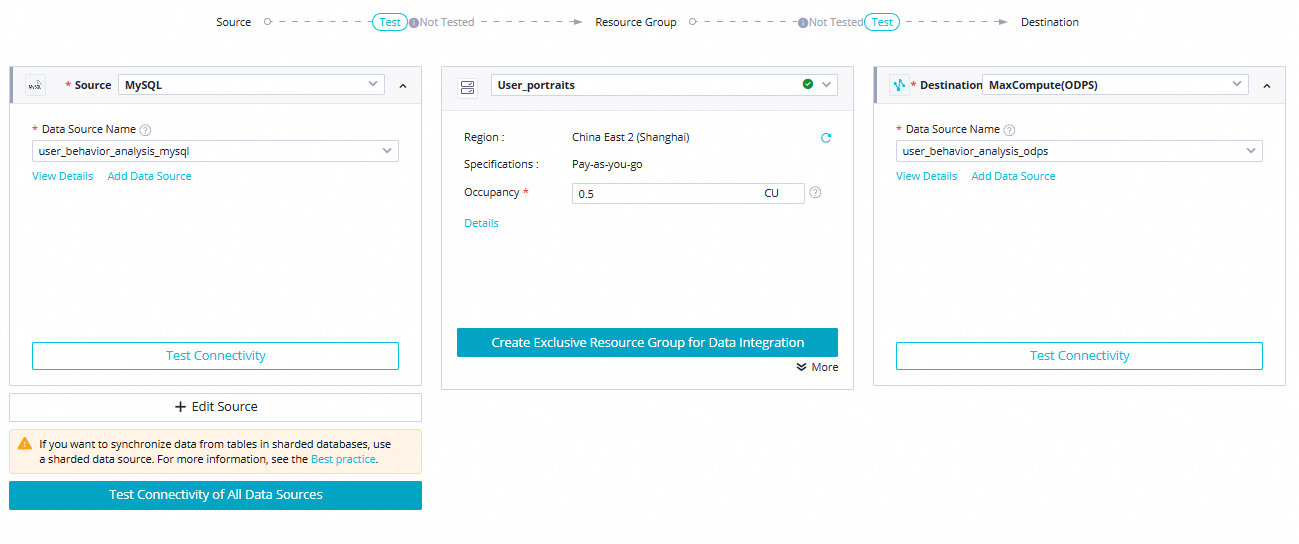
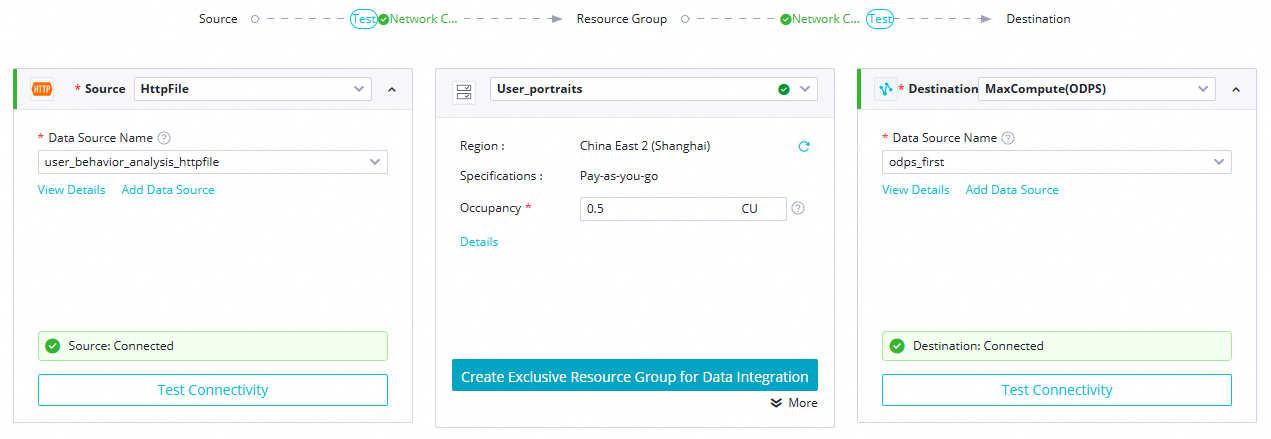
Configure the Data source, My Resource Group, and Data going, and then click The next Step. Perform the connectivity test as prompted. The following table describes these settings.
Parameter
Description
Data source
Data source:
MySQLData Source Name:
user_behavior_analysis_mysql
My Resource Group
Select the serverless resource group that you purchased in the Prepare environment step.
Data going
Data going:
MaxComputeData Source Name:
user_behavior_analysis_odps
Task configuration.
Configure the source and destination.
Module
Parameter
Description
Illustration
Data source
Table
Select the MySQL table
ods_user_info_d.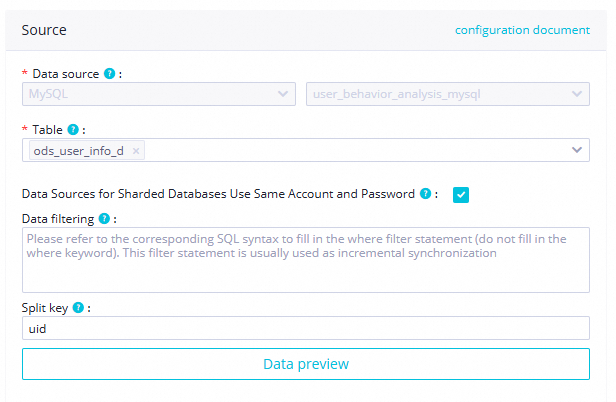
Shard Key
Use a primary key or an indexed column as the split key. The split key must be an integer field.
Here, the split key is set to the
uidfield.Data going
Tunnel Resource Group
This tutorial uses the default Common transmission resources. If you have an exclusive tunnel quota, you can select it from the drop-down list.
NoteFor more information about MaxCompute data transmission resources, see Purchase and use exclusive data transfer resource groups. If your exclusive tunnel quota is unavailable due to an overdue payment or expiration, the task automatically switches to common transmission resources during runtime.
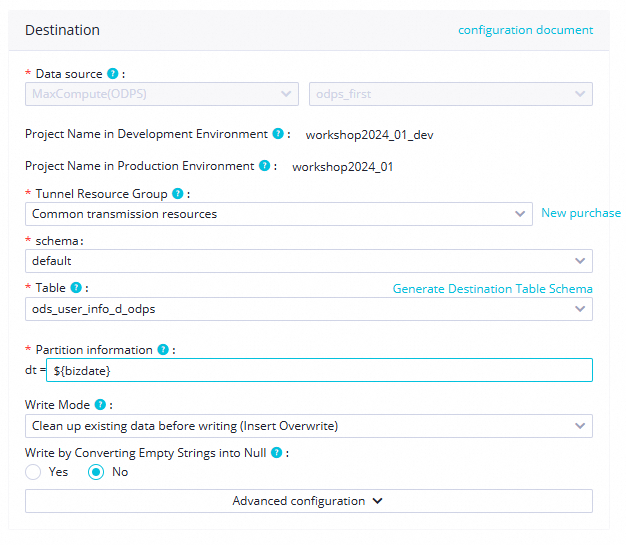
schema
In this tutorial, select
default. If your MaxCompute project has other schemas, you can select one from the drop-down list.Table
Select the
ods_user_info_d_odpstable that is created in the ad hoc query.Partition Information
This tutorial uses the
${bizdate}parameter.Write Method
For this tutorial, select "Clean up existing data before writing" from the drop-down list.
Two write modes are available:
insert into: Directly inserts data into a table or static partition.insert overwrite: Clears existing data from a table or static partition before inserting new data.
Write by Converting Empty Strings into Null
For this tutorial, select No.
Confirm field mappings and general settings.
DataWorks lets you map fields between the source and destination. You can also configure settings for read/write concurrency, rate limits to avoid impacting the database, dirty data handling, and distributed task execution. This tutorial uses the default settings. For more information about other configuration options, see Wizard Mode Configuration.
Scheduling Properties.
On the node configuration page, click Properties in the right-side navigation pane to open the Scheduling Configuration panel. On this panel, configure scheduling and node information. For more information, see Node Scheduling Configuration. The following table describes the configurations.
Parameter
Description
Illustration
Scheduling Parameters
You can leave the scheduling parameter value as the default
$bizdate.Notebizdate=$bizdate returns the previous day's date in
yyyymmddformat.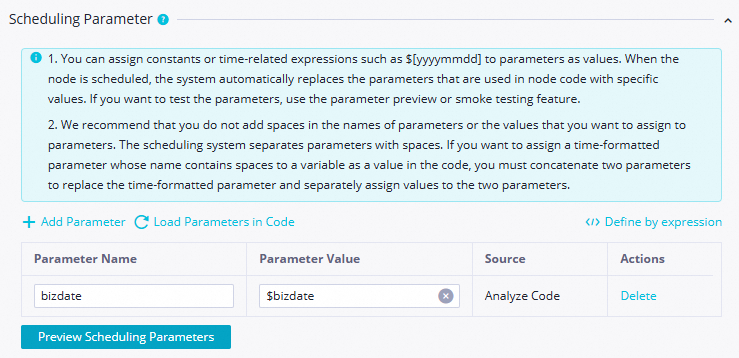
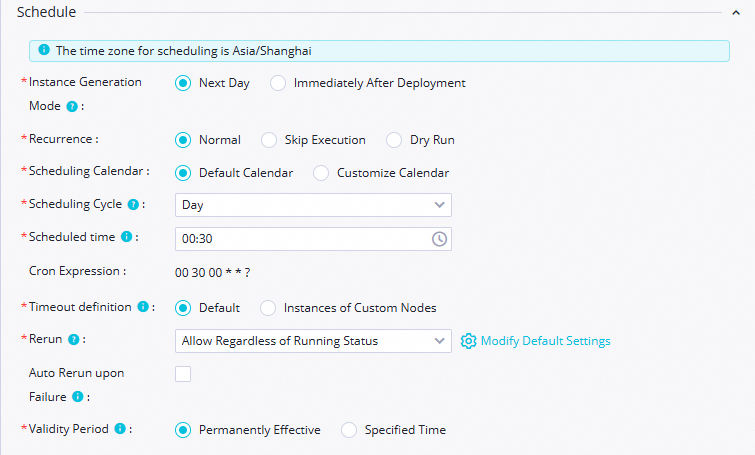
Time attribute
Scheduling period:
Day.Scheduling Time:
00:30.RUN Attribute: Allow Regardless of Running Status.
Keep the default values for other parameters.
NoteThis node's daily start time depends on the scheduled time of the workshop_start virtual node. The node runs only after 00:30 each day.
Resource Group
Select the serverless resource group that you created in the Prepare environment step.

Scheduling Dependency
Confirm the Parent Nodes: Confirm that the
workshop_startnode is displayed as the upstream node of the current node. Upstream dependencies that you configure by drawing lines are displayed here. If theworkshop_startnode is not displayed, make sure that you have completed the business flow design for the data synchronization stage as described in Design the business flow.In this example, the current node will be triggered to run after the scheduled time for the
workshop_startnode is reached and the node completes its execution.Confirm this node's output: check whether a node output named
MaxCompute_production_project_name.ods_user_info_d_odpsexists. If this node output does not exist, manually add the Node Output.
NoteDataWorks establishes node dependencies by using node outputs. To make it easier for a downstream SQL task to process the output table of a synchronization task, you can use the automatic parsing mechanism to quickly add the dependency based on table lineage. In this case, you must confirm that a node output exists with the same name as the synchronization output table, such as
MaxCompute_production_project_name.ods_user_info_d_odps.
Configure the user log pipeline
This batch synchronization node is used to configure a synchronization task to synchronize user website access information from the public HttpFile object user_log.txt to the MaxCompute table ods_raw_log_d_odps.
Double-click the batch synchronization node
ods_raw_log_d_odpsto open the node editing page.Network and resource configuration.
Configure the Data source, My Resource Group, and Data going. Then, click The next Step and run the connectivity test as prompted. The following table describes the configurations.
Parameter
Description
Data source
Data source:
HttpFileData Source Name:
user_behavior_analysis_HttpFile
My Resource Group
Select the serverless resource group that you purchased in the Prepare environment step.
Data going
Data going:
MaxComputeData Source Name:
user_behavior_analysis_odps
Task configuration.
Configure the source and destination.
Module
Parameter
Description
Illustration
Data source
File Path
In this tutorial, enter
/user_log.txt.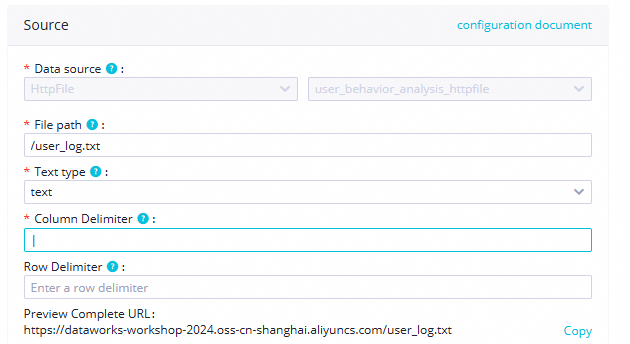
File Type
Select the
texttype.Field Delimiter
In this tutorial, enter:
|.Advanced Configuration
Encoding
Select the
UTF-8encoding format.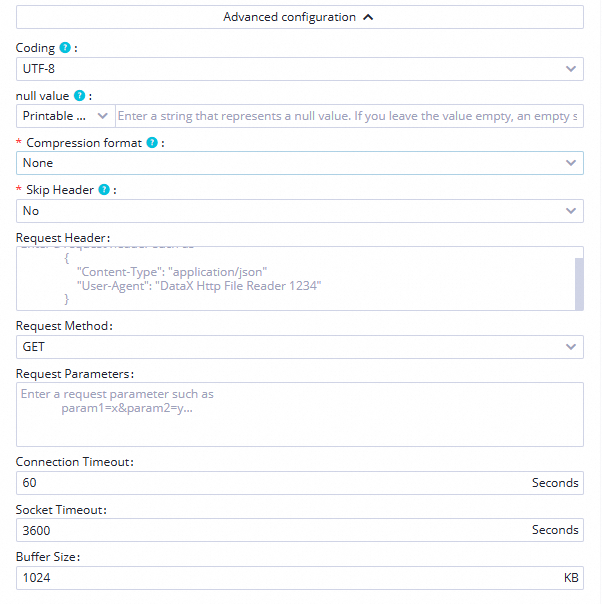
Compression Format
Select the
Noneformat.Skip Header
Select
Noto not skip the table header.Data going
Tunnel Resource Group
This tutorial uses common transmission resources by default. If you have an exclusive Tunnel quota, you can select it from the drop-down list.
NoteFor information about selecting data transmission resources for MaxCompute, see Purchase and use exclusive data transmission service resource groups. If an exclusive Tunnel quota is unavailable due to overdue payments or expiration, the task automatically switches to common transmission resources while it is running.
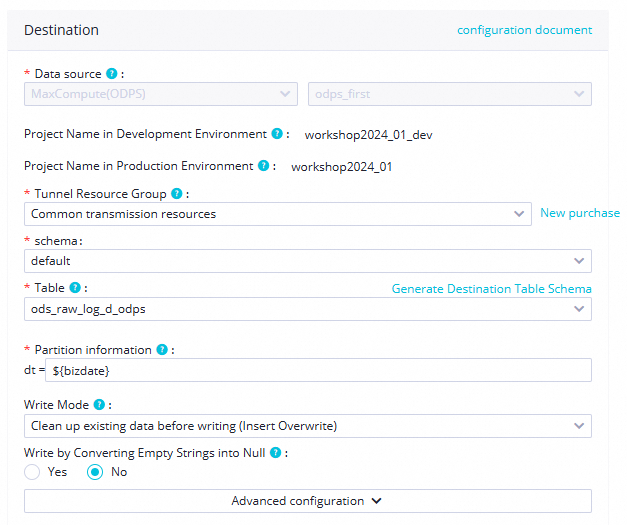
Schema
For this tutorial, select the default schema. If your DataWorks project has other schemas, you can select one from the drop-down list.
Table
From the drop-down list, select the
ods_raw_log_d_odpstable created in the ad-hoc query.Partition Information
This tutorial uses the
${bizdate}parameter.Write Method
For this tutorial, select Clean up existing data before writing.
The following write modes are supported:
insert into: Directly inserts data into a table or static partition.insert overwrite: Clears existing data from a table or static partition before inserting new data.
Write by Converting Empty Strings into Null
For this tutorial, select No.
After you configure the source, click Confirm Data Structure to verify that DataWorks can read the log file correctly.
Confirm field mapping and general settings.
DataWorks allows you to map source fields to destination fields. It also provides features such as parallelism, rate limiting (to avoid impacting your database), dirty data handling, and distributed task execution. For this tutorial, use the default settings. For more information about other configuration options, see Configure a batch synchronization task in wizard mode.
Configure scheduling properties.
On the configuration page, click Scheduling configuration in the right-side panel. Then, in the Scheduling Configuration panel, configure scheduling and node information. For more information, see Configure scheduling properties for a node. The following table describes the configurations.
Parameter
Description
Illustration
Scheduling Parameters
You can leave the scheduling parameter value as the default
$bizdate.Notebizdate=$bizdate returns the previous day's date in
yyyymmddformat.Time attribute
Scheduling period:
Day.Scheduling Time:
00:30.RUN Attribute: Allow Regardless of Running Status.
Keep the default values for other parameters.
NoteThis node's daily start time depends on the scheduled time of the workshop_start virtual node. The node runs only after 00:30 each day.
Resource Group
Select the serverless resource group you created in the Prepare environment stage.
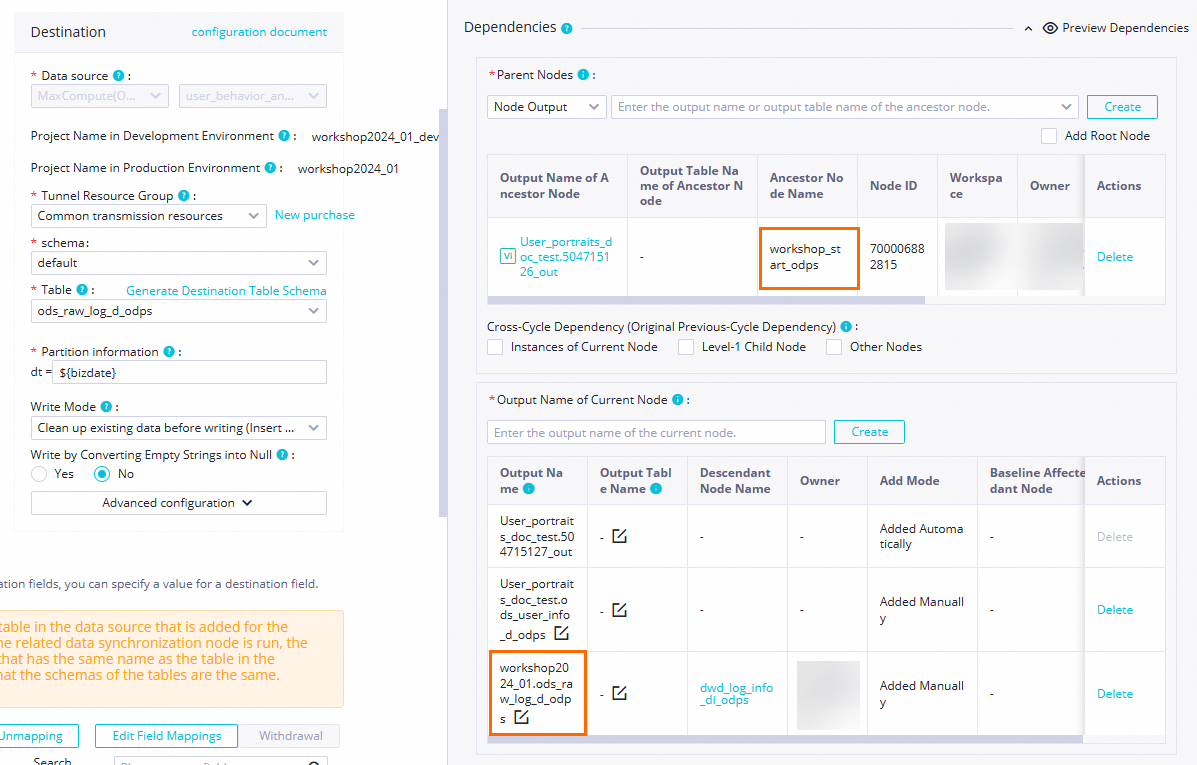
Scheduling Dependency
Confirm the Parent Nodes: Verify that the
workshop_startnode is displayed as an upstream node of the current node. Upstream dependencies that are configured by connecting nodes are displayed in this section. If theworkshop_startnode is not displayed, make sure that you have completed the business flow design for the business data synchronization stage as described in Design a business flow.In this example, when the scheduled time for the
workshop_startnode is reached and its execution is complete, the current node is triggered to run.Confirm the node output: Check whether a node output named
YourMaxComputeProjectName.ods_raw_log_d_odpsexists. If the node output does not exist, you must manually add the Node Output.
NoteDataWorks uses node outputs to establish node dependencies. When a downstream SQL task processes the output table of a synchronization task, the automatic parsing mechanism uses table lineage to quickly add the synchronization task as a dependency for the SQL node. For this mechanism to work, you must confirm that a node output exists with the same name as the synchronization output table:
MaxCompute production project name.ods_raw_log_d_odps.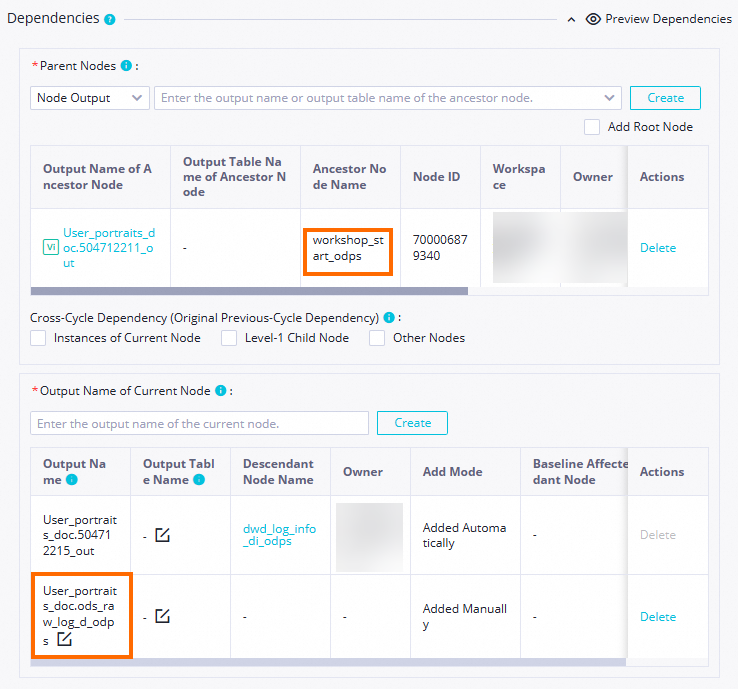
Step 3: Run and view results
Run the business flow
On the DataStudio page, double-click
user_profile_analysis_MaxComputeunder Workflow to open the Workflow panel, and then click the icon in the toolbar to run the workflow according to its upstream and downstream dependencies.
Check the execution status:
Check the node status: A
 status indicates that the synchronous execution process has no issues.
To view the task execution log, right-click the
ods_user_info_d_odpsorods_raw_log_d_odpsnode and select View Logs. When the following text appears in the log, it indicates that the synchronization node ran successfully and the data was synchronized successfully.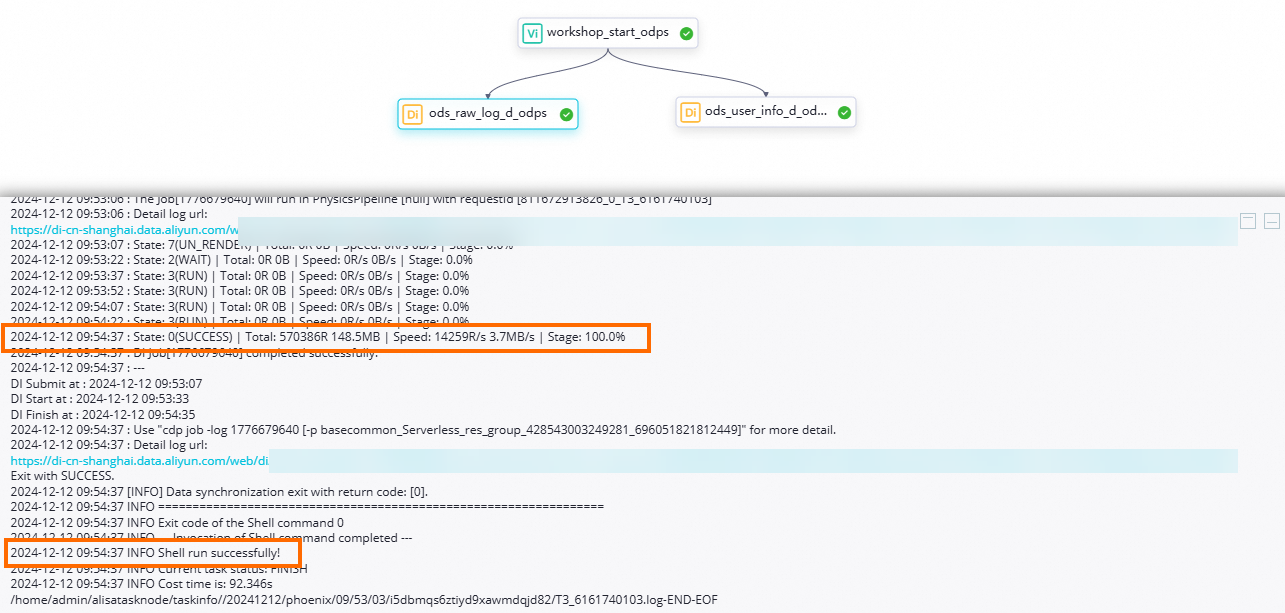
View the synchronization results
Running the business workflow is expected to fully synchronize the data from the basic user information table ods_user_info_d in MySQL to yesterday's partition of the workshop2024_01_dev.ods_user_info_d_odps table, and the user website access logs from the user_log.txt file in OSS to yesterday's partition of the workshop2024_01_dev.ods_raw_log_d_odps table. Because the query SQL does not need to be run in the production environment, you can create an ad hoc query file to verify the result.
Create an ad hoc query file.
In the left-side navigation pane of the DataStudio page, click the
 icon to open the Ad Hoc Query pane. Right-click Ad Hoc Query and select .
Query the synchronization result tables.
Execute the following SQL statement to verify the result of the data synchronization. Check the number of records imported into
ods_raw_log_d_odpsandods_user_info_d_odps.// Replace 'your_data_timestamp' with the actual data timestamp, which is the day before the task's run date (e.g., use 20230620 if the task runs on 20230621). select count(*) from ods_user_info_d_odps where dt='your_data_timestamp'; select count(*) from ods_raw_log_d_odps where dt='your_data_timestamp';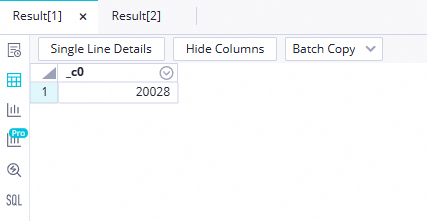 Note
NoteIn this tutorial, you run nodes in DataStudio, which is the development environment. Therefore, data is written by default to tables in the
workshop2024_01_devproject, which is the compute engine project for this environment.
Next steps
Now that you have completed data synchronization, the next tutorial shows you how to process basic user information and user website access logs in MaxCompute. For more information, see Process data.