Configure data detection rules and tasks
Data Security Guard lets you configure data detection rules based on sensitive field types to identify sensitive data within your tenant. DataWorks provides various built-in sensitive field types and detection rules. If the built-in rules do not meet your business needs, you can create custom sensitive field types and detection rules. This topic describes how to create a new sensitive field type and configure a data detection rule.
Background
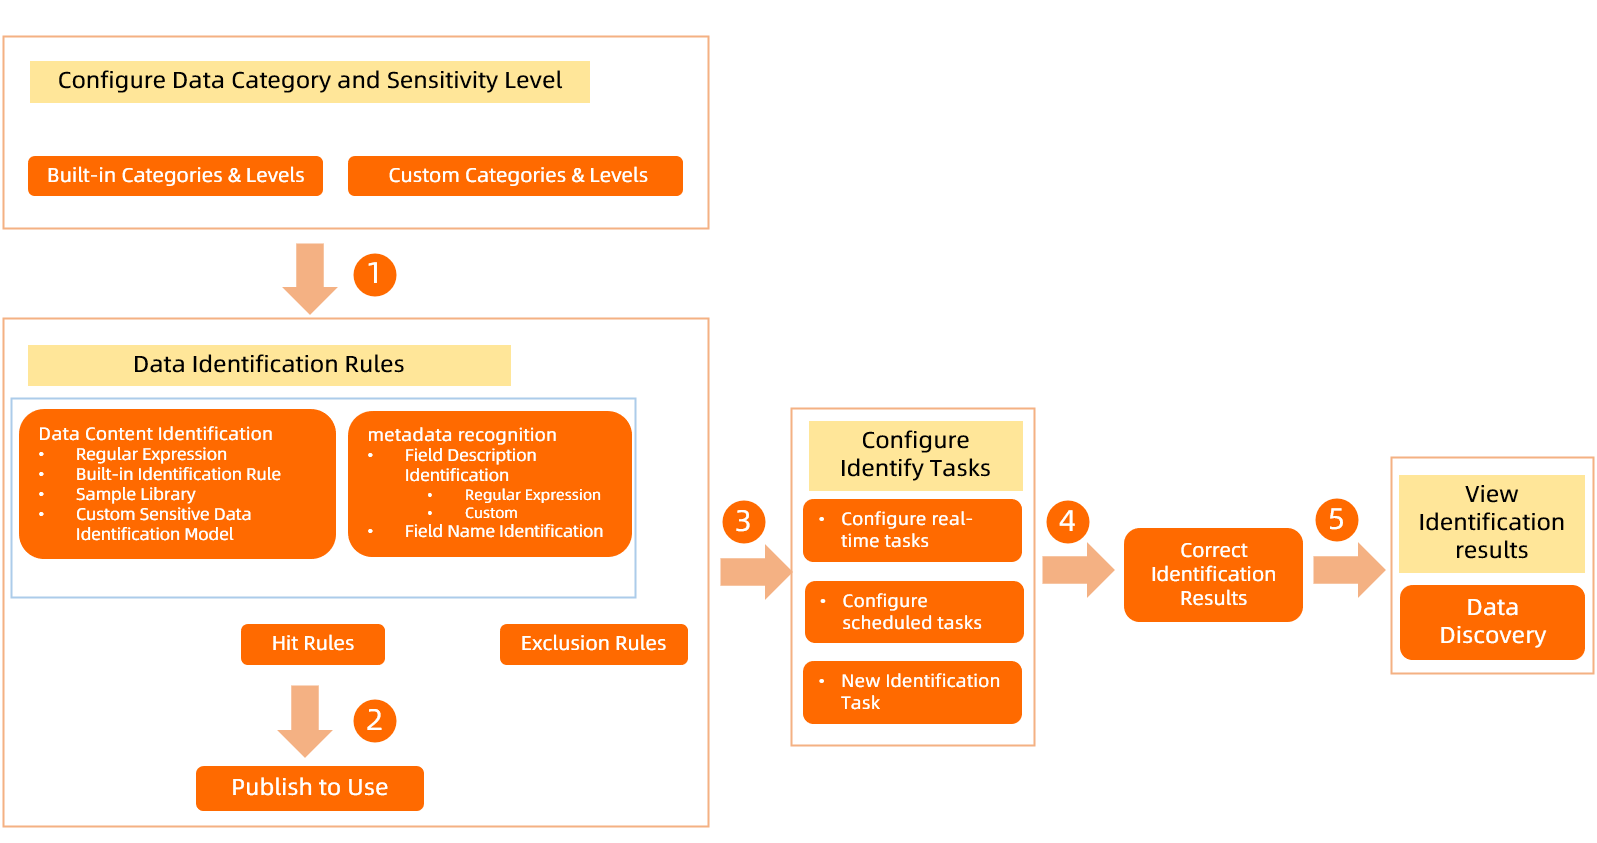
DataWorks lets you define data detection rules based on data sensitivity levels and categories to identify sensitive data in your organization. If detection results are inaccurate, you can view and manually correct them. The Sensitive Data Overview module displays the distribution of all sensitive fields recently identified by data detection rules, broken down by project. The following figure illustrates the workflow of data detection rules.
Go to data detection rules
Log on to the DataWorks console. In the target region, click in the left-side navigation pane. On the page that appears, click Go to Security Center.
In the left-side navigation pane, click and then click Try Now to access Data Security Guard.
NoteIf your Alibaba Cloud account is already authorized, you are directed to the Data Security Guard homepage.
If your Alibaba Cloud account is not authorized, you are redirected to the Data Security Guard authorization page. To use Data Security Guard features for the first time, go to , select Data Security Guard in the pop-up dialog, and then complete the authorization.
-
In the left-side navigation pane, choose to go to the data detection rules page.
Step 1: Configure data classification and grading
A sensitive field type must belong to a data category and have a defined sensitivity level. Therefore, before you create a new sensitive field type and configure its data detection rule, you must first configure data classification and grading.
-
Data Security Guard provides a built-in classification and grading template with four sensitivity levels and four major categories, which you can use directly. DataWorks allows you to edit the built-in template or create new classifications and grades. You can define up to 10 sensitivity levels. For categories, you can customize multiple layers, subcategories, and the sensitive field types they contain.
-
Configure sensitivity levels on the page.
-
The data classification and grading page displays the default built-in template. You can click the
 icon next to the template to modify its template name, description, and the number of sensitivity levels.
-
-
Configure data categories on the Rule Setting > Sensitive Data Detection page.
-
If you are using Data Security Guard for the first time, the left-side navigation pane on the data detection rules page displays the default categories from the built-in classification and grading template. You can search for a category by name or click the
 icon next to a category to perform actions such as Add Sibling Category, Add Subcategory, Rename, and Delete.
 -
If you are an existing Data Security Guard user, you can create data categories in the left-side navigation pane on the data detection rules page. You can create a maximum of four categories.
-
-
Category names must be unique. They can contain only Chinese characters, letters, and digits, and must be 1 to 30 characters in length.
-
Before you delete a category, check if it contains any published sensitive field detection rules. If it does, you must unpublish all rules in the category before you can delete it. For more information, see Manage data detection rules.
-
For more information about how to configure data sensitivity levels, see Configure data classification and grading.
Step 2: Configure a data detection rule
Data detection rules are configured based on sensitive field types. This topic uses the example of creating a new sensitive field type and configuring a data detection rule to walk you through the configuration process. You can also configure data detection rules based on built-in sensitive field types.
-
On the data detection rules page, click +Sensitive Field Type in the upper-right corner to create a sensitive field type.
-
Configure the basic information for the sensitive field type.
-
On the Basic Information tab, configure the type, category, and sensitivity level for the sensitive field.
The following table describes the parameters.
Parameter
Description
Sensitive field type
The custom name of the sensitive field type, such as Name, ID Card Number, or Phone Number. The name must be unique.
Category
Select the category to which the sensitive field type belongs. If the existing categories do not meet your requirements, go to the Data classification grading page to configure them. For more information, see Configure data classification and grading.
Sensitivity level
Select the sensitivity level for the sensitive field type. A larger number indicates a higher sensitivity level. If the existing sensitivity levels do not meet your requirements, go to the Data classification grading page to configure them. For more information, see Configure data classification and grading.
-
Click Next Step.
-
-
Configure the detection rule for the sensitive field type.
On the Rule Setting tab, configure the data detection rule, specify the match conditions, and test the accuracy of the rule.
Parameter
Description
Hit Rules
From the drop-down list on the right, select the match condition for the detection rule:
-
Satisfy any rule: This triggers the rule if any condition for
Data Content IdentificationorField Name Identificationis met. -
Satisfy all rules: This triggers the rule only if all conditions for both
Data Content IdentificationandField Name Identificationare met.
NoteThe Hit Rules setting applies only to
Data Content IdentificationandField Name Identificationrules.Data Content Identification
Identifies the data content (value) of a field. For example, if the
namefield has the value "Zhang San", the rule identifies "Zhang San".NoteThe content scanning feature is available only in DataWorks Professional Edition or higher. If you are using a lower edition, upgrade to the Professional Edition or a higher edition. For more information about upgrades, see Select and purchase a DataWorks edition.
Define the rule content using one of the following four rule types to match sensitive text:
-
Regular Expression: Enter a regular expression and provide test data to verify its accuracy.
-
Built-in Detection Rule: Select a built-in detection rule and provide test data to verify its accuracy.
NoteThe Built-in Detection Rule is available only in DataWorks Enterprise Edition.
-
Sample Library: Select a configured rule sample and provide test data to verify its accuracy. For more information about how to configure samples, see Identify data by using a sample library.
-
Self-generated Model: Select a custom rule model and provide test data to verify its accuracy. For more information about how to configure custom models, see Identify data by using a custom model.
NoteThe Self-generated Model rule type is supported only for the MaxCompute engine. The Self-generated Model feature is available only in DataWorks Enterprise Edition.
Field Name Identification
Identifies the name of a field. For example, if the
namefield has the value "Zhang San", the rule identifiesname.Enter the fields to be identified as sensitive data. Multiple fields are matched using an
ORrelationship. The input formats for different data sources are as follows:-
EMR, CDH, and MaxCompute:
project.table.column -
Hologres:
instance_id.project.table.column
You can use an asterisk (*) as a wildcard in any part of the format. Examples:
-
a.b.*: Indicates that all fields in table b of project a will be identified as sensitive data.
-
ab*.c*.salary: Indicates that all salary fields in tables that start with c within projects that start with ab are identified as sensitive data.
-
cd.ef.sa*ry : Indicates that in a project ending with
cd, all fields that start withsaand end withryin a table starting withefwill be identified as sensitive data.
Field Annotation Identification
Identifies the comment of a field. For example, you can configure "phone number" and "contact info" as comment keywords for the phone number sensitive field type. When the system detects a field whose comment contains "contact info", the service identifies the field as a phone number.
Enter field comments in the text box. The comments can be up to 100 characters in length and have no character restrictions. You can add up to 10 text boxes.
Field exclusion
Enter the fields to exclude in the input box. Fields that match the field exclusion rules will not be matched by this identification rule. You can match multiple fields, and they are evaluated based on an
ORrelationship. The input formats for different data sources are as follows:-
EMR, CDH, and MaxCompute:
project.table.column -
Hologres:
instance_id.project.table.column
You can use an asterisk (*) as a wildcard in any part of the format. Examples:
-
a.b.*: Indicates that all fields in table b of project a will be identified as sensitive data.
-
ab*.c*.salary: Indicates that all salary fields in tables that start with c within projects that start with ab are identified as sensitive data.
-
cd.ef.sa*ry : Indicates that in a project ending with
cd, all fields that start withsaand end withryin a table starting withefwill be identified as sensitive data.
Hit rate configuration
This setting lets you customize the match rate. It specifies the minimum percentage of non-empty data in a field that must match the
Data Content Identificationconditions for the rule to be triggered. For example, 50%. The default is 50%.The match rate is calculated using the following formula:
100% * (Number of matching data entries in the field) / (Total number of data entries in the field).NoteThe match rate applies only to
Data Content Identificationrules. -
-
Publish the data detection rule.
Click Publish to publish the current data detection rule. After a rule is published, you can use it in detection tasks to identify the corresponding sensitive data.
-
If you do not need to use the rule immediately, you can click Save as Draft to save it.
-
If a data column matches the detection rules of multiple sensitive field types, the rules are prioritized as follows:
-
If the sensitive field types have the same number of match conditions, the identification priority is .
-
If the sensitive field types have the same number and type of match conditions, the rule with the higher sensitivity level is prioritized.
-
Step 3: Authorize and start a detection task
After you configure data detection rules, authorize and start a sensitive data detection task, which will then identify sensitive data in your tenant based on these rules.
-
Authorize the sensitive data detection task.
The first time you start a sensitive data detection task, click Authorize Now in the upper-left corner of the Sensitive Data Detection page and follow the on-screen instructions to grant permissions.
NoteAfter the sensitive data detection task starts, you can click Authorization Records in the upper-right corner of the Sensitive Data Detection page to view the authorization details.
-
Start the sensitive data detection task.
-
Configure the sensitive data detection task.
When you configure a sensitive data detection task, you need to specify the task type, scan method, and scope. You can configure a real-time task, a scheduled task, or manually create a new detection task.
-
Configure a real-time task.
The following table describes the parameters.
Parameter
Description
Detection account
Specify whether to use an Alibaba Cloud account or a RAM user to sample and scan data. The scope of data that can be sampled varies based on the permissions of the selected account.
NoteIf you use a RAM user for detection, the RAM user must have permissions on the MaxCompute project.
Real-time detection
Only ODPS supports real-time detection. When ODPS metadata changes, such as when new tables or fields are added or fields are changed, Data Security Guard automatically starts a detection task for the modified metadata.
Data Security Guard retrieves metadata change information in real time. If the change is due to a new table or field, it may not yet contain data. In this case, the service uses only metadata for sensitive data identification.
-
Configure a scheduled task. The following table describes the parameters.
Parameter
Description
Execution
You must manually enable the task.
Scan and update policy for subsequent detection tasks
The following two options are available:
-
Rescan and update results only for changed rules, data affected by these changes, and data with no previous results.
-
Rescan all data and overwrite all existing results.
You can select the checkbox to prevent the service from overwriting manually corrected results.
Detection account
Specify whether to use an Alibaba Cloud Account or a Sub-account to sample and scan data. The scope of data that can be sampled and scanned varies based on the permissions of the selected account.
NoteIf you use a RAM user for sampling and scanning, the RAM user must have permissions on the MaxCompute project.
Content identification
Specify whether to enable Content Identification and Metadata Identification. The corresponding rules take effect only when this option is selected.
NoteIf you do not enable Content Identification, Data Security Guard does not sample or scan your data. The content identification rules will not take effect, but the field name and field comment rules remain active.
Sampling quantity
Specify the number of data entries to sample for content identification. We recommend a value greater than 100.
This parameter is required when Content Identification is enabled.
Scan frequency and Scan time
Define the scan cycle for the scheduled task.
This parameter is required only when Task type is set to Scheduled Task.
You can set the Scan Frequency to Once a week or Once a day. For weekly scans, you can select any day from Monday to Friday. The time range is from 00:00 to 23:59.
Scan scope
Configure the data scope for the sensitive data detection task.
-
Full Backup: Scans all data accessible by the authorized account within the current tenant.
-
Partial Data: Scans table data within specified projects.
Note-
By default, the scope includes all projects across all data engines.
-
You can currently scan specified tables in ODPS, EMR, and Hologres projects.
-
Table names can be up to
100characters long. All character types are supported. If you leave this field blank, all tables are scanned. -
The
.*wildcard is supported. For example,.*namematches tables ending withname, andprivate.*matches tables starting withprivate. -
Use commas (,) to separate multiple table or field names.
-
-
If you select Partial Data, you can add multiple project or database scan scopes. The final scan scope is the union of all specified scopes.
-
You must manually select projects from the left-side pane.
-
After you select a project, the tables within that scope are displayed on the right. You can manually select tables or select them all. By default, all tables in the selected scope are included.
-
Keyword search is supported for both project/database scopes and tables. To search for a table, you must first select a project and then perform the search within that project.
-
-
-
-
Configure a manual task, which creates a new detection task. The following table describes the parameters.
Parameter
Description
Scan and update policy for the detection task
The following two options are available:
-
Rescan and update results only for changed rules, data affected by these changes, and data with no previous results.
-
Rescan all data and overwrite all existing results.
You can select the checkbox to prevent the service from overwriting manually corrected results.
Detection account
Specify whether to use an Alibaba Cloud Account or a Sub-account to sample and scan data. The scope of data that can be sampled and scanned varies based on the permissions of the selected account.
NoteIf you use a RAM user for sampling and scanning, the RAM user must have permissions on the MaxCompute project.
Content identification
Specify whether to enable Content Identification and Metadata Identification. The corresponding rules take effect only when this option is selected.
NoteIf you do not enable Content Identification, Data Security Guard does not sample or scan your data. The content identification rules will not take effect, but the field name and field comment rules remain active.
Sampling quantity
Specify the number of data entries to sample for content identification. We recommend a value greater than 100.
This parameter is required when Content Identification is enabled.
Scan scope
Configure the data scope for the sensitive data detection task.
-
Full Backup: Scans all data accessible by the authorized account within the current tenant.
-
Partial Data: Scans table data within specified projects.
Note-
By default, the scope includes all projects across all data engines.
-
You can currently scan specified tables in ODPS, EMR, and Hologres projects.
-
Table names can be up to
100characters long. All character types are supported. If you leave this field blank, all tables are scanned. -
The
.*wildcard is supported. For example,.*namematches tables ending withname, andprivate.*matches tables starting withprivate. -
Use commas (,) to separate multiple table or field names.
-
-
If you select Partial Data, you can add multiple project or database scan scopes. The final scan scope is the union of all specified scopes.
-
You must manually select projects from the left-side pane.
-
After you select a project, the tables within that scope are displayed on the right. You can manually select tables or select them all. By default, all tables in the selected scope are included.
-
Keyword search is supported for both project/database scopes and tables. To search for a table, you must first select a project and then perform the search within that project.
-
-
-
-
-
Click Enable to start the scan task.
After the task starts, the Node Status changes as follows:
-
Real-time task: The status changes to Enabling.
-
Scheduled task: The status changes to Enabling. The service starts the detection task at the configured time.
-
New detection task: A progress bar appears. The scan is complete when the progress reaches 100%. Progress is calculated as follows: (Number of tables scanned in the current task / Total number of tables to be scanned in the current task) × 100%.
Note-
If you modify a detection rule, the changes take effect in the next scheduled scan. To trigger the new rule immediately, you must manually create a new detection task.
-
After a scan task is complete, the Node Status is updated to No Task.
-
-
Manage data detection rules
-
Copy a rule: To quickly copy an existing rule, click the
 icon. The new rule's name has a
 -copysuffix by default, and its status is Draft. You can configure it as needed. -
Edit a rule: To modify rule information, click the
 icon.Note
-
You cannot modify the basic information of rules that are configured based on built-in sensitive field types.
-
After a rule is modified, the identification results for fields that previously matched the rule are cleared.
-
-
Delete a rule: If a rule is no longer needed, click the
 icon to delete it.Important
Deleting a detection rule for a sensitive field type has a significant impact. Carefully review the following consequences before you confirm the deletion:
-
Records of this sensitive field type are deleted from the detection results. For more information, see View and manually correct sensitive data detection results.
-
The sensitive data distribution information in Data Discovery no longer includes statistics for this sensitive field type. For more information, see Sensitive Data Overview.
-
The sensitive field type is removed from any risk identification rules that reference it. For more information, see Manage risk identification rules.
-
-
Batch Publish rules: Rules must be published before they can be used to identify sensitive data. If you have a large number of rules, you can publish them in batches.
-
On the data detection rules page, click Batch Publish and select the rules that you want to publish.
NoteYou can select only rules that are in the Draft state.
-
Click Deploy. After the rules are published, their status changes to Yes.
NoteTo cancel, click Cancel. The rules revert to the Draft state.
-
-
Batch invalidate rules: After a rule is invalidated, it is no longer used to detect the corresponding sensitive field type. Records of this sensitive field type are deleted from modules such as Data Discovery and manual correction. Before you invalidate a rule, confirm whether its sensitive field type is referenced by any data masking rules or Risk identification rules. If it is, you must first invalidate the data masking rule and remove the reference from the Risk identification rules. For more information, see Create a data masking rule and Manage risk identification rules.
-
On the data detection rules page, click Batch Invalidate and select the rules that you want to invalidate.
NoteYou can select only rules that are in the Yes state.
-
Click Batch Invalidate. After the rules are invalidated, their status changes to Draft.
NoteTo cancel, click Cancel. The rules revert to the Yes state.
-
 icon to delete it.
View task execution records
The Sensitive Data Detection > Identify Tasks > Task Execution Records page lists tasks completed within the last week, but not tasks that are in progress. You can view details such as Start time, End Time, Runtime, Task type, Owner, and Data Scope.