Use this page to run sensitive data detection tasks and fix fields that Data Security Guard misidentified.
Manually corrected results are displayed and take effect the next day.
Prerequisites
Before you begin, ensure that you have:
-
Access to the sensitive data detection rule page. See Go to the sensitive data detection rule page
-
Data in an ODPS, EMR, CDH_HIVE, or HOLO project (manual correction is supported only for fields detected in these engines)
Create a detection task
Detection tasks scan your data and produce results that you can review and correct. Three task types are available:
| Task type | How it works | Best for |
|---|---|---|
| Real-time | Triggers automatically when ODPS metadata changes (new table, new field, or modified field) | Keeping results current as your ODPS schema evolves |
| Scheduled | Runs on a weekly or daily schedule you define | Routine, recurring scans |
| One-time | Runs once immediately after you enable it | Applying rule changes right away or an ad hoc scan |
Start a detection task
-
On the sensitive data detection rule page, click the Detection Task tab.
-
Click Enable Sensitive Data Detection Task and configure the task.
-
Click Enable.
After you click Enable, Task Status changes based on the task type:
-
Real-time task: Status changes to Enabling. Data Security Guard monitors ODPS metadata and starts detection automatically when changes occur.
-
Scheduled task: Status changes to Enabling. Detection runs at the configured scan time.
-
One-time task: Status shows a progress bar. Progress is calculated as: _(tables scanned / total tables to scan) x 100%_. When progress reaches 100%, Task Status returns to No Task.
A modified detection rule takes effect in the next scheduled task. To apply a rule change immediately, create a one-time detection task.
Detection task parameters
The parameters available depend on the task type.
Real-time task
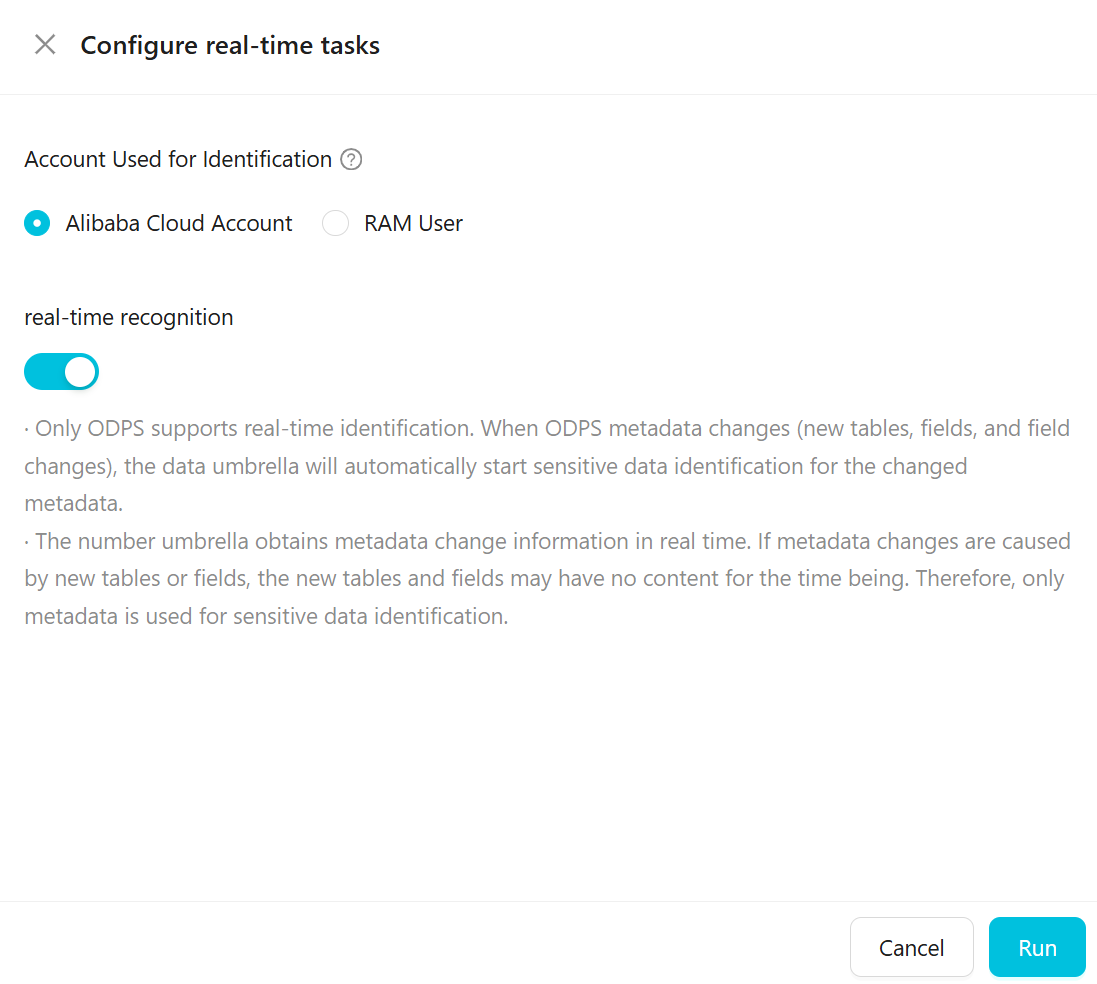
| Parameter | Description |
|---|---|
| Detection Account | The Alibaba Cloud account or RAM user used to sample and scan data. The account's permissions determine which data can be sampled. To use a RAM user, first grant the RAM user permissions on the MaxCompute project. |
| Real-time Detection | Only ODPS supports real-time detection. When ODPS metadata changes—such as adding a table or field, or modifying a field—Data Security Guard starts a detection task automatically. If the change involves a new table or field with no content yet, detection uses metadata only. |
Scheduled task
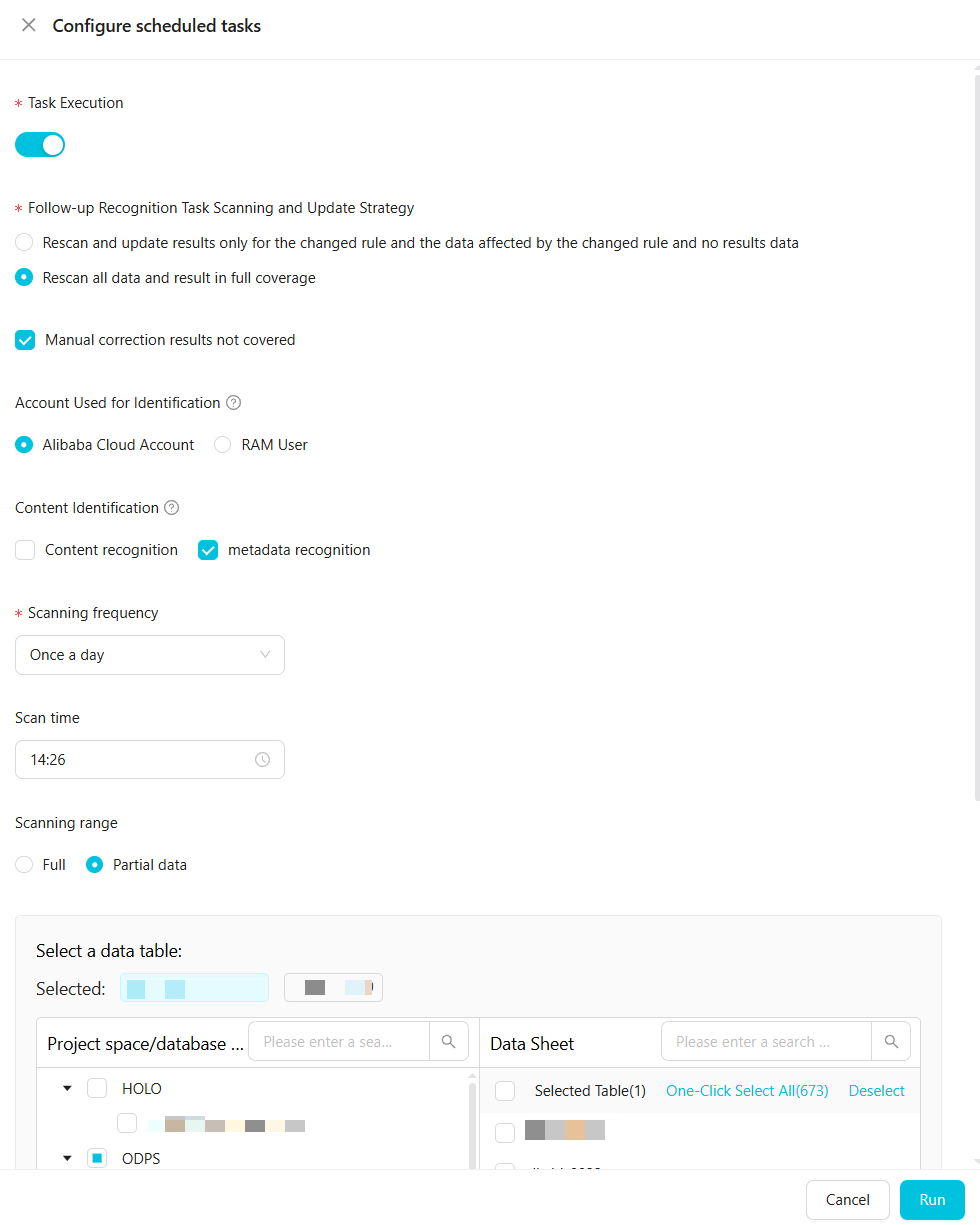
| Parameter | Description |
|---|---|
| Task Execution | Enable task execution manually. |
| Subsequent Detection Task Scan and Update Policy | Two options: (1) Rescan and update results only for changed rules, data affected by changed rules, and data with no results. (2) Rescan all data and overwrite all results. In either case, you can choose not to overwrite manually corrected results. |
| Detection Account | The Alibaba Cloud account or RAM user used to sample and scan data. To use a RAM user, first grant the RAM user permissions on the MaxCompute project. |
| Content Detection | Select Content Detection, Metadata Detection, or both. Rules take effect only for the detection types you select. If Content Detection is not selected, Data Security Guard skips data sampling; content detection rules have no effect, but rules based on field names and field comments remain active. |
| Sample Size | The number of data rows to sample for content detection. A value greater than 100 is recommended. Required when Content Detection is selected. |
| Scan Frequency and Scan Time | The schedule for the task. Set the frequency to Once a week or Once a day. For weekly scans, select any day from Monday to Friday. The time range is 0:00–23:59. |
| Scan Scope | The data to scan. Select All to scan all data under the authorized account of the current tenant, or Partial Data to scan specific projects. See Scan scope details. |
One-time task
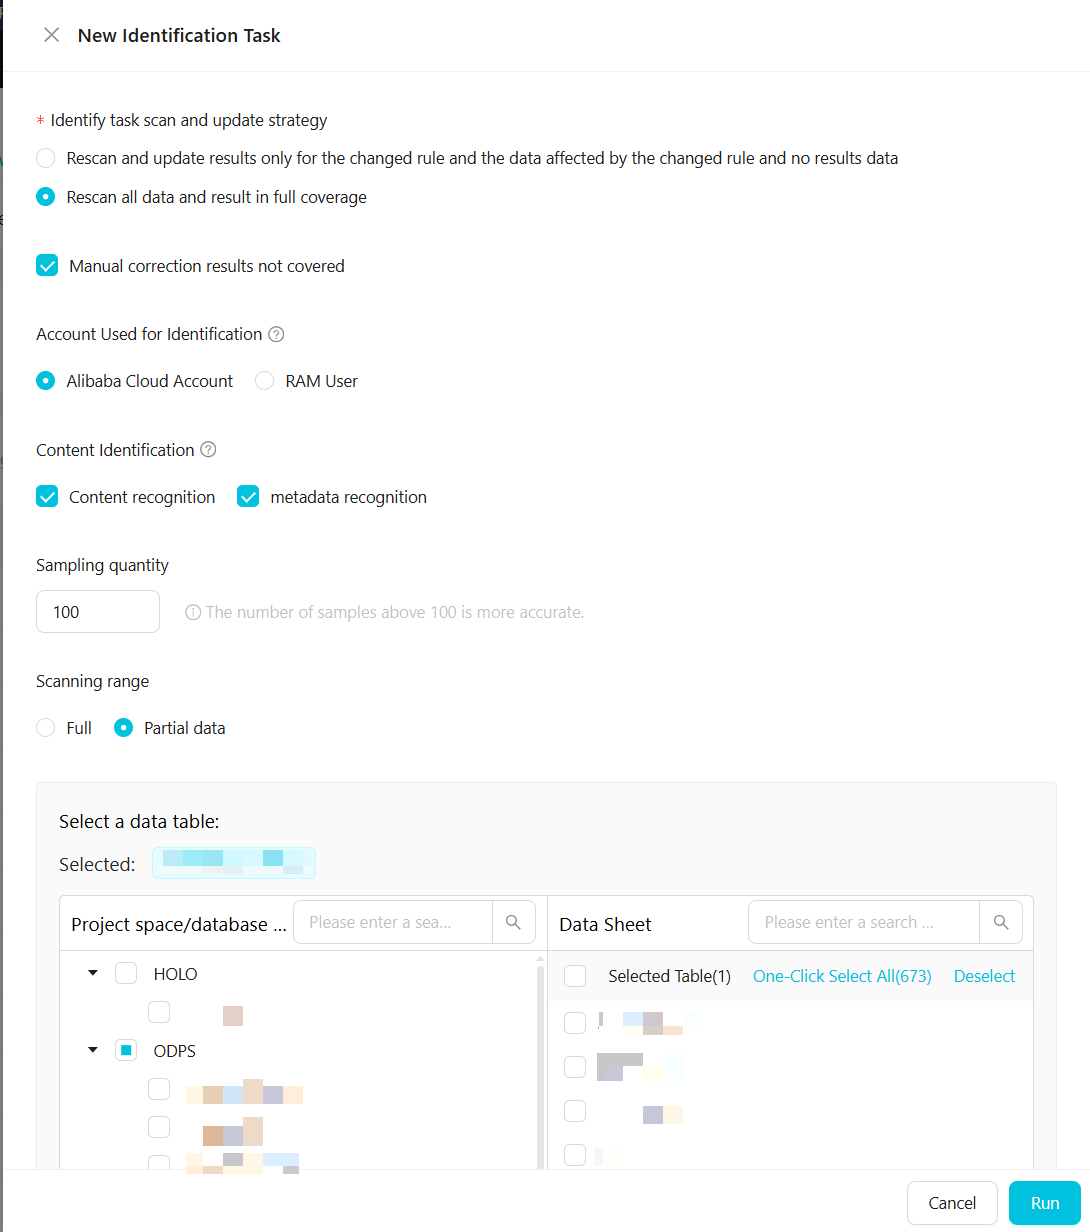
| Parameter | Description |
|---|---|
| Detection Task Scan and Update Policy | Two options: (1) Rescan and update results only for changed rules, data affected by changed rules, and data with no results. (2) Rescan all data and overwrite all results. In either case, you can choose not to overwrite manually corrected results. |
| Detection Account | The Alibaba Cloud account or RAM user used to sample and scan data. To use a RAM user, first grant the RAM user permissions on the MaxCompute project. |
| Content Detection | Select Content Detection, Metadata Detection, or both. Rules take effect only for the detection types you select. If Content Detection is not selected, Data Security Guard skips data sampling; content detection rules have no effect, but rules based on field names and field comments remain active. |
| Sample Size | The number of data rows to sample for content detection. A value greater than 100 is recommended. Required when Content Detection is selected. |
| Scan Scope | The data to scan. Select All to scan all data under the authorized account of the current tenant, or Partial Data to scan specific projects. See Scan scope details. |
Scan scope details
When you select Partial Data, the following rules apply:
-
The default scope includes all projects of all DPI engines.
-
You can specify individual tables within ODPS, EMR, and HOLO projects.
-
Select a project on the left side of the page. The data tables in that project appear on the right. Select individual tables, or select all tables at once. By default, all tables in the project are selected.
-
Keyword search is available for projects, databases, and tables. To search for a table, first select the project, then search within it.
-
You can add multiple project or database scopes. The final scan scope is the union of all specified scopes.
Table name rules for ODPS, EMR, and HOLO:
-
Length: 0–100 characters. All character types are supported. Leave blank to scan all tables.
-
Wildcard
.*is supported. For example,.*namematches table names ending inname, andprivate.*matches names starting withprivate. -
Use commas (,) to separate multiple table names or field names.
Correct detection results
Manual corrections are displayed and take effect the next day. To prevent future scans from overwriting your corrections, select not to overwrite manually corrected results when configuring scheduled or one-time tasks.
Manual correction is supported for fields in ODPS, EMR, CDH_HIVE, and HOLO engines only.
Filtering results (area ① and area ②) changes only your view of the list. To actually change a field's classification, use the correction actions in area ③ or the Batch Correct button in area ④.
Navigate to detection results
-
On the sensitive data detection rule page, click the Detection Results tab.
-
Use the filters in area ① and area ② to locate the fields to correct. The results list (area ③) displays the following fields by default: Project, Table Name, Field Name, Classification, Categorization, Sensitive Field Type, Manually Corrected, and Last Updated. Click Displayed Fields Settings to customize the columns.
-
Area ①: Select a DPI engine from the drop-down list to filter results by engine type.
-
Area ②: Filter by Project, Table Name, or Field Name. Click Expand for additional filters: Classification, Categorization, and Sensitive Field Type.

-
Correct a single field
-
In the results list, find the field with an incorrect Sensitive Field Type.
-
Click the drop-down arrow in the Sensitive Field Type column. The list shows all published sensitive field types from the default classification and categorization template for the current tenant.
-
Choose one of the following actions:
-
If an existing sensitive field type fits: Select it. Then click the icon on the right to go to the Data Detection Rule page and update the detection rules for both the original and the new sensitive field types. This improves detection accuracy for future scans.
-
If no existing type fits: Click the icon on the right to go to the Data Detection Rule page, or scroll to the bottom of the drop-down list and click Manage Sensitive Field Types. You are redirected to the Data Detection Rule page, and the Create Sensitive Field Type dialog box appears. Add a new sensitive field type and configure its detection rules. For more information, see Configure data detection rules and execute detection tasks.
-
Batch correct fields
-
In the results list, select the fields to correct.
-
Click Batch Correct (area ④). The Batch Correct Recognition Results dialog box appears.
-
In the Sensitive Field Type drop-down list, select the correct type. The list shows all published sensitive field types from the default classification and categorization template for the current tenant.
-
Click Save.
Export detection results
To download the results that match the current filter criteria, click the  icon (Export Detection Results).
Each export includes up to 100,000 data entries.
Next steps
After correcting misidentified fields, consider these follow-up actions:
-
Improve future detection accuracy: Update detection rules for the corrected field types so future scans classify them correctly. See Configure data detection rules and execute detection tasks.
-
Refine your classification taxonomy: If you created new sensitive field types during correction, review your classification and categorization structure. See Configure sensitive data classification and categorization.