A zero load node is a control node that acts as a dry-run node and does not generate data. When this node is scheduled, the system immediately returns a success status. The node does not run, consume resources, or block downstream nodes from running. A zero load node is typically used as a master start node for a business flow or as a consolidated output node for multiple branch nodes in a business flow. This topic describes the scenarios for zero load nodes and how to create and use them.
Scenarios
Virtual nodes are typically used in the following scenarios:
Manage business flows with complex dependencies
If your business involves multiple business flows, you can use a zero load node to create a dry-run master start node for each flow. This approach simplifies management and clarifies the data forwarding path.
Schedule nodes with no lineage dependencies
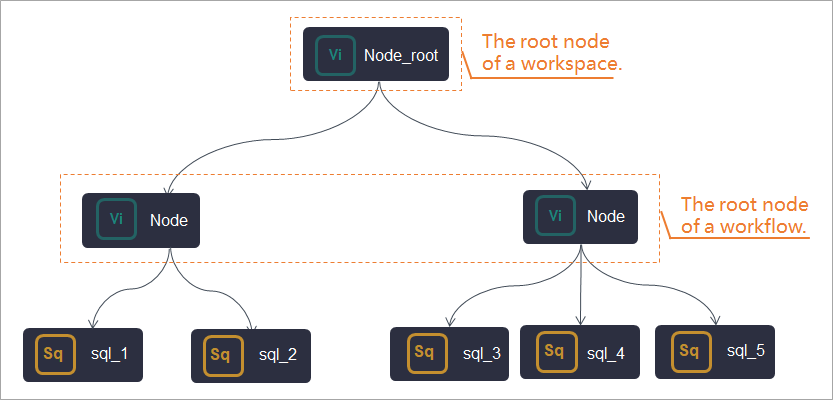
If the final output node of a business flow has multiple input nodes from different branches with no dependencies, you can use a zero load node as their upstream node. You can set the workspace root node as the upstream node for the zero load node. This way, the workspace root node schedules the zero load node, which in turn schedules the downstream business nodes. You can also use this method to set a scheduled time for the zero load node to control the earliest runtime of the branch nodes.
NoteWhen the workspace root node is an upstream dependency, it does not appear in the business flow pane. You can view it in the Operation Center after you commit and publish the task. For more information about the Operation Center, see Basic O&M operations for auto triggered tasks.
For example,
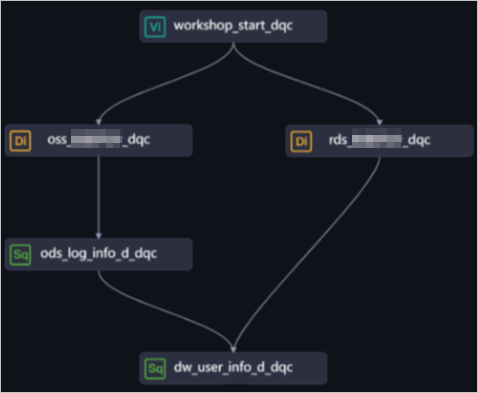 the
the oss_data_sync_dqcandrds_data_sync_dqcnodes have no lineage dependencies. You cannot set scheduling dependencies between them based on lineage. In this case, you can use a zero load node (workshop_start_dqc) as a master start node to schedule the downstream branch nodes. The downstream branch nodes start to run as soon as their runtime conditions are met.NoteWhen you use offline synchronization to sync data from other data sources to DataWorks, the destination table in DataWorks has no upstream lineage dependency within DataWorks.
Manage business flows with multiple branch outputs and create cross-flow scheduling dependencies
To create cross-flow dependencies for a business flow with multiple branch outputs, you can use a zero load node to consolidate the branch nodes. Then, you can manually set the output of this consolidated node as the input for the master start node of the downstream business flow. This action creates the cross-flow dependency. For more information, see Configure cross-flow scheduling dependencies.
NoteIf a business flow has multiple branch outputs, you can create a new zero load node, such as `business_flow_end_zero_load_node`. This node depends on the multiple upstream branch outputs. A successful run of the `business_flow_end_zero_load_node` indicates that the entire business flow is complete.
Create and use virtual nodes
Go to Data Studio.
Log on to the DataWorks console. In the top navigation bar, select the desired region. In the left-side navigation pane, choose . On the page that appears, select the desired workspace from the drop-down list and click Go to Data Development.
Create a Workflow.
If you have an existing Workflow, skip this step.
Hover over the
 icon and select Create Workflow.
In the Create Workflow dialog box, enter the Workflow Name.
Click Create.
You can create a virtual node.
Hover over the
 icon and choose .
Alternatively, you can find the business flow, right-click it, and choose .
In the Create Node dialog box, enter a Name, and select a Node Type and Path.
NoteThe node name can contain uppercase letters, lowercase letters, Chinese characters, digits, underscores (_), and periods (.). The name must not exceed 128 characters in length.
Click Confirm to open the virtual node edit page.
Configure scheduling for the task.
To run the node task periodically, click Scheduling Configuration on the right side of the node configuration page. Configure the scheduling properties for the node task as required:
Configure the basic scheduling properties for the task. For more information, see Configure basic properties.
Configure the scheduling cycle, rerun properties, and upstream and downstream dependencies. For more information, see Configure time properties and Configure same-cycle scheduling dependencies.
NoteYou must set the Rerun property and specify the Upstream Dependencies for the node before you can commit the node.
Configure resource properties. For more information, see Configure resource properties.
Submit and publish the node task.
Click the
 icon in the toolbar to save the node.
Click the
 icon in the toolbar to submit the node task.
In the Submit New Version dialog box, enter the Change Description.
Click OK.
In standard mode workspaces, you must deploy the task to production after submission. Click Task Publishing in the left-side navigation pane. For more information, see Publish tasks.
View the scheduled task.
Click Operation Center in the upper-right corner to access the production environment.
View the scheduled task. For more information, see Manage auto triggered tasks.
For more details about scheduled tasks, click Operation Center in the top navigation bar. For more information, see Overview.