Data Security Guard lets you configure sensitive data detection rules based on sensitive field types. After a rule is configured, you can use it to detect the corresponding type of sensitive data in your tenant. DataWorks provides various built-in sensitive field types and detection rules. If the built-in rules do not meet your business requirements, you can create custom sensitive field types and detection rules. This topic describes how to create a sensitive field type and configure a data detection rule.
Background information
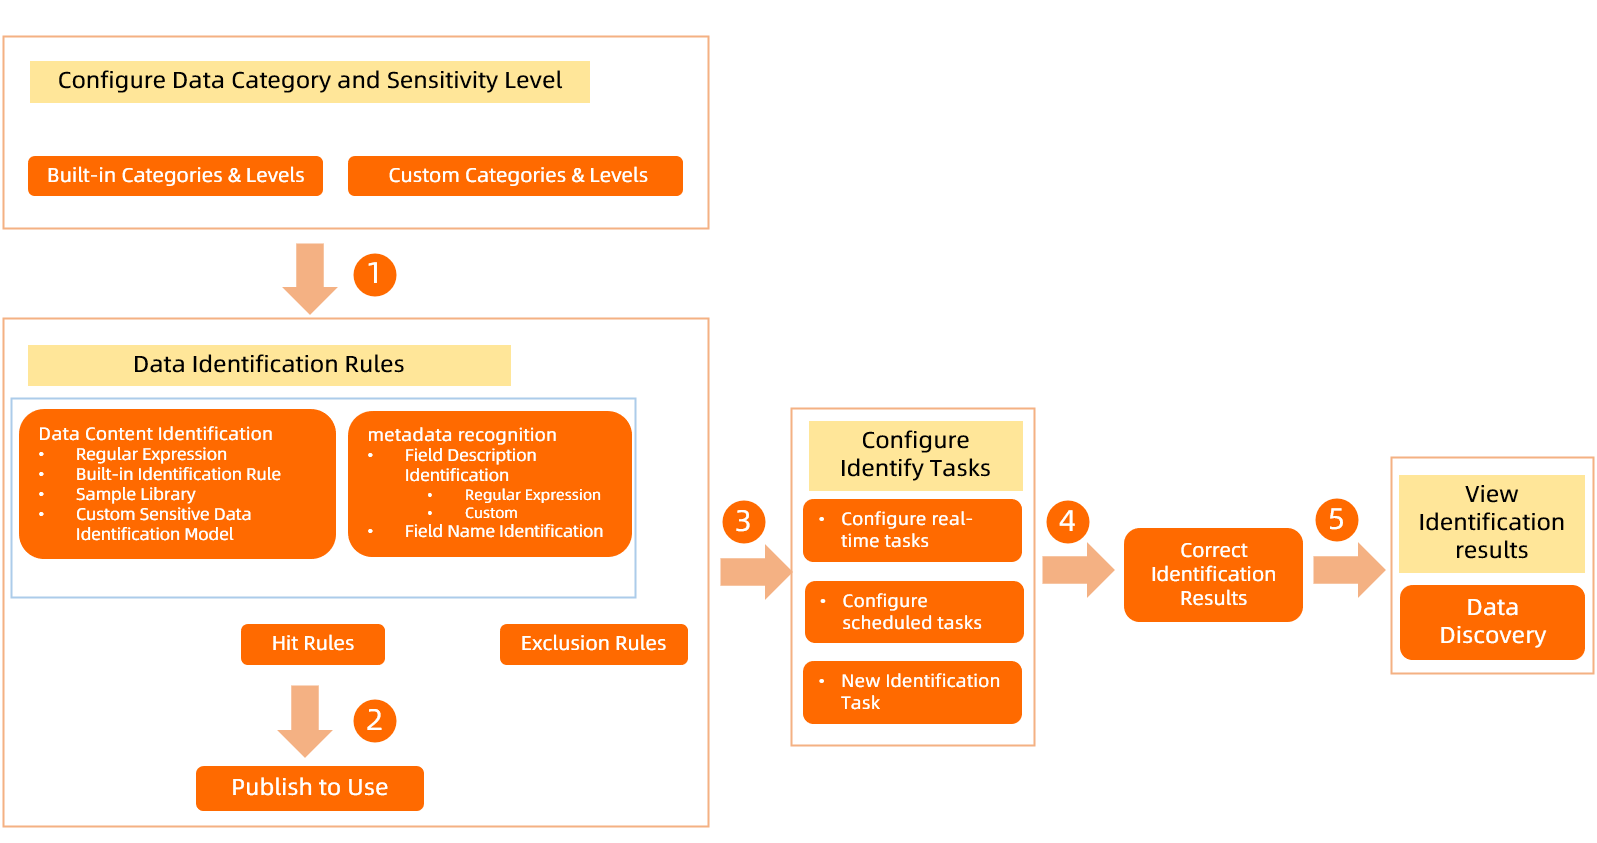
DataWorks lets you define data detection rules based on the sensitivity level and category of data. This helps you detect sensitive data in your organization. If detection results are inaccurate, you can view and manually correct sensitive data detection results. The Sensitive data overview module displays the distribution of all sensitive fields that have recently hit detection rules, broken down by project. The following figure shows how data detection rules are used.
Go to the Data Detection Rules page
Go to the DataStudio page.
Log on to the DataWorks console. In the top navigation bar, select the desired region. In the left-side navigation pane, choose . On the page that appears, select the desired workspace from the drop-down list and click Go to Data Development.
Click the
 icon in the upper-left corner. Then, choose . On the page that appears, click Try Now to go to the Data Security Guard page. Note
If your Alibaba Cloud account is granted the required permissions, you can directly access the homepage of Data Security Guard.
If your Alibaba Cloud account is not granted the required permissions, you are redirected to the authorization page of Data Security Guard. You can use the features of Data Security Guard only after your Alibaba Cloud account is granted the required permissions.
In the navigation pane on the left, choose to go to the Data Identification Rules page.
Step 1: Configure classification and grading for sensitive fields
A sensitive field type must belong to a data category and have a defined sensitivity level. Therefore, before you create a sensitive field type and configure a detection rule, you must first configure data classification and grading.
Data Security Guard provides a built-in classification and grading template. The template includes four sensitivity levels and four major categories that you can use directly. DataWorks lets you edit the classifications and grades in the built-in template or create custom ones. You can define up to 10 sensitivity levels. For categories, you can define multilayer categories, subcategories, and information about the sensitive field types they contain.
Configure sensitivity grading for fields on the page.
The Data Classification and Grading page displays the default built-in template. Click the
 icon next to the template to edit the template name, description, and number of grades.
Configure classification for sensitive fields on the page.
If you are new to Data Security Guard, the default categories from the Built-in classification and grading template are displayed on the left side of the Data Detection Rules page. You can search for a category by name. You can also click the
 icon next to a category name to add a same-level category, add a subcategory, rename the category, or delete the category.
If you are an existing Data Security Guard user, you can create up to four data categories on the left side of the Data Detection Rules page as needed.
A category name must be unique. It must be 1 to 30 characters in length and can contain only letters and digits.
Before you delete a category, check if it contains any published sensitive data detection rules. If it does, deactivate all rules in the category before you delete it. For more information, see Manage data detection rules.
For more information about how to configure sensitive data grading, see Configure sensitive data classification and grading.
Step 2: Configure a sensitive data detection rule
Sensitive data detection rules must be configured based on sensitive field types. This topic uses the example of creating a sensitive field type and configuring a data detection rule to describe the configuration details. You can also configure a data detection rule based on a built-in sensitive field type.
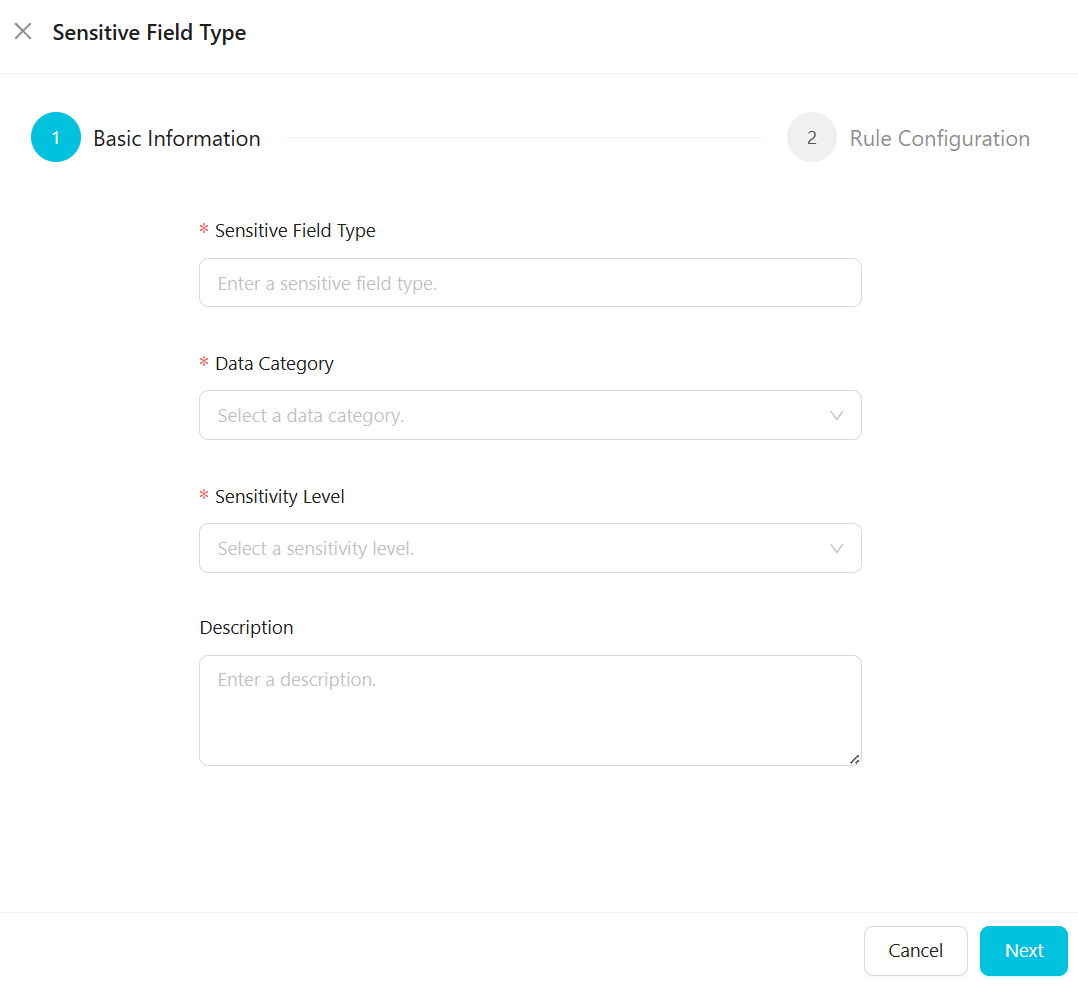
On the Data Detection Rules page, click + Sensitive field type in the upper-right corner to add a sensitive field type.
Configure the basic information of the sensitive field type.
On the Basic Information tab, configure parameters for the sensitive field, such as its type, classification, and grading.
The following table describes the main parameters.
Parameter
Description
Sensitive Field Type
The custom name of the sensitive field type, such as name, ID card number, or phone number. The name must be unique.
Category
The category to which the sensitive field type belongs. If the existing categories do not meet your needs, go to the Data Category and Sensitivity Level page to configure a category. For more information, see Configure sensitive data classification and grading.
Sensitivity Level
The sensitivity level to which the sensitive field type belongs. A larger number indicates a higher sensitivity level. If the existing grades do not meet your needs, go to the Data Category and Sensitivity Level page to configure a grade. For more information, see Configure sensitive data classification and grading.
Click Next.
Configure the detection rule for the sensitive field type.
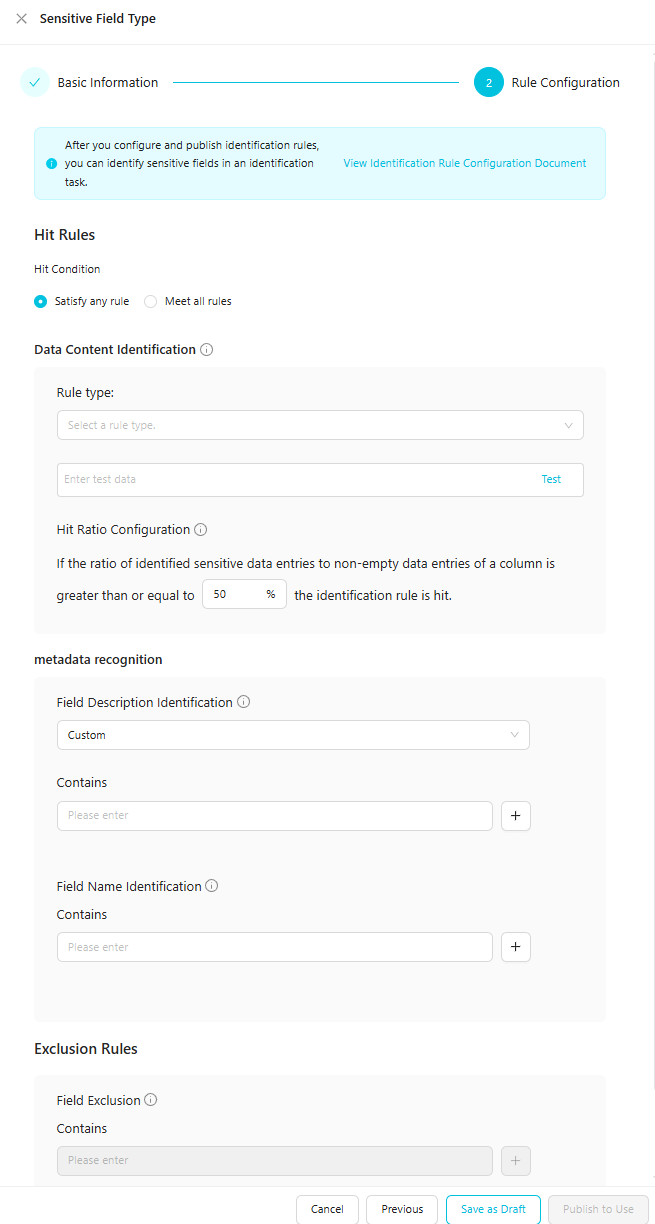
On the Rule Configuration tab, configure the sensitive data detection rule and its hit conditions, and then test the accuracy of the rule.
Parameter
Description
Hit Rules
Select a hit condition for the detection rule from the drop-down list on the right:
Satisfy any rule: The detection rule is hit if either the
Data content detectionorField name detectioncondition is met.Meet all rules: The detection rule is hit only if both the
Data content detectionandField name detectionconditions are met.
NoteThe Hit Rules parameter takes effect only for
Data content detectionandField name detectionrules.Data Content Identification
Detects sensitive data based on the data content of a field, which is the field's value. For example, if the value of the
namefield is Zhang San, the rule detects Zhang San.NoteThe content scan feature is available only in DataWorks Professional Edition and higher. If you use a lower edition of DataWorks, upgrade to the Professional Edition or higher. For more information about how to upgrade, see Select and pay for a software version.
Define the content of the sensitive data detection rule based on the rule type to match sensitive text. Four rule types are available:
Regular Expression: Enter a regular expression for the detection rule and enter test data to test the accuracy of the rule.
Built-in Identification Rule: Select a built-in detection rule and enter test data to test the accuracy of the rule.
NoteYou can select Built-in Identification Rule only in DataWorks Enterprise Edition.
Sample Library: Select a configured rule sample and enter test data to test the accuracy of the rule. For more information about how to configure samples, see Detection using a sample library.
Custom Sensitive Data Identification Model: Select a custom rule model and enter test data to test the accuracy of the rule. For more information about how to configure a custom model, see Detection using a custom model.
NoteYou can select the Custom Sensitive Data Identification Model rule only for the MaxCompute engine. You can use Custom Sensitive Data Identification Model only in DataWorks Enterprise Edition.
Field Name Identification
Detects sensitive data based on the name of a field. For example, if the value of the
namefield is Zhang San, the rule detectsname.Enter the fields to be detected as sensitive data. You can specify multiple fields. The logical relationship between the fields is
OR. The input formats for different data sources are as follows:EMR, CDH, and MaxCompute:
project.table.columnHologres:
instance_id.project.table.column
You can use an asterisk (*) as a wildcard character in any segment of the input format. For example:
a.b.*: All fields in table b of project a are detected as sensitive data.
ab*.c*.salary: All salary fields in tables whose names start with c in projects whose names start with ab are detected as sensitive data.
*cd.ef*.sa*ry : All fields whose names start with sa and end with ry in tables whose names start with ef in projects whose names end with cd are detected as sensitive data.
Field Description Identification
Detects sensitive data based on the comment of a field. For example, you can configure the comments for a phone number sensitive field type as "phone number" and "contact method". When the system detects that a data comment contains "contact method", the data is detected as a phone number.
Enter the field comments in the input box. The comment can be 0 to 100 characters in length. All character types are supported. You can add up to 10 input boxes.
Field Exclusion
Enter the fields to exclude. Fields that match the exclusion rules are not hit by this detection rule. You can specify multiple fields. The logical relationship between the fields is
OR. The input formats for different data sources are as follows:EMR, CDH, and MaxCompute:
project.table.columnHologres:
instance_id.project.table.column
You can use an asterisk (*) as a wildcard character in any segment of the input format. For example:
a.b.*: All fields in table b of project a are detected as sensitive data.
ab*.c*.salary: All salary fields in tables whose names start with c in projects whose names start with ab are detected as sensitive data.
*cd.ef*.sa*ry : All fields whose names start with sa and end with ry in tables whose names start with ef in projects whose names end with cd are detected as sensitive data.
Hit Ratio Configuration
Defines a custom hit rate for the rule. This specifies the percentage of non-empty data in a column that must match the
Data content detectioncondition for the detection rule to be hit. For example, 50%. The default value is 50%.The hit rate is calculated using the formula:
100% × Number of data records in the column that hit the detection rule / Total number of data records in the column.NoteThe hit rate takes effect only for
Data content detectionrules.Publish the data detection rule.
Click Publish to Use to publish the current data detection rule. After the rule is published, you can use it in a detection task to detect the corresponding sensitive data.
If you do not need to use the rule immediately, click Save as Draft to save the data detection rule.
If data in a column hits the detection rules of multiple sensitive field types, the rules take effect in the following order:
If the number of hit conditions is the same for these sensitive field types, the detection order is .
If the number and types of hit conditions are the same, the detection rule for the sensitive field type with the higher sensitivity level takes precedence.
Step 3: Authorize and start a sensitive data detection task
After you configure the sensitive data detection rules, you must authorize and start a sensitive data detection task. After the task starts, the platform detects sensitive data in the tenant based on the detection rules.
Authorize the sensitive data detection task.
The first time you start a sensitive data detection task, click Enable and Authorize in the upper-left corner of the Sensitive Data Identification page and grant permissions as prompted.
NoteAfter the sensitive data detection task starts, you can click Authorization Records in the upper-right corner of the Sensitive Data Identification page to view the authorization details.
Start the sensitive data detection task.
Configure the sensitive data detection task.
When you configure a sensitive data detection task, you must configure its type, scan method, and scan scope. You can configure a real-time task, a scheduled task, or a one-time task.
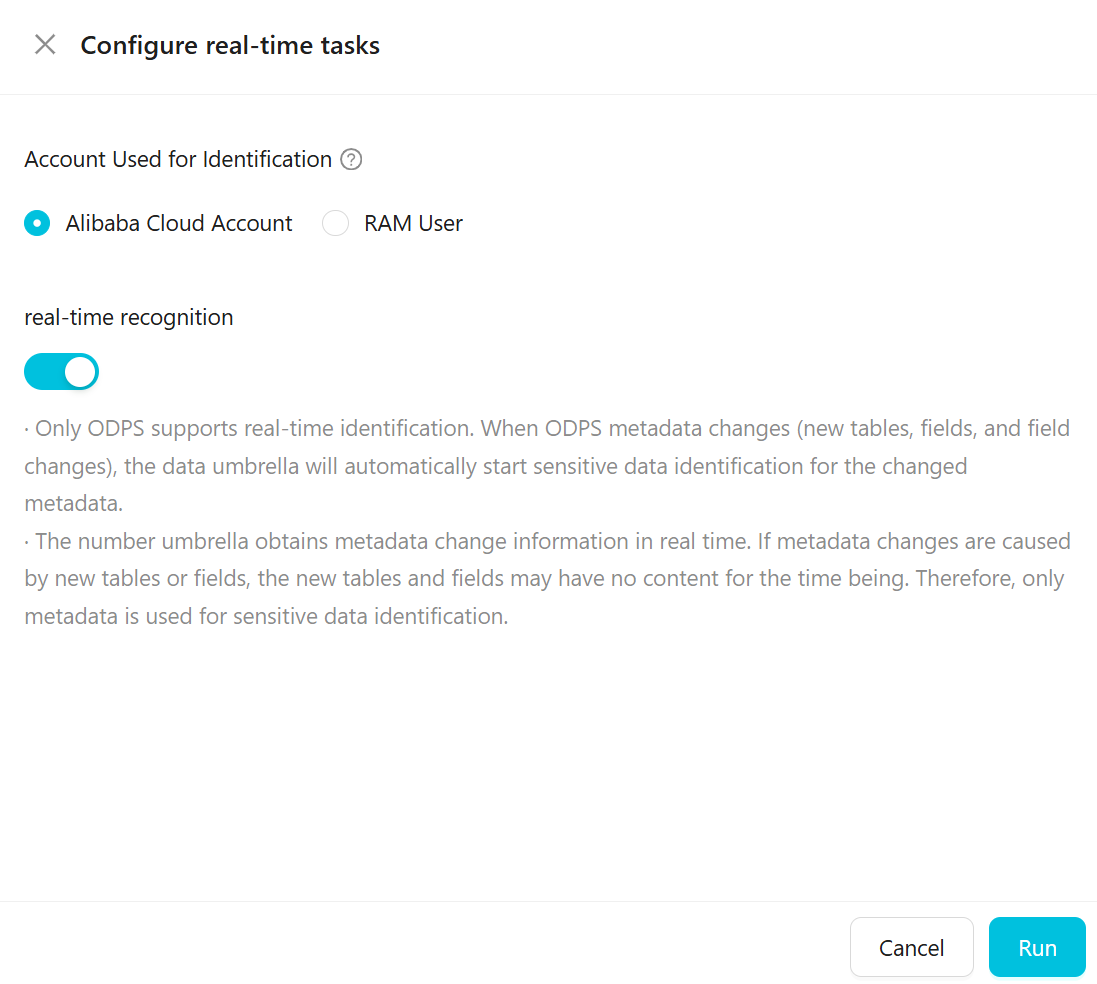
Configure a real-time task.
The following table describes the parameters.
Parameter
Description
Account Used for Identification
Specify an Alibaba Cloud account or a RAM user to sample and scan data. The data is sampled and scanned using the selected account. The range of data that can be sampled varies based on the permissions of the account.
NoteIf you use a RAM user for detection, the RAM user must have permissions on the MaxCompute project.
Real-time Recognition
Only ODPS supports real-time detection. When ODPS metadata changes (such as adding a table or field, or changing a field), Data Security Guard automatically starts a sensitive data detection task for the changed metadata.
Data Security Guard obtains metadata changes in real time. If the change is caused by a new table or field, the new table or field may not have content yet. In this case, only metadata is used for sensitive data detection.
Configure a scheduled task.
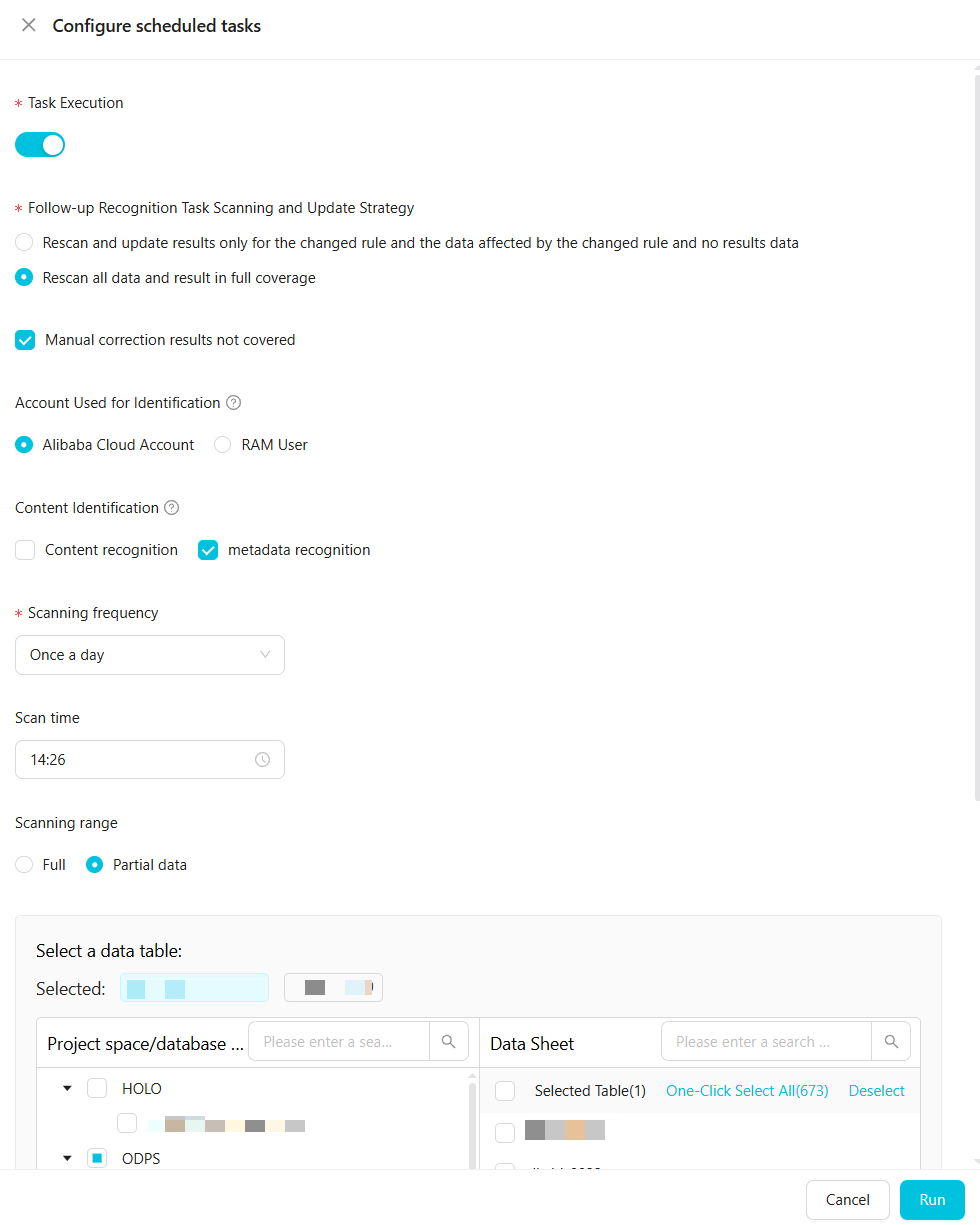 The following table describes the parameters.
Parameter
Description
Task Execution
You must manually start the task.
Follow-up Recognition Task Scanning and Update Strategy
Two options are available:
Rescan and update results only for the changed rule and the data affected by the changed rule and no results data.
Rescan all data and result in full coverage.
You can select Do not overwrite manually corrected results.
Account Used for Identification
Specify an Alibaba Cloud Account or a RAM user to sample and scan data. The data is sampled and scanned using the selected account. The range of data that can be sampled and scanned varies based on the permissions of the account.
NoteIf you use a RAM user to sample and scan data, the RAM user must have permissions on the MaxCompute project.
Content Identification
Specifies whether the Content recognition and metadata recognition rules take effect. The corresponding rules take effect only after you select them.
NoteIf you do not select Content detection, Data Security Guard does not sample or scan data. The content detection rules do not take effect. However, the field name and field comment detection rules still take effect.
Scanning frequency
The number of data records to sample for content detection. We recommend a value greater than 100.
You must configure this parameter if you select Content Identification.
Scanning frequency and Scan time
Define the scan epoch for the scheduled task.
You must configure this parameter only if you set Task Type to Scheduled task.
You can set the scan frequency to Once a week or Once a day. For once a week, you can select any day from Monday to Friday. The time range is from 0:00 to 23:59.
Scanning range
Configure the range of data for the sensitive data detection task to scan.
Full: Scans all data under the authorized account of the current tenant.
Partial data: Scans the data of tables in a specified project.
NoteBy default, the project scope includes all projects of all data processing engines.
You can scan specified tables in ODPS, EMR, and Hologres projects.
The total length of a table name is
0 to 100characters. All character types are supported. If you leave this blank, all tables are scanned.The
.*wildcard character is supported. For example,.*nameindicates a name with the suffixname.private.*indicates a name with the prefixprivate.Separate multiple table or field names with commas (,).
Select Partial data to add multiple project or database scan scopes. The final scan scope is the union of all added scopes.
Manually select a project in the pane on the left.
After you select a project, the data tables within that project or database are displayed on the right. You can manually select tables or select all tables at once. By default, all data tables in the database are selected.
You can search for project or database scopes and data tables by keyword. To search for a data table by keyword, first select a project to search within.
Configure a one-time task.
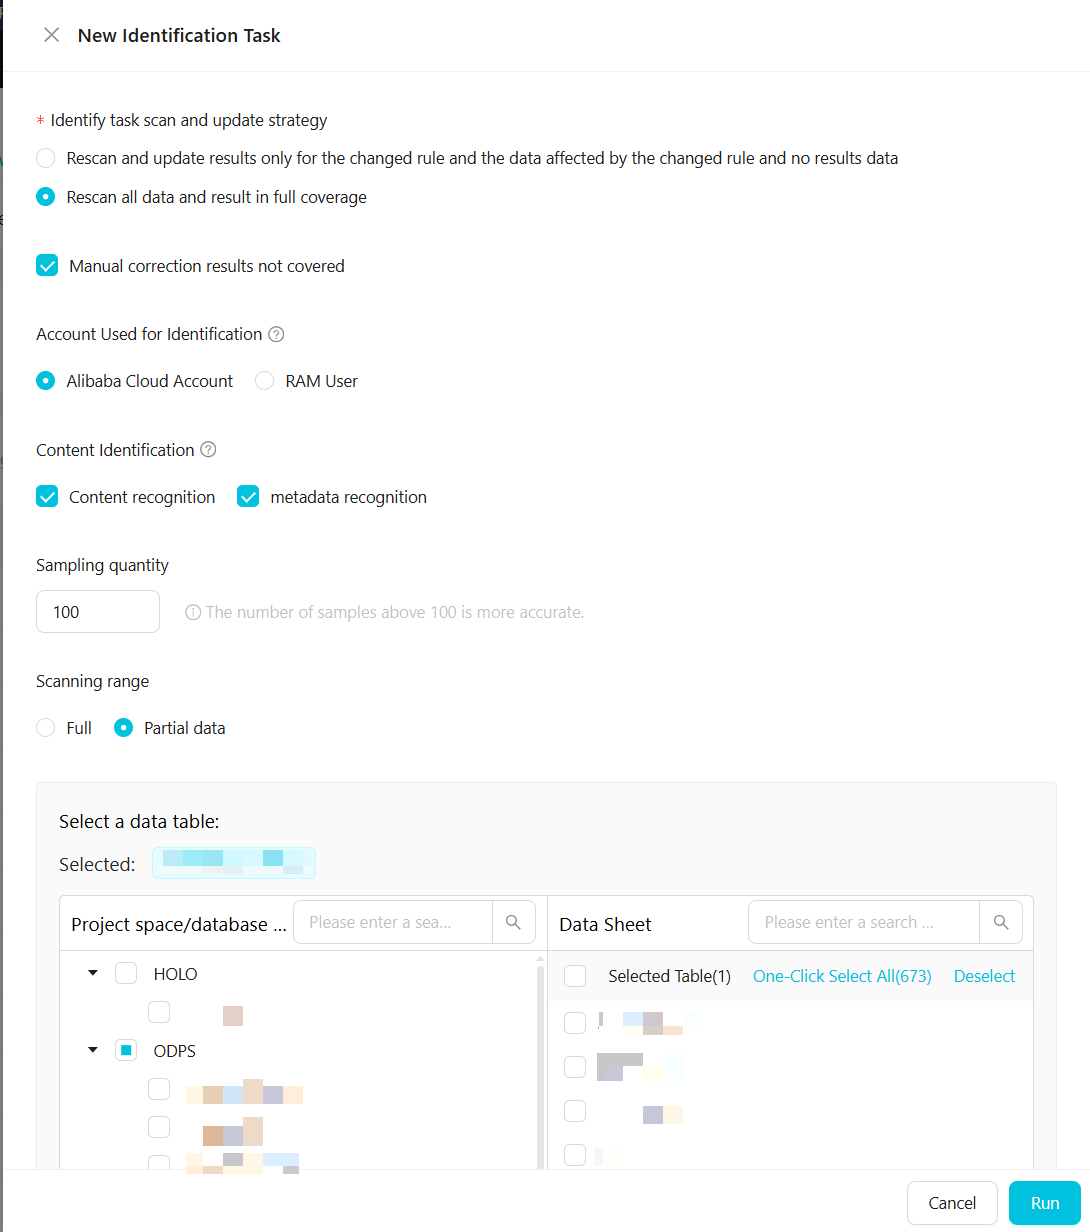 The following table describes the parameters.
Parameter
Description
Identify task scan and update strategy
Two options are available:
Rescan and update results only for changed rules, the data affected by them, and data with no results.
Rescan all data and overwrite all previous results.
You can select Do not overwrite manually corrected results.
Account Used for Identification
Specify an Alibaba Cloud account or a RAM user to sample and scan data. The data is sampled and scanned using the selected account. The range of data that can be sampled and scanned varies based on the permissions of the account.
NoteIf you use a RAM user to sample and scan data, the RAM user must have permissions on the MaxCompute project.
Content Identification
Specifies whether the Content recognition and Metadata recognition rules take effect. The corresponding rules take effect only after you select them.
NoteIf you do not select Content detection, Data Security Guard does not sample or scan data. The content detection rules do not take effect. However, the field name and field comment detection rules still take effect.
Sampling quantity
The number of data records to sample for content detection. We recommend a value greater than 100.
You must configure this parameter if you select Content recognition.
Scanning range
Configure the range of data for the sensitive data detection task to scan.
Full: Scans all data under the authorized account of the current tenant.
Partial data: Scans the data of tables in a specified project.
NoteBy default, the project scope includes all projects of all data processing engines.
You can scan specified tables in ODPS, EMR, and Hologres projects.
The total length of a table name is
0 to 100characters. All character types are supported. If you leave this blank, all tables are scanned.The
.*wildcard character is supported. For example,.*nameindicates a name with the suffixname.private.*indicates a name with the prefixprivate.Separate multiple table or field names with commas (,).
Select Partial data to add multiple project or database scan scopes. The final scan scope is the union of all added scopes.
Manually select a project in the pane on the left.
After you select a project, the data tables within that project or database are displayed on the right. You can manually select tables or select all tables at once. By default, all data tables in the database are selected.
You can search for project or database scopes and data tables by keyword. To search for a data table by keyword, first select a project to search within.
Click Run to start the scan task.
After the task starts, the Task Status changes as follows:
Real-time task: The status changes to Running.
Scheduled task: The status changes to Running. When the configured scan time is reached, the platform detects sensitive data based on the configuration.
One-time task: A progress bar is displayed. When the progress reaches 100%, the scan is complete. Progress is calculated using the formula: (Number of tables scanned in the current task / Total number of tables to scan in the current task) × 100%.
NoteIf you modify a detection rule, the new rule takes effect in the next scheduled task, not in real time. To trigger a new task immediately, you must manually create a one-time detection task.
After the scan task is complete, the Task Status is updated to No Task.
Manage data detection rules
Copy rule: To quickly copy an existing rule, click the
 icon. The new rule name has the suffix
 -copyby default, and its status is Draft. You can configure it as needed.Edit rule: To modify rule information, click the
 icon.Note
You cannot modify the basic information of rules that are configured based on built-in sensitive field types.
If you modify a rule, detection results for fields that matched the previous version of the rule are cleared.
Delete rule: If a rule is no longer needed, click the
 icon to delete it.Important
Deleting a detection rule for a sensitive data type has significant impacts. Read the following impacts carefully before you confirm the deletion.
Records of this sensitive field type are deleted from the detection results. For more information, see view sensitive data detection results and manually correct them.
Statistics for this sensitive field type are no longer included in the sensitive data distribution information in the Data Discovery module. For more information, see Sensitive data overview.
If a Fraud Detection rule references this sensitive field type, the reference is removed. For more information, see Fraud Detection management.
Batch publishing: After a rule is published, the platform uses it to detect the corresponding sensitive data. If you have many rules, you can publish them in a batch.
On the Data Detection Rules page, click Batch publishing and select the rules to publish.
NoteYou can select only rules in the Draft state.
Click Publish. After the rules are published, their status changes to Published.
NoteTo cancel the publication, click Cancel. The rules revert to their original Draft state.
Batch failure: After a rule is deactivated, the platform no longer uses it to detect that type of sensitive data. Records of this sensitive field type in modules such as Data Discovery and Manual Data Correction are deleted. Before you deactivate a rule, check if it is referenced by Data Masking Rule or Risk Identification Rules. If it is, you must first set the Data Masking Rule to inactive and remove the reference from the Risk Identification Rules. For more information, see Create a data masking rule and Fraud Detection management.
On the Data Detection Rules page, click Batch failure and select the rules to deactivate.
NoteYou can select only rules in the Published state.
Click Batch Deactivate. After deactivation, the status of the rules changes to Draft.
NoteTo cancel the deactivation, click Cancel. The rule reverts to its original Published state.
What to do next: View task execution records
The page displays the records of completed tasks from the last week. It does not include records of tasks that are currently running. You can view details such as Start Time, End Time, Duration, Task Type, Owner, and Data Range.