View sensitive data identification results and manually correct them
This topic describes how to view sensitive data detection results and manually correct any inaccurate results.
Manual corrections take effect and appear in the results the next day.
Prerequisite
-
You have created data detection rules and enabled a Identify Tasks. For more information, see Configure data detection rules and run a detection task.
Background
DataWorks lets you define data detection rules based on the sensitivity level and classification of your data. By running sensitive data detection tasks, you can identify sensitive data and obtain detection results. You can manually correct any inaccurate detection results. The Sensitive Data Overview module displays the distribution of all recently identified sensitive fields, broken down by project.
Go to sensitive data detection results
-
Log on to the DataWorks console. After you switch to the target region, in the left-side navigation pane, click , and then click Go to Security Center.
-
In the left-side navigation pane, click , and then click Try Now to go to Data Security Guard.
Note
-
If your Alibaba Cloud account is already authorized, you are taken to the Data Security Guard home page.
-
If your Alibaba Cloud account is not authorized, you are taken to the authorization page. When you go to for the first time, you must select Data Security Guard in the pop-up dialog and grant it the required permissions.
-
-
In the left-side navigation pane, click Rule Setting > Sensitive Data Detection, and then click Identification results in the upper-left corner of the page to go to the Identification results page.
View detection results
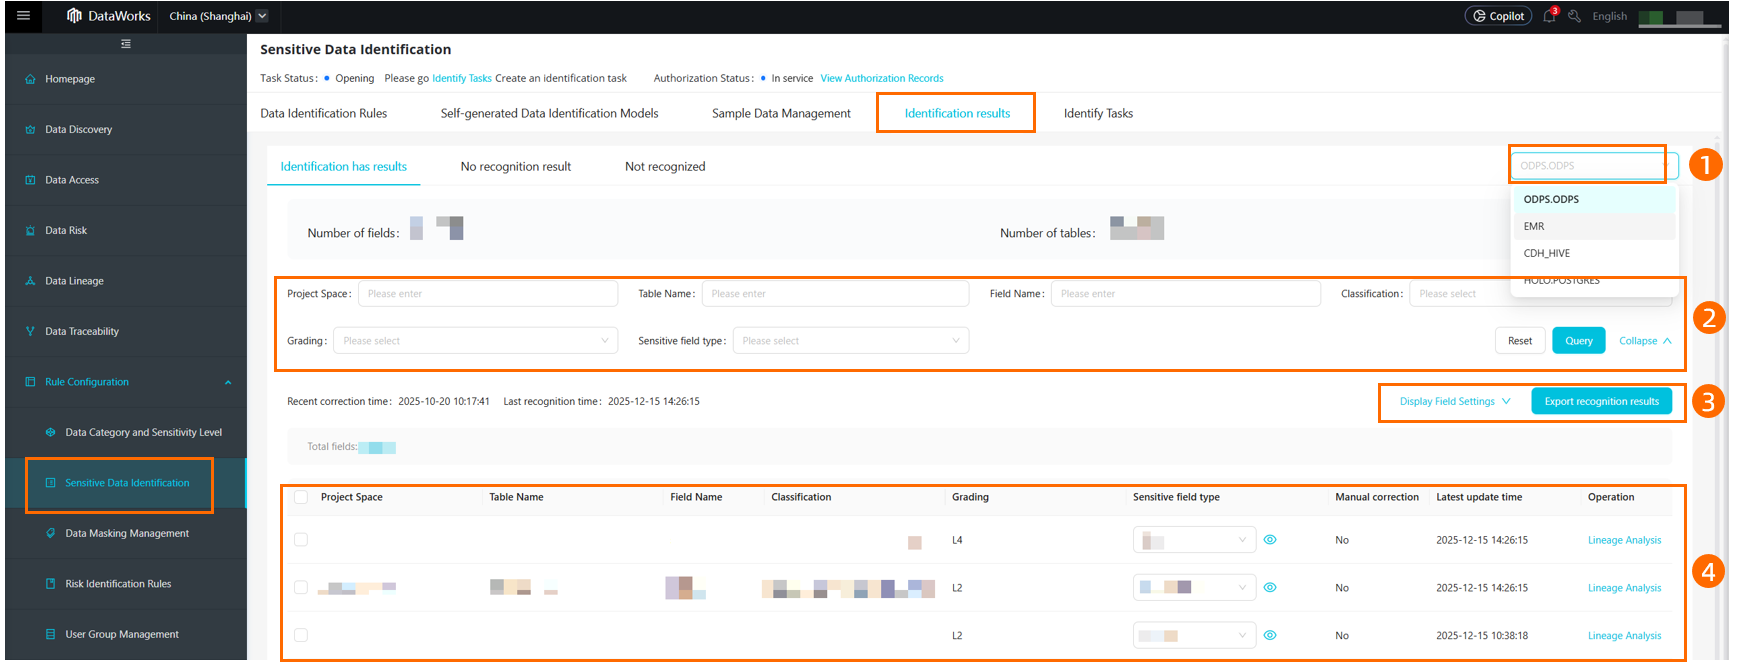
On the Identification results page, you can switch between columns with detection results, columns without detection results, and undetected columns. The page displays information such as the detection status, column count, table count, and detection result details. The following figure uses With Results as an example to show the content of the detection results page.
|
Action |
Description |
|
Filter by engine type |
In Area ① of the preceding figure, you can select a data engine from the drop-down list. Note Currently, you can correct the sensitive column detection results for the ODPS, EMR, CDH_HIVE, and HOLO engines. |
|
Filter |
In Area ② of the preceding figure, you can use filter conditions to narrow down the detection results. You can filter by Workspace, Table Name, Field Name, and other conditions. You can also click Expand to view more filter conditions and further filter by Category, Level, Sensitive Field Type, and other conditions.
|
|
Query detection results |
In Area ③ of the preceding figure, you can query or reset filters to search for detection results that match the filter conditions. |
|
Detection results list |
Area ④ of the preceding figure displays the detection results list. You can click Display Field Settings to select the column information you want to focus on and refresh the detection results list. By default, the list displays Workspace, Table Name, Field Name, Category, Level, Sensitive Field Type, Manually Corrected, and Last Updated At. |
Manually correct detection results
DataWorks allows you to manually correct inaccurate sensitive data detection results. The following figure shows the logic of manual correction.

Go to manual correction
-
Go to the data detection rules page. For more information, see Go to the data detection rules page.
-
Click the Identification results tab to go to the detection results page.
-
Manually correct columns with inaccurate detection results.

Action
Description
Filter by engine type
In Area ① of the preceding figure, you can select a data engine from the drop-down list.
NoteCurrently, you can correct the sensitive column detection results for the ODPS, EMR, CDH_HIVE, and HOLO engines.
Filter
In Area ② of the preceding figure, you can use filter conditions to narrow down the detection results.
You can filter by Workspace, Table Name, Field Name, and other conditions. You can also click Expand to view more filter conditions and further filter by Category, Level, Sensitive Field Type, and other conditions.
-
Category: The classification information from the default classification and categorization template of the current tenant. For more information, see Configure classification and categorization templates.
-
Level: The level information from the default classification and categorization template of the current tenant.
Correct a single record
Area ③ of the preceding figure displays the detection results list. You can click Display Field Settings to select the column information you want to focus on and refresh the detection results list. By default, the list displays Workspace, Table Name, Field Name, Category, Level, Sensitive Field Type, Manually Corrected, and Last Updated At.
For columns whose Sensitive Field Type detection result is inaccurate, click the drop-down list in the Sensitive Field Type column on the right. The drop-down list displays the sensitive field types that are set to Yes in the default classification and categorization template of the current tenant. Check whether the existing sensitive field types meet your requirements:
-
Requirements met: Select another existing sensitive field type, and then click the
 icon on the right to go to the Data Detection Rules page. Modify the detection rules for both the original and the updated sensitive field types to ensure the accuracy of future detections.
 -
Requirements not met: Click the
icon on the right to go to the Data Detection Rules page, or scroll to the bottom of the drop-down list and click Manage Sensitive Field Types. You are redirected to the Data Detection Rules page and the Create Sensitive Field Type dialog appears, where you can create a sensitive field type and configure detection rules. For more information, see Configure data detection rules and run a detection task.
Batch correct data
Select the columns that you want to correct in batches, and then click the Batch Correct button in Area ④ of the preceding figure. In the Batch Correct Detection Results dialog that appears, the Sensitive Field Type drop-down list displays the sensitive field types that are set to Yes in the default classification and categorization template of the current tenant. Select the correct sensitive field type and click Save to complete the batch correction.
-
Export detection results
For data with detection results, you can click Export Detection Results to export the detection results that match the current filter conditions to your local machine.
-
Export Detection Results: Click
 to automatically export the detection results that match the current filter conditions.Note
A maximum of 100,000 records can be exported.