This tutorial explains how to connect a Java application running in a Container Service for Kubernetes (ACK) cluster to Application Real-Time Monitoring Service (ARMS). You can then analyze application performance, use Trace Explorer, and configure alerts.
To connect Java applications in other environments or Go applications to Application Monitoring, see Connect applications.
Workflow
-
Install an agent for the application.
-
Install the ack-onepilot component: ack-onepilot is a system component of ACK that connects Java or Go applications deployed in ACK to ARMS.
-
Update the YAML file: Add
labelsto the application's YAML file to enable monitoring and set its display name in ARMS.
-
-
View monitoring data.
-
Configure alerts.
Prerequisites
-
ACK:
-
A Kubernetes cluster is created. For more information, see Create an ACK managed cluster.
-
A Java application:
-
For JDK version requirements, see Java components and frameworks supported by Application Monitoring.
-
The maximum heap memory of the process must be greater than 256 MB.
If you do not have a Java application, you can use the following sample YAML to create one. For more information, see Create a stateless workload (Deployment).
NoteThe sample YAML creates the following resources:
-
A namespace named arms-demo. All subsequent resources are created in this namespace.
-
Two stateless workloads: arms-springboot-demo and arms-springboot-demo-subcomponent.
-
A Service named arms-demo-component.
-
A database named arms-demo-mysql.
-
-
-
ARMS:
A paid edition of Application Monitoring is activated.
Unused quota does not carry over to the next month. If you exceed the free quota in the current month, you are charged based on the amount of data written. For more information, see Billing.
Install the agent
1. Install the ack-onepilot component
-
Log on to the ACK console. On the Clusters page, click the name of the cluster.
-
In the left-side navigation pane, click . On the Add-ons page, search for ack-onepilot.
-
On the ack-onepilot card, click Install. In the dialog box that appears, click OK.
After the installation is complete, an Installed label appears in the upper-right corner of the ack-onepilot component card, and the component card displays the current version at the bottom.
2. Update the YAML
-
On the , select your application's namespace. In the row of the target application, choose
 > Edit YAML.
 -
In the Edit YAML panel, add the following
labelsunderspec.template.metadata, and then click Update.labels: armsPilotAutoEnable: "on" armsPilotCreateAppName: "<your-deployment-name>" # The display name of the application in ARMS.For example, add the configuration to the YAML files of the arms-springboot-demo and arms-springboot-demo-subcomponent applications to enable monitoring and set their display names in ARMS to arms-k8s-demo and arms-k8s-demo-subcomponent, respectively.
arms-springboot-demo
strategy:
      rollingUpdate:
        maxSurge: 25%
        maxUnavailable: 25%
      type: RollingUpdate
    template:
      metadata:
        labels:
          app: arms-springboot-demo
          armsPilotAutoEnable: 'on'
          armsPilotCreateAppName: arms-k8s-demo
      spec:
        containers:
          - env:
              - name: SELF_INVOKE_SWITCH
                value: 'true'
              - name: COMPONENT_HOST
                value: arms-demo-component
              - name: COMPONENT_PORT
                value: '6666'
              - name: MYSQL_SERVICE_HOST
                value: arms-demo-mysql
              - name: MYSQL_SERVICE_PORT
                value: '3306'
            image: >-
              registry.cn-hangzhou.aliyuncs.com/arms-docker-repo/arms-springboot-demo:v0.1
            imagePullPolicy: Always
            name: arms-springboot-demo
            resources:
              limits:
                cpu: 500m
arms-springboot-demo-subcomponent
strategy: rollingUpdate: maxSurge: 25% maxUnavailable: 25% type: RollingUpdate template: metadata: labels: app: arms-springboot-demo-subcomponent armsPilotAutoEnable: 'on' armsPilotCreateAppName: arms-k8s-demo-subcomponent spec: containers: - env: - name: SELF_INVOKE_SWITCH value: 'false' - name: MYSQL_SERVICE_HOST value: arms-demo-mysql - name: MYSQL_SERVICE_PORT value: '3306' image: >- registry.cn-hangzhou.aliyuncs.com/arms-docker-repo/arms-springboot-demo:v0.1 imagePullPolicy: Always name: arms-springboot-demo-subcomponent resources: limits: cpu: 500m terminationMessagePath: /dev/termination-log terminationMessagePolicy: File dnsPolicy: ClusterFirst restartPolicy: Always -
After the containers are automatically redeployed, wait for 1 to 2 minutes. In the ARMS console, go to the , and click an application name to view its monitoring metrics. For more information, see View monitoring details (New).
In the application list, you can see the two Java applications arms-k8s-demo-subcomponent and arms-k8s-demo. The table displays monitoring metrics and their trends, such as requests per second, error rate, average response time, number of CVE vulnerabilities, and intelligent insights.
View monitoring details
Trace Explorer
The Trace Explorer feature enables real-time analysis by combining various filter conditions and aggregation dimensions. It also provides error and slow trace analysis to locate the cause of failed or slow calls in your system or application.
arms-k8s-demo
In the ARMS console, on the Trace Explorer page, select the arms-k8s-demo application. You can filter call records by criteria such as serviceName, time range, status (Normal/Error), response time, API name, and host address. The central area of the page displays a bar chart for Call Count, a bar chart for HTTP Errors (including 500 status codes), and a line chart for Response Time Percentiles (p50/p90/p95/p99/average). The table below shows trace details, including columns for TraceId, API Name, Application Name, Response Time, Status Code, Start Time, and Host Address. You can switch between views such as List, Scatter Plot, Aggregated Trace, Aggregated Topology, and Error/Slow Trace Analysis. The Slow Trace Analysis panel on the right identifies the dimensional attributes most relevant to slow calls based on the traces with the longest response times.
Trace details:
The trace with TraceID eaac1ed0ba172137124366816284d0001 has a total response time of 69 ms. The trace contains two spans. The first span is for the API /demo/queryNotExistDB/{id} from the arms-k8s-demo application, with a status code of 200 and a response time of 69 ms. The second span is a MySQL query select * from from arms_apm_demo_db, with a response time of 2 ms. The span details panel on the right shows the application name arms-k8s-demo, API name MySQL, and IP user_notExist where id = 0172.30.208.186, with a normal status. The Attributes section includes properties such as db.name: arms_apm_demo_db, db.statement: select * from , and user_notExist where id = 0net.peer.name: arms-demo-mysql:3306.
arms-k8s-demo-subcomponent
On the Trace Explorer page for the arms-k8s-demo-subcomponent application, the top section displays charts for Call Count, HTTP Errors, and Response Time Percentile (p50/p90/p95/p99). The left side provides quick filters for Status (Normal/Error), Response Time, API Name, and Host Address. Below is the trace list, which includes columns for TraceId, API Name, Application Name, Response Time, Status, Start Time, and Host Address. The panel on the right displays Slow Trace Analysis and top attribute dimensions.
Trace details:
The trace details page shows a trace with TraceID eaac1ed0e017213712146427640d0001, which started at 2024-07-19 14:40:14 and has a total response time of 99 ms. The trace contains three spans. The entry span /demo/invokeComponent (from arms-k8s-demo, status code 200, 99 ms) calls /demo/queryUser/{id} (from arms-k8s-demo-subcomponent, status code 200, 96 ms), which then executes the MySQL query select * from `user` where id = ? (from arms_apm_demo_db, 1 ms). The span details show the application name arms-k8s-demo-subcomponent, API /demo/queryUser/{id}, IP address 172.30.208.119, and a normal status. Attributes include http.path: /demo/queryUser/10, http.status_code: 200, namespace: arms-demo, and clusterName: go-test-1.
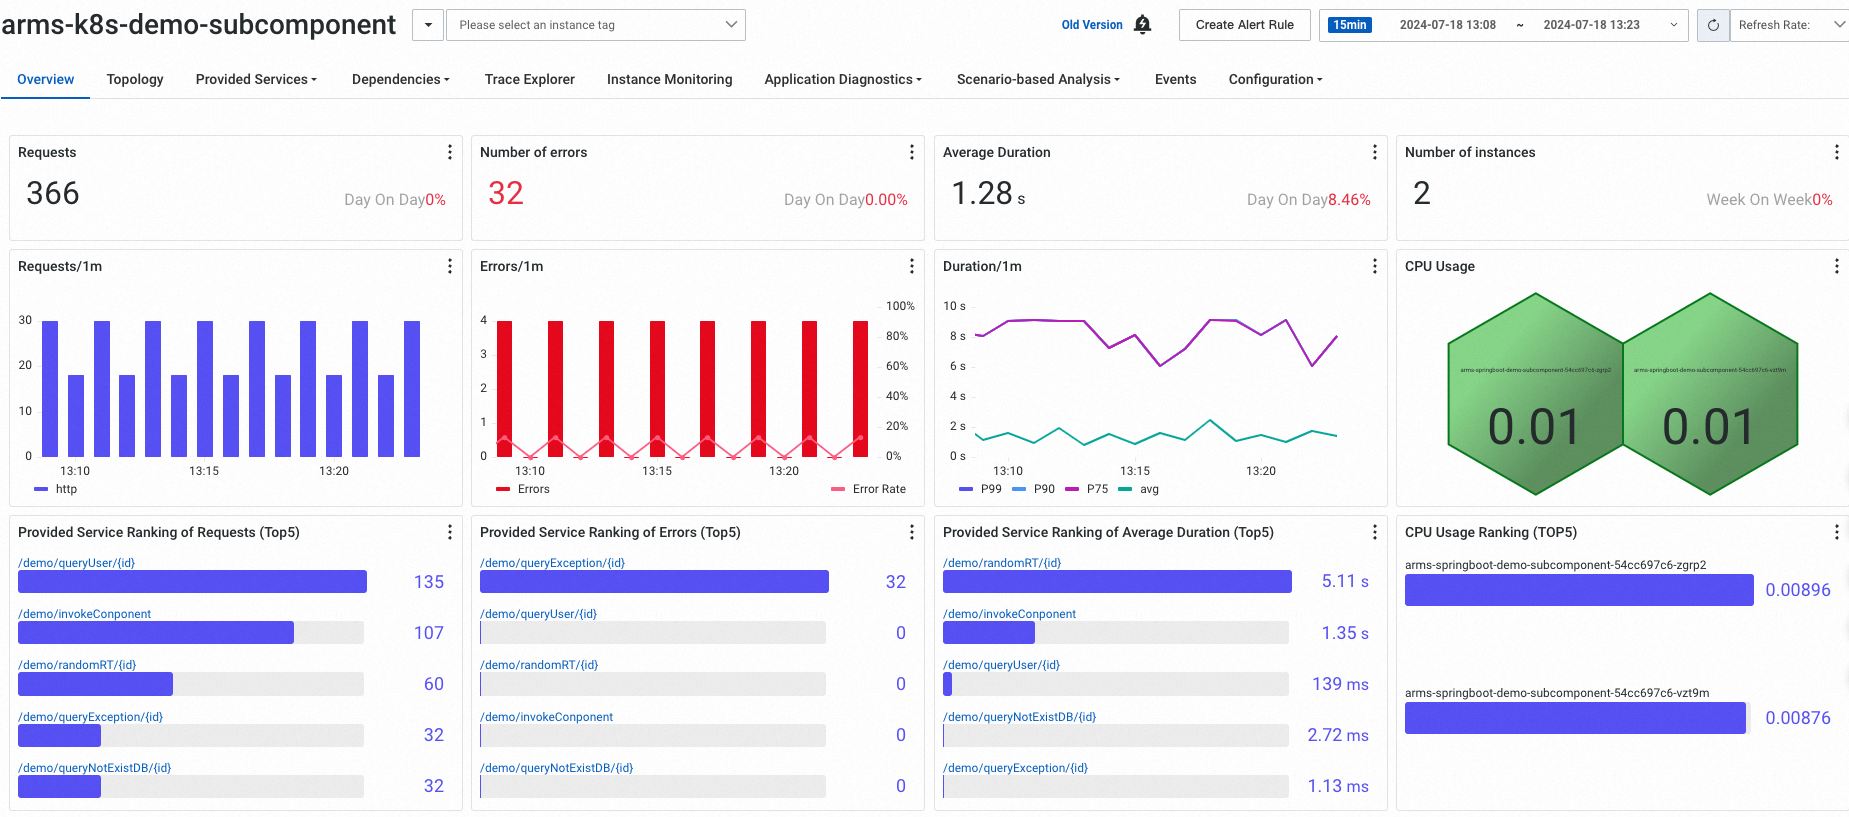
Metrics
-
Application overview
arms-k8s-demo

arms-k8s-demo-subcomponent
-
Topology
arms-k8s-demo
In the ARMS console, select the arms-k8s-demo application and click the Topology tab to view the application call topology. The topology shows the arms-k8s-demo node (Errors: 16, Requests: 259, Response Time: 1.2s) and its three downstream dependencies: arms-k8s-demo-subcomponent (Errors: 16, Requests: 152, Response Time: 1.1s), www.aliyun.com (Errors: 0, Requests: 75, Response Time: 72.85ms), and arms-demo-mysql (Errors: 0, Requests: 91, Response Time: 1.50ms).
arms-k8s-demo-subcomponent
On the Topology tab, the service call topology for the arms-k8s-demo-subcomponent application is displayed. The topology diagram includes the following nodes and their metrics: arms-k8s-demo (Errors: 16, Requests: 259, Response Time: 1.2s), arms-k8s-demo-subcomponent (Errors: 64, Requests: 732, Response Time: 1.2s), arms-demo-mysql (Errors: 0, Requests: 227, Response Time: 0.59ms), and www.aliyun.com (Errors: 0, Requests: 195, Response Time: 106.21ms). Lines between the nodes indicate call relationships: arms-k8s-demo calls arms-k8s-demo-subcomponent, which in turn calls both arms-demo-mysql and www.aliyun.com.
Configure alerts
Create alert rules for specific applications. When an alert rule is triggered, the system sends notifications to the specified contacts or DingTalk groups, so you can take action. For more information, see Application Monitoring alert rules.
Example alert rule configuration: For the alert objects, select the arms-k8s-demo and arms-k8s-demo-subcomponent applications. For the metric type, select Statistics on services provided by applications. In the filter conditions, set both API Name and API Call Type to All. The trigger mode is Single Condition. The alert is triggered when the average response time over the last 5 minutes is greater than or equal to the corresponding threshold. The multi-level thresholds are set to P1:critical 6000 ms, P2:error 4000 ms, and P4:page 2500 ms.
Clean up resources
After you complete this tutorial:
-
If you want to continue monitoring the application, ensure your account has a sufficient balance.
-
If you no longer need to monitor the application, uninstall the agent. For more information, see Uninstall the agent in a Kubernetes environment.
References
-
ARMS supports multiple trace sampling modes. You can select a suitable mode based on your use case to obtain the desired trace data at a lower cost. For more information, see Select a trace sampling mode (agent version 3.2.8 or later).
-
Application Monitoring lets you correlate TraceIDs in business logs. When an application issue occurs, you can use the TraceID to quickly find the relevant business logs for troubleshooting and resolution. For more information, see Correlate TraceIDs with business logs for Java applications.
-
If your online application experiences high CPU or memory usage or a large number of slow calls, you can use the flame graphs generated by the continuous profiling feature in ARMS to identify the root cause. For more information, see Continuous profiling for Java applications.
-
Alibaba Cloud Managed Service for Prometheus is integrated with the ARMS Application Monitoring data source by default. You can directly obtain Application Monitoring data, view pre-built Application Monitoring dashboards, and perform custom development in Managed Service for Prometheus. For more information, see Obtain ARMS Application Monitoring data by using Managed Service for Prometheus.