ESA is an upgraded version of DCDN. It includes all the capabilities of DCDN and provides enhanced security, improved real-time monitoring, and simplified configuration. This topic guides you on how to smoothly migrate from CDN or DCDN to ESA.
Background information
DCDN will gradually stop allowing new users to activate features such as edge security protection and edge computing. If you are a CDN user and require edge security protection or edge computing, you can migrate your site to ESA. ESA provides the following benefits:
Expanded edge computing capabilities for more scenarios: Built on DCDN, ESA provides a wide range of frontend frameworks for one-click deployment of Pages. It also adds tools such as function metric monitoring and instant logs to facilitate business operations and maintenance (O&M) and offers a rich collection of function template samples to help you quickly get started with edge computing.
Enhanced edge protection capabilities: ESA uses a native Web Application Firewall (WAF) to provide one-click intelligent rate limiting and highly customizable protection rules. All plans also include basic native Anti-DDoS protection. In addition, ESA supports features such as Bot management and origin protection to provide comprehensive security for your business.
For a comparison of product features, see Feature Comparison of CDN, DCDN, and ESA.
Precautions
Unlike the billing method for CDN or DCDN, which is based on purchasing resource plans, ESA uses a subscription billing model. ESA provides services for your business through subscription packages.
Step 1: In ESA, configure an accelerated domain name
To minimize the impact on your business during site migration, you must first add your original accelerated domain name to ESA and then migrate the related configurations. For example, assume that you have added the accelerated domain name cdn.example.cn and the corresponding origin configuration 192.0.2.0:80 to CDN or DCDN.
Add a root domain
First, you must add the root domain of the accelerated domain name, example.cn, to ESA. This lets you manage accelerated domain names by root domain.
In the ESA console, select Websites and click Add Website. On the Enter Domain Name page, enter the root domain of the original accelerated domain name, such as
example.cn, and click Next.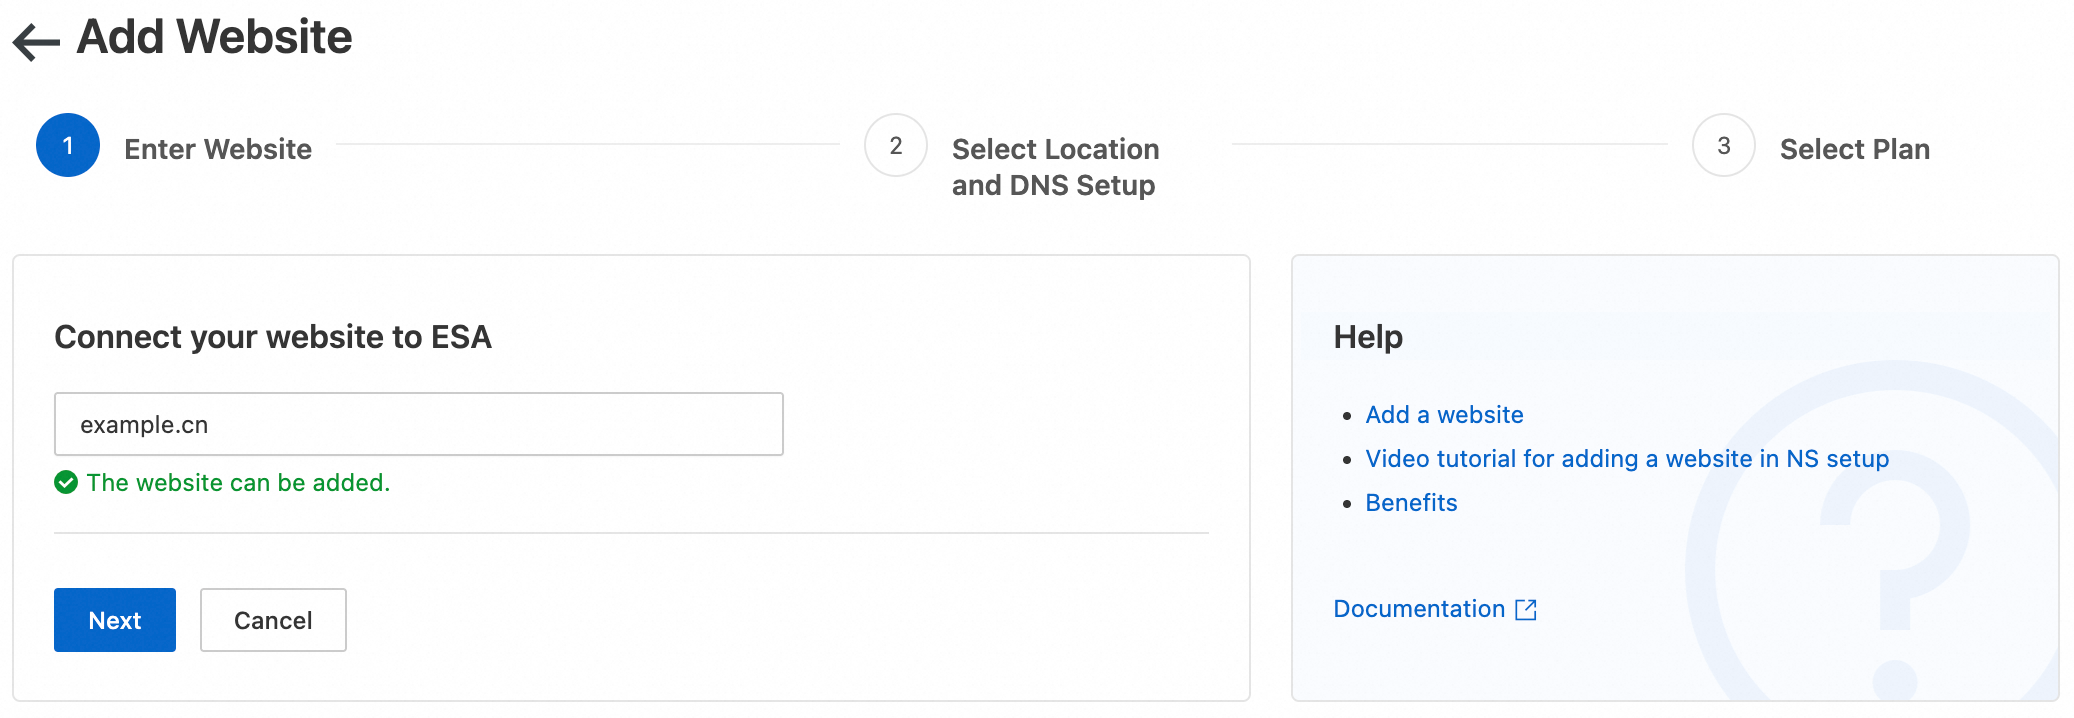
On the Select Location and DNS Setup page, select the acceleration region of your original domain name. For DNS Setup, select CNAME. Click Next.
NoteIf your root domain has multiple subdomains, ESA provides a DNS proxy feature. You can choose to connect to ESA using NS records to centrally manage your different businesses.
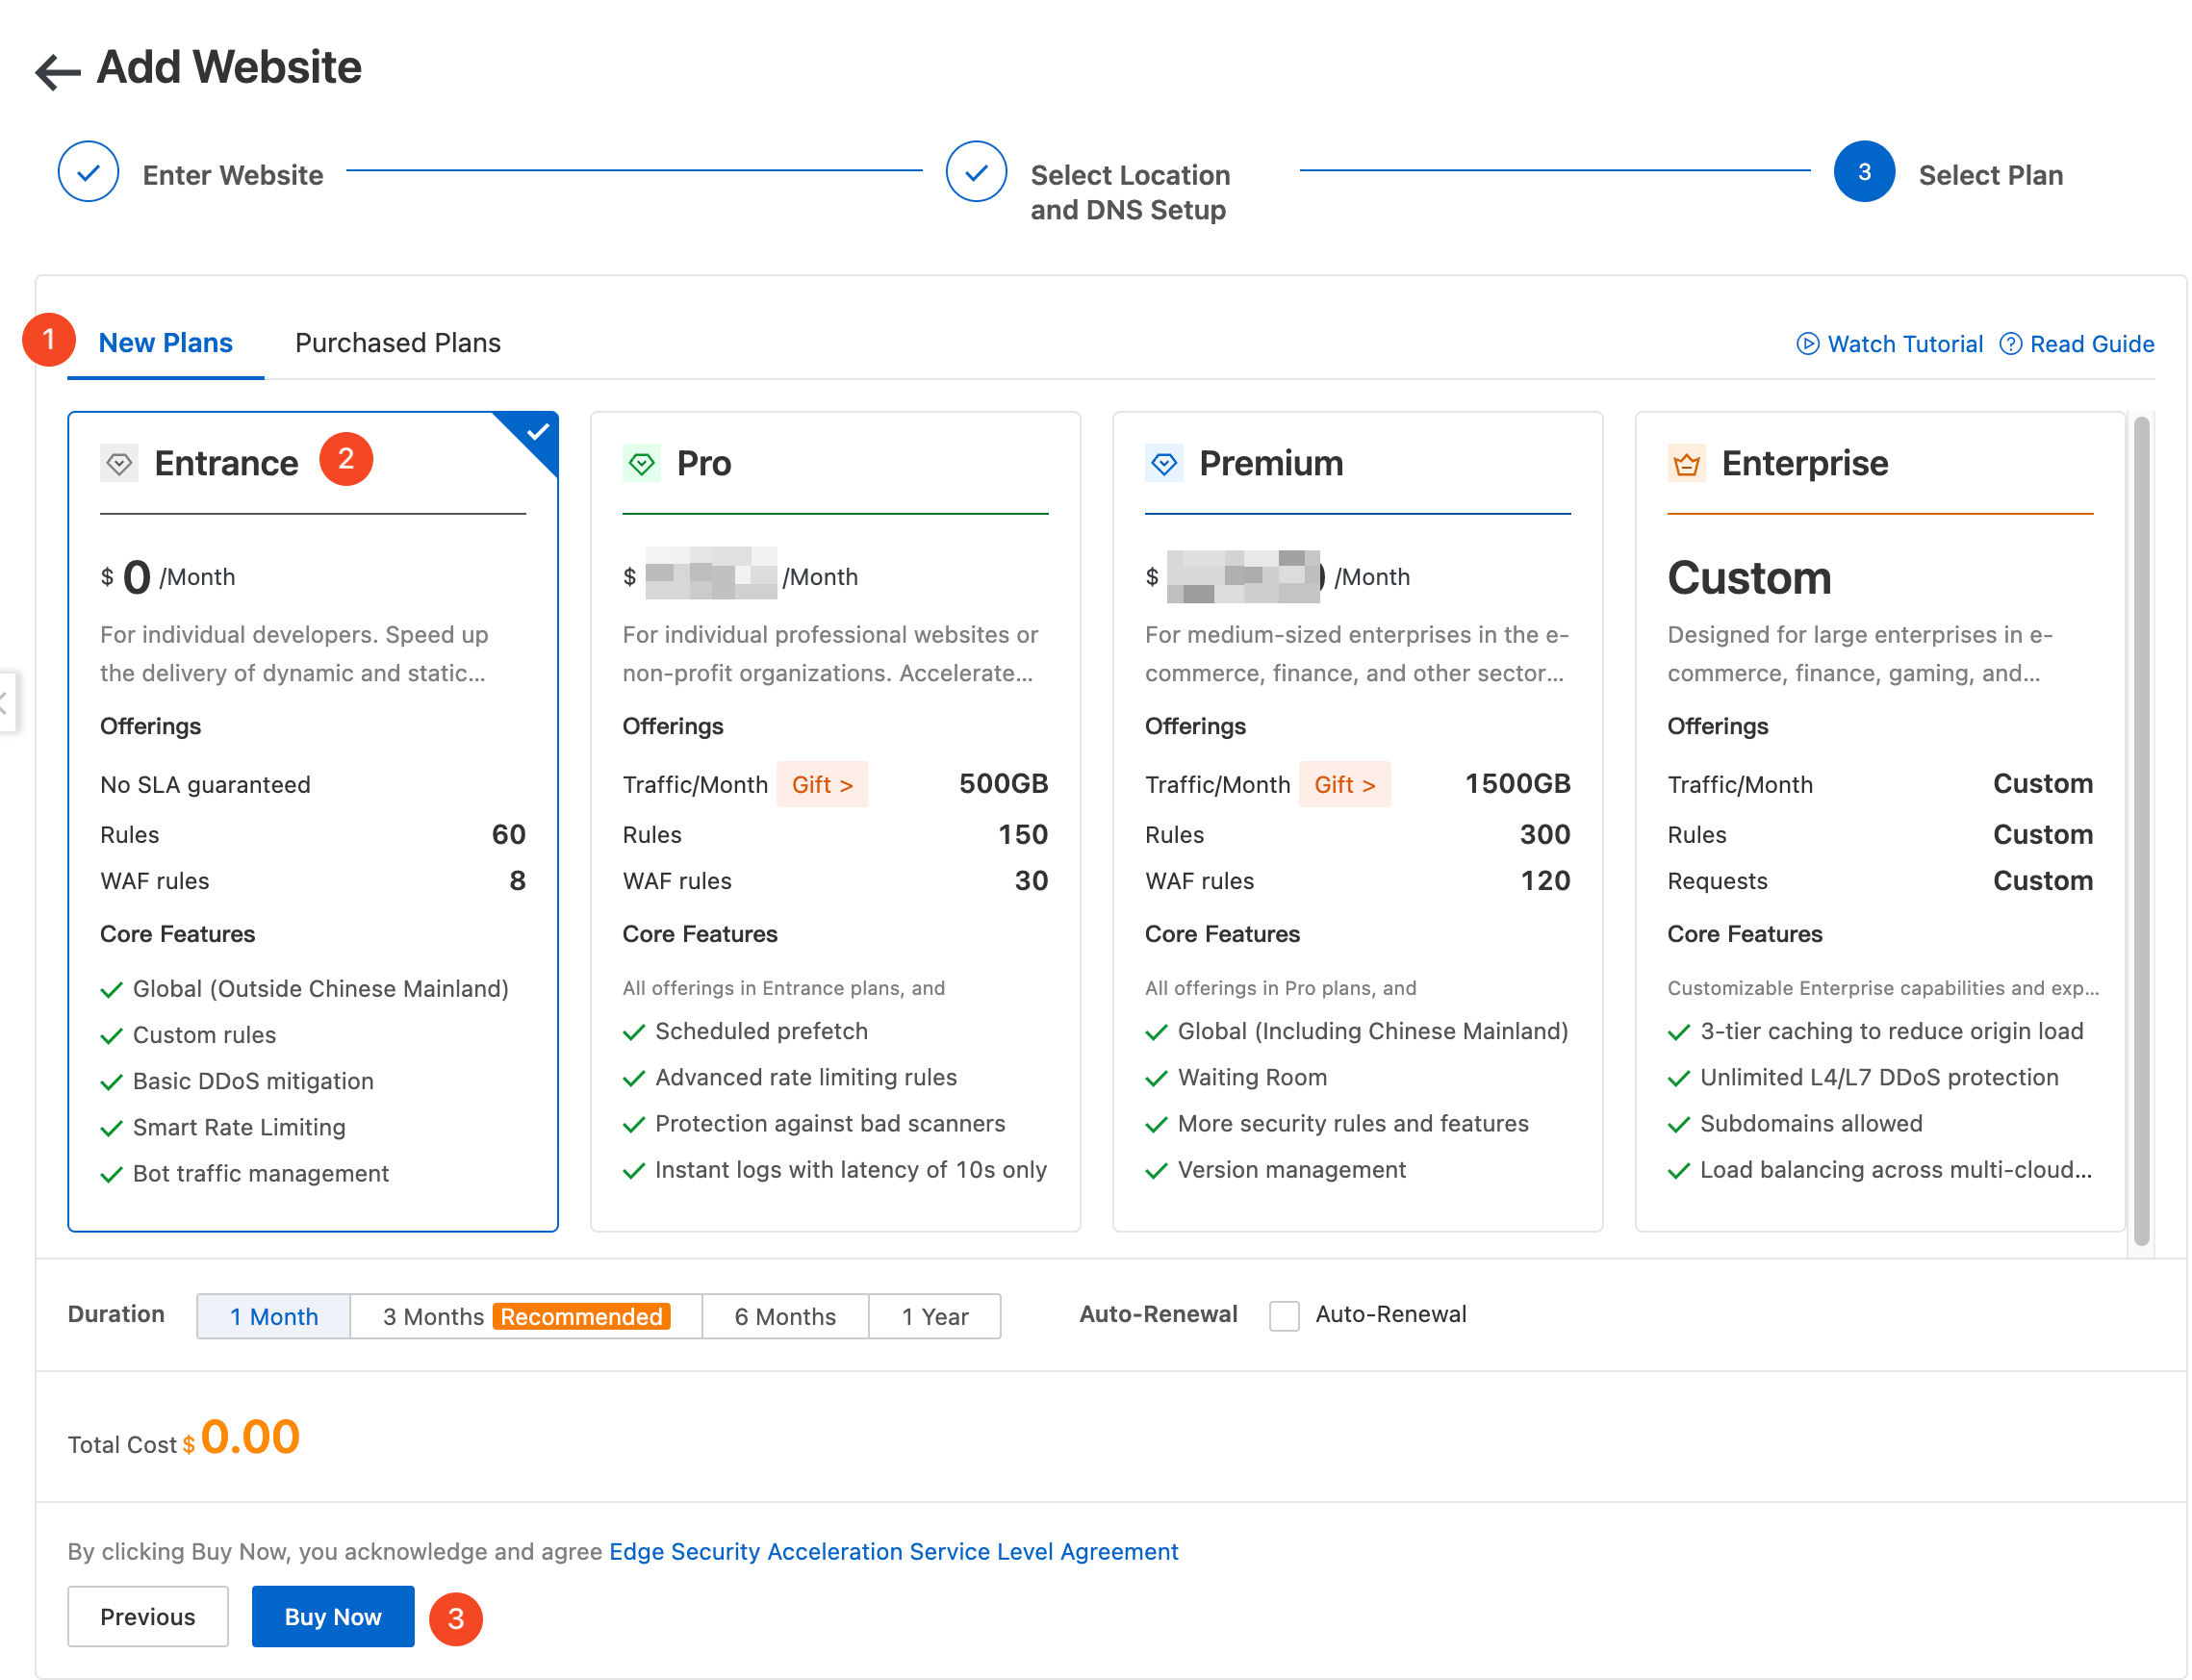
On the Select Plan page, you can start with the Entrance plan. You can upgrade to a different plan at any time.
Verify domain ownership
After adding a domain name to ESA for the first time, you must verify its ownership. Once verified, ownership does not need to be re-verified for the domain or its subdomains.
In the navigation pane on the left, click Account Overview and click
 to copy the TXT record provided by ESA. This record is used to verify the ownership of your domain name.
Follow the instructions in the console to go to your DNS service provider and add the copied information in TXT format to your domain name resolution records.

The following are configuration examples for other DNS service providers. If you cannot find your DNS service provider, you need to consult your DNS service provider.
Cloudflare
If your DNS service provider is Cloudflare, you can add a TXT record by following these steps.
Log on to the Cloudflare console.
Go to the DNS page, click Add Record, and add a TXT record.

Click Save to complete the addition.
GCP
If your DNS service provider is GCP, you can add a TXT record by following these steps.
Log on to the GCP console.
Go to the DNS page, click Add Record, and add a TXT record.

Click Save to complete the addition.
AWS
If your DNS service provider is AWS, you can add a TXT record by following these steps.
Log on to the AWS console.
Go to the DNS page, click Add Record, and add a TXT record.

Click Save to complete the addition.
Dyn
If your DNS service provider is Dyn, you can add a TXT record by following these steps.
Log on to the Dyn console.
Go to the DNS page, click Add Record, and add a TXT record.

Click Create Record to complete the addition.
Return to the ESA console, click Verify to complete the verification.
NoteIt may take minutes to hours for the TXT record to take effect after it is configured. If the verification fails, try again later.
Add an accelerated domain name
After you add the site, you must add the original accelerated domain name, cdn.example.cn, to the DNS of ESA to obtain its CNAME record value.
In the left navigation pane, choose .
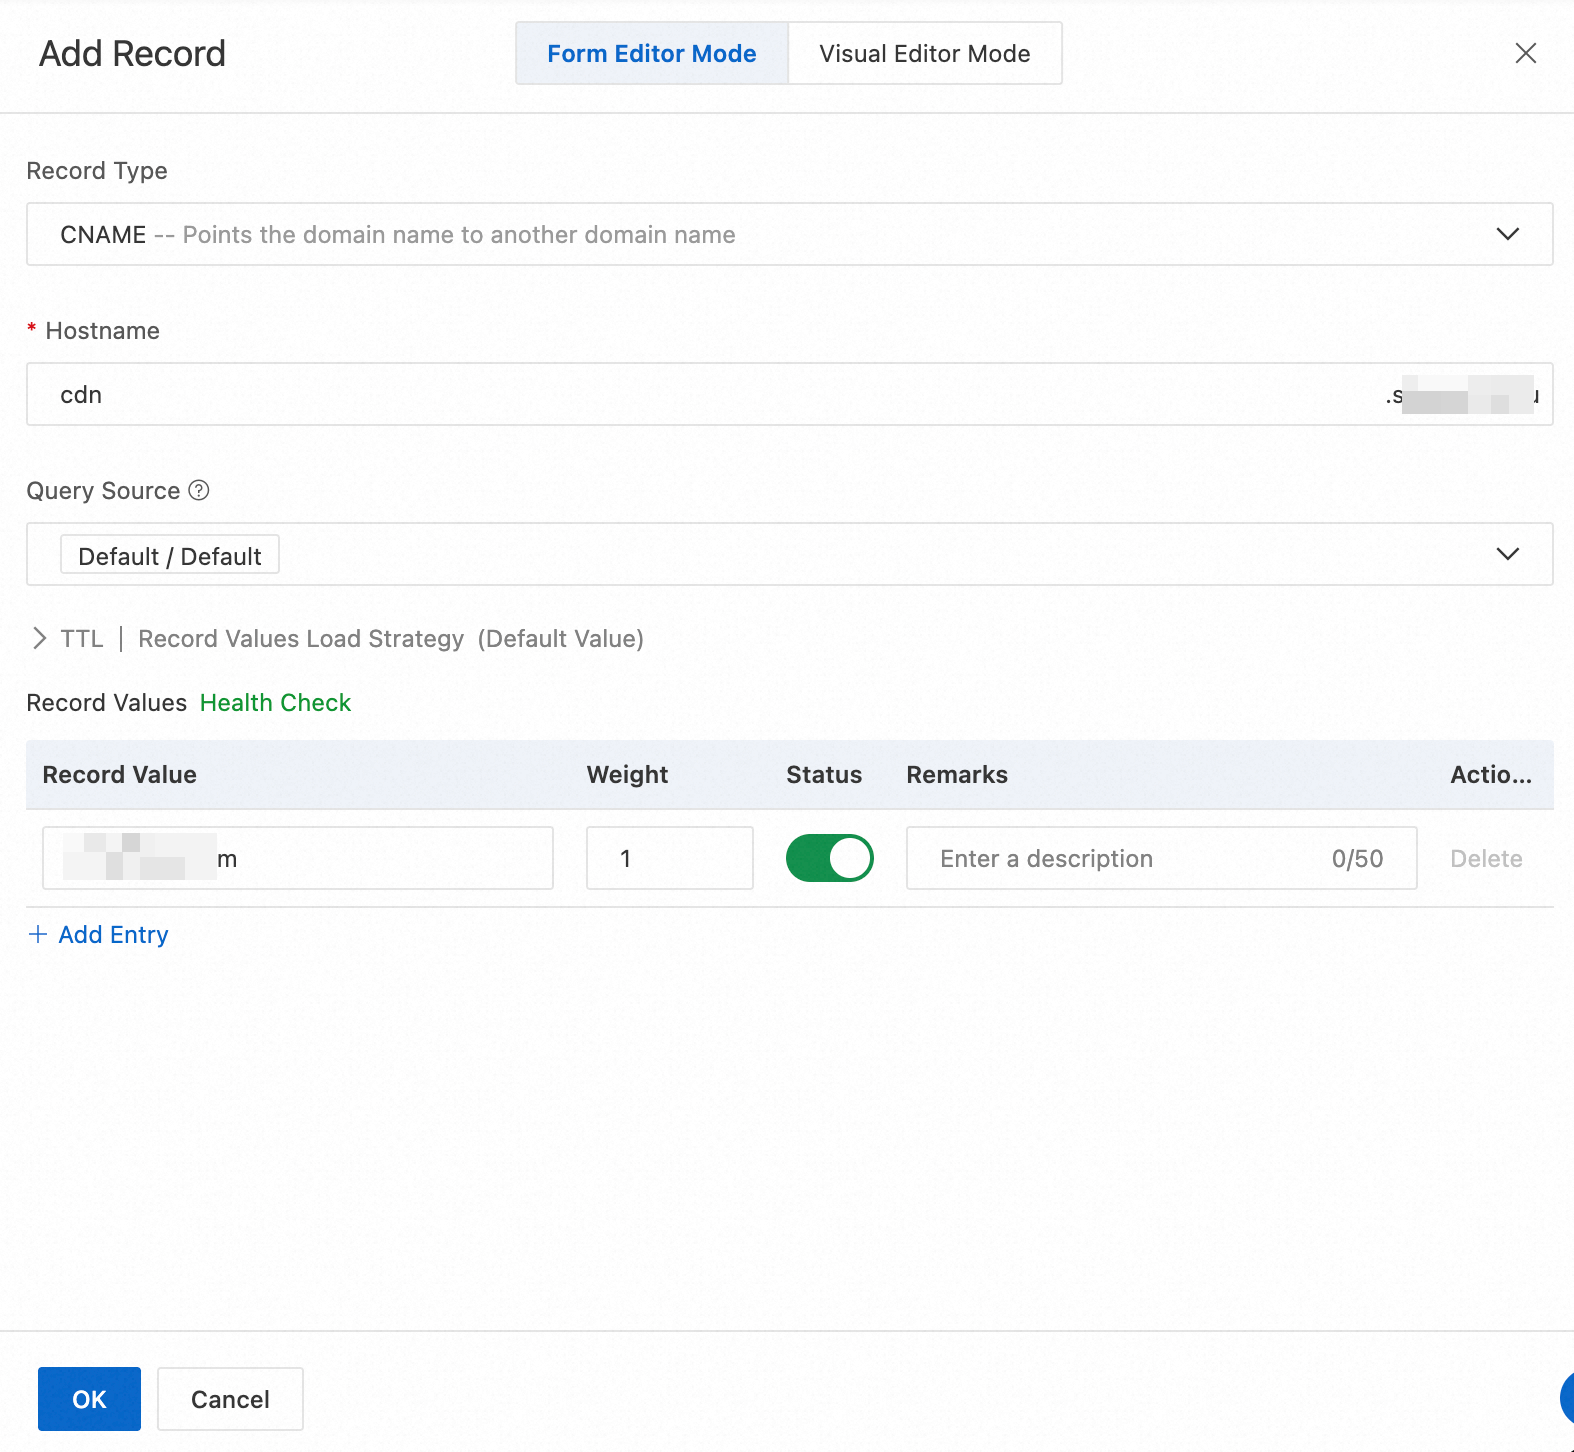
Click Add Record. Enter the information for your original accelerated domain name and origin server. In this example, set Record Type to A/AAAA, Hostname to
cdn, and Record Value to192.0.2.0.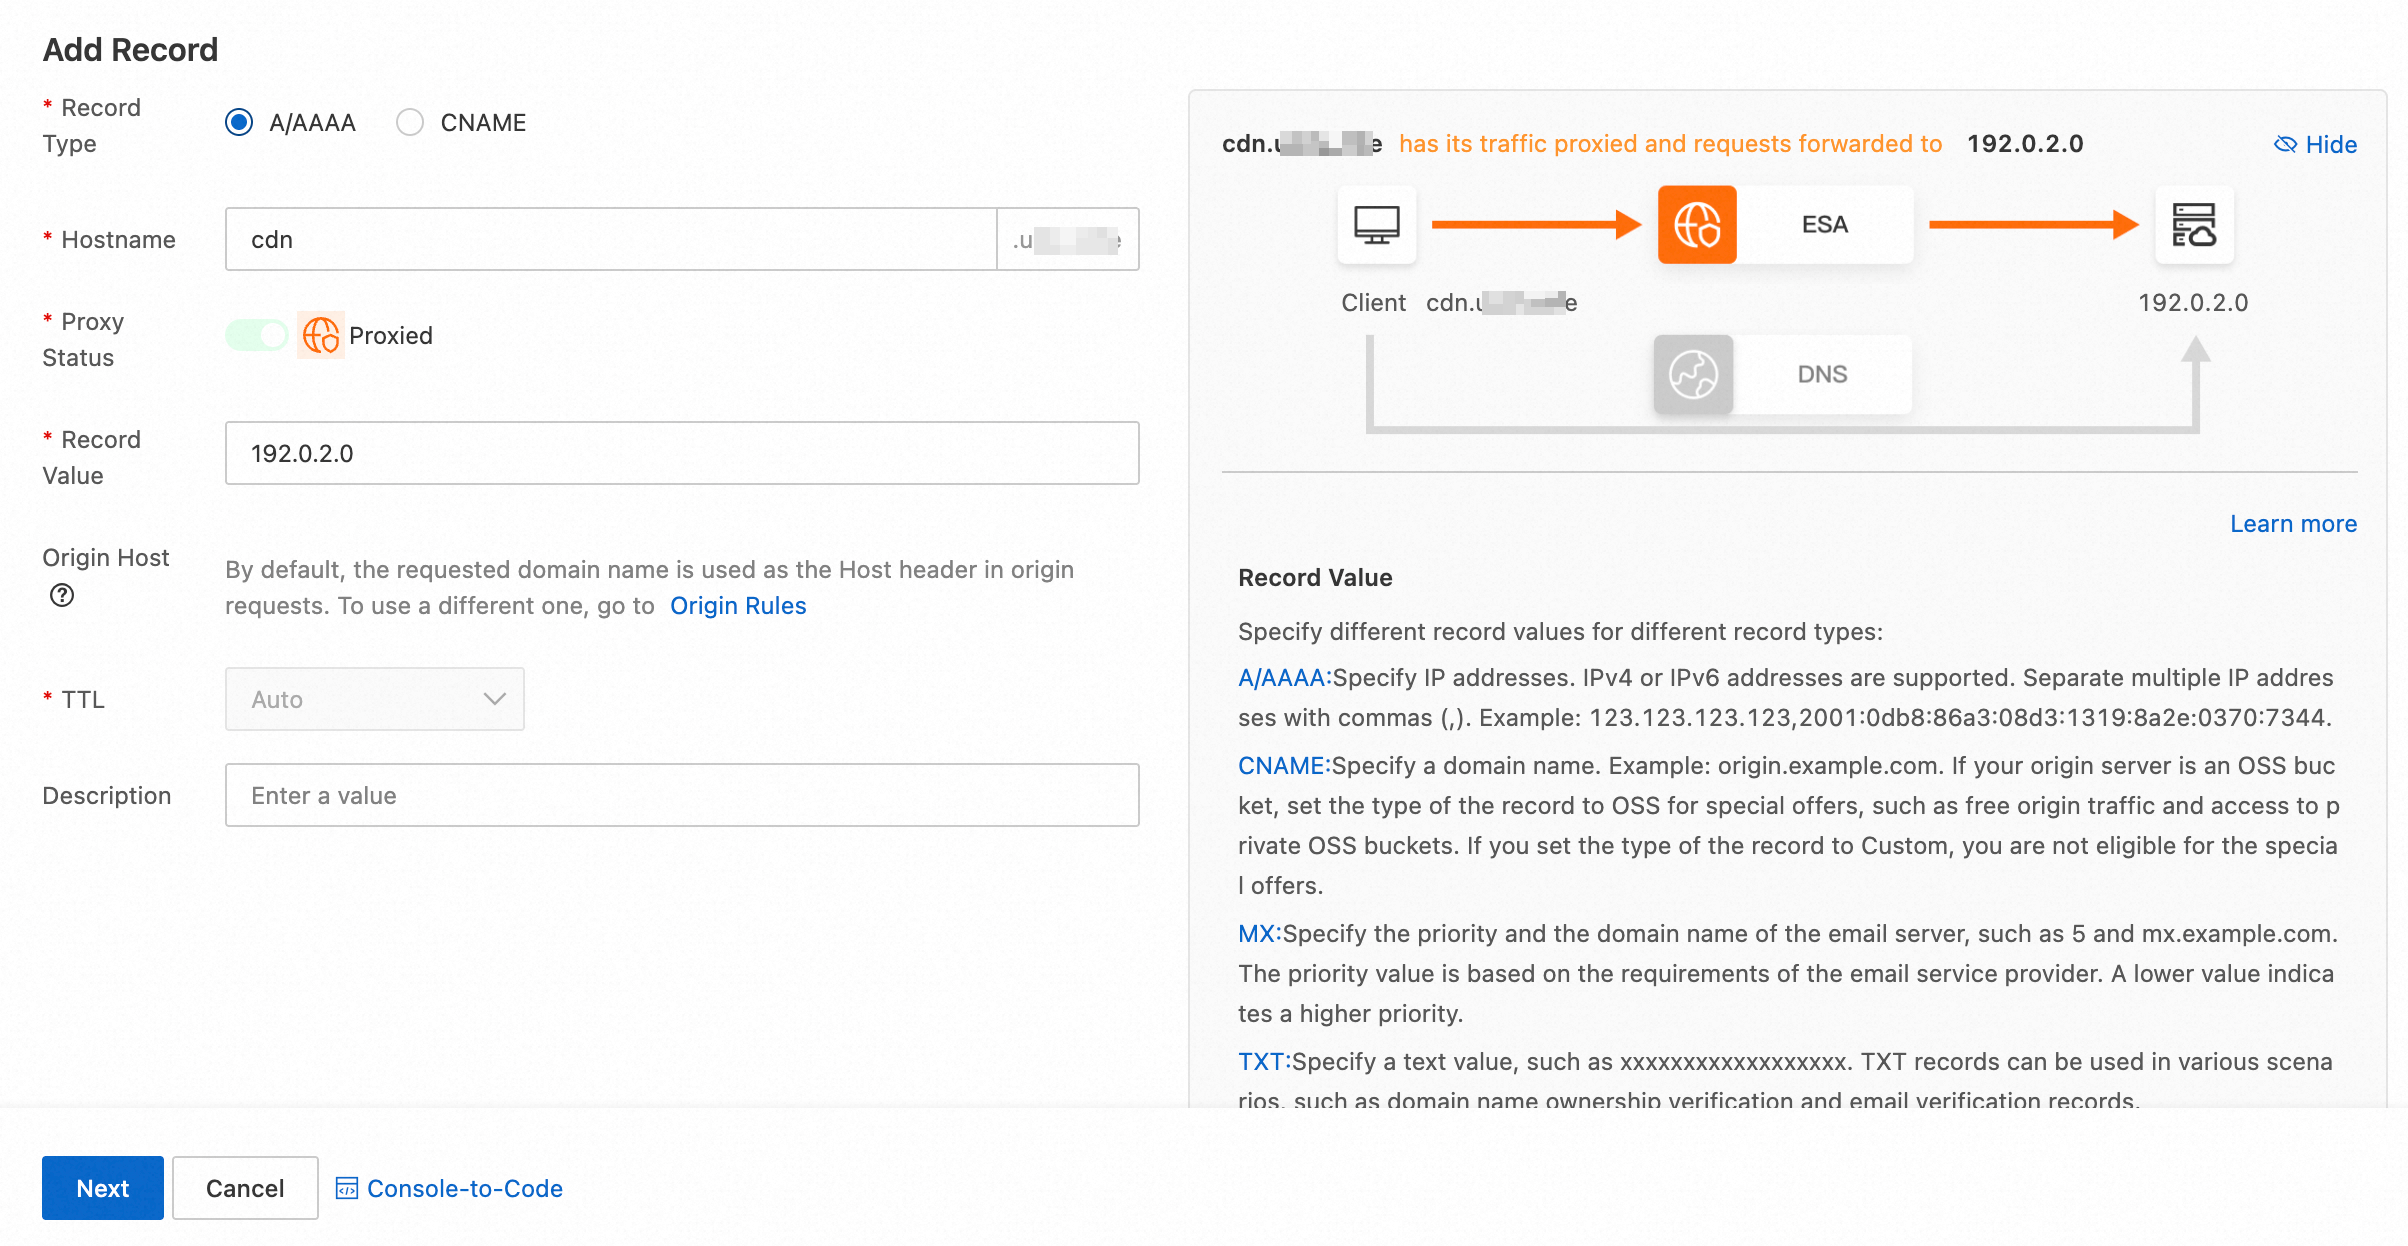
Click Next, select the Business Type for the domain name, and click Finish.
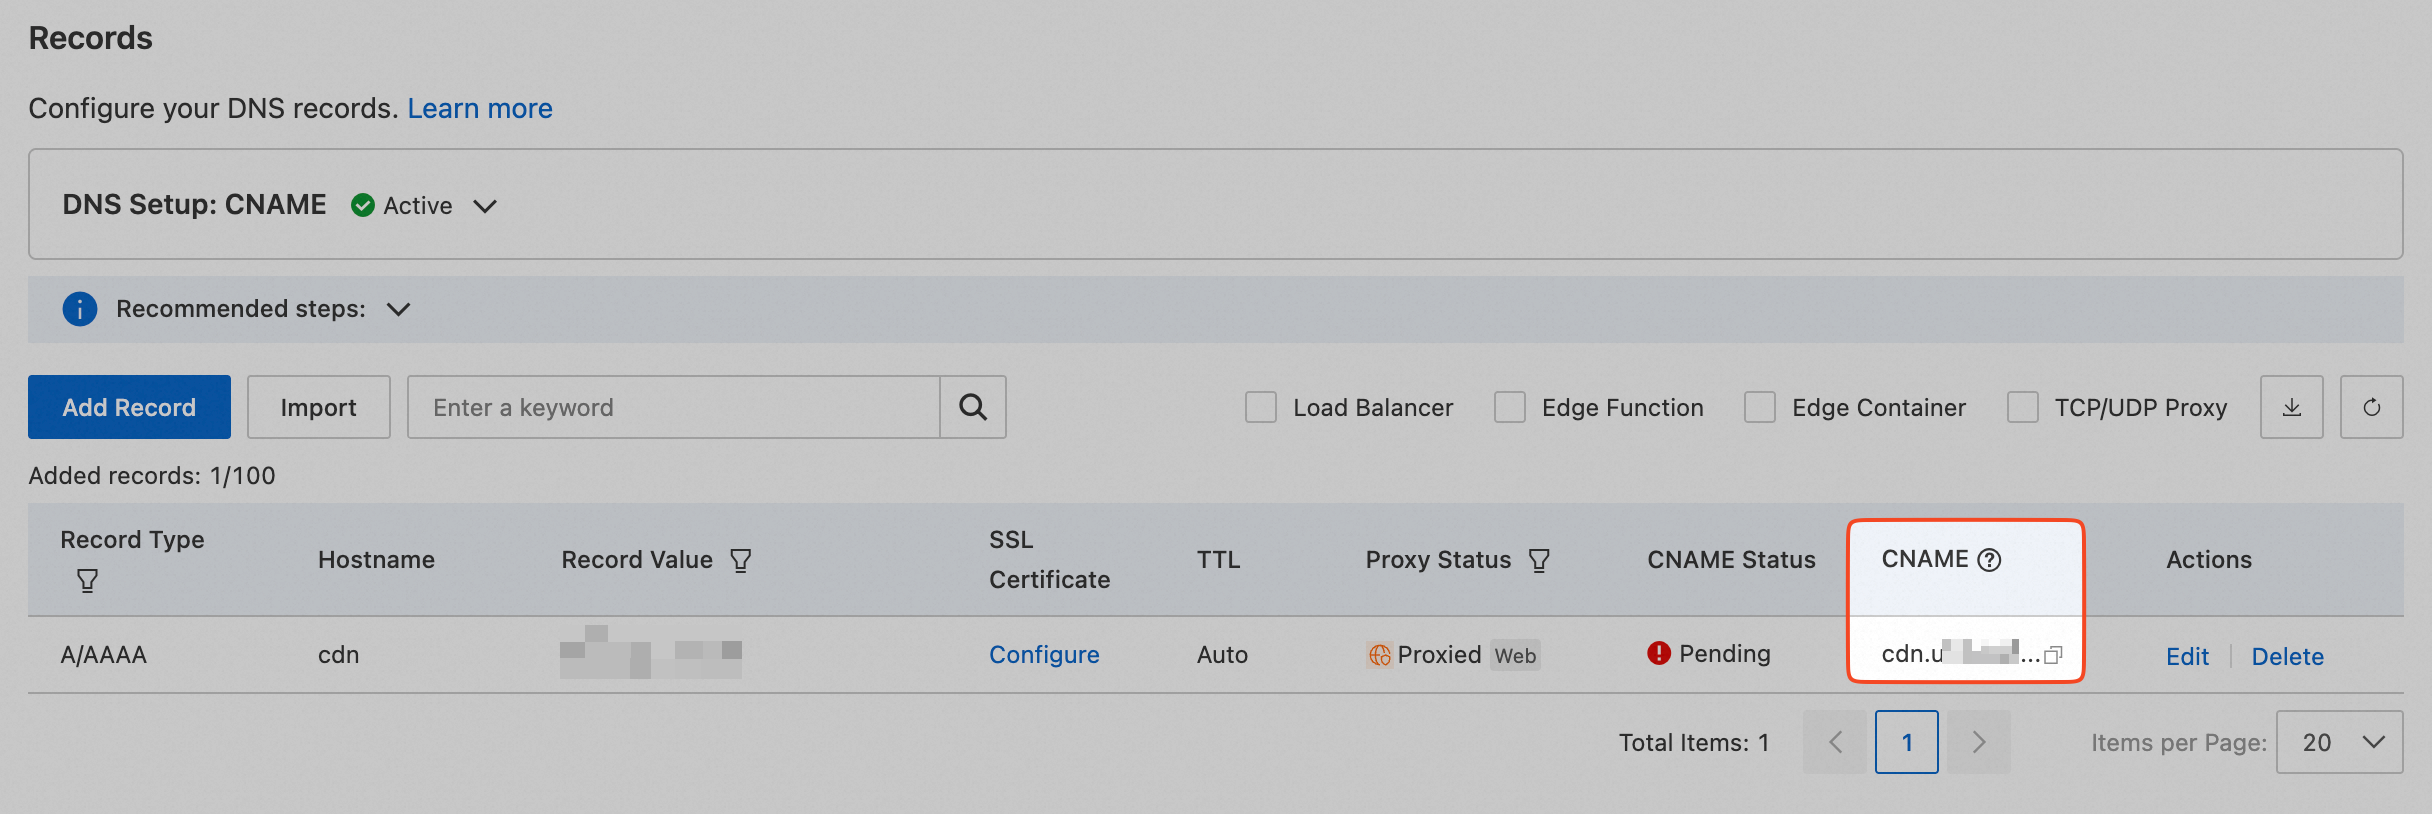
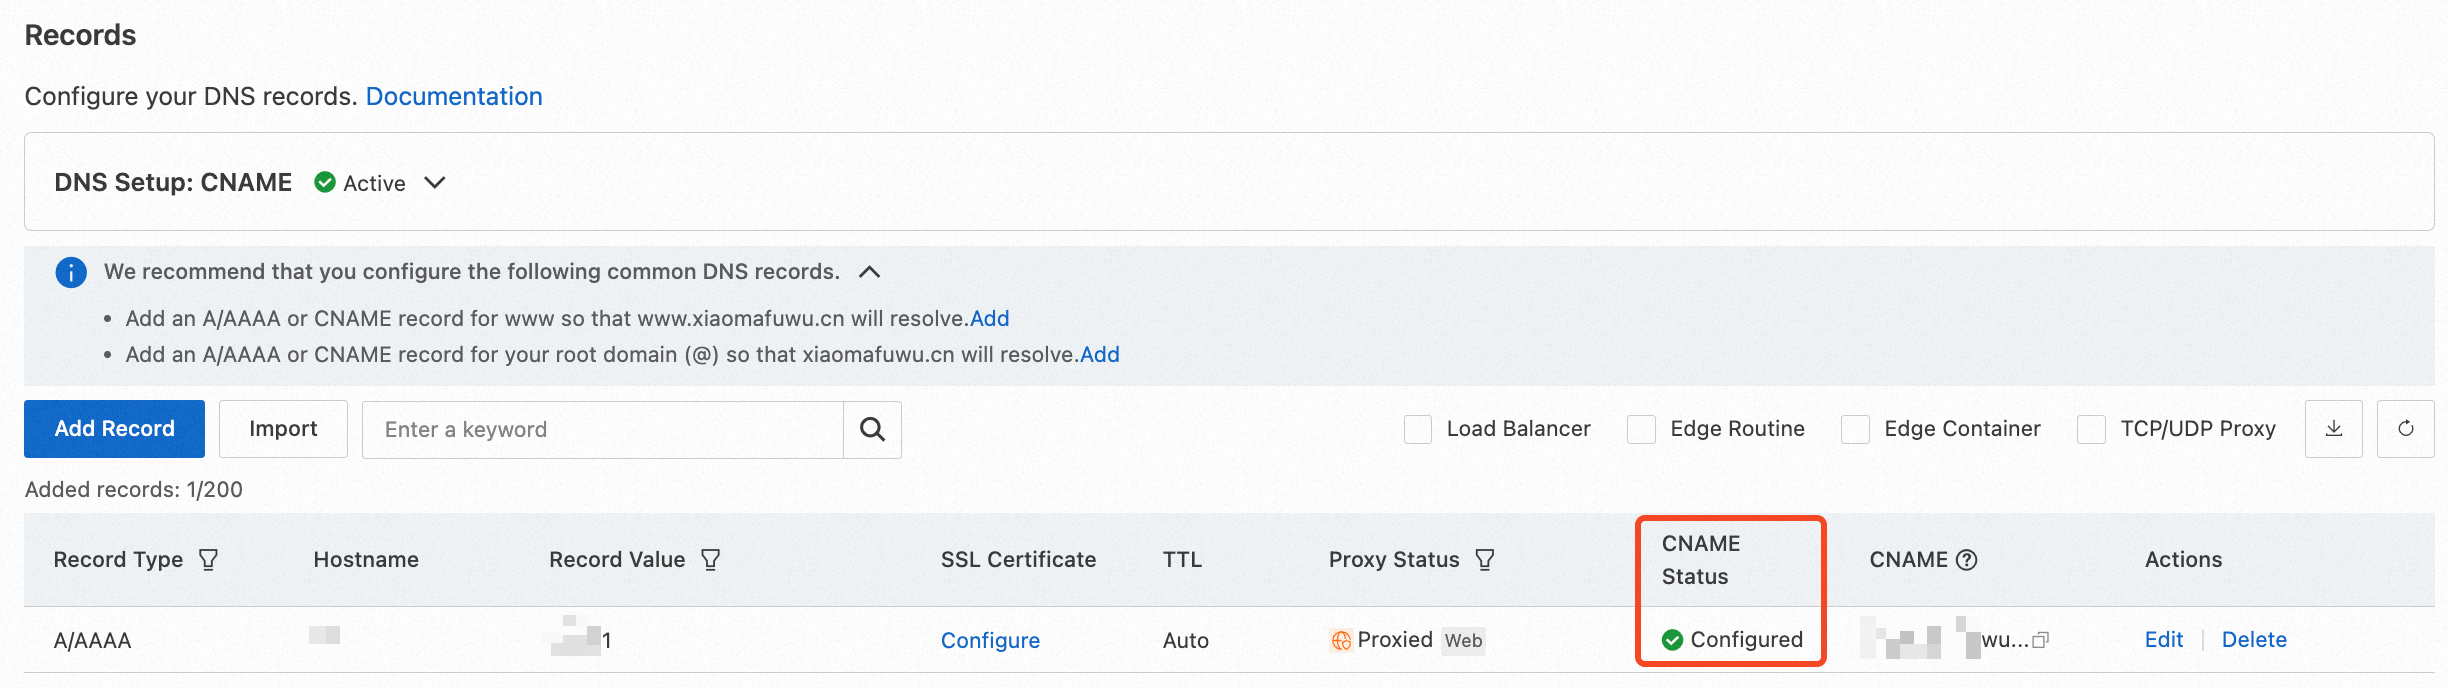
On the Records page, you can view the new CNAME record value that ESA assigned to the accelerated domain name.
Step 2: Migrate configurations
To minimize downtime, you must migrate the configuration items from the original CDN or DCDN to ESA before the configuration for the accelerated domain name takes effect.
Migrate origin port configurations
The default back-to-origin ports for ESA are 80 for HTTP and 443 for HTTPS. If your back-to-origin port is not 80 or 443, back-to-origin requests from ESA fail. Therefore, you must manually configure the back-to-origin port to match your actual back-to-origin port.
Migrate HTTPS configurations
To allow clients to access ESA points of presence (POPs) over HTTPS, go to the ESA console, select the corresponding site, and in the section, upload a certificate.
Migrate content acceleration configurations
To migrate static content acceleration configurations from CDN or DCDN, see Quick Start for Cache Configuration. In addition to global cache configurations, ESA also provides Edge Cache TTL Rules that allow you to configure cache policies based on custom traffic filtering conditions. You can use these rules in conjunction with the Cache Priority Policy to adjust your configuration.
After you enable proxy acceleration for ESA, acceleration for dynamic content is automatically enabled. No separate configuration is required.
Migrate edge security protection configurations
ESA provides upgraded security protection compared to DCDN. You can smoothly migrate your mitigation settings.
WAF configuration
ESA integrates native WAF mitigation capabilities, so you can complete the WAF mitigation settings without attaching a domain name. In the console, go to and use WAF protection rules to configure the characteristics of requests that you want to protect or allow.
Requests that are blocked by WAF rules are not billed and do not count against your plan's quota.
For edge protection, in addition to security analytics reports, ESA provides analysis reports that are triggered by security events to help you gain insights into your business security posture. ESA also supports configuring WAF mitigation settings directly from the reports.
DDoS
ESA enables Basic DDoS Protection by default. For more information, see Anti-DDoS.
Migrate edge computing configurations
ESA offers its edge functions in a free version for a wide range of developers and individual use cases. If you require concurrent performance and log collection, you can switch to a paid mode. ESA triggers edge functions by attaching a function domain name. You can see Create an application using a function template and select a suitable function template to configure the migration.
Step 3: Enable the accelerated domain name and verify the result
After you migrate the feature configurations to ESA based on your business needs, you must change the record value of the original accelerated domain name in your DNS service provider to the CNAME record value that you obtained in Step 1.
Enable the accelerated domain name
On the Records page, click
 Copy for the corresponding DNS record to copy the CNAME record that ESA provides to point to a point of presence (POP).
Go to your DNS provider, find the CNAME record for the original accelerated domain name, and update the record value to the CNAME record value provided by ESA.
Return to the ESA console, select , and confirm that the CNAME Status of the newly added record is Configured.
Verification
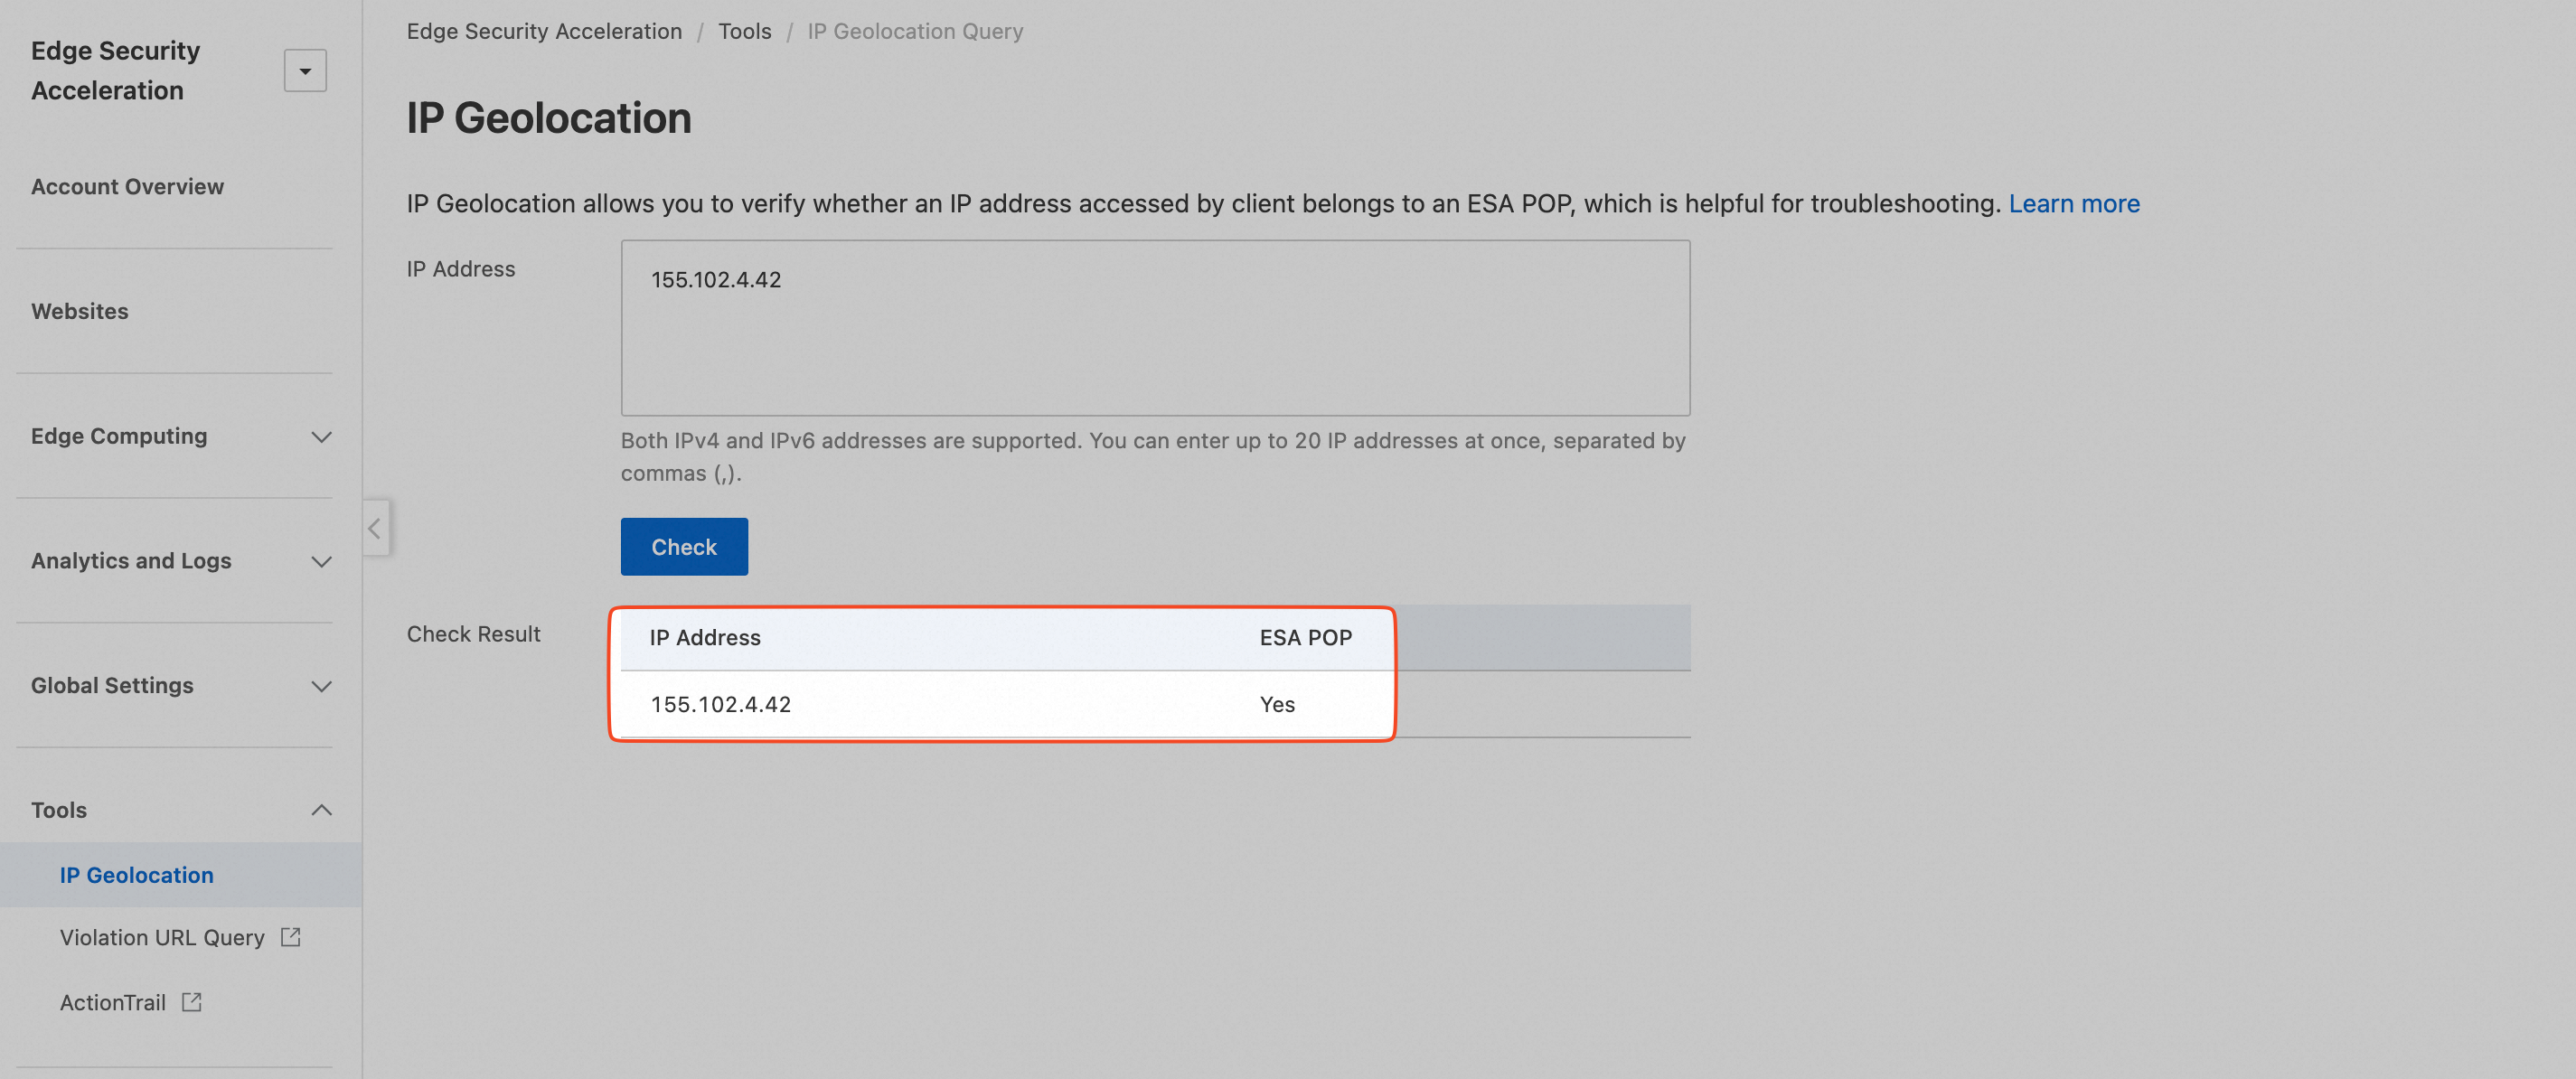
In a browser, access a resource on your site, such as http://cdn.example.cn/bb.jpg. Open the developer tools of the browser and check the IP address for the request.
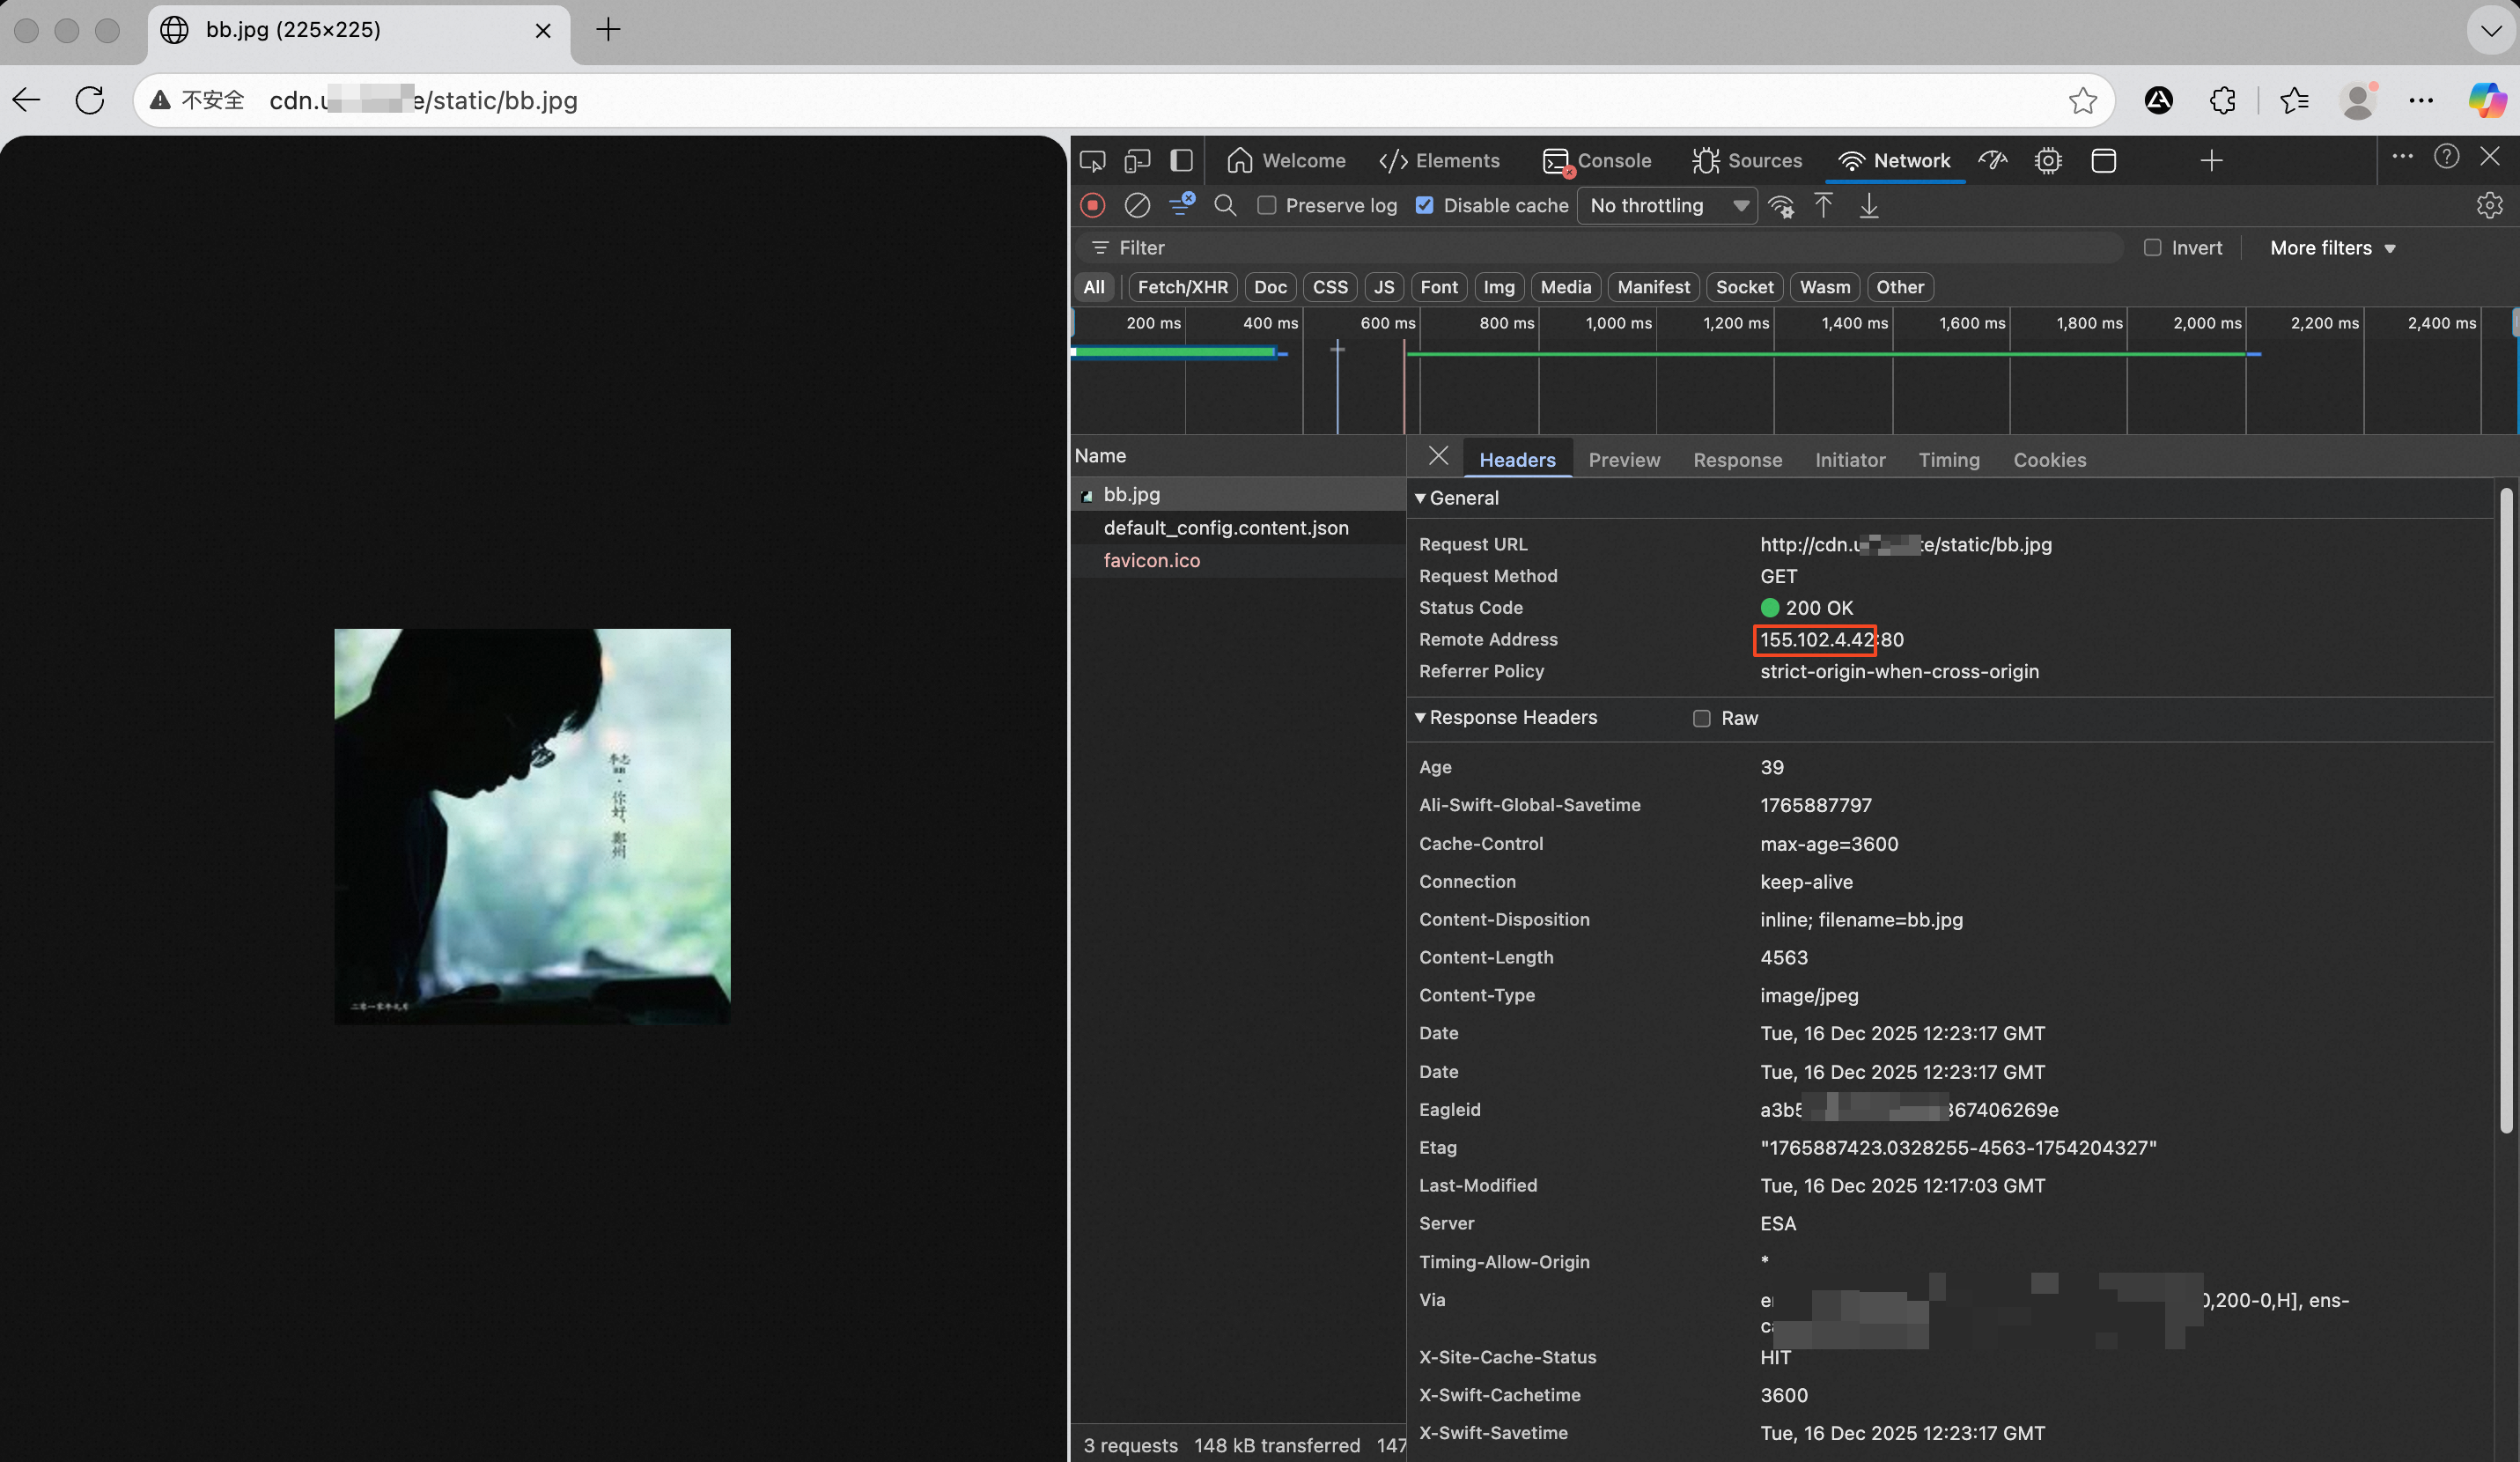
Use IP Address Lookup to check whether the IP address belongs to ESA. If the result is Yes, your site is accelerated by ESA.
What to do next
After you configure the accelerated domain name on ESA and verify that your services are running and accessible as expected, you can permanently disable the accelerated domain name on the original CDN or DCDN. .