Add the list of ESA node IP addresses to the firewall rules of your origin server. This protects your origin server by allowing only requests or traffic from the IP addresses in the allowlist to access it.
Feature overview
To protect your origin server from malicious attacks or unauthorized access, you can configure an IP address whitelist in your firewall rules to restrict access to only specified IP addresses, such as the IP addresses of ESA POPs, thereby providing Origin Protection.
After you enable the Origin Protection feature, ESA provides a consolidated list of POP IP addresses (including IPv4 and IPv6). You must add these IP addresses to the IP address whitelist on your origin server to enable Origin Protection.
Usage notes
The IP list provided by Origin Protection consists of converged node IPs, while
fetch()calls from Function and Pages actually use pre-convergence node IPs. If a website called by fetch does not have Origin Protection enabled, the actual origin-pull IP addresses of the fetch call are not in this list of converged node IPs.ESA is now integrated with Cloud Firewall. If all your origin servers are on Alibaba Cloud and you use Cloud Firewall, you must enable Origin Protection and then enable the Auto-apply Latest Origin Fetch IP List switch. This ensures that Cloud Firewall can automatically update the origin-fetch IP information.

Enable Origin Protection
In the ESA console, select Websites. In the Website column, click the target website.
In the left-side navigation pane, choose .
On the Origin Protection page, click Configure.

Turn on the Status switch. In the dialog box that appears, select I understand the risks and click OK.

Click OK. After Origin Protection is enabled, the system displays the consolidated origin-fetch IP list for ESA. Click
 to copy the IP addresses.
Manually add all IP address ranges from the list to your origin server's IP address whitelist. If your origin server is an Alibaba Cloud ECS instance, you can refer to How do I add the origin-fetch IP list to an ECS instance? to configure an inbound rule in a security group. This allows access only from the whitelisted IP addresses.
ImportantIf you stop using the ESA service, you must manually remove these rules from your origin server's firewall to prevent access disruptions.
Update the origin-fetch IP list
When the ESA POP IP addresses change, ESA notifies you by internal message or email. You must update your origin server's firewall or security group rules to ensure that ESA POPs can continue to access your origin server.
In the ESA console, select Websites. In the Website column, click the target website.
In the left-side navigation pane, choose .
In the Origin Protection section, add all IP address ranges from the IP Addresses to your origin server's whitelist, and then click Review.
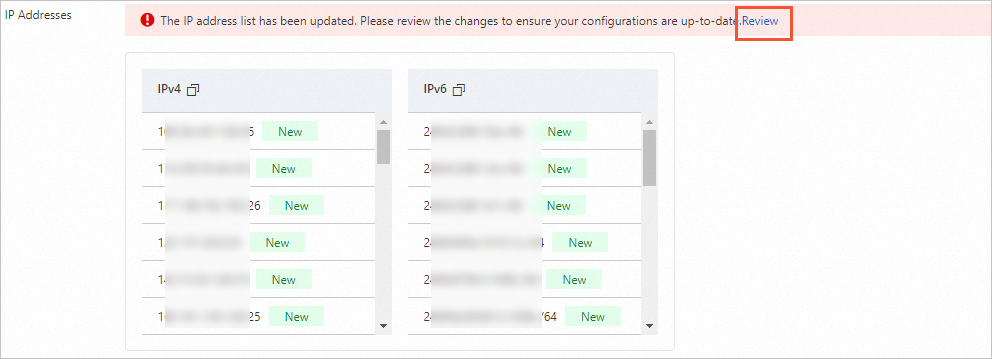
In the Review Latest IP List panel, click I Have Applied and Confirm to Enable the Latest IP List. In the dialog box that appears, click OK.
NoteThe new IP list takes effect only after you confirm it. Until then, your service continues to use the previously confirmed IP list. To ensure service performance and quality, regularly update your origin server's whitelist with the latest ESA IP list.

Disable Origin Protection
To prevent service interruptions, first remove the IP address whitelist from your origin server's firewall, and then disable Origin Protection.
In the ESA console, select Websites. In the Website column, click the target website.
In the left-side navigation pane, choose .
Click Configure and turn off the Status switch. In the dialog box that appears, select I understand the risks and click OK.

In the Origin Protection section, click OK. The status changes to Disabled.
Plan availability
Feature category | Feature | Entrance (USD 0/month) | Pro (USD 15/month) | Premium (USD 249/month) | Enterprise (contact sales for custom pricing) |
origin protection |
FAQ
Configuration prerequisites
Origin Protection requires a caching architecture with at least two tiers. You cannot enable Origin Protection if your Tiered Cache policy is set to Edge Tiered Cache. To change this, hover over the Configure button and click Modify in the tooltip to navigate to the Tiered Cache configuration page.

On the Tiered Cache page, click Configure, select a suitable tiered caching architecture, and then you can enable Origin Protection.

ECS IP list setup
A security group for an ECS instance is a virtual firewall that controls inbound and outbound traffic for the instance. To quickly configure Origin Protection, add the origin-fetch IP list provided by ESA to the inbound rules of a security group.
Go to the ECS console - Prefix lists page. Alternatively, in the ECS console, hover over Network & Security in the navigation pane and click Prefix lists.

Switch to the region where your origin server instance is located.

Click Create prefix list to create a prefix list for IPv4 addresses:
Prefix list name: Enter a name for the list, such as
`list-esa-ipv4`.Address family: Select IPv4.
Max entries: Enter
200.Prefix list entries: Click Add Entry. In the CIDR block column, paste the IPv4 list you obtained when you enabled Origin Protection, and then click OK.

Click Create prefix list to create a prefix list for IPv6 addresses:
Prefix list name: Enter a name for the list, such as
`list-esa-ipv6`.Address family: Select IPv6.
Max entries: Enter
200.Prefix list entries: Click Add Entry. In the CIDR block column, paste the IPv6 list you obtained when you enabled Origin Protection, and then click OK.

Go to the ECS console - Security groups page, and click Create security group.
Select the VPC where the instance is located. In the Access rule section, delete the default rules. Click Add Manually. For Authorization object, select the IPv4 and IPv6 prefix lists that you created, select the service ports, and then click Create security group.

Go to ECS console - Instances.
In the instance list, click the ID of the instance for which you want to configure Origin Protection. Go to the Security groups tab and click Change security groups.

On the Change security groups page, select only the security group that you just created, and then click OK.
