By Alain Francois
SonarQube is a cross-platform and web-based tool used for continuous source code inspection that can be integrated into platforms, such as GitHub, GitLab, BitBucket, and more. It comes in various editions, including Community, Developer, Enterprise, and Datacenter editions. It enables you to write cleaner and safer code by inspecting code and detecting bugs and other inconsistencies. It is compatible with MySQL and PostgreSQL management databases. This article explains how to install SonarQube and PostgreSQL using Docker on your ECS instance.
Before you start, we recommend using a Linux ECS instance with root privileges and a minimum of 4GB RAM and 2vCPU cores for basic comfortable operations.
Make sure to update the system package manager first:
$ sudo apt update
You will need to install some additional tools:
$ sudo apt install net-tools unzip vim curlIt will be important to increase the virtual memory kernel of the system, the maximum number of open files, and the resource limits. You need to edit the **/etc/sysctl.conf** configuration file:
$ sudo vim /etc/sysctl.confvm.max_map_count=262144
fs.file-max=65536
ulimit -n 65536
ulimit -u 4096Save and exit. Now, open the limits.conf file to add some lines at the bottom of the file:
$ sudo vim /etc/security/limits.confsonarqube - nofile 65536
sonarqube - nproc 4096Save and exit. Now, you should understand that by editing the configuration files, it's for persistent changes so that it will be considered even after a reboot of the server. Restart the server for those configurations to take effect. However, if you can't restart, you can also use some commands for effective changes but not persistent:
$ sudo sysctl -w vm.max_map_count=262144$ sudo sysctl -w fs.file-max=65536$ ulimit -n 65536$ ulimit -u 4096With this, the changes will be effective. The next time your server reboots, the configuration files that have been edited will maintain the new values. That is the turnaround you can use.
You need an account to create an ECS instance. If you don't have one, you can get a coupon during the Alibaba Cloud March Mega Sale.
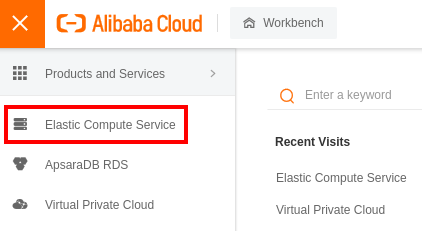
Log into your Alibaba Cloud account and go to the _Elastic Compute Service_:
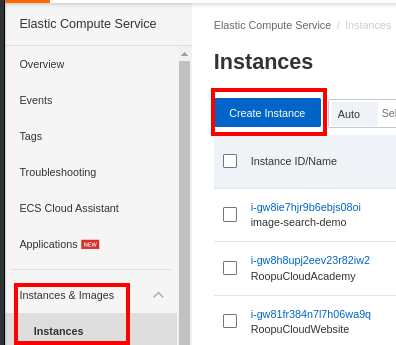
On the left panel, scroll to Instances & Images and select Instances to create a new ECS instance:
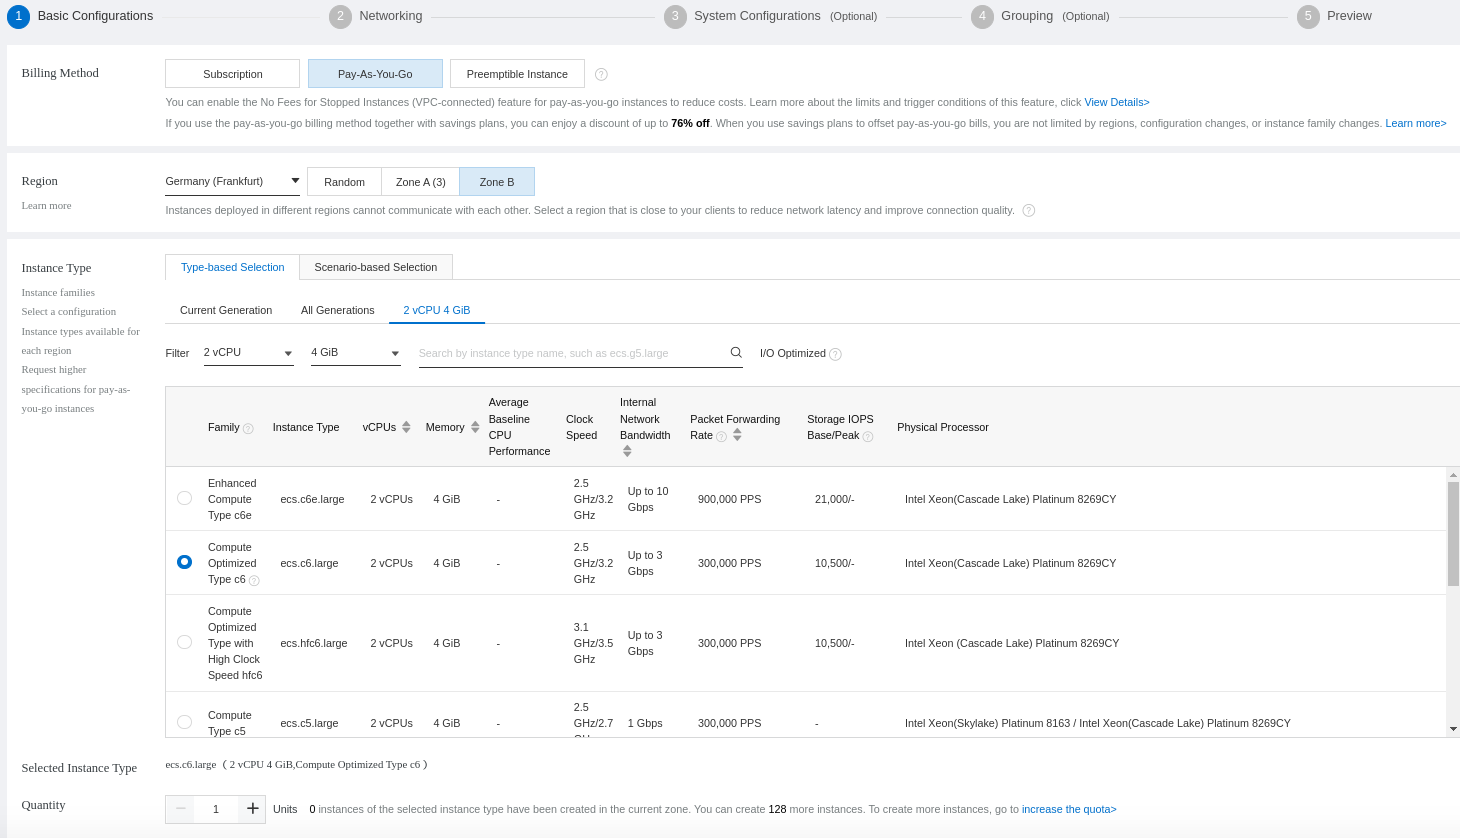
We will create a Pay-As-You-Go instance with 2 vCPU and 4 GB memory:
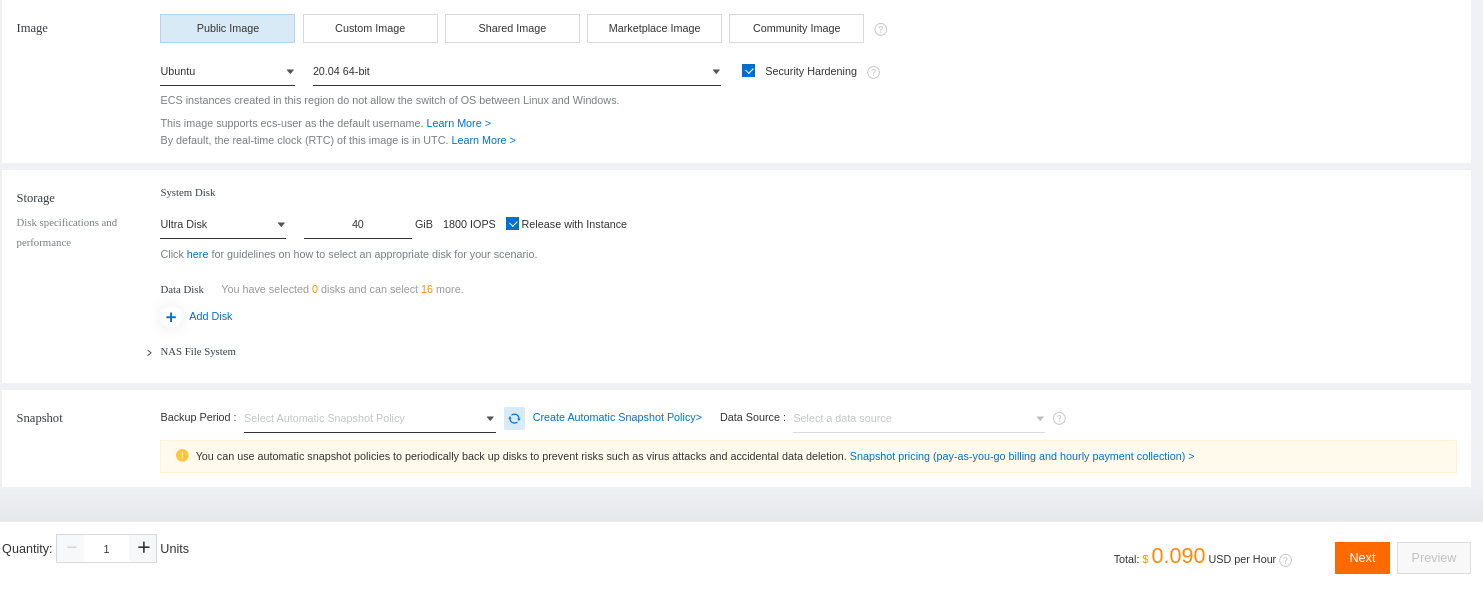
Select the operating system and define the disk size:
Select the VPC that will be used for your instance:
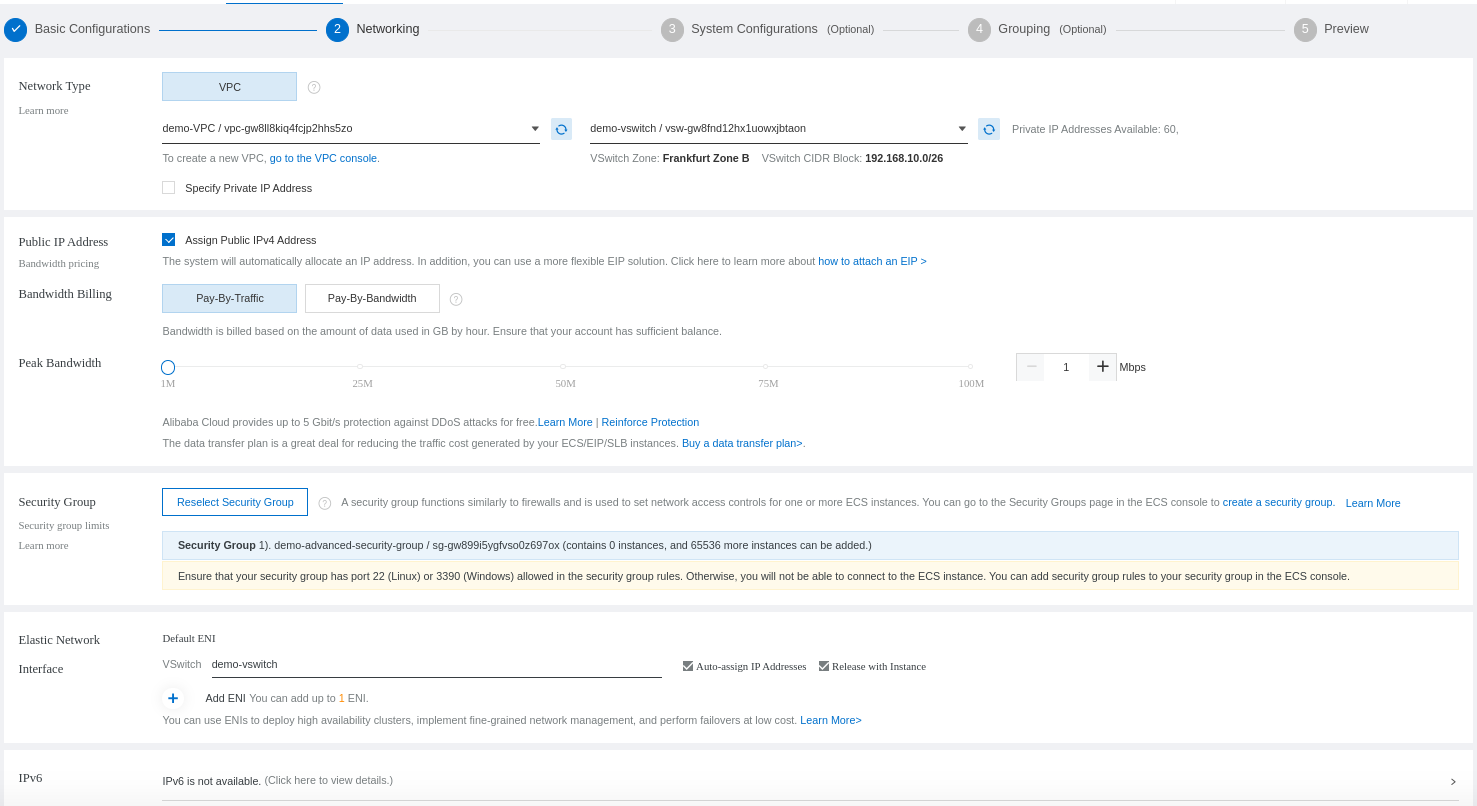
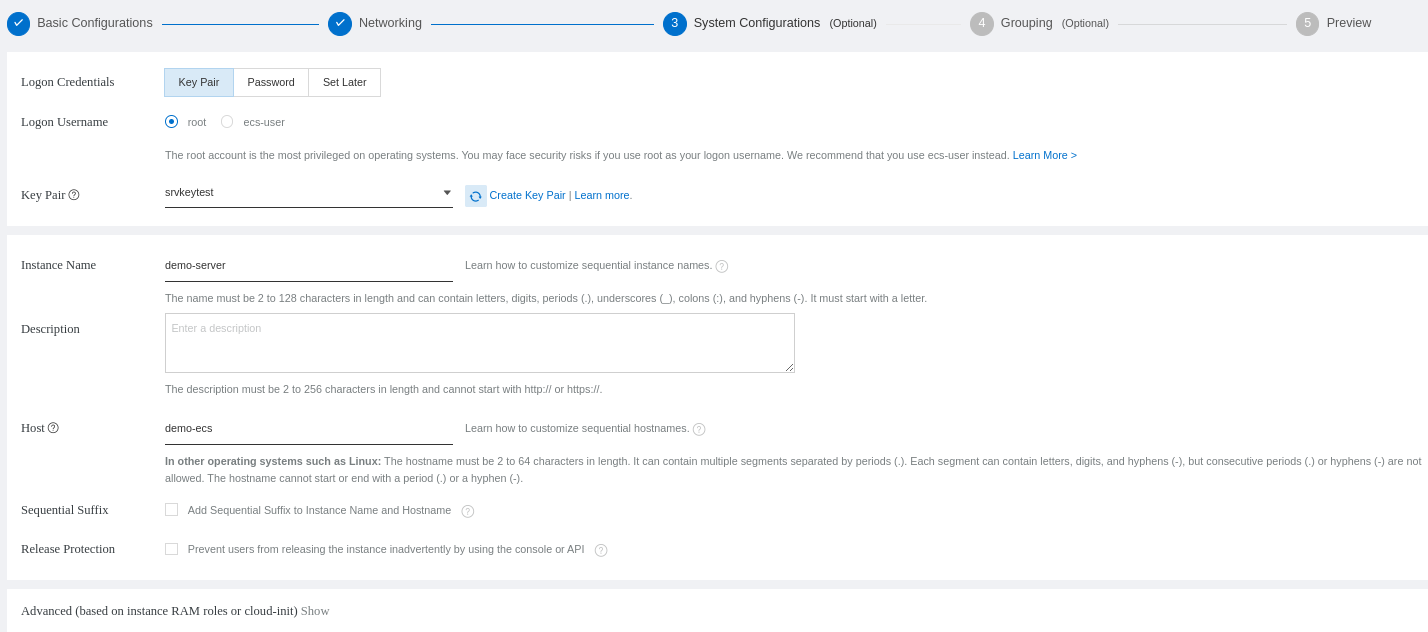
Now, you need to configure if you will access your ECS with a password or a public key:
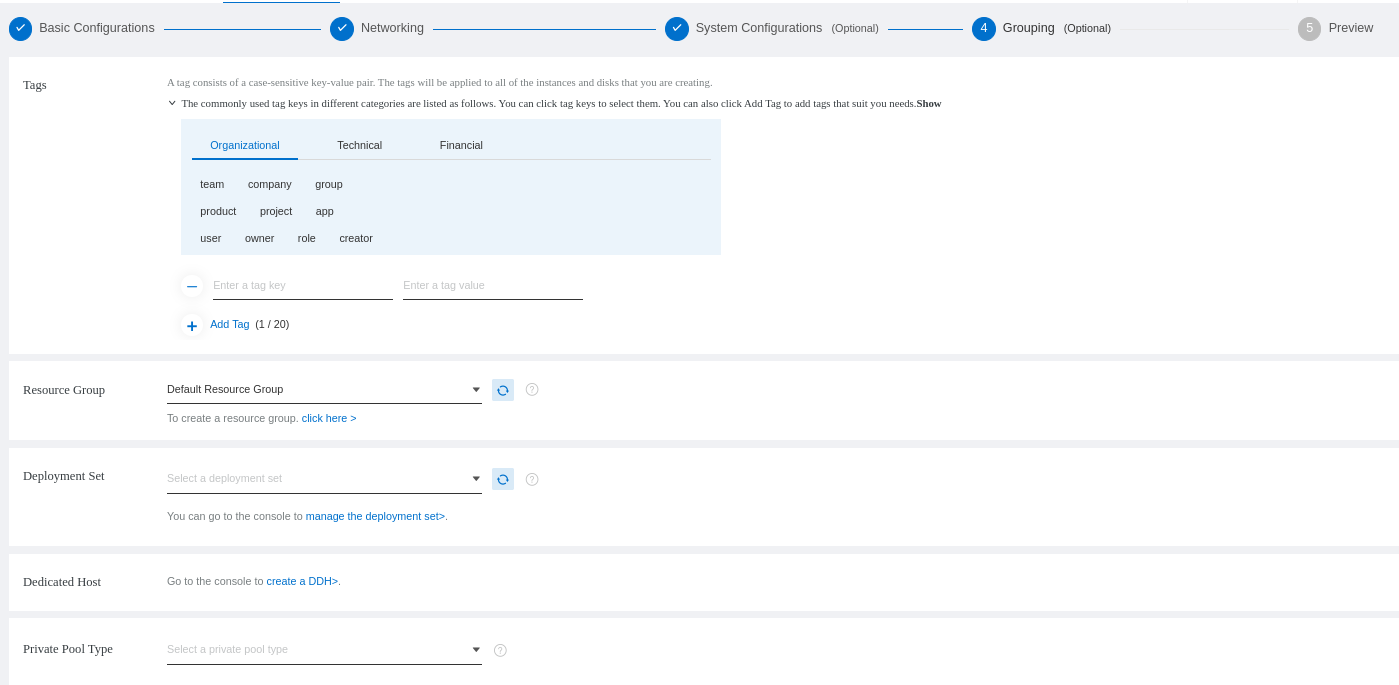
Select the default resource group:
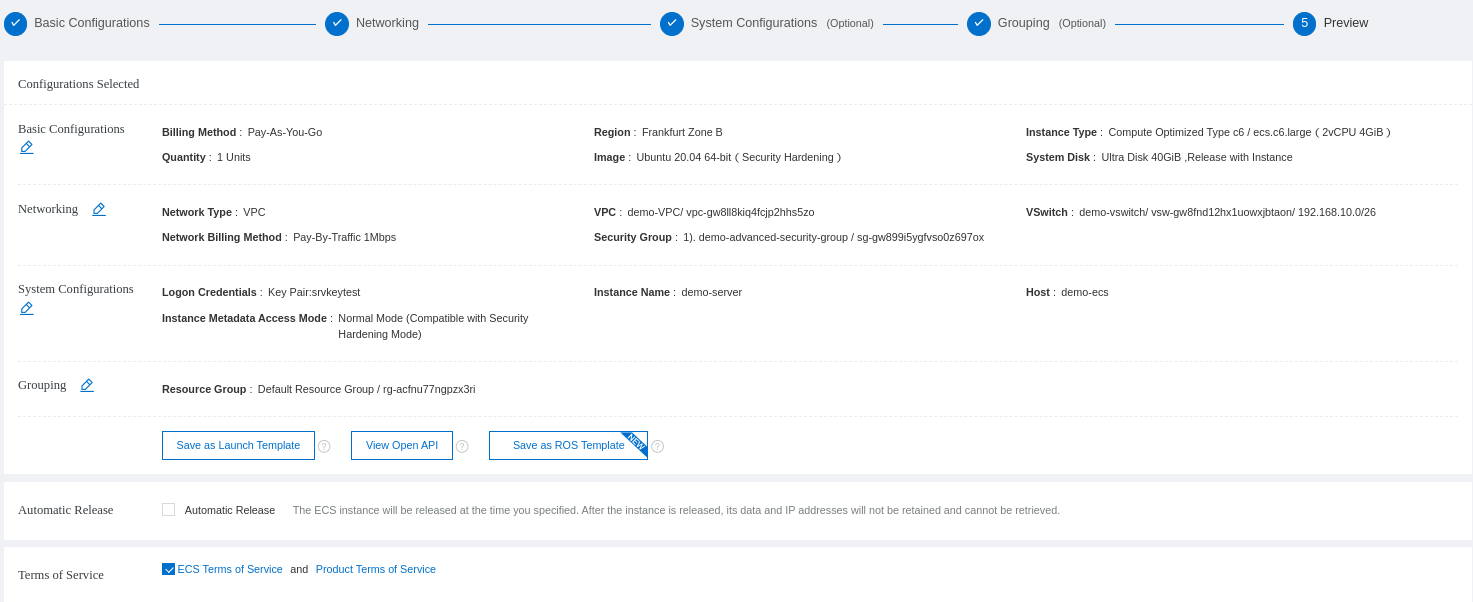
You will see a review of your ECS configuration and order:
You can see your new instance. Make sure to take the public IP for the remote access later:

The security group allows SSH access to your access by default.
Access your server to install Docker. We will show you on Debian-based system.
The first thing to do is update the cache of the server and set up the repository over HTTPS:
$ sudo apt update && sudo apt install ca-certificates curl gnupg lsb-releaseAdd the official Docker GPG key:
$ curl -fsSL https://download.docker.com/linux/debian/gpg | sudo gpg --dearmor -o /usr/share/keyrings/docker-archive-keyring.gpgThen, you can set the stable repository of Docker based on if your operating system uses Ubuntu 20.04 or Debian 9.9.
$ echo "deb [arch=$(dpkg --print-architecture) signed-by=/usr/share/keyrings/docker-archive-keyring.gpg] https://download.docker.com/linux/ubuntu $(lsb_release -cs) stable" | sudo tee /etc/apt/sources.list.d/docker.list > /dev/null$ echo "deb [arch=$(dpkg --print-architecture) signed-by=/usr/share/keyrings/docker-archive-keyring.gpg] https://download.docker.com/linux/debian $(lsb_release -cs) stable" | sudo tee /etc/apt/sources.list.d/docker.list > /dev/null
You need to update the cache again:
$ sudo apt updateYou can finally install the Docker engine:
$ sudo apt-get install docker-ce docker-ce-cli containerd.io
You will need to run the Docker command with the sudo privileges by default. If you want to avoid doing that, you need to add the name of the user that will operate the Docker command to the Docker group:
$ sudo usermod -aG docker franckIf you are connected with that user, you need to disconnect and reconnect to the server for the changes to take effect. Then, you can try to run a Docker command without sudo:
$ docker ps
CONTAINER ID   IMAGE     COMMAND   CREATED   STATUS    PORTS     NAMES
Since it's a fresh server, you need to make sure to allow SSH access to avoid losing your connection after enabling the firewall:
$ sudo ufw allow OpenSSHYou need to restart the firewall for the changes to be effective:
$ sudo ufw disable && sudo ufw enableAfter the firewall is up and Docker is installed, you can continue with the different container services.
PostgreSQL (post-gress-Q-L) is an open-source relational database management system (DBMS) known for reliability, feature robustness, and performance. It supports advanced data types and performance optimization features and boasts sophisticated features, such as Multi-Version Concurrency Control (MVCC), point in time recovery, tablespaces, asynchronous replication, nested transactions, online/hot backups, a sophisticated query planner/optimizer, and write-ahead logging for fault tolerance.
Now that Docker is installed, you need to pull the latest version of PostgreSQL (for Log4Shell CVE consideration) available from the official Postgres Docker repository:
$ docker pull postgres:latest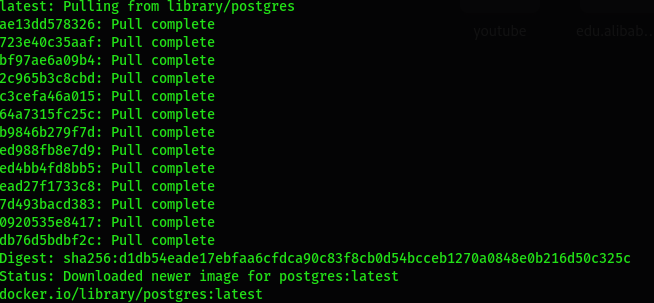
Check the Docker image you just pulled:
$ docker images
REPOSITORY   TAG       IMAGE ID       CREATED      SIZE
postgres     latest    5cd1494671e9   3 days ago   376MB
You need to execute the Docker command to run the Postgres container. The command will create a default postgres user with the database password that you will indicate. We recommend creating a volume for persistent data:
$ docker run --name postgresql-sonar -v /opt/volume/postgresql-sonar:/var/lib/postgresql/data -e POSTGRES_PASSWORD=POSGRES_DB_PASSWORD -d postgres:latest
c0bac31a6cdfe40b1e6628d6dc7bdc6ce2e4c037d0530864ec67e2896ad21b92
You can check if the container is running:
$ docker ps
CONTAINER ID   IMAGE             COMMAND                  CREATED          STATUS          PORTS      NAMES
c0bac31a6cdf   postgres:latest   "docker-entrypoint.s…"   16 seconds ago   Up 15 seconds   5432/tcp   postgresql-sonar
You will need to establish the communication between SonarQube and the PostgreSQL database. Check its IP address and save it for later:
$ docker inspect postgresql-sonar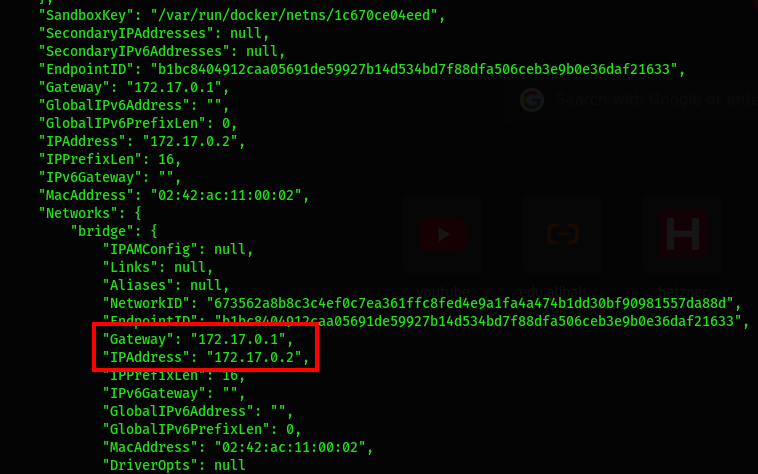
You need to connect to the database container to create a user and database for SonarQube:
$ docker exec -it postgresql-sonar bashAfter logging on to the container, connect to the database. You will be prompted to enter the database password. Use the one that indicated when creating the container:
# psql -U postgres -W
Password:
postgres=# CREATE DATABASE sonarqubedb;
CREATE DATABASEpostgres=# CREATE USER sonarqube WITH ENCRYPTED PASSWORD 'SONARQUBE_DB_PASSWORD';
CREATE ROLEpostgres=# GRANT ALL PRIVILEGES ON DATABASE sonarqubedb TO sonarqube;
GRANTExit the PostgreSQL command prompt:
postgres=# \qExit the container:
root@c0bac31a6cdf:/# exit
exitNow that Docker and PostgreSQL are fully running, you can pull the latest version of Sonarqube (for Log4Shell CVE consideration) from the official Sonarqube Docker repository. We will pull the latest community version:
$ docker pull sonarqube:lts-community
You can check the SonarQube Docker image:
$ docker images
REPOSITORY   TAG             IMAGE ID       CREATED      SIZE
sonarqube    lts-community   977cbc713499   3 days ago   495MB
postgres     latest          5cd1494671e9   3 days ago   376MB
You can use the Docker command to run SonarQube. You should also use volumes, but SonarQube does not recommend using bind mounts. The volumes that will be created are listed below:
sonarqube_conf contains configurations files, such as the sonar.properties, for web and databases access.sonarqube_data for data files, such as the embedded H2 database and Elasticsearch indexessonarqube_logs contains SonarQube logs about access, web process, CE process, and Elasticsearch.sonarqube_extensions for any plugins you install and the Oracle JDBC driver if necessaryIn this guide, we will configure Nginx and Let's Encrypt later to access the sonar web service through the domain name. We will indicate some more parameters to the command and use the IP of the PostgreSQL container that we created previously:
$ docker run -d --name sonarqube-demo \
    -e VIRTUAL_HOST=web-demo.com \
    -e VIRTUAL_PORT=9000 \
    -e SONAR_JDBC_URL="jdbc:postgresql://172.17.0.2:5432/sonarqubedb" \
    -e SONAR_JDBC_USERNAME=sonarqube \
    -e SONAR_JDBC_PASSWORD=SONARQUBE_DB_PASSWORD \
    -v sonarqube_conf:/opt/sonarqube/conf \
    -v sonarqube_data:/opt/sonarqube/data \
    -v sonarqube_extensions:/opt/sonarqube/extensions \
    -v sonarqube_logs:/opt/sonarqube/logs \
    sonarqube:lts-community
NB: The -p 9000:9000 is first to check if we can access the sonar web page via the IP:PORT before the configuration with Nginx. If you are going to use it, don't forget to open port 9000 on your firewall.
You can check if the container is running:
$ docker ps
CONTAINER ID   IMAGE                     COMMAND                  CREATED          STATUS          PORTS      NAMES
8916eb22419b   sonarqube:lts-community   "bin/run.sh bin/sona…"   15 seconds ago   Up 14 seconds   9000/tcp   sonarqube-demo
c0bac31a6cdf   postgres:latest           "docker-entrypoint.s…"   2 hours ago      Up 2 hours      5432/tcp   postgresql-sonar
You can open your web browser and access sonar via the IP and port number http://IP-ADDRESS:9000. The default login is admin, and the password admin:
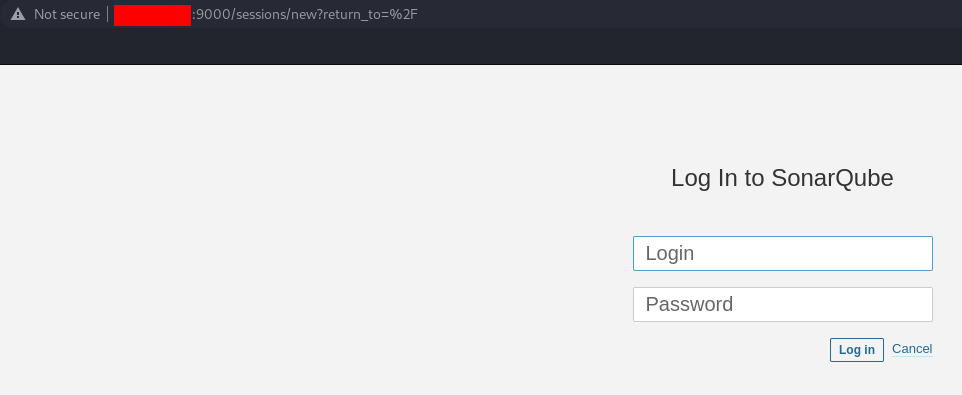
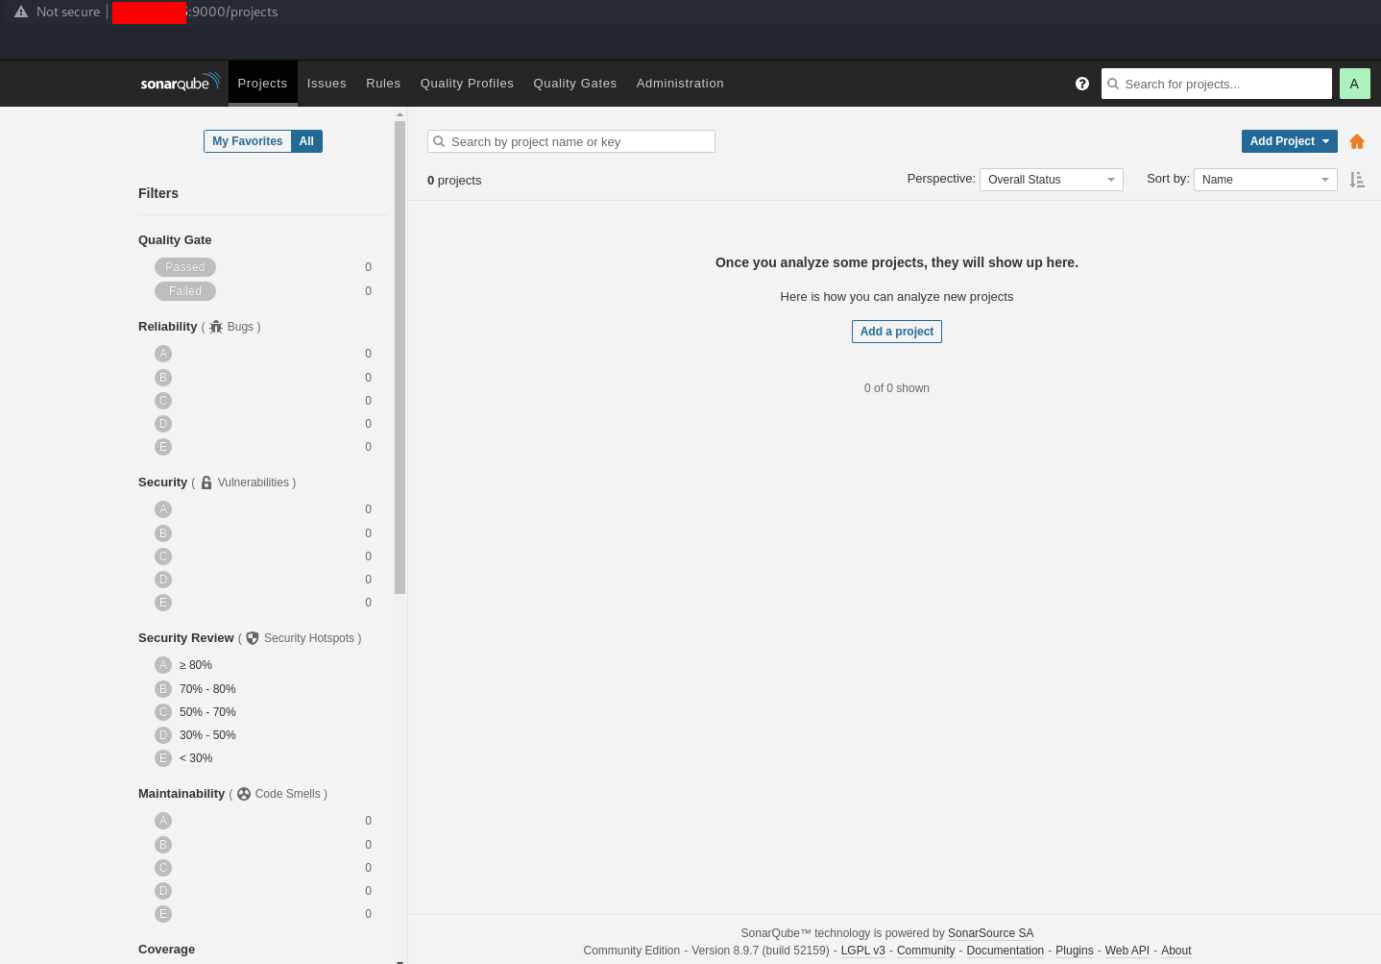
You will be asked to change the password. After that, you can access the homepage:
We can configure the access through the domain with Nginx.
Now that SonarQube is working fine, let's update the system package manager to install Nginx:
$ sudo apt update && sudo apt install nginx
Let's list the default application recognized by ufw to allow the appropriate application:
$ sudo ufw app list
We will authorize the profile Nginx Full to allow web access for both the HTTP and HTTPS protocol:
$ sudo ufw allow 'Nginx Full'Now restart the firewall:
$ sudo ufw disable && sudo ufw enableNow, we need to create an Nginx virtual host configuration for SonarQube located at /etc/nginx/sites-available/ :
$ sudo vim /etc/nginx/sites-available/web-demo.comserver {
listen 80;
server_name web-demo.com;
access_log /var/log/nginx/sonaraccess.demo.log;
error_log /var/log/nginx/sonarerror.demo.log;
proxy_buffers 16 64k;
proxy_buffer_size 128k;
location / {
proxy_pass http://127.0.0.1:9000;
proxy_next_upstream error timeout invalid_header http_500 http_502 http_503 http_504;
proxy_redirect off;
proxy_set_header Host $host;
proxy_set_header X-Real-IP $remote_addr;
proxy_set_header X-Forwarded-For $proxy_add_x_forwarded_for;
proxy_set_header X-Forwarded-Proto http;
}
}Enable the server block:
$ sudo ln -s /etc/nginx/sites-available/web-demo.com /etc/nginx/sites-enabled/Check the configuration file:
sudo nginx -t
nginx: the configuration file /etc/nginx/nginx.conf syntax is ok
nginx: configuration file /etc/nginx/nginx.conf test is successful
Restart the Nginx service:
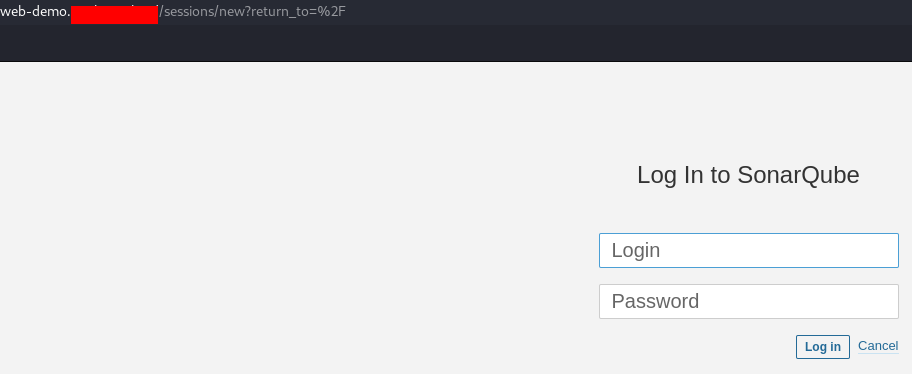
$ sudo systemctl restart nginxYou can try to access your service with the domain name http://web-domain.com:
Let's Encrypt uses the certbot tool to install and configure the certificate. You need to install it with the required package for Nginx first:
$ sudo apt install certbot python3-certbot-nginx
You should try to generate the certificate for your web domain. Make sure the domain is pointing again to the good server IP. The process will generate the certificate to the virtual host automatically. It will also force the redirection of all the non-secure (HTTP) communications to the secured (HTTPS) ones:
$ sudo certbot --nginx -d web-demo.com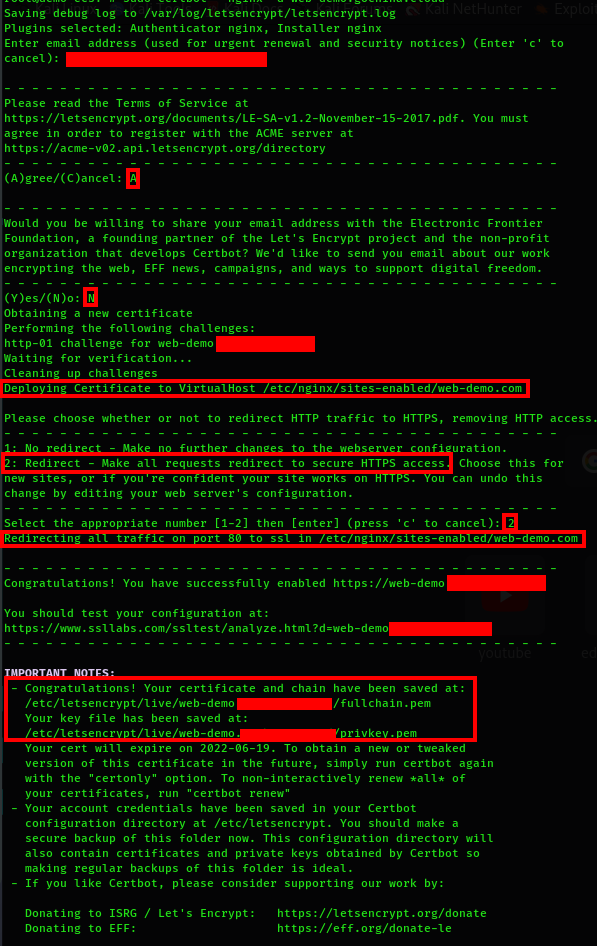
You can take a look at your server block configuration file to see the changes that have been operated for the secure channel:
$ sudo vim /etc/nginx/sites-available/web-demo.com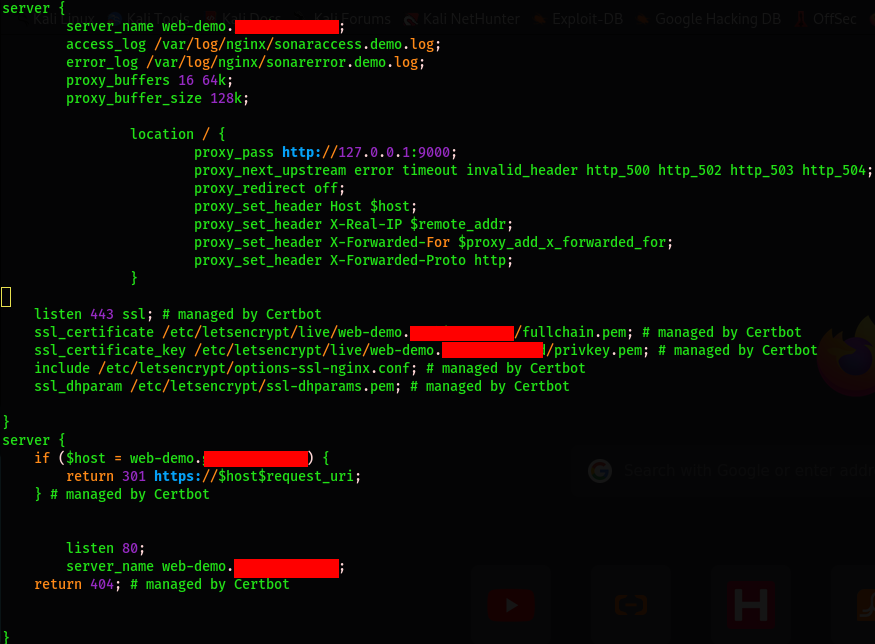
You can restart the Nginx server and try to access it through the non-secure domain name http://web-demo.com. It will automatically redirect the traffic to the HTTPS secure channel https://web-demo.com:

You have a fully secured and running SonarQube server configured with Docker, Nginx, and Let's Encrypt. Now that the access with the domain name is effective, you can close port 9000 on your firewall since we only opened it for test purposes. It also means you can use the Docker command to start SonarQube without the option -p 9000:9000 and remember this only if you will configure the access with the domain name via Nginx on Apache or anything else.
How to Create a VPC and Configure a Security Group to Protect Your Alibaba Cloud Instances
How to Secure Your LEMP Server with Let's Encrypt on an Ubuntu 20.04 ECS Instance

1,304 posts | 461 followers
FollowAlibaba Cloud Community - March 28, 2022
Alibaba Clouder - August 21, 2018
Alibaba Clouder - June 4, 2019
Alibaba Clouder - January 2, 2019
Alibaba Clouder - June 10, 2019
Alibaba Clouder - June 5, 2019

1,304 posts | 461 followers
Follow AnalyticDB for PostgreSQL
An online MPP warehousing service based on the Greenplum Database open source program
Learn More PolarDB for PostgreSQL
Alibaba Cloud PolarDB for PostgreSQL is an in-house relational database service 100% compatible with PostgreSQL and highly compatible with the Oracle syntax.
Learn More ApsaraDB RDS for PostgreSQL
An on-demand database hosting service for PostgreSQL with automated monitoring, backup and disaster recovery capabilities
Learn MoreMore Posts by Alibaba Cloud Community