You can create standard, privileged, and global read-only accounts for an ApsaraDB RDS for SQL Server instance by using the ApsaraDB RDS console or by calling an API operation.
Prerequisites and limits
-
The first account for an instance must be a privileged account or a superuser account (with SA permissions).
-
You can create privileged and standard accounts on instances of any specification. Global read-only accounts can be created only on instances that meet the following requirements:
-
Database version: SQL Server 2016 or later.
-
Instance family: general-purpose or dedicated.
-
-
Account limits:
-
Standard accounts: No limit.
-
Privileged accounts: A maximum of one privileged account per instance.
-
Global read-only accounts: A maximum of two global read-only accounts per instance.
-
Account permission rules
Privileged account
|
Scenario |
Description |
|
Create a privileged account |
Upon creation, the account is automatically granted the db_owner role for all existing databases. |
|
Add a database |
|
|
Delete a privileged account |
|
|
Re-create a privileged account |
|
Manually selecting the sysadmin server role for a privileged account in SQL Server Management Studio (SSMS) does not take effect. ApsaraDB RDS applies security restrictions to privileged accounts and does not allow you to directly grant the sysadmin permission. If you need the sysadmin permission, create a superuser account (with SA permissions). After you create a superuser account, the instance is no longer covered by the SLA. For more information, see Create a database account with SA permissions.
Standard account
|
Scenario |
Description |
|
Create a standard account |
|
|
Add a database |
|
|
Delete a standard account |
|
|
Re-create a standard account with the same name |
|
Global read-only account
|
Scenario |
Description |
|
Create a global read-only account |
|
|
Add a database |
The account is automatically granted read-only access to new databases. |
|
Delete a global read-only account |
|
|
Re-create a global read-only account |
|
Precautions
-
Set a strong password: To ensure database security, set a strong password for the database account and change it regularly. You can also set a password policy for an account to control the password validity period and enhance account security.
-
Principle of least privilege: When assigning permissions, follow the principle of least privilege. Create accounts based on business roles and assign read-only and read/write permissions as needed. If necessary, you can create database accounts and databases with finer granularity. This ensures that each database account can access only the data required for its business. If an account does not need to modify data, grant it read-only permissions.
Create an account
Go to the Instances page. In the top navigation bar, select the region in which the RDS instance resides. Then, find the RDS instance and click the ID of the instance.
-
In the left-side navigation pane, click Accounts.
-
Click Create Account and configure the parameters.
NoteThe first account for an ApsaraDB RDS for SQL Server instance must be a privileged account or a superuser account. You can create a standard or global read-only account only after one of these accounts has been created.
Privileged account
Parameter
Description
Database Account
Enter a database account name. The name must start with a letter, end with a letter or a digit, and contain only lowercase letters, digits, and underscores (_). The account name cannot be the same as a reserved keyword.
Account Type
Select Privileged Account. Each instance can have only one privileged account.
New Password
Enter a password for the account. The password must meet the following requirements:
-
8 to 32 characters in length.
-
Contains at least three of the following character types: uppercase letters, lowercase letters, digits, and special characters.
-
The supported special characters are
!@#$%^&*()_+-=.
Confirm Password
Enter the same password again to confirm it.
Apply password policy
Applying a password policy allows you to control the password validity period and enhance account security. Before you apply a policy, you must first set a password policy for an account.
Description
Enter a description. The description can be up to 256 characters in length.
Standard account
Parameter
Description
Database Account
Enter a database account name. The name must start with a letter, end with a letter or a digit, and contain only lowercase letters, digits, and underscores (_). The account name cannot be the same as a reserved keyword.
Account Type
Select Standard Account. An instance can have multiple standard accounts.
Authorize Database:
You can grant a Standard Account permissions on one or more databases and set different permissions for each. If no databases exist, you can leave this field empty and grant permissions later. To grant permissions:
-
In the Unauthorized Databases list, select the databases that you want to authorize.
-
Click
 to add the databases to the Authorized Databases list.
 -
Set permissions on the databases for the account. The permissions can be Read/Write (DML), Read-Only, or Owner. For more information about permissions, see Account permissions.
New Password
Enter a password for the account. The password must meet the following requirements:
-
8 to 32 characters in length.
-
Contains at least three of the following character types: uppercase letters, lowercase letters, digits, and special characters.
-
The supported special characters are
!@#$%^&*()_+-=.
Confirm Password
Enter the same password again to confirm it.
Apply password policy
Applying a password policy allows you to control the password validity period and enhance account security. Before you apply a policy, you must first set a password policy for an account.
Description
Enter a description. The description can be up to 256 characters in length.
Global read-only account
Parameter
Description
Database Account
Enter a database account name. The name must start with a letter, end with a letter or a digit, and contain only lowercase letters, digits, and underscores (_). The account name cannot be the same as a reserved keyword.
Account Type
Select Global Read-Only Account. After this account is created, it is automatically granted read-only permissions on all existing databases in the instance. These permissions also apply to any new databases that you create.
New Password
Enter a password for the account. The password must meet the following requirements:
-
8 to 32 characters in length.
-
Contains at least three of the following character types: uppercase letters, lowercase letters, digits, and special characters.
-
The supported special characters are
!@#$%^&*()_+-=.
Confirm Password
Enter the same password again to confirm it.
Apply password policy
Applying a password policy allows you to control the password validity period and enhance account security. Before you apply a policy, you must first set a password policy for an account.
Description
Enter a description. The description can be up to 256 characters in length.
-
-
Click OK. After the page refreshes, you can view the created account.
Related documents
-
Use the console to create a database account with SA permissions.
-
Create accounts by calling the CreateAccount API operation.
-
Delete accounts by calling the DeleteAccount API operation.
FAQ
Accounts on read-only instances
Bypass password complexity
An ApsaraDB RDS for SQL Server account is inactive and login fails with the errorThe account is disabled.?
Issue
On the Accounts page of an ApsaraDB RDS for SQL Server instance, the account status is displayed as Inactive. When you try to log on to the database by using an inactive account, the error message The account is disabled. is reported.
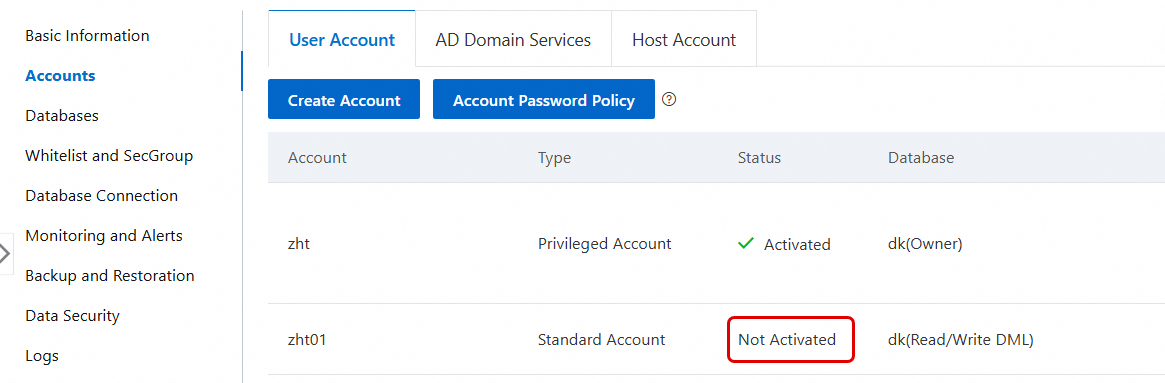
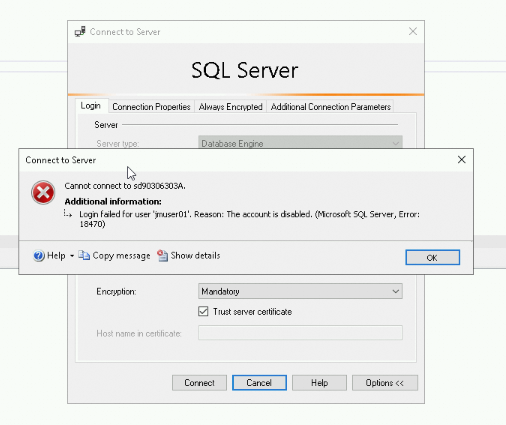
Cause
User accounts that are created on the Accounts page of an ApsaraDB RDS for SQL Server instance or by calling an API operation are active by default. You do not need to manually activate them. An account can become inactive for the following reasons:
-
The account was created in a disabled state using an SQL statement.
-
The account was manually disabled after it was created.
Solution
-
Use another active account to connect to the SQL Server instance by using SQL Server Management Studio (SSMS).
-
Check whether the target account is disabled. If it is, enable the account.
-
Method 1: View and modify the account status in the SSMS graphical user interface (GUI).
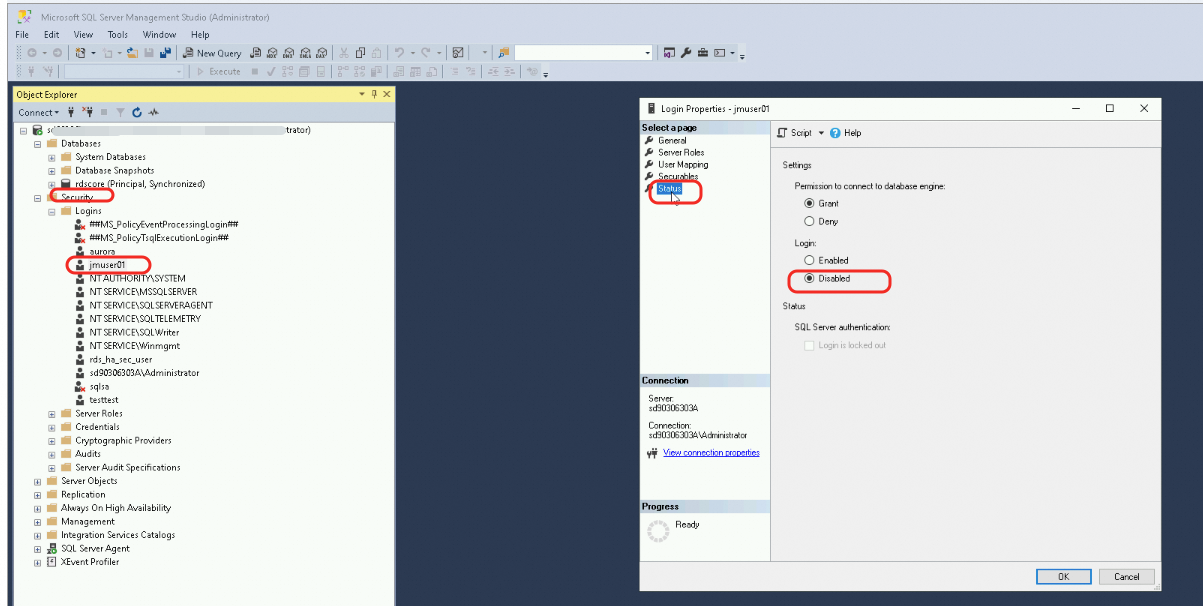
-
Method 2: View and modify the account status by using SQL statements.
-
Execute the following SQL query to check the current status of the target account:
-- Query the status of the target logon name.
SELECT
    name AS LoginName,          -- Logon name
    is_disabled AS IsDisabled   -- Status: 1 indicates disabled, 0 indicates enabled.
FROM
    sys.server_principals
WHERE
    name = 'your_logon_name';
-
If the target account is disabled (
is_disabled = 1), execute the following SQL command to enable the account:ALTER LOGIN [your_logon_name] ENABLE;
-
-