SSL-VPN is a network connection technology based on the OpenVPN architecture. Once deployed, you only need to load a certificate into the client and initiate a connection to remotely access applications and services in a Virtual Private Cloud (VPC) over SSL-VPN. This topic describes how to use an SSL-VPN connection to connect an on-premises client to the Elastic Desktop Service (EDS) Enterprise Edition office network VPC. This allows the client to access a cloud computer over a private network.
Prerequisites
Before you begin, read the Solutions for connecting to a cloud computer over a private network topic and complete the following prerequisite tasks.
Create a Cloud Enterprise Network (CEN) instance. For details, see Create a CEN instance.
Create a Virtual Private Cloud (VPC) instance and add the VPC instance to a Cloud Enterprise Network. For more information, see Create a VPC and a vSwitch or Quickly add a network instance to a CEN.
Create an office network, and add its VPC to Cloud Enterprise Network. For more information, see Create and manage an office network that uses a convenience account or Create and manage an office network that uses an enterprise AD account.
ImportantTo prevent IP address conflicts among the new office network, existing networks in Cloud Enterprise Network, and your on-premises data center, plan your IPv4 CIDR blocks before you create the office network. For details, see Plan CIDR blocks.
If you already have a convenient office network, you need to add it to the Cloud Enterprise Network.
If AD is deployed on an Elastic Compute Service (ECS) instance, you must add the VPC that contains the AD server to a Cloud Enterprise Network. If AD is deployed on an on-premises server, you must first establish a connection between your on-premises network and the cloud to successfully integrate with AD. You can first create an AD office network, and then complete the AD domain configuration after the network connection is established.
Create a cloud computer and a user account, and then assign the cloud computer to the user account.
To learn how to create a user account, see Create a convenience user or Create and manage AD users.
To learn how to create and assign a cloud computer, see Create a cloud computer and Assign a cloud computer to a user.
Prepare a device to install OpenVPN and the Alibaba Cloud Workspace client. Install both on the same device.
NoteThe supported Alibaba Cloud Workspace clients include the Windows client and the macOS client.
Step 1: Configure an SSL-VPN
Configuring an SSL-VPN includes creating a VPN Gateway, creating an SSL server, publishing the client CIDR block to Cloud Enterprise Network (CEN), and creating and downloading an SSL client certificate. The following steps describe this process.
Purchase a VPN Gateway and enable the SSL-VPN feature. For more information, see VPN Gateway instances.
The following table describes the parameters and provides example values.
Parameter
Description
Example
Instance Name
The name of the VPN Gateway instance.
test-vpn
Region
Select the region where you want to create the VPN Gateway instance.
Make sure that the VPN Gateway instance and the associated Virtual Private Cloud (VPC) instance are in the same region.
China (Hangzhou)
Network Type
Select the network type of the VPN Gateway instance.
Public network: The VPN Gateway establishes VPN connections over the internet.
Private network: The VPN Gateway establishes VPN connections over a private network.
Public network
VPC
Select the VPC instance to associate with the VPN Gateway instance.
test-vpc
Specify VSwitch
Specifies whether to specify a VSwitch for the VPN Gateway instance.
No: Does not specify a VSwitch for the VPN Gateway instance. After the VPN Gateway is created, it is automatically associated with a random VSwitch in the VPC.
Yes: Specifies a VSwitch for the VPN Gateway instance. After the VPN Gateway is created, it is associated with the specified VSwitch.
No
Peak Bandwidth
Select the maximum bandwidth of the VPN Gateway instance. Unit: Mbps.
200 Mbps
Traffic
The billing method of the VPN Gateway instance. Default value: Pay-by-data-transfer.
Pay-by-data-transfer
IPsec-VPN
Specifies whether to enable the IPsec-VPN feature. Default value: Enabled.
IPsec-VPN can establish secure connections between a data center and a VPC, or between different VPCs.
Disabled
SSL-VPN
Specifies whether to enable the SSL-VPN feature. Default value: Disabled.
SSL-VPN can establish secure connections between sites without the need to configure a customer gateway. For example, SSL-VPN can establish a secure connection between a Linux client and a VPC.
Enabled
Number of SSL Connections
Select the maximum number of clients that can be connected at the same time.
NoteThis parameter is available only after you enable the SSL-VPN feature.
5
Subscription Duration
The billing cycle of the VPN Gateway. Default value: Pay-by-hour.
1 Month
Service-Linked Role
Click Create Service-Linked Role. The system automatically creates the AliyunServiceRoleForVpn service-linked role.
The VPN Gateway uses this role to access resources in other Alibaba Cloud services. For more information, see AliyunServiceRoleForVpn.
If this parameter is displayed as Created, the role has been created under your account and you do not need to create it again.
/
Create an SSL server. For more information, see Create and manage an SSL server.
The following table describes the parameters and provides example values.
Parameter
Description
Example
Name
The name of the SSL server.
The name must be 2 to 128 characters in length. It must start with a letter or a Chinese character, and can contain digits, hyphens (-), and underscores (_).
test-ssl
VPN Gateway
Select the VPN Gateway to associate.
Make sure that the SSL-VPN feature is enabled for the VPN Gateway.
test-vpn
Local Network
The local network is the CIDR block that clients access through the SSL-VPN connection.
The local network can be the CIDR block of a Virtual Private Cloud (VPC), a VSwitch, a data center connected to a VPC through an Express Connect circuit, or an Alibaba Cloud service such as Object Storage Service (OSS) or ApsaraDB RDS.
Click Add Local Network to add multiple local networks.
NoteThe subnet mask of the local network must be 8 to 32 bits in length.
Includes the following three CIDR blocks:
The CIDR block of the office network VPC: 172.16.111.0/24
The CIDR block of the user VPC: 192.168.0.0/16
The CIDR block for DNS in the VPC and the CIDR block where the Alibaba Cloud private OpenAPI endpoint resides. This is fixed to 100.64.0.0/10.
Client CIDR Block
The client CIDR block is a network segment from which IP addresses are allocated to client virtual network interface cards (NICs). It is not the existing private CIDR block of the client. When a client connects to the local network through an SSL-VPN connection, the VPN Gateway assigns an IP address from the specified client CIDR block to the client.
When you specify the client CIDR block, make sure that the number of IP addresses in the client CIDR block is at least four times the maximum number of SSL connections supported by the VPN Gateway.
ImportantThe subnet mask of the client CIDR block must be 16 to 29 bits in length.
Make sure that the client CIDR block and the local network do not overlap.
When you specify the client CIDR block, use 10.0.0.0/8, 172.16.0.0/12, 192.168.0.0/16, or their subnets. If you must use a public CIDR block, set it as a user CIDR block for the VPC to ensure that the VPC can access the public CIDR block. For more information about user CIDR blocks, see VPC FAQ and VPC FAQ.
10.10.111.0/24
Advanced Configuration
Advanced configurations include protocol and encryption algorithm settings. This example does not use advanced configurations.
No additional parameters are required. Use the default settings.
Publish the client CIDR block that is specified in the SSL server to CEN.
In the navigation pane on the left, click Route Tables.
On the Route Tables page, find the user VPC for which you want to establish the connection and click the ID of its route table.
On the Route Entry List tab, click the Custom Route Entry tab.
Find the client CIDR block that is specified in the SSL server and click Publish.
If the value in the Status in CEN column for the client CIDR block is Published, the publishing is successful.
Create an SSL client certificate. For more information, see Create and manage SSL client certificates.
On the SSL Clients page, find the target SSL client certificate, and in the Actions column, click Download.
After you download the SSL client certificate to your computer, store it in a secure location. You will need this certificate when you configure the client.
Step 2: Install and connect to OpenVPN on your local computer
Install OpenVPN on your local computer.
Windows
Download the OpenVPN client for your Windows version and follow the on-screen instructions to install it.
Windows 64-bit system (Intel/AMD): OpenVPN client (Windows 64-bit).
Windows ARM64 system: OpenVPN client (Windows ARM64).
Unzip the downloaded ssl client certificate package and copy all extracted files to the OpenVPN configuration directory.
Default path:
C:\Program Files\OpenVPN\configNote: If you changed the installation path, copy the files to the config folder in your actual installation directory.

Open the
config.ovpnfile with a text editor and add the following line to the end of the file:disable-dco.The Data Channel Offload (DCO) feature introduced in OpenVPN 2.6 is incompatible with some Windows systems, such as specific versions of Windows 10 and 11. This configuration disables DCO to resolve potential connection issues on these devices.

Right-click the OpenVPN icon in the system tray, and then click Connect to establish a VPN connection.

If the state changes to Connected and an IP address is assigned, the connection is successful.

Mac
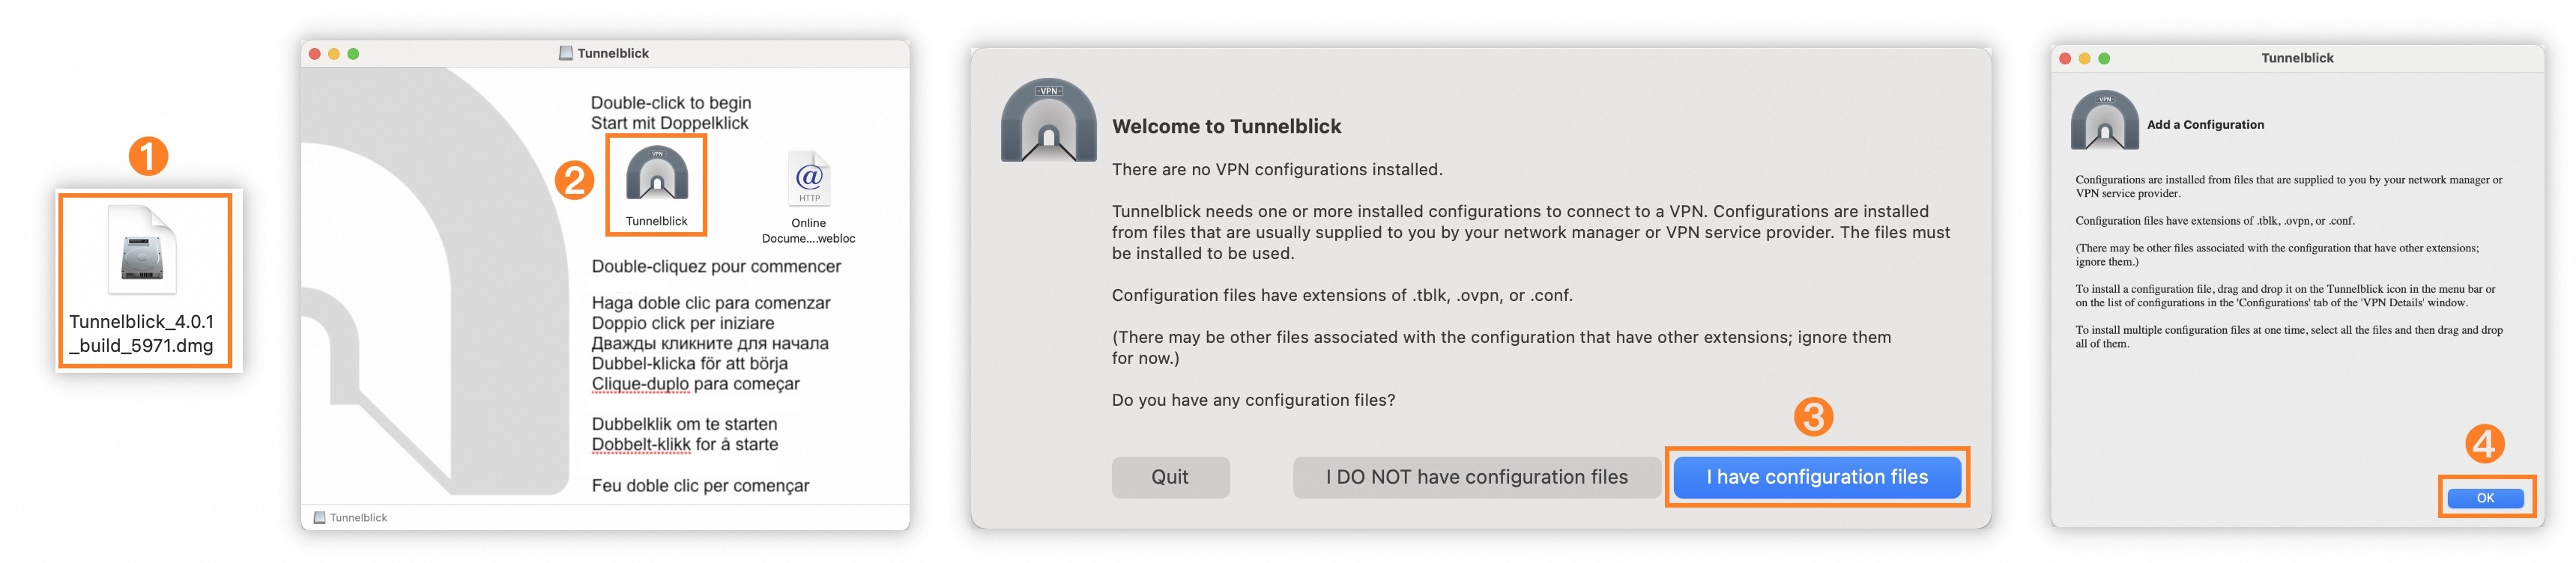
Open the Tunnelblick Releases page and find the latest stable version to download the dmg file. This topic uses version
Tunnelblick 4.0.1 (build 5971)as an example, and downloads the file in.dmgformat from the Assets panel.
Install the Tunnelblick software.
Step
Description
①
Double-click the downloaded Tunnelblick installer package.
②
Double-click the Tunnelblick icon.
③
Select I have configuration files.
④
Click OK.
Unzip the downloaded ssl client certificate package. Then, drag the extracted
config.ovpnfile to the Configurations panel.
Step
Description
①
In Launchpad, click the Tunnelblick icon to open Tunnelblick.
②
Drag the extracted
config.ovpnfile to the Configurations panel.③
Select Only Me.
④
Click Connect.
Step 3: Configure an enterprise private network address or a cloud service route
You can choose one of the following solutions. Solutions 1 and 2 both involve configuring an Alibaba Cloud VPC address. The difference is that Solution 1 uses a default address, which is simpler for end users as it does not require configuring a custom address.
VPC address (default)
Obtain the private gateway address of the office network.
Log on to the EDS enterprise console.
In the left-side navigation pane, choose .
On the Office Network page, click the target office network ID.
In the Network Information section of the office network details page, copy the Private Gateway Address. You will use this address in a later step.
On your enterprise DNS service, configure a CNAME record to point
private.wuying.comto the private gateway address of the office network.The end user completes the network connection configuration on the Alibaba Cloud Workspace client.
Open the Windows client.
In the upper-right corner of the logon screen, click the icon and select Connection Configuration.
In the Connection Configuration dialog box, set the following options:
ImportantThis feature requires Windows client version 7.7 or later. Earlier versions do not support configuring an Alibaba Cloud VPC address.
Connection Type: Select Alibaba Cloud VPC.
Alibaba Cloud VPC Address: Select Default Address.
Click Confirm.
VPC address (custom)
Obtain the private gateway address of the office network and provide it to your end users.
Log on to the EDS enterprise console.
In the left-side navigation pane, choose .
On the Office Network page, click the target office network ID.
In the Network Information section of the office network details page, copy the Private Gateway Address. You will use this address in a later step.
The end user completes the network connection configuration on the Alibaba Cloud Workspace client.
Open the Windows client.
In the upper-right corner of the logon screen, click the icon and select Connection Configuration.
In the Connection Configuration dialog box, set the following options:
ImportantThis feature requires Windows client version 7.7 or later. Earlier versions do not support configuring an Alibaba Cloud VPC address.
Connection Type: Select Alibaba Cloud VPC.
Alibaba Cloud VPC Address: Select Custom Address.
Custom Address: Enter the private gateway address of the office network provided by the administrator.
Click Confirm.
Solution 3: Configure a cloud service route and DNS
Configure a cloud service route.
The CIDR block for private cloud services on Alibaba Cloud is
100.64.0.0/10. This is a reserved CIDR block as specified in RFC 6598. The Alibaba Cloud Workspace client needs to call service APIs for Elastic Desktop Service (EDS). To enable this, add the100.64.0.0/10CIDR block as a local address in your VPN. This ensures that requests destined for this CIDR block are forwarded to your user VPC on the cloud.NoteIf your 100.x.x.x network segment has a conflict, use Solution 1 or Solution 2.
If you use cloud computers in multiple regions, you can set the large
100.64.0.0/10CIDR block as the CIDR block for cloud services. If you need a more granular network, see Cloud computer service port requirements to set the cloud service CIDR block. The IP address that corresponds to the domain name of the private management service is the cloud service IP address.
(Optional) Before you configure DNS, run the following command to test if the domain name can be resolved.
nslookup ecd-vpc.cn-hangzhou.aliyuncs.comIf an IP address is returned, the domain name is resolved correctly and you can skip Step 3. If no IP address is returned, you must configure DNS as described in the next step.
Configure DNS on your local computer.
Add
100.100.2.136or100.100.2.138to the DNS server list.The following steps show how to configure DNS on a Windows 10 operating system:
From the Start menu, search for and open Control Panel.
In the Control Panel window, click Network and Internet, and then click Network and Sharing Center.
In the navigation pane on the left, click Change adapter settings.
Right-click the network adapter for OpenVPN and choose Properties.
In the dialog box that appears, in the This connection uses the following items section, double-click Internet Protocol Version 4 (TCP/IPv4).
In the panel that appears, enter the specified DNS server addresses.
Set the Preferred DNS server to
100.100.2.136and the Alternate DNS server to100.100.2.138.
Run the following command to verify that DNS works correctly.
nslookup ecd-vpc.cn-hangzhou.aliyuncs.com
Step 4: Verify the private network connection to your cloud computer
The following example uses the Windows client version 7.7 to verify the private network connection to a cloud computer. In practice, select the client that matches your situation.
Open the Windows client.
In the upper-right corner of the logon screen, click the settings icon and select Connection Configuration.
In the Connection Configuration dialog box, set Connection Type to Alibaba Cloud VPC.
On the logon screen, enter the credentials you received in the cloud computer assignment notification email (including the office network ID or organization ID, username, and password), and then click the next icon.
In the cloud resource list on the client, find your cloud computer, and then start and connect to it.
NoteA network request timeout error indicates that the network is disconnected. Check your configuration. After you correct it, log on to the client and connect to the cloud computer again.