The Security Center agent is a lightweight security component that runs on your servers to collect security data and enforce protection policies. This topic describes how to install the agent on cloud and on-premises servers, verify the installation, and troubleshoot common issues.
Agent workflow
The Security Center agent is a lightweight proxy that runs on your target server. Its workflow is as follows:
-
Installation and registration: When you run the installation command, the agent automatically downloads and registers with the service using a unique installation key.
-
Data collection: The agent runs in the background and collects security data in real time, such as processes, network connections, and logon behaviors.
-
Data reporting: The agent securely reports the collected data to the service over a Transport Layer Security (TLS)-encrypted channel, adapting to different network environments, such as proxies.
-
Command execution: The agent executes security commands received from the service, such as vulnerability scans and baseline checks, and reports the results.
-
Status synchronization: The agent sends periodic heartbeat signals to report its online and health status, ensuring the console displays the real-time protection status of your servers.
Applicability
-
System version: You must install the agent on a supported operating system. For more information, see Supported systems.
-
Server ownership: You can install the agent only on servers in your Alibaba Cloud account. Security Center does not support cross-account installation.
NoteTo protect cross-account resources with Security Center, use the multi-account management feature.
Prerequisites
Installation notes
-
Installation time: The installation process takes approximately 5 minutes per server.
-
Resource consumption: The agent is a lightweight proxy. During high-load tasks such as scans, the agent's resource use (CPU and memory) may temporarily increase.
-
Business impact: Installation does not require a server restart or interrupt normal business operations.
Clean up previous installations
If the agent is already installed on the server, first uninstall the agent and then manually delete any remaining files from the installation directory. The default paths are as follows:
-
Linux: /usr/local/aegis.
-
Windows (64-bit): C:\Program Files (x86)\Alibaba\Aegis.
Identify assets missing the agent
-
Log on to the Security Center console.
-
In the left-side navigation pane, choose . In the upper-left corner of the console, select the asset region: Chinese Mainland or Outside Chinese Mainland.
-
On the tab, view the servers that are missing the agent.
Installation methods
|
Installation method |
Scenarios |
Key advantages |
|
For running ECS instances in a supported region that use a VPC and have Cloud Assistant installed. |
Simple installation from the console, with no server login required. |
|
|
For any server with Internet access, including ECS instances and external servers. |
Highly versatile. Supports all major operating systems. |
|
|
To create multiple, standardized servers with the agent pre-installed. |
Scalable deployment. Create once, reuse for multiple deployments. |
|
|
For servers that lack direct Internet access, have unstable network connectivity, or require a specific endpoint. |
Supports complex network scenarios through a proxy or leased line. |
Installation
One-click installation
Use cases
You can use one-click installation if your ECS instance meets all the following conditions:
-
The ECS instance is in the Running state and has Cloud Assistant installed.
NoteIf Cloud Assistant is not installed on the server, install Cloud Assistant first.
-
The network type is VPC.
-
The ECS instance must be in one of the following supported regions.
Region category
Region name
Asia-Pacific
-
China (Hangzhou), China (Shanghai), China (Qingdao), China (Beijing), China (Zhangjiakou), China (Hohhot), China (Shenzhen), China (Hong Kong)
-
Singapore, Malaysia (Kuala Lumpur), Indonesia (Jakarta), and Japan (Tokyo)
Europe and Americas
Germany (Frankfurt), UK (London), US (Silicon Valley), and US (Virginia)
Middle East and India
UAE (Dubai)
-
-
Disable or uninstall third-party security software to prevent installation conflicts.
NoteAfter the Security Center agent is installed, you can restart or reinstall your third-party security software as needed.
Procedure
-
Log on to the Security Center console.
-
In the left-side navigation pane, choose . In the upper-left corner of the console, select the region where your assets are located: Chinese Mainland or Outside Chinese Mainland.
-
On the tab, find the server where you want to install the agent, and click Install Agent in the Actions column.
NoteYou can also select multiple servers and click Install to install the agent in batches.
General installation
Use cases
Use this method for any server with Internet access.
To ensure a successful installation, allow outbound traffic to the service endpoints of Security Center in your firewall or security group. For more information, see Configure an allowlist policy.
Procedure
-
Log on to the Security Center console.
-
In the left-side navigation pane, choose . In the upper-left corner of the console, select the region where your assets are located: Chinese Mainland or Outside Chinese Mainland.
-
On the tab, copy the installation command that corresponds to your server's operating system.
NoteThe command includes a dedicated installation key, which is the value after
-k.-
Default installation command: A quick and convenient option that requires no extra configuration. This method is suitable for scenarios where you do not need to immediately assign the asset to a specific group.
-
Custom installation command: A flexible option that lets you configure the server group and command expiration time. This method is suitable for scenarios where you need to automate asset categorization during installation for fine-grained management.
Default command
Servers installed with the default installation command are assigned to the Ungrouped group. For more information about how to view and create server groups, see Manage server groups.
Custom command
Click Create Installation Command, configure the parameters for the command, and then click OK. On the Installation Command page, view and copy the new command. The following table describes the parameters.
Parameter
Description
Expiration Time
Specifies when the command expires. You cannot use an expired command to install the agent.
Service Provider
From the drop-down list, select the server's service provider.
Default Group
Select a server group. For more information about how to view and create server groups, see Manage server groups.
OS
Select the server's operating system.
Create Image System
Select No.
Access Method
Set the access method of the server to Public Endpoint. The server communicates with the Security Center service directly through a public IP address, without requiring an extra proxy or private connection.
-
-
Log on to the server and run the installation command with administrator or root privileges.
-
Windows: In Command Prompt (CMD) or PowerShell, run the copied installation command to download and install the agent.
-
Linux: In the command-line interface of the server, run the copied installation command to download and install the agent.
-
Batch image installation
Use cases
This method is suitable for creating servers at scale. It involves installing the agent on a template server without activation and then creating a custom image from that server.
Procedure
-
Prepare a template server and generate an image installation command
-
Prepare a clean server to use as an image template (no third-party security software installed).
-
Log on to the Security Center console.
-
In the left-side navigation pane, choose . In the upper-left corner of the console, select the region where your assets are located: Chinese Mainland or Outside Chinese Mainland.
-
On the tab, click Create Installation Command, and configure the following parameters:
-
Create Image System: Select Yes. This is the most critical step.
-
Operating System: Select the operating system that matches the template server.
-
Other options (such as Default Group): Configure the options as needed. For more information, see Custom installation command.
-
-
-
Install the agent on the template server
-
Log on to the template server with administrator privileges.
-
Run the image installation command that you copied in the previous step. The script downloads the required agent files to the specified directory but does not start any service processes.
-
After the installation is complete, immediately shut down the template server. Do not restart the template server.
-
-
Create and use the image
Warning-
Do not restart the template server when you create the image.
-
Before you use the same template server to create multiple images, make sure to uninstall and clean up the old agent, and then obtain a new installation command. This prevents registration failures from conflicting unique agent identifiers (agent IDs).
-
Use the powered-off template server to create a custom image. For more information, see Create a custom image.
-
Use the image to create a new instance. For more information, see Create an ECS instance from a custom image.
-
The agent automatically completes initialization when the new instance starts for the first time. It generates a unique agent identifier (agent ID) and connects to Security Center.
-
Installation in complex networks
Use cases
Security Center provides the following installation methods for complex network environments:
-
Access via proxy: For servers without direct Internet access.
-
Access from outside the Chinese mainland over a third-party leased line: For scenarios where you connect to an Alibaba Cloud region over a third-party leased line and need to specify the region-specific domain name for Security Center.
Procedure
-
The host running this command must be able to access the Security Center service endpoints through the specified method, such as the public network, a proxy, a leased line, or a VPN.
-
This installation command does not support 32-bit Linux operating systems.
Proxy access
-
First, deploy and configure a proxy cluster. For more information, see Proxy access.
-
Log on to the Security Center console.
-
In the left-side navigation pane, choose . In the upper-left corner of the console, select the region where your assets are located: Chinese Mainland or Outside Chinese Mainland.
-
On the tab, click Create Installation Command, and configure the following parameters:
-
Access Method: Select Self-managed Proxy Cluster and select the created proxy cluster from the drop-down list. This is the most critical step.
-
Create Image System: Select No.
NoteIf you select Yes, follow the instructions in Batch installation using an image.
-
Operating System: Select the operating system that matches the target server.
-
Other options (such as Default Group): Configure the options as needed. For more information, see Custom installation command.
-
-
Use the generated command to install the agent. The agent will then communicate with Security Center through the specified proxy.
Third-party leased line
The following table lists the region-specific domain names of Security Center for external servers located outside the Chinese mainland.
Ensure the corresponding region-specific Security Center domain name is accessible.
|
Region |
Domain name |
|
Malaysia (Kuala Lumpur) |
|
|
Philippines (Manila) |
|
|
South Korea (Seoul) |
|
|
Thailand (Bangkok) |
|
|
SAU (Riyadh - Partner Region) |
|
|
Indonesia (Jakarta) |
|
|
UK (London) |
|
|
Germany (Frankfurt) |
|
|
Japan (Tokyo) |
|
|
US (Silicon Valley) |
|
|
US (Virginia) |
|
-
Obtain the installation key: The installation key for Security Center is the value that follows
-kin the default installation command generated by the console. -
Select an installation command, and log on to the server to run it.
ImportantIn the following commands, replace
<YOUR_INSTALL_KEY>with your actual installation key.-
Malaysia (Kuala Lumpur)
-
Linux
wget "https://aegis.alicdn.com/download/install/2.0/linux/AliAqsInstall.sh" && chmod +x AliAqsInstall.sh && ./AliAqsInstall.sh "-j=jsrv-ap-southeast-3.aegis.aliyuncs.com|jsrv-ap-southeast-1-internet.aegis.aliyuncs.com" "-u=update-ap-southeast-3.aegis.aliyuncs.com|aegis.alicdn.com|update-ap-southeast-1-internet.aegis.aliyuncs.com" -k=<YOUR_INSTALL_KEY> -
Windows
powershell -executionpolicy bypass -c "(New-Object Net.WebClient).DownloadFile('http://aegis.alicdn.com/download/install/2.0/windows/AliAqsInstall.exe', $ExecutionContext.SessionState.Path.GetUnresolvedProviderPathFromPSPath('.\AliAqsInstall.exe'))"; "./AliAqsInstall.exe '-j=jsrv-ap-southeast-3.aegis.aliyuncs.com|jsrv-ap-southeast-1-internet.aegis.aliyuncs.com' '-u=update-ap-southeast-3.aegis.aliyuncs.com|aegis.alicdn.com|update-ap-southeast-1-internet.aegis.aliyuncs.com' -k=<YOUR_INSTALL_KEY>"
-
-
Other regions
Replace
$jsrv_domainin the command with the region-specific domain name that starts withjsrv, and replace$update_domainwith the region-specific domain name that starts withupdate.-
Linux
wget "https://aegis.alicdn.com/download/install/2.0/linux/AliAqsInstall.sh" && chmod +x AliAqsInstall.sh && ./AliAqsInstall.sh "-j=$jsrv_domain|jsrv-ap-southeast-1-internet.aegis.aliyuncs.com" "-u=$update_domain|aegis.alicdn.com|update-ap-southeast-1-internet.aegis.aliyuncs.com" -k=<YOUR_INSTALL_KEY> -
Windows
powershell -executionpolicy bypass -c "(New-Object Net.WebClient).DownloadFile('http://aegis.alicdn.com/download/install/2.0/windows/AliAqsInstall.exe', $ExecutionContext.SessionState.Path.GetUnresolvedProviderPathFromPSPath('.\AliAqsInstall.exe'))"; "./AliAqsInstall.exe '-j=$jsrv_domain|jsrv-ap-southeast-1-internet.aegis.aliyuncs.com' '-u=$update_domain|aegis.alicdn.com|update-ap-southeast-1-internet.aegis.aliyuncs.com' -k=<YOUR_INSTALL_KEY>"
-
-
Verify the installation status
After installation, use one of the following methods to verify that the agent is running:
-
Verify on the console: Check the agent status from the console without logging in to the server. This method relies on data synchronization, which typically has a delay of a few minutes.
-
Verify on the server: This provides immediate and accurate feedback on the server's local status. You must log in to the server and run commands, making it ideal for immediate confirmation or for troubleshooting installation issues.
Console (approximately 5-minute latency)
You can check the online status of the agent on the Host page of the Security Center console:
-
For an Alibaba Cloud server, the icon in the Agent column changes from
 to
to  .
. -
A non-Alibaba Cloud server appears in the server list, and the icon in the Agent column changes from
to .ImportantThe Security Center console automatically synchronizes asset information for installed agents every minute. Due to network conditions, information synchronization for non-Alibaba Cloud servers may be delayed after the agent is installed. If the server does not appear on the Host page, click Synchronize Assets to manually synchronize the asset information. For more information, see Synchronize Assets.
Server (real-time)
Verify that the installation was successful by checking the status of agent processes and the server's network connectivity.
-
Check the service processes: Check whether the core processes of the Security Center agent (AliYunDun, AliYunDunMonitor, and AliYunDunUpdate) are running on the server. For more information about the agent processes, see Security Center agent processes.
Linux
Run the following commands in a terminal:
# Check that AliYunDun, AliYunDunMonitor, and AliYunDunUpdate are all running.
ps -ef | grep -E 'AliYunDun|YunDunMonitor|YunDunUpdate'

# Check the service status. The output should show "active (running)".
systemctl status aegis
Expected output when all processes are healthy:
root        5472       1  0 Sep10 ?        00:00:18 /usr/local/aegis/aegis_update/AliYunDunUpdate
root        5524       1  0 Sep10 ?        00:01:34 /usr/local/aegis/aegis_client/aegis_12_61/AliYunDun
root        5546       1  0 Sep10 ?        00:03:13 /usr/local/aegis/aegis_client/aegis_12_61/AliYunDunMonitor

● aegis.service - LSB: Aegis service
   Loaded: loaded (/etc/rc.d/init.d/aegis; generated)
   Active: active (running) since Mon 2023-10-30 10:00:00 CST; 1 day 2h ago
If any of the three core processes is missing from the
psoutput, or the service status is notactive (running), the agent is not fully operational.Windows
Use one of the following methods.
Method 1: Open Task Manager and check that
AliYunDun,AliYunDunMonitor, andAliYunDunUpdateappear in the process list.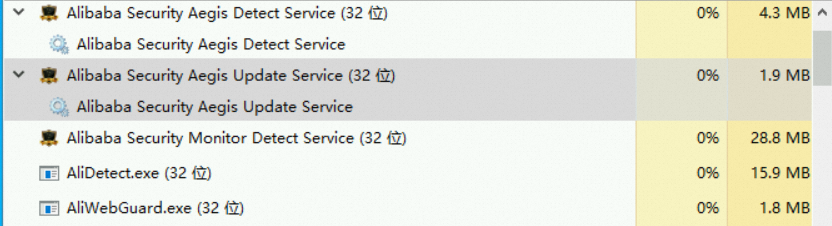
Method 2: Run the following commands in PowerShell:
# Check that the three core processes are running.
Get-Process | Where-Object {$_.Name -match '^(AliYunDun|AliYunDunMonitor|AliYunDunUpdate)$'}

# Check the service status. The Status column should show "Running".
Get-Service | Where-Object {$_.Name -match 'Aegis|AliYunDun'}
Expected output when all processes are healthy:
Handles  NPM(K)    PM(K)      WS(K)     CPU(s)     Id  SI ProcessName
-------  ------    -----      -----     ------     --  -- -----------
    380      26    15948      19656     615.75   6072   0 AliYunDun
    599      31    47576      37356     968.73   2488   0 AliYunDunMonitor
    257      14     8072      11336     232.03   2904   0 AliYunDunUpdate

Status   Name               DisplayName
------   ----               -----------
Running  Alibaba Securit... Alibaba Security Aegis Detect Service
Running  Alibaba Securit... Alibaba Security Aegis Update Service
If any core process is missing or a service status shows anything other than
Running, the agent is not fully operational. -
Check network connectivity: On your server, run the following command to check whether you can connect to the Security Center service endpoint on port 443 or 80. If the connection is successful, the terminal displays a
Connected to ...message. If the connection fails, aConnection refusedorConnection timed outmessage is returned.NoteMake sure that the server can connect to at least one jsrv domain name and one update domain name. The jsrv domain name is used to issue instructions, such as vulnerability scans and virus detection. The update domain name is used to download and update agent plugins.
-
telnet jsrv.aegis.aliyun.com 443 -
telnet jsrv2.aegis.aliyun.com 443 -
telnet jsrv3.aegis.aliyun.com 443 -
telnet update.aegis.aliyun.com 443 -
telnet update2.aegis.aliyun.com 443 -
telnet update3.aegis.aliyun.com 443
-
Troubleshooting
Installation command failure
If the agent installation command fails to run, refer to the following common causes and solutions.
Insufficient script execution permissions
Symptom: The system returns a Permission denied error when you run the installation script.
Resolution: Switch to an account with administrator or root permissions and run the installation command again.
Self-protection
Symptom: Reinstalling the Security Center agent fails after a virus is removed. An error message indicates that self-protection is running and prompts you to uninstall or disable it on the Security Center console first.
Resolution: Restart the server. This action disables the self-protection process, which allows you to install the agent.
Assess the potential risks before you proceed.
Agent offline
An offline status on the console indicates that the agent has lost communication with the service. The following sections describe common diagnostic steps and solutions.
Agent processes
Diagnostic steps: Verify that the two core processes, AliYunDun and AliYunDunUpdate, are running.
-
Linux: Run the
ps -ef | grep AliYunDuncommand to check. -
Windows: Open Task Manager and go to the Details or Services tab to find the related processes and services.
Resolution: Manually restart the agent processes.
Linux
Run the following commands to restart the processes.
-
Stop the related processes:
killall AliYunDun killall AliYunDunUpdate -
Start the latest version of the agent.
In the
/usr/local/aegis/aegis_clientdirectory, find theaegis_10_xxfolders and select the one with the highest version number.For example, among
aegis_10_70,aegis_10_73, andaegis_10_75, selectaegis_10_75./usr/local/aegis/aegis_client/aegis_10_xx/AliYunDun
Windows
In the Services panel, restart the two Security Center services: Alibaba Security Aegis Detect Service and Alibaba Security Aegis Update Service. To do so, right-click each service and select Restart.

Network connection
Diagnostic steps: Verify that your firewall or security group allows outbound traffic to the Security Center service IP addresses or domain names, such as jsrv.aegis.aliyun.com or update.aegis.aliyun.com. The agent can also go offline if the server cannot connect to the Security Center service.
For more information about the Security Center service IP addresses and domain names, see Appendix: Agent communication endpoints (domain names and IP addresses).
Resolution:
-
Verify that the DNS service on the server is running correctly.
If the DNS service is not running, restart the server or troubleshoot the DNS service.
-
Check if network access policies are configured on the server.
-
Firewall ACL rules
Add the Security Center service IP addresses or domain names to your firewall's allowlist to permit network access. You only need to configure rules for outbound traffic.
NoteIf you use Alibaba Cloud Firewall, see Create an outbound access control policy for traffic from an internal network to the Internet for instructions.
Example firewall configuration (iptables):
# Allow access to the control service iptables -A OUTPUT -p tcp -d jsrv.aegis.aliyun.com --dport 443 -j ACCEPT iptables -A OUTPUT -p tcp -d jsrv.aegis.aliyun.com --dport 80 -j ACCEPT # Allow access to the update service iptables -A OUTPUT -p tcp -d update.aegis.aliyun.com --dport 443 -j ACCEPT iptables -A OUTPUT -p tcp -d update.aegis.aliyun.com --dport 80 -j ACCEPT -
Alibaba Cloud security group rules
If you use an ECS instance, see Manage security groups for specific steps.
NoteAllow outbound traffic to the Security Center CIDR blocks. You can either leave the port unrestricted or allow traffic on ports 80 and 443.
The following is an example configuration for the 100.100.0.0/16 CIDR block:
-
Direction: Outbound
-
Authorization policy: Allow
-
Protocol type: TCP
-
Port range: 80/443
-
Authorization object: 100.100.0.0/16
-
-
System resources
Diagnostic steps:
Verify that the server has sufficient resources. The agent may stop running if server resources are exhausted.
-
CPU/Memory: Use
top(Linux) or Task Manager (Windows) to check the usage. -
Disk space: Use
df -h(Linux) or This PC (Windows) to check the remaining disk space.
Resolution:
-
High resource usage
-
If the
AliYunDunprocess is the cause, contact technical support and provide the relevant logs. -
If other business processes are the cause, optimize your applications or consider upgrading the server configuration.
-
-
Insufficient disk space: Delete unnecessary files to free up disk space.
Duplicate agent IDs
Diagnostic steps: This issue often occurs when you create multiple servers from the same system image. Check if the uuid field in the following configuration files is duplicated across multiple servers.
-
Linux:
/usr/local/aegis/aegis_client.conf -
Windows:
-
32-bit: C:\Program Files\Alibaba\aegis\aegis_client.conf
-
64-bit: C:\Program Files (x86)\Alibaba\aegis\aegis_client.conf
-
Resolution:
Before creating multiple images from a single template server, uninstall and clean up the old agent, and then obtain a new installation command.
Software conflicts
Diagnostic steps: Check if other Host-based Intrusion Detection System (HIDS), Endpoint Detection and Response (EDR), or antivirus software is installed on the server. Such software can conflict with the Security Center agent.
Resolution:
Disable or uninstall the third-party security software. After the Security Center agent is installed, you can restart or reinstall the original software as needed.
Agent logs
Diagnostic steps: Review the agent logs for specific error messages. The log files are located in the following directories:
-
Linux: /usr/local/aegis/aegis_client/aegis_12_xx/data/.
NoteThe
aegis_xx_xxplaceholder represents the version directory for the running agent. To find the exact path, check the output of theps -ef|grep AliYunDuncommand. -
Windows: C:\Program Files (x86)\Alibaba\Aegis\aegis_client\aegis_12_xx\data\.
Resolution:
Troubleshoot the issue based on the error messages in the logs. If you cannot resolve the issue, contact technical support and provide the complete log files.
Agent Troubleshooting feature
Security Center provides the Agent Troubleshooting feature to perform a comprehensive check on the agent. This feature allows you to quickly identify issues, such as system exceptions caused by the agent, high CPU usage of agent processes, installation failures, or unexpected offline status, and provides potential causes and solutions. The following section describes the procedure and provides an example configuration:
-
In the left-side navigation pane, choose .
-
On the Host page, on the Server tab, select the server to troubleshoot. In the More Operations menu, click Agent Troubleshooting.
-
After configuring the check requirements, click Start Check.
-
Issue Type: Overall Check (Unknown Issues).
-
Mode: Enhancement Mode.
NoteEnhancement mode collects and reports agent-related data, such as network, process, and log information, to Security Center for analysis. The check takes about 5 minutes.
-
-
After the check is complete, view the result in the Agent Task Management panel in the upper-right corner of the Host page.
-
On the task details page, follow the solution provided in the Result column.
ImportantIf no solution is provided in the Result column, click Download Diagnostic Logs. Then, submit the exported diagnostic logs and your Alibaba Cloud account ID (AliUid) to Security Center technical support for further analysis.
Appendix: Agent communication endpoints
Wildcard domains
|
Domain name |
Business type |
|
|
Enables communication between the agent and the Security Center server. |
|
|
|
|
|
CDN domain for downloading static files for Security Center. |
IP address ranges
|
IP address range |
Business type |
|
|
Private IP address range for Security Center servers. |
|
|
Public IP addresses for Security Center servers. |
|
|
|
|
|
|
|
|
|
|
|
|
|
|
|
|
|
|
|
|
|
|
|
|
|
|
|
|
|
|
|
|
|
|
|
|
|
|
|
|
|
|
|
|
|
|
|
|
|
|
|
|
|
Domain names
|
Region |
Domain name |
Use case |
Business type |
|
Chinese Mainland |
|
Accessing Security Center over the public network. |
Persistent TCP connections |
|
|
Accessing Security Center over a private network. |
||
|
|
Accessing Security Center over Classic Network (to be deprecated). |
||
|
|
|||
|
|
|||
|
|
Accessing Security Center over the public network. |
HTTP short-lived connections |
|
|
|
Accessing Security Center over a private network. |
||
|
|
Accessing Security Center over Classic Network (to be deprecated). |
||
|
|
|||
|
|
|||
|
|
Enables the agent to download static files from the public CDN. |
File download |
|
|
Outside Chinese Mainland |
|
Accessing Security Center over the public network. |
Persistent TCP connections |
|
|
Accessing Security Center over a private network. |
||
|
|
Accessing Security Center over Classic Network (to be deprecated). |
||
|
|
Accessing Security Center over the public network. |
HTTP short-lived connections |
|
|
|
Accessing Security Center over a private network. |
||
|
|
Accessing Security Center over Classic Network (to be deprecated). |
||
|
|
Enables the agent to download static files from the public CDN. |
File download |
FAQ
Installation and uninstallation
-
How do I uninstall the agent?
Security Center provides two uninstallation methods: one-click uninstallation from the console and manual uninstallation. For more information, see Uninstall agent.
-
Can I restart the template server when I create an image?
No. After you run the image installation command, you must immediately shut down the server to create the image. A restart activates the agent on the template server and generates a fixed instance ID. Servers created from this image will fail to report data due to ID conflicts.
Assets and groups
-
After I manually install the agent, to which group is the server automatically added?
Servers installed using the default installation command are automatically assigned to the Ungrouped group. You can specify a Default Group when you Create Installation Command, or you can manually change the server's group on the Host Assets page after installation.
-
Why can't I see my server in the Agent Not Installed list?
Possible reasons include the following:
-
The agent is already installed on the server.
-
The server is new, and its asset information has not yet been synchronized. Wait a few minutes or manually click Sync Now.
-
The server does not belong to the current Alibaba Cloud account or the selected region.
-