Use the multi-account management feature of Security Center to centrally purchase security products, configure security protection, and handle risks for multiple Alibaba Cloud accounts.
Use cases
Centralized security configuration and risk management
Centralized management of security protection and risks
Member account data and configurations are isolated, but a delegated administrator account in Security Center can centrally manage security settings, handle risks, and perform hardening across all member accounts.
Cross-account log ingestion, storage, and threat analysis
Agentic SOC ingests data from member accounts into a delegated administrator account for centralized storage and analysis, helping identify cross-account security risks and providing a global view of security events.
Centralized billing and shared quotas
A delegated administrator can purchase Security Center feature quotas and allocate them to member accounts, eliminating individual purchases and simplifying cost allocation.
If a member account has already purchased a Security Center instance, you cannot allocate a quota to it. To allocate a quota, the member account must first unsubscribe from its subscription instance and disable any pay-as-you-go instances.
To centrally pay for all cloud products used by member accounts, use the finance trusteeship feature. Finance Trusteeship overview.
For security reasons, we recommend that you use a Security Center delegated administrator account, not the management account, to purchase quotas.
Example of a multi-account architecture
A security expert uses a dedicated security account (delegated administrator) to centrally manage your organization's production and testing accounts, streamlining risk detection, response, and hardening. For more complex multi-account scenarios, submit a ticket for technical support.

Prerequisites
Resource Directory is enabled. Enable Resource Directory.
Member accounts are created in Resource Directory, or existing Alibaba Cloud accounts have joined your Resource Directory. Create a member and Invite an Alibaba Cloud account to join a Resource Directory.
Step 1: Add a delegated administrator account
The Resource Directory management account designates a member account as the delegated administrator for a trusted service. Once designated, this account can access organizational information and perform management tasks on behalf of the organization.
Log on to the Resource Management console by using your management account.
-
In the navigation pane on the left, choose .
On the Trusted Services page, find Security Center and click Manage in the Actions column.
-
In the Delegated Administrator Account section, click Add.
In the Add delegated administrator account panel, select the member account that you want to set as a delegated administrator, and then click Confirm.
After the account is added, it can access the multi-account management feature in Security Center and manage resources within your Resource Directory organization.
NoteYou can add a maximum of 10 delegated administrator accounts for Security Center.
Step 2: Configure the account management scope
Configure the scope of member accounts that a delegated administrator can manage.
A delegated administrator can only view and manage member accounts within its scope and cannot access accounts managed by other delegated administrators. If the management account configures the scope, only the management account can view and manage those member accounts.
A member account can be managed by only one delegated administrator at a time.
Log on to the Security Center console by using a delegated administrator account.
In the left-side navigation pane, choose . In the upper-left corner of the console, select the region where the assets that you want to protect are located: Chinese Mainland or Outside Chinese Mainland.
(Required for first-time use) On the Multi-account Management page, click Enable Management in Security Center.
On the Configure tab, in the Total Monitored Accounts section, click Account Management.
In the Multi-account Management Settings panel, select the member accounts that you want the current account to manage.

(Optional) Turn on Automatic Management of New Accounts to set a management policy for new accounts.
After you turn on this switch, click Configure Policy, select the target Resource Directory nodes, and click OK. When a new account is added to a selected node, it is automatically added to the list of managed accounts.
Click OK.
You can view the member accounts within the management scope on the Configure tab.

Step 3 (Optional): Allocate quotas
A delegated administrator can centrally purchase subscription quotas for Security Center features and then allocate them to member accounts.
Quota allocation limits
Only a delegated administrator can allocate subscription quotas to member accounts within its management scope. Target accounts must not have purchased a Security Center subscription or enabled pay-as-you-go services (except agentless detection and Serverless security). The following table lists features that support quota allocation.
Feature | Minimum and increment | Description |
Host and container security
|
|
Note
|
anti-ransomware capacity |
Note After you purchase the managed anti-ransomware service, the anti-ransomware capacity allocated to member accounts automatically uses the managed service capabilities. | |
Managed anti-ransomware service | ||
Log analysis capacity |
| |
container image scan |
| |
application protection |
| |
cloud honeypot |
| |
web tamper proofing |
| |
CSPM |
| |
malicious file detection |
| |
Agentic SOC - Log ingestion traffic |
| |
Agentic SOC - Log storage capacity |
|
View and purchase quotas
Log on to the Security Center console by using a delegated administrator account.
On the Overview page, in the Subscription section, view the subscription quotas for your Security Center instance.
This area displays all purchased features and quotas. For example, for the Subscription displayed to the right of Anti-ransomware, 150 indicates the total anti-ransomware capacity (GB) and 132.9 indicates used capacity (including regions in and outside mainland China).

To purchase more quotas, click Buy Now or Upgrade Now and complete the purchase.
Purchase Security Center and Upgrade and downgrade Security Center.
Allocate quotas
The multi-account quota allocation feature is in beta testing. To use this feature, contact technical support.
Log on to the Security Center console by using a delegated administrator account.
On the page, on the Configure tab, click Quota Management under Total Monitored Accounts to go to the Multi-account Quota Management page.

On the Multi-account Quota Management page, click Edit.
Click Add Account. In the Add Account dialog box, select the member accounts to which you want to allocate quotas, and then click OK.
You can allocate quotas only to member accounts that are managed by the current delegated administrator. You cannot allocate quotas to unmanaged accounts or accounts managed by other delegated administrators.
You can select only member accounts that have not purchased a Security Center subscription instance and have not enabled pay-as-you-go services, except for agentless detection and Serverless security.

In the Quota Management section, allocate quotas to the member accounts.
In the Purchased Quota section, you can view the features and quotas purchased for the current account.
The first row in the Quota Management section shows remaining quota available for allocation and cannot be edited. Unallocated quotas stay with the current account. The total allocated to member accounts cannot exceed the first-row value. Quota allocation limits.

Click Save.
After you allocate server quotas, the system automatically and randomly binds them to servers in the member account to maximize usage. Additional quotas allocated later are not automatically bound. You must switch to the member account to manually bind new quotas. Manage quotas for host and container security.
Step 4: Manage security for member accounts
View risk overview
View a summary of risk information for member accounts
On the Overview tab of the page, view security scores, at-risk assets, alerts, vulnerabilities, and baseline issues for all managed member accounts to identify high-risk accounts.

On the Configure tab of the page, you can view statistics on security risks within member accounts.

View risk details for a member account
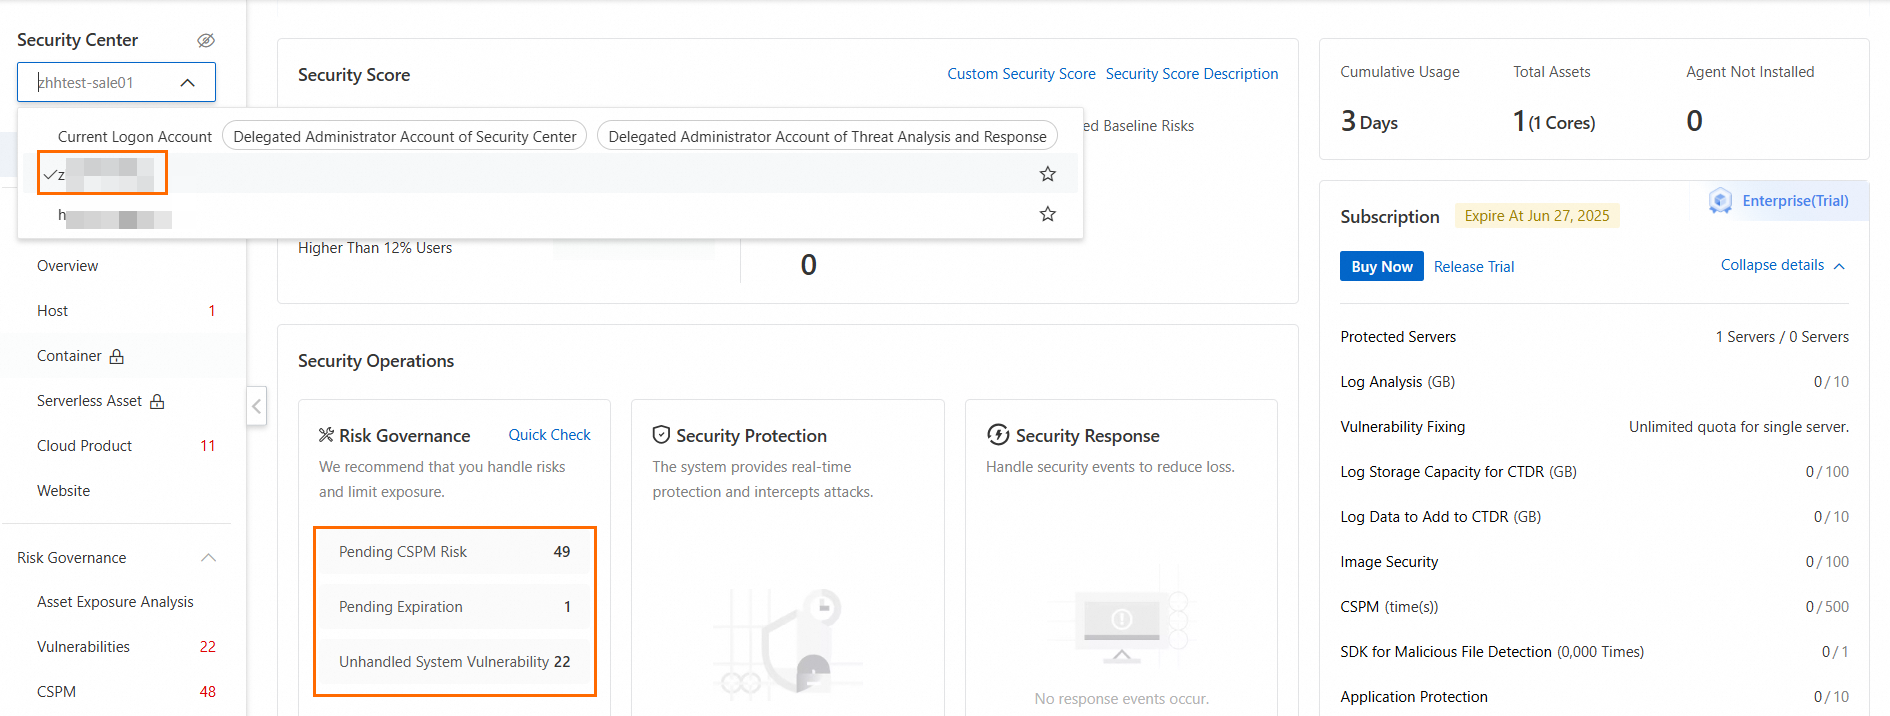
In the upper-left corner of the console, switch to a member account to view its security operations on the Member page. Overview (new).
Manage security for member accounts
Log on to the Security Center console by using a delegated administrator account.
In the left-side navigation pane, choose . In the upper-left corner of the console, select the region where the assets that you want to protect are located: Chinese Mainland or Outside Chinese Mainland.
On the Configure tab of the page, click Settings in the Actions column of a member account.
In the Settings panel, configure agent, vulnerability, and baseline scan settings for the member account, and then click OK.
Agent Management: Configure security defense capabilities and alert settings.
Vulnerabilities: Configure vulnerability scan settings for the member account. Scan for vulnerabilities.
Baseline Check: Configure baseline check policies for the member account. Configure and run baseline check policies.

In the upper-left corner of the console, switch to the member account to access its console.
After switching to the member account console, the delegated administrator can perform asset inventory, risk detection, hardening, real-time protection, and active detection and response. Features.
More operations
Using allocated quotas
After a delegated administrator allocates quotas, the member account can use them. If quota is insufficient, request more from the management account. Member accounts cannot purchase, renew, or upgrade Security Center instances independently. To avoid wasting quotas, follow the instructions below for each feature.
Manage quotas for host and container security: On the Overview or Host page, view and manage server protection quotas, including Ultimate, Enterprise, Advanced, and Anti-virus server quotas.
Anti-ransomware: Create a protection policy to back up core data files on your servers or databases. For instructions, see the following topics:
Log analysis: Delivery of all log types is enabled by default. No manual action is required.
ImportantA delegated administrator cannot use the log analysis feature of a member account by switching accounts in the upper-left corner of the console. The member account must log on to its own console to use this feature.
Container image scan: After you perform an image scan, the corresponding quota is used to detect security risks in the image.
Application protection: You must add your application to the application protection feature.
Cloud honeypot: Deploy cloud honeypots on your servers to trap attacks.
Web tamper proofing: Add protection to your servers to prevent malicious content from being injected into your website and ensure normal operation.
CSPM: Configure risk check policies for cloud product configurations, system baselines, and attack path scan rules to perform CSPM.
Malicious file detection: Detect malicious files by calling the SDK on your servers to scan offline files or by scanning files stored in OSS from the Security Center console.
Agentic SOC log storage capacity: To enable log delivery for Security Center and standardized logs.
Agentic SOC log ingestion traffic: To add cloud product logs to Agentic SOC.
Delete a member account
Log on with the delegated administrator account, go to the Configure tab of the page, and click Delete in the Actions column of a member account to remove it.
If a member account has been allocated quotas, deleting the account or its quota allocation will remove the allocated quotas. All assets under that member account will lose protection, the system will automatically release all quotas, and all logs will be cleared. Proceed with caution.
Delete a quota allocation
Log on with the delegated administrator account and go to the Overview page. In the Subscription section, click Multi-account Management. In the Quota Management section, move the pointer over the account name, click the  icon, and click OK in the confirmation dialog box.

Related documents
If you are using the Agentic SOC 1.0 architecture, where you have set up a delegated administrator for Security Center - Threat Analysis for multi-account management, see Centralized management of multiple accounts for operational guidance.
For an authorized member account to purchase Security Center independently, see How can an authorized member account purchase Security Center independently?