After an ECS instance is compromised by a cryptomining program, CPU resources are exhausted, business services are interrupted, and the malware may spread laterally across the internal network. This document describes a complete incident response workflow—from immediate containment and root cause analysis through multi-path cleanup to long-term security hardening—to help you quickly restore system security.
Dangers of cryptomining programs and how to identify them
Dangers
Resource consumption and degradation: Cryptomining programs consume CPU resources for intensive computations to mine cryptocurrency, causing severe CPU exhaustion that directly impacts the normal operation of other business applications on the server.
Worm-like propagation: Once the security perimeter is breached, cryptomining malware rapidly spreads laterally across the internal network and establishes persistence mechanisms on compromised servers to ensure long-term profit.
Difficult to remove: Cryptomining programs employ coordinated protection mechanisms, and incomplete cleanup leads to recurring infections. Some variants, such as xorddos, replace system commands so that executing normal system commands triggers malicious scripts, making removal more difficult.
Identification methods
Drastic performance degradation: The server's CPU utilization periodically or continuously exceeds 80%, causing business applications to respond slowly or become completely unavailable.
Compromised system stability: The high computational load from cryptomining programs can lead to system crashes or service interruptions.
Receive security alerts: Security Center sends alert notifications when it detects cryptomining programs, mining pool communication, or access to malicious domain names.
Response strategy
Respond quickly to completely remove the cryptomining program and its persistence backdoors, restore normal server performance, and implement security hardening to prevent future compromises.
Costs and risks
Costs:
Security Center: Advanced features such as Antivirus and Deep Cleanup require the Anti-virus edition or higher. A 7-day free trial is available.
Agentless Detection: This is a pay-as-you-go service. You must purchase the Agentless Detection billing feature separately.
Emergency Response Service: If you cannot handle the issue yourself, you can purchase the Alibaba Cloud Emergency Response Service for support from professional security engineers.
Risks:
Risks of manual cleanup: Manual operations may accidentally delete system files or modify configurations, causing the server to fail to boot or interrupting business operations. We recommend creating a snapshot before performing any manual cleanup.
Risk of data loss: Re-initializing the system disk permanently deletes all data on the system disk. If you do not create a snapshot beforehand, the data cannot be recovered.
Solution architecture
This guide follows a "discovery–containment–cleanup–hardening" incident response model and provides three remediation paths to suit different technical capabilities and business scenarios.
Quick self-check and emergency containment: Identify the threat and control the situation as quickly as possible to prevent further damage. Key actions include identifying abnormal processes and network connections and using a security group for network isolation.
Decision and path selection: Based on your technical expertise, time constraints, and risk tolerance, choose the most suitable cleanup path from the following three options:
Automated cleanup with Security Center (Recommended): Use the automated tools provided by Security Center to efficiently and accurately handle alerts, scan for viruses, and remove persistence backdoors.
Manual cleanup: Suitable for professionals with extensive experience in Linux/Windows operations and maintenance. This involves in-depth system cleanup through manual investigation and command execution.
System reset: If the infection is deep-rooted or recurs, back up your data and re-initialize the system disk to eliminate the threat at its source.
Verification and security hardening: After cleanup, verify that the system is operating normally and implement security hardening measures.
Procedure
Quick self-check and emergency containment
When you receive an alert or notice abnormal server performance, perform the following actions for initial diagnosis and emergency containment.
Identify abnormal processes and network connections
Check for high-CPU processes: Log on to the server and run the
top -corps -eo pid,ppid,cmd,%cpu --sort=-%cpu | morecommand to find unknown processes that are consuming high CPU resources for an extended period.Check for suspicious network connections: Run the
ss -ntpornetstat -antpcommand to check for connections to unknown remote addresses, especially those on common mining pool ports like 3333, 5555, and 7775.
Perform emergency containment
Network isolation (Recommended): This is the fastest and most secure way to contain the threat. Immediately log on to the ECS console, modify the security group rules for the server, and set the outbound rule to deny all traffic. Allow access only for remote login ports (such as SSH 22 or RDP 3389) from trusted IP addresses. This action instantly cuts off communication between the cryptomining program and its mining pool.
Terminate malicious processes: For any identified malicious process, run the
kill -9 <PID>command to terminate it. Note that this is a temporary measure. The process will likely restart if its persistence mechanism is not removed.
Perform cleanup
Choose one of the following cleanup methods based on your situation.
Automated cleanup with Security Center (recommended)
Prerequisites
You have purchased the Anti-virus, Advanced, Enterprise, or Ultimate edition of Security Center.
NoteYou can also activate the 7-day free trial to use the related features.
To perform a full scan, you must enable the Agentless Detection feature, which is a pay-as-you-go service.
Ensure the Security Center agent on the target server is online.
Step 1: Handle alerts and terminate malicious processes
Use the Alert feature in Security Center to terminate malicious processes and quarantine virus files to quickly stop the cryptomining program. For more information, see Evaluate and handle security alerts. The following steps provide an example.
Log on to the Security Center console.
In the navigation pane on the left, select . In the upper-left corner of the console, select the region where your assets are located: Chinese Mainland or Outside Chinese Mainland.
Find the cryptomining alert and click Details in the Actions column to view the alert details.
ImportantBased on the basic information and event description provided in the Security Center console, you can locate the cryptomining program and check for other alerts or suspicious files. You must determine whether the file that triggered the alert is a legitimate business file or a file run by an attacker. If you confirm it is an attack, we recommend that after handling the cryptomining alert, you also address all other alerts and suspicious files on the server.
Return to the Alerts page to handle the cryptomining alert.
Click Handle in the Actions column for the target cryptomining alert.
In the Handle Alert dialog box, select Virus Detection and Removal as the handling method. Then, select Terminate Process or Terminate Process and Quarantine Source File, and click Handle Now to prevent the program from running again.
If you confirm the file that caused the alert is not a business file, we recommend selecting Terminate Process and Quarantine Source File to prevent the virus from further infecting your server.
NoteSecurity Center supports the Batch Handle Same Alerts feature. If you need to batch-process alerts that are triggered by the same rule or type, you can select Batch Handle Same Alerts.
On the Alerts page, find any related alerts generated by the cryptomining event (such as mining pool communication) and perform the Block action.
NoteSecurity Center generates a corresponding policy to prevent the server from accessing the mining pool, giving you sufficient time to handle the security event. You can also manually add the mining pool IP address to a security group to block access. For more information about how to add a security group rule, see Add a security group rule.
On the Alerts page, check for any process behavior anomaly alerts to determine if there are abnormal scheduled tasks, and handle those alerts accordingly.
Note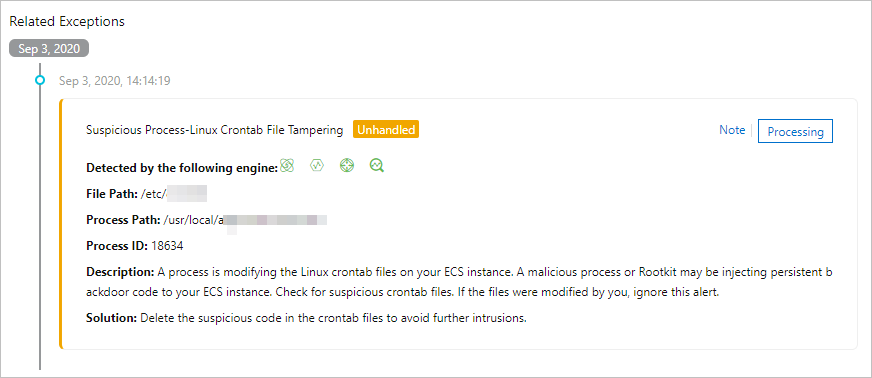
Step 2: Deep scan and cleanup
After a malicious process is terminated, its persistence mechanisms such as auto-startup services and scheduled tasks may still exist. Use the Antivirus feature in Security Center to scan and clean them. For more information, see Antivirus. The following steps provide an example.
Log on to the Security Center console.In the navigation pane on the left, select . In the upper-left corner of the console, select the region where the assets to be protected are located: Chinese Mainland or Outside Chinese Mainland.
On the Virus Detection and Removal page, click Scan Now or Scan Again.
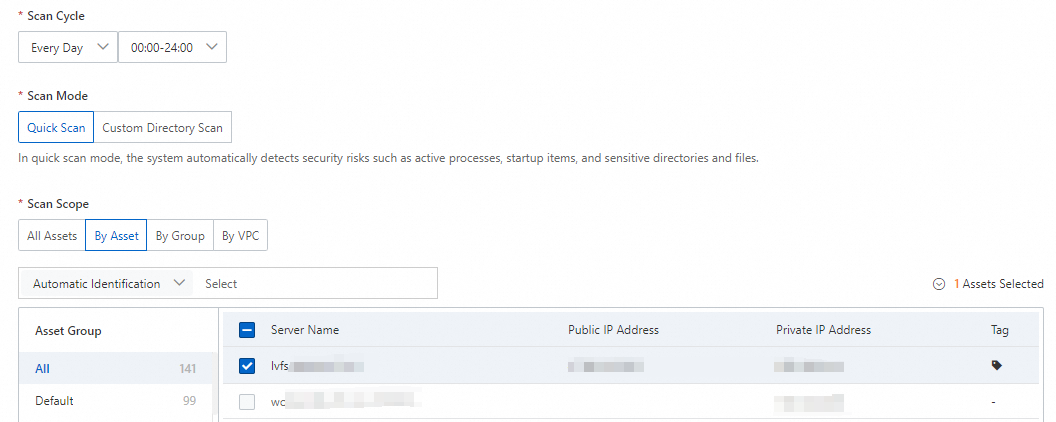
In the Scan Settings panel, configure the scan mode and scan range, then click OK.
Scan Mode: Select Quick Scan.
Scan Scope: Select the server that was compromised by the cryptomining program.
After the scan is complete, on the Virus Detection and Removal page, click Actions in the Handle column for the target alert.
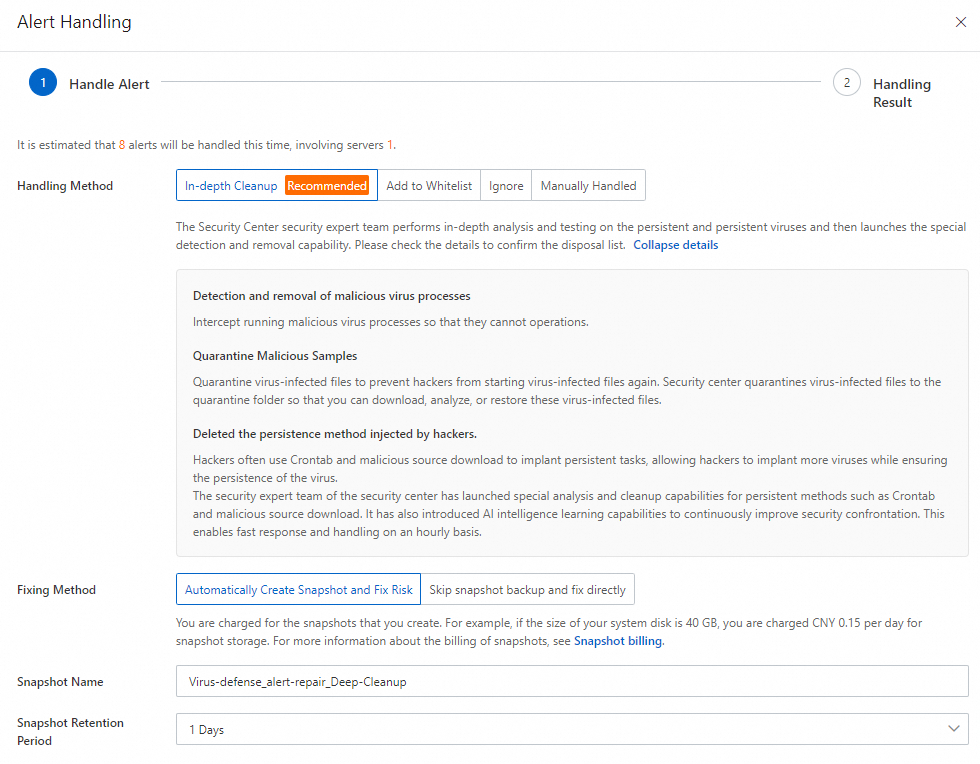
In the Alert Handling panel, select Deep Cleanup, click Next, and wait for the system to process the alert.
After the alert is handled, view the result and alert status on the Alerts page.
Step 3: Full scan
To ensure no residual files remain, you can use the agentless detection feature to perform an offline full-disk scan. This feature only supports detection, not remediation. You must handle any detected risks based on the details provided on the risk details page. For more information, see Agentless Detection.
Log on to the Security Center console.Select the region where the assets that you want to protect are located: Chinese Mainland or Outside Chinese Mainland.
-
On the tab, in the Risk Detection section, click Detect Now.
-
In the Detect Now panel, configure the settings as described in the following table and click OK.
-
Scan Scope: We recommend scanning the data disk for broader vulnerability and alert detection coverage.
-
Image Retention Duration:
-
The value can range from 1 to 365 days.
-
You are charged for creating images. The longer you retain the images, the higher the fees.
ImportantIf you select Retain Only At-risk Image, the system automatically deletes threat-free images after the scan is complete.
-
-
-
After you create the task, Security Center automatically creates the image and performs the scan and subsequent operations. For more information, see Automatic creation of images.
NoteScan duration depends on data volume. Wait for the task to complete.
After the detection task is complete, review and handle any detected vulnerability risks, baseline check failures, security alerts, and sensitive files.
Manual cleanup
Cryptomining programs create numerous persistence backdoors, making them difficult to remove. If you encounter a cryptomining virus without a Security Center subscription, you can take the following measures to investigate and handle it.
This method involves modifying files and configurations. Before you proceed, create a snapshot of the server's disks to ensure you can restore data in case of an operational error.
Linux systems
Block malicious network communication.
After discovering cryptomining activity on a host, the first step is to block the cryptomining Trojan's network communication to immediately control the impact, as a full remediation can be time-consuming.
Run the following command to check the current system network connections.
netstat -antp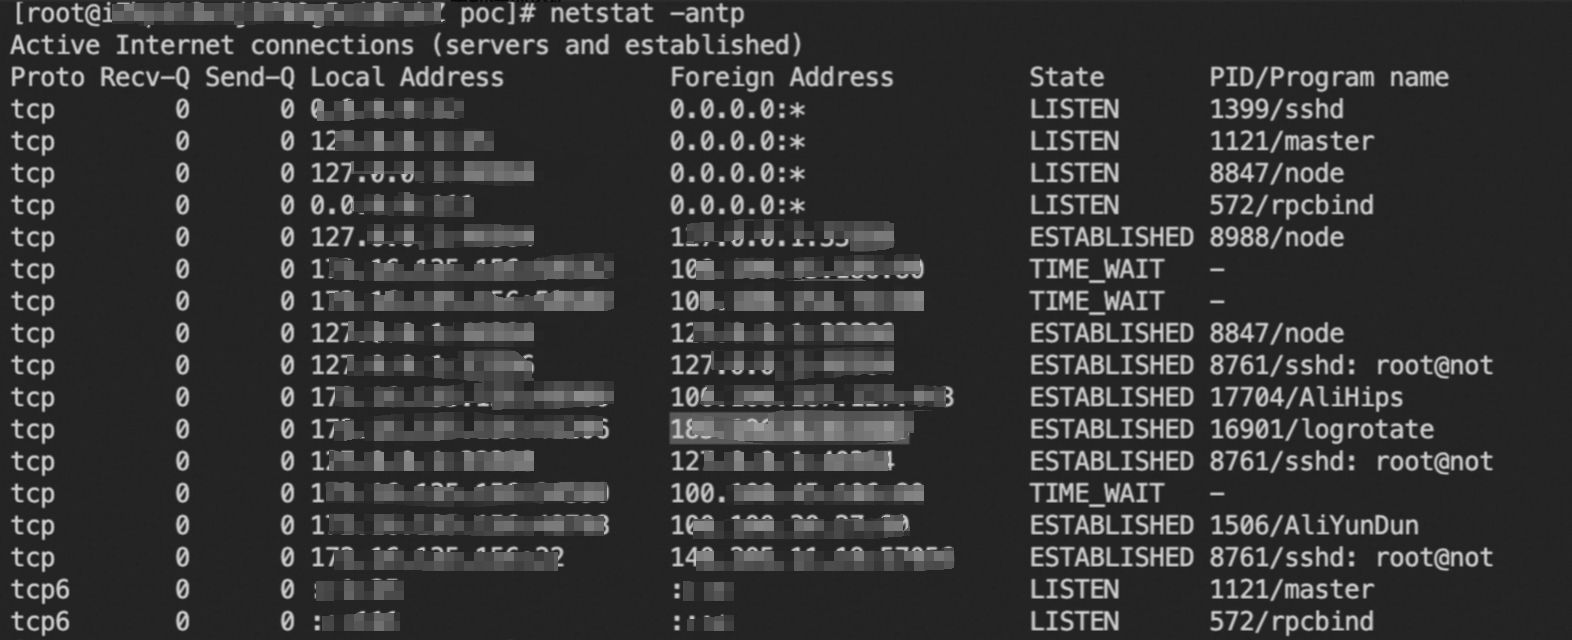
In the following commands, replace
C&C addresswith a suspicious remote address (Foreign Address) that is not used by your normal business operations. Then, run the commands to add firewall rules to block all network connections between the server and the suspicious address.iptables -A INPUT -s C&C address -j DROP iptables -A OUTPUT -d C&C address -j DROP
Clear scheduled tasks.
Cryptomining Trojans often use scheduled tasks to periodically download (update) and start the Trojan. Simply cleaning the process and the Trojan file is not enough to eradicate the program and can lead to recurring infections.
Investigate the following scheduled task files and remove any tasks related to downloading or starting the cryptomining Trojan.
View the scheduled tasks for the current user or a specified user (
username).crontab -l crontab -u username -lAll scheduled task files on the host.
/etc/crontab
/var/spool/cron/
/etc/anacrontab
/etc/cron.d/
/etc/cron.hourly/
/etc/cron.daily/
/etc/cron.weekly/
/etc/cron.monthly/
Clear auto-startup services.
Run the following command to investigate all auto-startup services on the system.
systemctl list-unit-files | grep enabledFind the unit file for the suspicious service and check its details.
Replace
*with the service name and<service_unit_name>with the service unit file name.ls -al /etc/systemd/system/*.service ls -al /usr/lib/systemd/system/*.service # View service details (the process file started by the service) cat /etc/systemd/system/<service_unit_name>.serviceIf you find a malicious auto-startup service, use the following commands to disable the service and delete its unit file.
Replace
<service name>with the service name and<service_unit_name>with the service unit file name.systemctl disable <service name> rm /etc/systemd/system/<service_unit_name>.service rm /usr/lib/systemd/system/<service_unit_name>.serviceInvestigate the following service paths for auto-startup services and clean them up using the steps above.
/etc/rc.local
/etc/inittab
/etc/rc.d/
/etc/init.d/
Clear SSH public keys.
Cryptomining Trojans often add the attacker's SSH public key to the
~/.ssh/authorized_keysfile. This allows the attacker to log on to the compromised host without a password and reinstall malicious files. Investigate the~/.ssh/authorized_keysfile and immediately delete any suspicious public keys.Clear
.sohijacking.Preloaded
.sofiles, set via the/etc/ld.so.preloadfile, can hijack common system commands such astop, , and to hide the cryptomining process.Run the following command to investigate preloaded
.sofiles.cat /etc/ld.so.preloadRun the following command to remove the preload hijacking.
echo > /etc/ld.so.preload
Clear malicious accounts.
Some cryptomining Trojan families create new backdoor accounts to maintain long-term control over the compromised host. Run the following commands to check for malicious accounts, then manually delete the relevant account information.
Check logs for recent account creation activity.
cat /var/log/audit/audit.log | grep useradd
# Or
cat /var/log/secure | grep 'new user'
Check the
/etc/passwdfile for suspicious accounts.cut -d: -f1 /etc/passwdCheck the creation or last active time of an account's
homedirectory. Pay special attention to recently createdhomedirectories.stat /home/guest/
Counter anti-modification techniques.
After writing persistence files such as scheduled tasks and auto-startup services, some cryptomining Trojans set an immutable attribute on the file to prevent the persistence mechanism from being deleted.
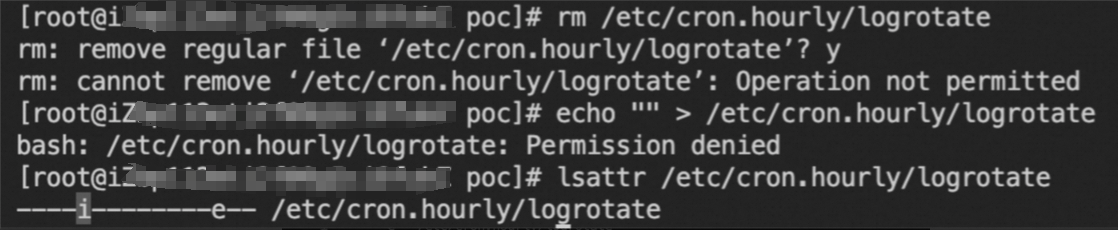
If you encounter this situation, run the following command to restore the file attributes before deleting the corresponding task.
chattr -i /etc/passwd
chattr -i /etc/crontab
Kill the cryptomining Trojan process.
Cryptomining processes usually consume high CPU resources. You can use the following commands to investigate suspicious cryptomining processes.
Investigate processes consuming a large amount of the host's CPU.
top -c
ps -eo pid,ppid,cmd,%cpu --sort=-%cpu | more
Investigate abnormal network connection behavior.
netstat -antp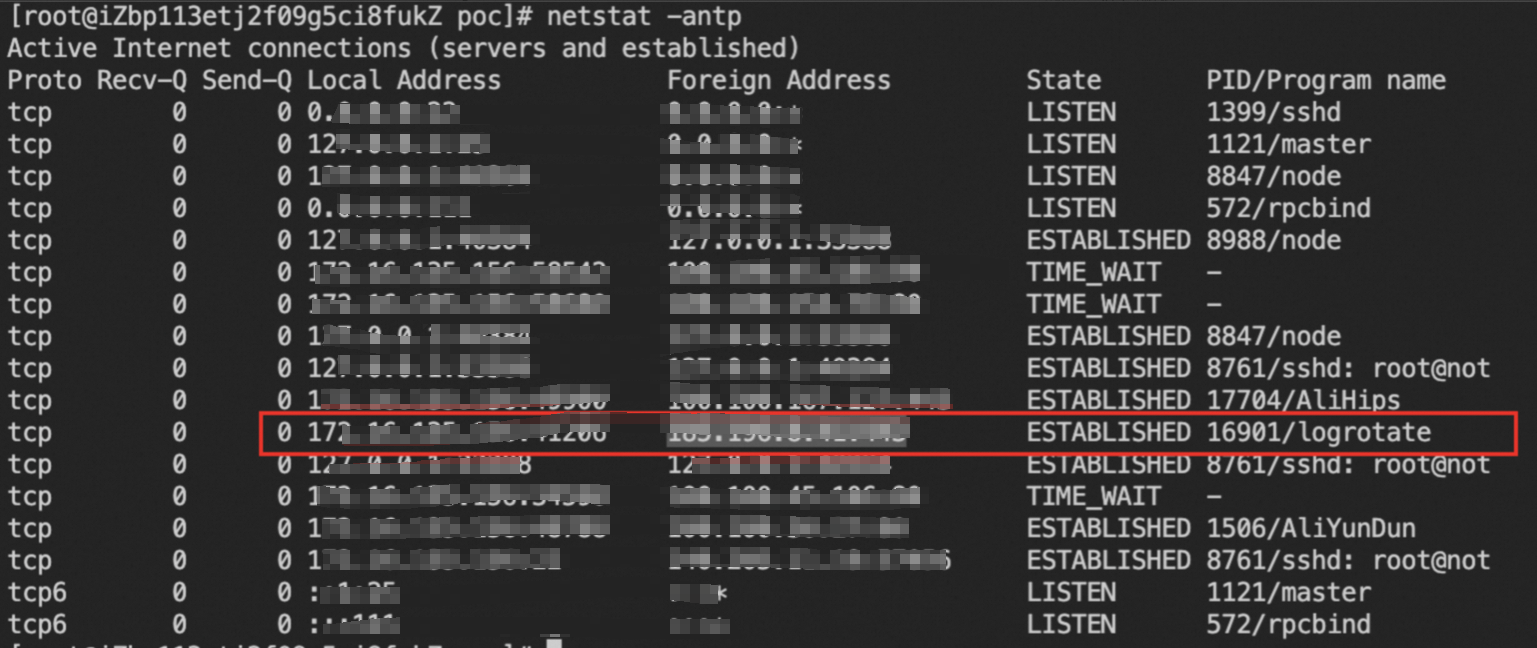
Get the file path of the suspicious process.
ls -al /proc/$PID/exeCalculate the MD5 hash of the process file and look it up on the Alibaba Cloud Threat Intelligence platform.
md5sum /proc/$PID/exe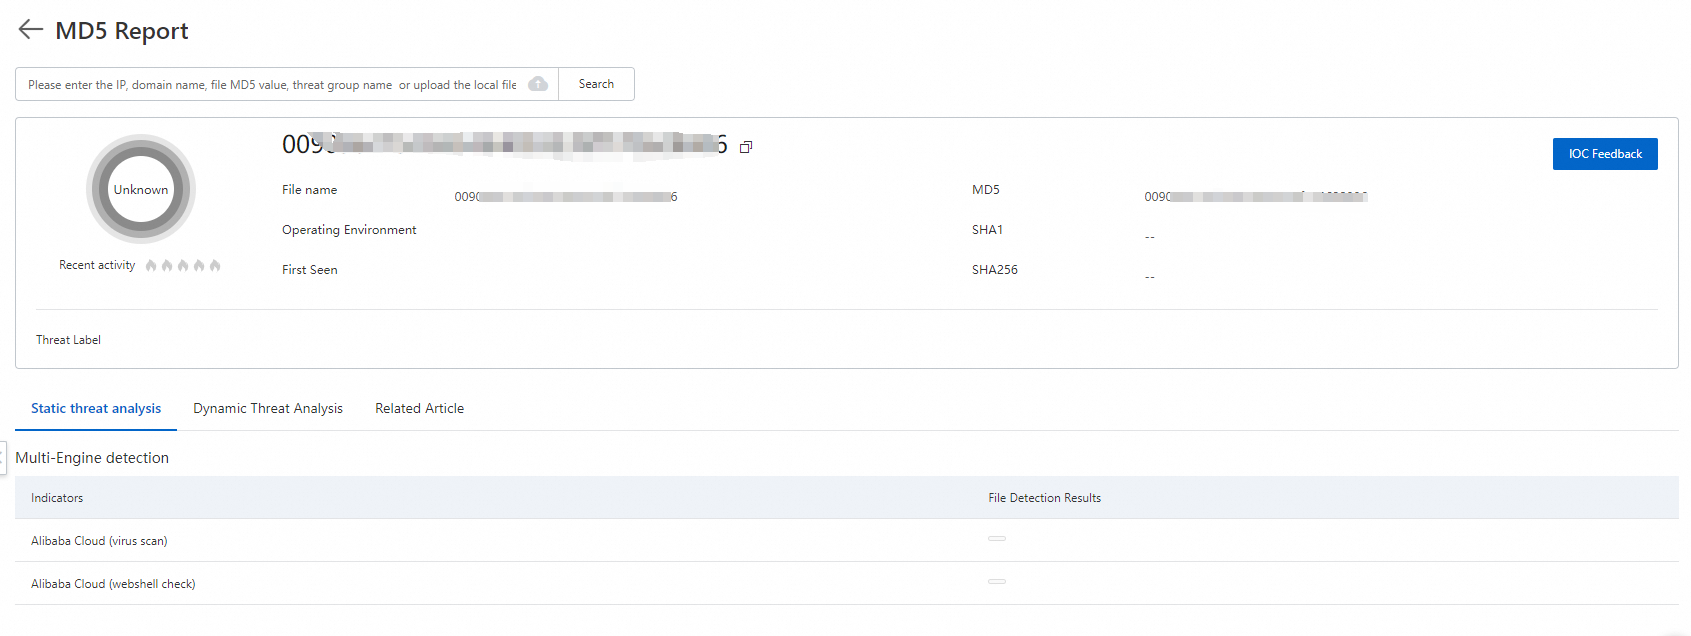
Run the following commands to terminate the cryptomining process and clean up the Trojan file.
kill -9 $PID
# Delete the process path obtained from ls -al /proc/$PID/exe
rm /path/to/executable
Linux systems (specific cryptomining cases)
Cryptomining disguised as AliyunDuns
Run the following commands to investigate persistent auto-startup entries.
grep -rlE "\\-\\-donate\\-level|xmrig|\\/opt\\/sysetmd|A_li_yun_Duns" /etc/systemd/system/*
grep -rl "wget"  /etc/cron.hourly/*
If any results are found, an auto-startup service exists. Run the following commands to delete it.
rm -f /etc/systemd/system/sysetmd.service
rm -f /etc/systemd/system/monero.service
rm -f /etc/systemd/system/A_li_yun_Duns.service
chattr -i /etc/cron.hourly/0
rm -f /etc/cron.hourly/0
Investigate and handle suspicious users.
Run the following command to query the system user list and identify the suspicious username.
cat /etc/passwdRun the following command to view information about an abnormal system user. In this example, the user is
shaojiang99.cat /etc/passwd | grep shaojiang99 cat /etc/shadow | grep shaojiang99Run the following command to delete the suspicious system user.
chattr -i /etc/passwd
chattr -i /etc/shadow
sed -i '/^shaojiang99:/d' /etc/shadow
sed -i '/^shaojiang99:/d' /etc/passwd
Manual remediation for Skidmap
Run the following commands to delete the auto-startup service entries.
echo "" > /lib/systemd/system/systemd-cgroup.service
echo "" > /lib/systemd/system/systemd-deltaed.service
echo "" > /usr/bin/systemd-cgroup.org
echo "" > /usr/bin/systemd-cgroup
echo "" > /usr/bin/systemd-deltaed
echo "" > /usr/bin/systemd-deltaed.org
Manually clean the SSH public key file
authorized_keysby removing any suspicious keys.
Manual remediation for Cleanfda
Investigate the following scheduled task paths for suspicious script execution (for example,
/etc/upat.sh)./var/spool/cron/ /etc/cron.d/ /var/spool/cron/crontabs /etc/crontabInvestigate modified commands (original programs such as
ps,pstree, andtopwill be renamed with the suffix.original).ls -al /usr/bin | grep originalInvestigate SSH public keys and delete any unknown keys.
cat ~/.ssh/authorized_keys
cat /root/.ssh/authorized_keys
Example:
# Restore modified commands
crondir='/var/spool/cron/'"$USER"
mv /bin/ps.original /bin/ps
mv /bin/top.original /bin/top
mv /bin/pstree.original /bin/pstree

# Restore editing permissions for scheduled task files
chattr -R -ia /var/spool/cron
chattr -ia /etc/crontab
chattr -R -ia /var/spool/cron/crontabs
chattr -R -ia /etc/cron.d

# Delete suspicious scheduled tasks and payloads
sed -i '/upat.sh/d' /etc/crontab
rm -rf /etc/cron.d/httpd2
rm -rf /etc/upat.sh
rm -rf /tmp/upat.sh
rm -rf /etc/httpd2
rm -rf /tmp/httpd2

# Delete suspicious public keys
sed -i '/cKtXBjj******hVI0K7b/d' ~/.ssh/authorized_keys
sed -i '/cKtXBjj******hVI0K7b/d' /root/.ssh/authorized_keys
Outlaw family cryptomining
Investigate all
cronscheduled tasks for the string.configrc5/.Scheduled task paths:
/var/spool/cron/root
/var/spool/cron/
/etc/cron.d/
/var/spool/cron/crontabs
/etc/crontab
Run the following commands to investigate.
grep -r ".configrc5/" /var/spool/cron/*
grep -r ".configrc5/" /etc/cron*
If found, run the following commands to delete the related files.
rm -rf /tmp/.X2xi-unix/.rsync
rm -rf ~/.configrc5
kinsing family cryptomining
Run the following command to investigate
cronscheduled tasks. Look for content similar togi.sh | bash > /dev/null. If it exists, delete that line.grep -r "gi.sh | bash > /dev/null" /etc/cron* grep -r "gi.sh | bash > /dev/null" /var/spool/cron/*Run the following command to check if the
/lib/systemd/system/bot.serviceservice exists.cat /lib/systemd/system/bot.serviceIf the service exists, run the following command to check
/etc/ld.so.preloadfor thelibsystem.sofile.cat /etc/ld.so.preloadAfter locating the
libsystem.sofile path, delete the file.
Windows Systems
In PowerShell, run the following command to investigate suspicious cryptomining processes based on CPU usage.
Noteps | sort -des cpu While(1) {ps | sort -des cpu | select -f 15 | ft -a; sleep 1; cls}Run the following command to view the executable path and command-line arguments of the cryptomining process.
Notewmic process where processid=xxx get processid,executablepath,commandline,name // xxx is the process PIDTerminate the cryptomining process and clean up the Trojan file.
Run the following command to check for connections on suspicious network ports.
Notenetstat -ano | findstr xxx // xxx is the suspicious network portRun the following command to check if the server's hosts file contains the mining pool address of the cryptomining program.
Notetype C:\Windows\System32\drivers\etc\hostsRun the following command to check for any scheduled tasks set by the cryptomining program.
Noteschtasks /query
Reset the system
If the virus has deeply infiltrated the system, the issue recurs after manual cleanup, or the server does not contain critical business data, we recommend this option. We strongly recommend that you back up important data before resetting the server's system to ensure complete cleanup of the cryptomining program.
Create snapshots to back up important data on the server. For more information, see Create a snapshot for a disk.
Re-initialize the system disk: In the ECS console, select the target instance and perform the Re-initialize System Disk operation. This action completely erases the system disk and restores it to its initial state. For more information, see Re-initialize a system disk (reset an operating system).
Use a snapshot to create a new cloud disk. For more information, see Create a disk from a snapshot.
Attach the cloud disk to the server with the reinstalled system. For more information, see Attach a data disk.
Log on to the server and copy only the business data (such as website code and database files) from the attached data disk.
ImportantDo not restore any executable files, system configuration files, or scripts from the old snapshot to avoid reintroducing backdoors.
Purchase emergency response service
Alibaba Cloud offers an Emergency Response Service where professional security engineers can help you resolve issues such as virus infections. The service includes the following:
Comprehensive cleanup of Trojans, viruses, abnormal accounts, abnormal files, webshells, hidden links, and other issues in your system.
Analysis of the attacker's intrusion methods to determine the root cause.
Guidance on security hardening.
For more information, see Emergency Response Service.
Verify the remediation
After cleanup, you must verify the results and harden the system to ensure security and prevent reinfection.
Scan again: Use the Antivirus or Agentless Detection feature in Security Center to perform a full scan of the server and confirm there are no alerts.
Monitor performance: Continuously monitor the server's CPU utilization to confirm it has returned to a normal level.
Security hardening
Enable proactive defense for malicious host behavior: The proactive defense feature provided by Security Center can accurately intercept cryptomining programs, thus preventing cryptomining incidents before they occur. For more information, see Proactive Defense.
Strengthen access control:
Apply the principle of least privilege to security groups: Configure the ECS security group to open only necessary business ports (such as 80 and 443). For management ports like SSH (22) and RDP (3389), ensure they are open only to trusted, fixed IP addresses (such as your office network or a bastion host IP).
Password policy: Configure strong passwords for database systems or file systems (MySQL, PolarDB, MaxCompute, Redis, NAS, OSS), service management consoles (such as BT-Panel, Nacos), and operating system user accounts (SSH, RDP). Limit the number of incorrect password attempts to prevent brute-force intrusions.
Vulnerability and patch management:
Update promptly: Regularly apply the latest security patches to your operating system and application software (such as web servers and databases).
Vulnerability scanning: Use the vulnerability scanning feature in Security Center to proactively discover and fix vulnerabilities in your system and applications.
Harden application security: Before deploying business code, perform code security testing or integrate with a Web Application Firewall to defend against common OWASP attacks like SQL injection, XSS, common web server plugin vulnerabilities, Trojan uploads, and unauthorized access to core resources. This helps prevent system compromise through application vulnerabilities.
Credential security: Avoid hardcoding Alibaba Cloud AccessKeys in your code or configuration files. Use RAM roles or instance RAM roles to grant permissions to applications, following the principle of least privilege. For more information, see Securely use credentials.