Attackers can exploit vulnerabilities in your systems or applications. Detecting and fixing these vulnerabilities promptly is essential to securing your assets and reducing potential risks. Security Center detects various vulnerabilities across your assets, provides detailed information and remediation guidance, and supports one-click fixes for some vulnerabilities, enabling efficient risk management.
Vulnerability discovery and assessment
Before you fix vulnerabilities, you must accurately identify and assess the risks they pose to your assets.
Vulnerability overview
Go to the Security Center console > risk governance > vulnerability management. In the upper-left corner, select the region where your assets are located: Chinese Mainland or Outside Chinese Mainland.
View the vulnerability overview
The top of the Vulnerabilities page provides summary statistics about vulnerabilities to help you quickly understand your overall risk posture.
High-priority Vulnerabilities (CVE): Vulnerabilities that require immediate attention based on their severity and exploitability.
NoteIf a server has multiple vulnerabilities, each vulnerability is counted separately.
Vulnerable Servers: Shows the total number of servers affected by vulnerabilities. Click the number to go to the tab and view the vulnerable assets.
Fixing: Click the number to view the list of vulnerabilities being fixed and their progress.
Total Handled Vulnerabilities: The total number of fixed, ignored, or whitelisted vulnerabilities. Hover over the information icon
 to view the number of Handled Vulnerabilities Today.
Disclosed Vulnerabilities: Click the number to open the Detectable Vulnerabilities panel. In this panel, you can view a list of detectable vulnerabilities and their details, such as vulnerability ID, detection method, and release time.
Filter and identify vulnerabilities
When dealing with a large number of vulnerability alerts, effective filtering is essential. You can start with the following three approaches:
Enable the "Show Only Exploitable Vulnerabilities" filter to automatically reduce noise
This method automatically filters out low-priority vulnerabilities that pose only a theoretical risk and are difficult to exploit in practice.
Description:
This feature uses the Alibaba Cloud vulnerability assessment model, which incorporates factors like weakness score, time, environment, and asset importance, along with exploitability data (PoC/EXP), to automatically identify vulnerabilities that pose a genuine threat.
If Automatic Vulnerability Remediation is also enabled, filtered low-risk vulnerabilities do not trigger automatic remediation tasks. This practice prevents unnecessary consumption of remediation resources, such as the number of available vulnerability fixes.
Instructions: Turn on the Show Only Exploitable Vulnerabilities switch in the upper-right corner of the page.
Use "AI Analysis" for in-depth assessment
Description: This feature uses a large AI model to provide a vulnerability overview, analysis of its external exploitation popularity and attack paths, and contextual remediation advice. This helps you more accurately assess complex vulnerability risks.
Instructions:
Click the name of the target Vulnerability to go to its details page.
In the Vulnerability Details area, click AI Analysis next to the CVE ID.
Filter precisely and locate quickly
Use the platform's filtering and sorting features to quickly locate specific vulnerabilities or assets of interest.
Filter for AI application-related vulnerabilities:
Description: Security Center detects and centrally displays vulnerabilities in AI applications—such as models and frameworks—that could lead to data breaches or unauthorized model access.
Instructions: On the Vulnerabilities page, on the Application Vulnerability tab, select the Display Only AI-related Vulnerabilities checkbox.
Understanding the "Affected Assets" column
This column shows the number of assets affected by a vulnerability and uses colors to indicate the remediation urgency.
Red: The number of servers with a High remediation urgency.
Orange: The number of servers with a Medium remediation urgency.
Gray: The number of servers with a Low remediation urgency.
Vulnerability details
Click the name of a Vulnerability to expand its details panel, where you can view detailed information and a list of affected assets. For more information, see Appendix: Parameter description for the vulnerability details page.
Vulnerability details: Includes a description of the vulnerability, its CVSS impact score (0.1–3.9 is Low, 4.0–6.9 is Medium, 7.0–8.9 is High, and 9.0–10.0 is Critical), affected component versions, and more.
Unhandled vulnerability list: Lists all servers where this vulnerability was detected. In this list, you can view the Status of the vulnerability on each server. The statuses are described as follows:
NoteIf multiple processes on a single server match the vulnerability, multiple entries appear in the list.
Category
Status
Description
Handled
Fixed
The vulnerability is fixed.
Fix failed
The fix failed. This may be because the vulnerable file was modified or no longer exists.
Ignored
The vulnerability has been marked as Ignore, and Security Center will no longer generate alerts for this vulnerability.
Vulnerability expired
The vulnerability was not detected again within a specified period. The expiration periods for different vulnerability types are as follows:
Linux software vulnerabilities, Windows system vulnerabilities: 3 days
Application Vulnerability and Urgent Vulnerability: 7 days
Application vulnerabilities: 30 days
Emergency vulnerabilities: 90 days
Unhandled
Unfixed
The vulnerability is awaiting remediation.
Verifying
After you manually fix a vulnerability, click Verify in the Actions column. The status changes from Unfixed to Verifying while Security Center confirms the fix.
Remediate vulnerabilities
Fix vulnerabilities
Step 1: Choose a remediation method
One-click fix: Security Center provides a one-click fix feature on the console that automates vulnerability remediation without requiring you to log on to a server.
Important note: When fixing kernel vulnerabilities, the system checks whether the upgraded kernel version is compatible with the Security Center client. If incompatible, the system interrupts the fix and displays a fix failure dialog. You must close the dialog, initiate the fix again, and select the Mandatory Fix option to skip the compatibility check and execute the remediation task. For details, see One-click fix in Step 2.
WarningForce fix skips the client compatibility check, which may introduce compatibility risks and prevent Security Center from protecting the server.
ImportantThe one-click fix feature does not support Application Vulnerability and Urgent Vulnerability.
Service model
Service edition / Protection level
Description
Subscription
Enterprise and Ultimate
Supports remediation for Linux Software Vulnerability,and Windows System Vulnerability.
Advanced
Supports remediation for Linux Software Vulnerability and Windows System Vulnerability.
Basic, Value-added Plan, and Anti-virus
ImportantYou must purchase the Vulnerability Fix value-added service to use one-click remediation. For purchase instructions, see Purchase Security Center.
Supports remediation for Linux Software Vulnerability and Windows System Vulnerability.
Pay-as-you-go
All protection levels
Auto-fix: You can turn on the Automatic Vulnerability Remediation switch and configure auto-fix tasks to periodically fix newly discovered vulnerabilities at a specified time.
ImportantAuto-fix tasks depend on the one-click fix feature. If the one-click fix feature is not supported for the current edition or vulnerability type, auto-fix is also not supported.
Auto-fix supports only non-kernel Linux system vulnerabilities. It is not supported for other vulnerability types.
Manual fix: If the current edition or vulnerability type does not support one-click fixes, or if the Vulnerability Fix feature is not enabled, you must log on to the server and apply the fix manually based on the remediation suggestions in the vulnerability details.
Step 2: Apply the fix
One-click fix
Access the Security Center console - Risk Administration - Vulnerability Management. In the upper-left corner of the page, select the region where the assets to be protected are located: Chinese Mainland or Outside Chinese Mainland.
On the Linux Software Vulnerability or Windows System Vulnerability tab, click the name of the target Vulnerability or click Fix in the Actions column.
In the Unhandled Vulnerabilities section, find the target server and click Fix in the Actions column.
NoteYou can also select multiple servers and click Fix below the list to fix vulnerabilities on multiple servers at once.
In the dialog box that appears, select a remediation method: Automatically Create Snapshot and Fix Risk or Skip Snapshot and Fix.
ImportantFixing vulnerabilities can involve upgrading system kernels or software versions, which may introduce compatibility risks. We recommend that you perform this operation during off-peak hours and select the Automatically Create Snapshot and Fix Risk option. This option allows you to quickly roll back changes if issues occur.
(Optional) Configure Mandatory Fix: When fixing kernel vulnerabilities, the system checks whether the upgraded kernel version is compatible with the Security Center client. If incompatible, the system interrupts the fix and displays a fix failure dialog.
Close the fix failure dialog, then click Fix again in the Actions column for the target vulnerability.
In the fix dialog, a new Mandatory Fix option appears. Select it, choose a remediation method, and click Fix Now to retry.
ImportantFixing vulnerabilities may involve upgrading system kernels or software versions, which poses compatibility risks. We recommend selecting the Automatically Create Snapshot and Fix Risk option for quick rollback if issues occur.
Click Fix Now. The system starts the remediation task, and the vulnerability status changes to Fixing. After the fix succeeds, the status changes to Fixed.
Auto-fix
Procedure
On the Vulnerabilities page, click Vulnerability Settings in the upper-right corner.
On the Vulnerability Auto-remediation Settings table, enable the Automatic Vulnerability Remediation switch.
Configure the auto-fix policy
Vulnerability Auto-Fix Schedule
ImportantFixing vulnerabilities can be risky. We recommend that you apply fixes during off-peak hours to minimize the impact on your business.
Task Type: Select One-time (runs only once) or Cycle (runs periodically).
Execution Date : This parameter is required only when Task Type is set to One-time. Configure the specific date and time for the task to run.
Execution Cycle: This parameter is required only when Task Type is set to Cycle. You can set the cycle to Every Day or Every Week.
Execution Time: This parameter is required only when Task Type is set to Cycle. Specify the time for the task to run.
Vulnerability Fix Configuration
Vulnerability Level: Select a Vulnerability Level to filter for vulnerabilities that require fixing.
Select Manually: Filter for vulnerabilities that require fixing based on the selected Vulnerability.
Snapshot Configuration
WarningIf you turn on the snapshot switch, additional snapshot fees are incurred when the vulnerability fix task runs. Creating and retaining snapshots incurs fees. The snapshot service charges these fees. By default, the billing method is pay-as-you-go.
Snapshot Configuration switch: If you turn on this switch, the system creates a snapshot backup when a remediation task runs. If an issue occurs, you can use the snapshot to roll back the system and quickly restore your services.
Snapshot Name: Set a descriptive name, such as
vulnerability-fix-snapshot.Storage Period: Set the storage duration for the snapshot.
Configure Auto-Repair Asset
All Assets: Fixes all assets for which fixable vulnerabilities are detected.
ImportantRemediation consumes Vulnerability Fix quotas. To avoid unnecessary consumption, use this option with caution.
By Asset: Specify the assets on which auto-fix tasks can run.
After you complete the configuration, click Save.
View auto-fix tasks
The system periodically scans for vulnerabilities on your servers and remediates them based on the configured auto-fix schedule. To view the execution results:
On the Vulnerabilities page, click Task Management in the upper-right corner.
On the Auto Repair Task tab, you can view the execution statistics of the remediation tasks.
NoteA new record is generated each time a periodic task runs.
Status: The execution status of the task.
Progress: The execution progress of the task.
Vulnerability Statistics: The number of successful and failed fixes.
Host Statistics: The number of affected hosts.
Click Details in the Actions column of a task to view its execution details.
Click the
 icon next to a target server to expand the details of all remediated vulnerabilities, including CVE ID, Handled At, and Status.
Manual fix
Find the remediation plan
In the vulnerability list on the corresponding tab, click the name of the target vulnerability.
Application Vulnerability: On the Vulnerability Details tab, view the affected scope and Fixing Suggestions.
Linux Software Vulnerability or Windows System Vulnerability:
In the Vulnerability Details section, click Fixing Suggestions in the Actions column for the vulnerability.
In the Solution Suggestions section of the Alibaba Cloud Vulnerability Database, view the remediation plan for the vulnerability. Follow the plan to log on to the server and fix the vulnerability.
Apply the remediation plan
Before you make changes, we recommend manually creating a snapshot to back up the server.
WarningFixing vulnerabilities can be risky. We recommend backing up your server data before you fix a vulnerability. If the server with the vulnerability is an Alibaba Cloud ECS instance, you can create a snapshot to back up data. For more information, see Create a snapshot.
Log on to the server by using a method such as SSH or Remote Desktop.
Run the required commands based on the remediation plan, such as updating software packages or modifying configurations.
View the remediation result
After a manual fix, the vulnerability status is not immediately updated. The status updates after the next scan by Security Center.
After the vulnerability is fixed, return to the Security Center console.
Click the name of the vulnerability to open the details panel. In the Unhandled Vulnerabilities list, find the server where you just fixed the vulnerability.
Click Verify in the Actions column to confirm the fix. Once verified, its status changes to Fixed.
NoteIf the status is not updated for a long time, the cause might be a network latency or cache issue. You can refresh the page later to check the status.
Step 3: Verify results and troubleshoot
If the vulnerability status is Fixing Failed or verification fails after a manual fix, follow these steps to troubleshoot the issue:
One-click fix failure:
This issue usually occurs due to an exception in the fix script environment, such as a modified target file, insufficient disk space, or permission issues. You can view the failure reason in the task details and then try a manual fix.
WarningA server restart may be required after a one-click fix. If a fix fails, your Vulnerability Fix quota is not consumed.
Kernel compatibility check failure. When fixing kernel vulnerabilities, the system checks whether the upgraded kernel version is compatible with the Security Center client. If incompatible, the system interrupts the fix. You can initiate the one-click fix again and select Mandatory Fix to skip the compatibility check.
Verification failure after a manual fix:
Confirm that the remediation is correct: Verify that the commands or operations you performed on the server match the remediation suggestions.
Confirm the component version: Check whether the related software or component is upgraded to the version required by the remediation plan.
Status update delay: The vulnerability status update depends on scan results, which may be delayed.
Step 4 (Optional): Roll back the fix
If a fix causes service issues and you created a snapshot beforehand, you can roll back the changes on the console.
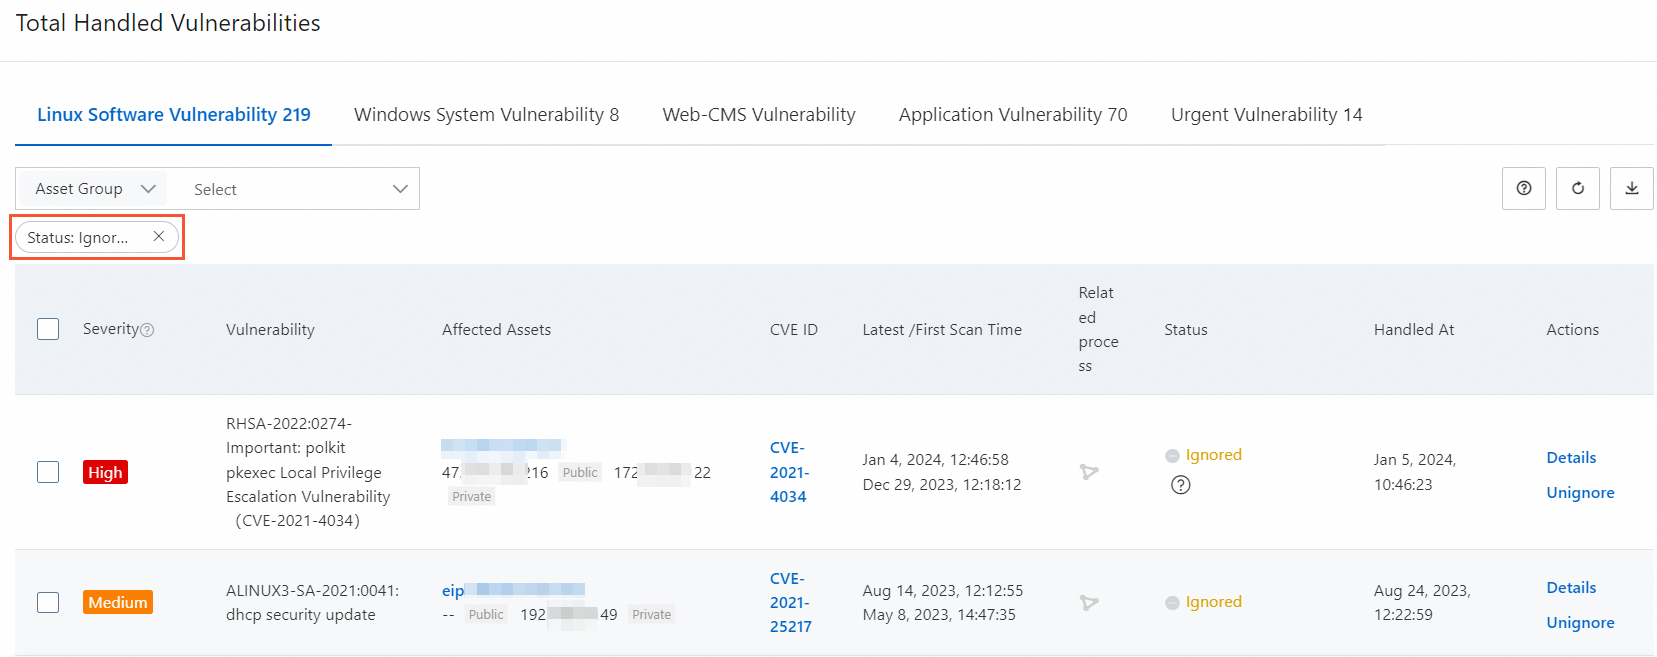
On the Vulnerabilities page, click the number under Total Handled Vulnerabilities.
In the Total Handled Vulnerabilities panel, set Status to Fixed, find the target vulnerability, and then click Roll Back in the Actions column.
Select the snapshot that you want to use for the rollback and click OK.
Defer remediation (Ignore or Add to Whitelist)
If you determine that a vulnerability does not require a fix, you can ignore it or add it to a whitelist to prevent repeated alerts.
Add to Whitelist: This action suppresses alerts for a specific type of vulnerability within the configured scope. The default scope is all assets. This may cause you to overlook related security risks. Use this feature with caution.
Ignore: The ignore operation affects only the current process. If the application restarts or a new process starts, Security Center may detect the vulnerability again.
Feature | Ignore | Add to Whitelist |
Scope | Applies to a single vulnerability instance on a single asset. |
|
Persistence | Temporary. An alert may be triggered again after the process restarts. | Persists until you manually delete the whitelist rule. |
Use cases |
|
|
Ignore
Procedure
On the Vulnerabilities page, go to the corresponding tab, such as Linux Software Vulnerability, and find the target vulnerability.
Click the vulnerability name to open its details page. In the Unhandled Vulnerabilities section, select one or more servers for which you want to ignore the vulnerability.
Click Ignore below the list, enter a reason, and then click OK.
NoteYou can also click the
 icon and then click Ignore in the Actions column for a single vulnerability.
View and cancel ignores
Return to the Vulnerabilities page and click the number under Total Handled Vulnerabilities.
In the Total Handled Vulnerabilities panel, set Status to Ignored to view a list of all ignored vulnerabilities.
Find the target vulnerability and click Cancel Ignore in the Actions column.
Add to Whitelist
Procedure
Method 1:
On the Vulnerabilities page, go to the corresponding vulnerability tab, such as Linux Software Vulnerability, and select the vulnerabilities that you want to process.
Click Add to Whitelist in the lower-left corner of the list.
ImportantBy default, this method applies to All Assets.
Method 2:
On the Vulnerabilities page, click Vulnerability Settings in the upper-right corner.
On the Vulnerability Whitelist Settings tab, click Create Rule.
Configure the parameters as described in the following table and click OK.
Select Vulnerability: Select one or more vulnerabilities that you want to add to the whitelist.
Applied Assets: Set the scope for the whitelist rule. If you select Asset Group or Hosts, you must select the target assets.
View and manage whitelist
On the Vulnerabilities page, click Vulnerability Settings in the upper-right corner.
On the Vulnerability Whitelist Settings tab, you can view all configured whitelist rules.
To modify or delete a rule, click Edit or Delete in the Actions column of the rule.
Delete: After you delete a rule, Security Center detects the vulnerability again in subsequent scans.
Edit: You can modify only the Applied Assets (the scope of the whitelist rule) and the remarks.
Billing
The vulnerability fixing feature incurs the following fees:
Vulnerability fixing service (pay-as-you-go): You can enable this pay-as-you-go service to use the one-click fix feature. You are charged USD 0.30 per fix and billed daily. The number of vulnerability fixes is calculated as follows:
Minimum unit: Successfully fixing one Security Notice on one server counts as one fix.
ImportantA single Security Notice may contain multiple related CVEs. Fixing the notice counts as only 1 fix, regardless of how many CVEs it includes.
Number of vulnerability fixes = Σ (Number of Security Notices with the "Fixed" status on each server)
ImportantA fix is counted only after the server restarts and its status changes to "Fixed". Failed fixes are not counted.
Example:
If you use Security Center to successfully fix 10 different Security Notices on each of 5 servers:
Total vulnerability fixes = 5 servers × 10 Security Notices = 50 fixes
Snapshot backup fees: When you perform a one-click fix, we recommend that you select Automatically Create Snapshot and Fix Risk. This action creates a snapshot backup of the server disk so that you can quickly roll back the changes if the fix causes unexpected issues. Creating and retaining snapshots incurs fees that are charged by the ECS Snapshot service. For more information about the fees, contact pre-sales support.
Production implementation
Remediation procedure
Before remediation
Asset Confirmation: Verify that the affected software versions are present on your server assets.
Risk Assessment: Evaluate the business impact to determine the urgency and necessity of remediation. Not all vulnerabilities require immediate remediation.
Thorough Testing: Deploy the patch in a staging environment. Fully validate its compatibility and security, and then generate a detailed test report.
Data Backup: Perform a full backup of the server, for example, by creating an ECS snapshot, to enable a quick rollback if an error occurs.
Schedule the Remediation: Perform the remediation during off-peak hours to minimize business impact.
During remediation
Two-Person Operation: Ensure at least two professionals are present. To prevent errors, one professional performs the operation while another reviews and records it.
Follow the Plan: Strictly adhere to the remediation plan and apply fixes sequentially.
After remediation
Verify the Results: Confirm that the vulnerability is remediated and that all system functions and business applications are running correctly.
Archive the Documentation: Document the entire process in a final vulnerability remediation report and archive it.
Risk mitigation
Develop a Detailed Plan: Create a feasible remediation plan that has been thoroughly tested and validated. Adhere strictly to the defined steps during execution.
Test in a Simulated Environment: Set up a simulated test environment identical to the production environment—including its system, applications, and data—to fully validate the remediation plan.
Complete System Backup: Select the Automatically Create Snapshot and Fix Risk option to perform a full system backup, including the system, application, and data. Verify the backup's recoverability to ensure you can quickly restore services if an issue arises.
FAQ
Remediation limitations and principles
Why is the Fix button grayed out?
Issue: Product edition limitations
Cause: The
one-click fixfeature is not supported inBasic EditionorAnti-virus Edition.Resolution: Purchase the "Vulnerability Fixing"
value-added service, or upgrade toEnterprise EditionorUltimate Edition.
Issue: Server-side problems
Linux server issues
The operating system has reached its end-of-life (EOL): The vendor no longer provides
patch. You must manually upgrade theoperating system. Fixing vulnerabilities in the following operating systems requires an OS upgrade:Red Hat 5, Red Hat 6, Red Hat 7, Red Hat 8
CentOS 5
Ubuntu 12
Debian 8, 9, 10
Insufficient disk space: The available disk space is less than 3 GB. Free up space or expand the disk.
Process in use: The
aptoryumprocess is running. Wait for the process to finish and then retry, or manually terminate the process.Insufficient permissions: The user running the remediation command does not have sufficient permissions. Ensure that the file owner is the
rootuser and set appropriate permissions, such as755.
Windows server issues
Insufficient disk space: The available disk space is less than 500 MB. Free up space or expand the disk.
Windows Update service is not working as expected: The service is disabled or a
patchinstallation is already in progress.If the service is disabled, go to the Services manager on the
server, enable the Windows Update service, and then try fixing thevulnerabilityagain.If an update is in progress, wait for the Wusa.exe process to complete or manually end the process, and then try fixing the
vulnerabilityagain.
What is the difference between an application vulnerability and a system vulnerability? Why doesn't one-click fix support application vulnerabilities?
A
system vulnerability, such as aLinux software vulnerabilityor aWindows system vulnerability, affects theoperating systemor its components. These vulnerabilities have standardized remediation paths, which allows them to be fixed with theone-click fixfeature.An
application vulnerabilityexists in a self-managed application, such as website code or third-party software. The remediation method for this type ofvulnerabilityis closely tied to your specific business logic and code. Because automated tools cannot understand your business context, you must remediate these vulnerabilities manually.
Why does my server have so many vulnerabilities?
As new attack methods emerge, vulnerabilities are continuously discovered in older software. Regular scanning and patching are essential and ongoing security tasks. To help you focus on the most critical risks, turn on the Show Only Exploitable Vulnerabilities switch.
Remediation operations
What should I do if the error "Permission acquisition failed, please check permissions and retry" appears when I run a fix command?
Cause: The owner of the file required to perform the repair operation is not
root, which results in insufficient permissions.Resolution:
Locate the file:
In
Security Center, view thevulnerabilitydetails to identify the specific file and path that require remediation.Modify permissions:
Log in to the server and run the following command to change the file owner to
root.Retry the fix:
Return to the
Security Centerconsoleand run the remediation operation on thevulnerabilityagain.
When I fix vulnerabilities in a batch, in what order are they fixed?
Linux software vulnerabilityis fixed in the order they appear in theconsolelist. SomeWindows system vulnerabilitiesrequire prerequisitepatchto be installed first. When you run a batch fix forWindows system vulnerabilities, these types of vulnerabilities are prioritized. The remaining vulnerabilities are fixed in the order they appear in theconsolelist.Why does a restart not work after I fix a kernel vulnerability on Ubuntu?
Symptom: After you use the one-click fix feature in Security Center to patch a kernel vulnerability on an Ubuntu server, a "Fixed, pending restart" message is displayed. However, after you restart the server, the vulnerability alert persists because the system does not use the newly installed kernel.
Cause: This issue typically occurs if the default boot order of the GRUB boot menu was manually modified. The remediation script is then unable to set the new
kernelas the default boot option.Resolution:
Solution 1: Automatically configure new kernel
This solution discards your existing custom GRUB configuration and allows the system to automatically apply the default settings for the new
kernel.Procedure:
Before you fix the vulnerability, log on to your Ubuntu
server.Run the following command to set the environment variable:
<BASH>

export DEBIAN_FRONTEND=noninteractive
Return to the
Security Centerconsoleand perform a one-click fix on thevulnerability.After the fix is complete, restart the
serveras prompted. The system automatically enables the latestkernel.
Solution 2: Manually modify boot order
If you need to keep your existing GRUB configuration, you can use this solution.
Procedure:
In the
Security Centerconsole, perform aone-click fixand restart theserveras prompted.After the
serverrestarts, log on to your Ubuntuserver.Manually modify the GRUB boot order to set the newly installed
kernelversion as the default boot option.NoteThe procedure usually involves modifying the
/etc/default/grubfile and running theupdate-grubcommand. For more information, see Change the kernel boot order of an ECS Linux CentOS instance.Restart the
serveragain for the new boot order to take effect.
Do I need to restart the system after fixing a vulnerability?
Windows: A restart is required.
Linux Software Vulnerability: A restart is required if either of the following conditions is met:
A
kernelvulnerabilitywas fixed.On the Linux Software Vulnerability tab of the page in the Security Center console, the bulletin for the
vulnerabilityhas a Restart Required tag.
Why does a vulnerability rollback operation fail?
If a
vulnerability rollbackoperation fails, investigate the following possible causes:Check the agent status
The rollback operation requires the
Security Centeragentto be online. If theagentis offline, the command cannot be delivered. You must first troubleshoot and resolve the agent's offline status.Confirm that the backup snapshot is valid
The rollback feature relies on the
backup snapshotthat was created before the remediation. If thesnapshothas expired or was manually deleted, the rollback operation cannot be performed.
Why does snapshot creation fail when I fix a vulnerability?
Creating a
snapshotmay fail for the following reasons:Operation performed by a RAM user: If a
RAM userwithout the requiredpermissionperforms the operation,snapshotcreation fails. We recommend that you use yourAlibaba Cloud accountto perform the operation. For more information aboutRAM user, see Overview.Non-Alibaba Cloud server: Snapshot creation for vulnerability remediation is not supported on
non-Alibaba Cloud server.
Post-remediation status and verification
I fixed a vulnerability, but Security Center still reports it. What should I do?
Cause: This issue occurs because some vulnerabilities, such as Linux
kernelvulnerabilities, require aserverrestart after remediation.Resolution: On the
vulnerabilitydetails page, click Restart. After the restart is complete, click Verify. If the status changes to Repaired, thevulnerabilityis successfully fixed.
Why does Security Center show that a Windows vulnerability is fixed even though the host has not installed a specific patch?
This is expected behavior due to the Windows update mechanism. As long as the latest
cumulative updateis installed, all historical vulnerabilities covered by that update are considered fixed. You do not need to install olderpatchindividually.NoteYou can visit the official Microsoft Update Catalog website to look up the latest installed
patch(usually identified by its KB number) and check its package details to confirm that it supersedes the oldervulnerabilityyou are concerned about.Cause: The Windows cumulative update model
Windows security updates follow a cumulative model. This means the latest monthly security
patchis a comprehensive package that includes all security fixes from previous months up to its release date.Verification logic: When
Security Centerdetects that the latestcumulative updateis installed on the system, it marks all superseded vulnerabilities as fixed. Therefore, you do not need to install a separatepatchfor each historicalvulnerability.
After I fix a vulnerability, why does the console still show a "Not fixed" status?
This may occur for the following reasons:
Verification delay: After a manual fix, you must click the Verify button to trigger an immediate scan. The status update may take a few minutes.
Browser cache: The
consolepage may be cached in your browser. Try force-refreshing the page or waiting a few minutes.Incomplete fix: The remediation operation may not have been fully successful. For example, a
vulnerabilitymay have multiple vulnerable paths, but only one was fixed. Review the remediation steps and try again.
Fixed and Pending Restarted: Can Security Center automatically verify a vulnerability in this state?
No. You must restart the
serverfrom theSecurity Centerconsoleor restart it manually. After theserverrestarts, click Verify to confirm that thevulnerabilityis fixed.ImportantIf you do not manually verify the fix,
Security Centerautomatically checks the status during the next scheduled scan. To prevent false negatives from network issues, the system retains thevulnerabilityrecord for three days if it is not detected in the first scan. If thevulnerabilityremains undetected for three consecutive days, the system removes the record.Why does the verification status not update after I manually fix a vulnerability?
After you manually fix a vulnerability on a server, if the 'Verify' feature in the Security Center console fails to update the vulnerability's status to 'Fixed', this issue usually occurs for the following two reasons:
The vulnerability scan level is not fully configured
Cause:
Security Centerscans and updates the status only for the risk levels selected in Vulnerability Settings. If the risk level of the targetvulnerability, such as High or Medium, is not selected, the system does not update its status.Resolution: Check the scan settings in Vulnerability Settings and ensure that the risk level of the target
vulnerabilityis selected.
The Security Center agent is offline
Reason: The 'Verification' function relies on real-time communication between the console and the client on the server. If the client is offline, the console cannot send verification commands or receive the results.
Resolution: Troubleshoot the offline
agentissue. After theagentis back online, try verifying again.
Appendix: Vulnerability details parameters
Parameter | Description |
CVE ID | This is the CVE ID for the vulnerability. Common Vulnerabilities and Exposures (CVE) is a list of public names for widely recognized information security vulnerabilities or exposed weaknesses. By using the CVE ID, such as CVE-2018-1123, you can quickly find information about the corresponding vulnerability fix in any other CVE-compatible database to help you resolve security issues. |
Impact Score | The CVSS score is based on the Common Vulnerability Scoring System (CVSS), a widely adopted industry standard. The score is calculated using a formula based on various attributes of a vulnerability. It is primarily used to quantify the severity of a vulnerability and helps you determine the urgency and importance of vulnerability fixing. The CVSS scoring system defines severity levels as follows:
|
Affected Assets | Information about the server assets affected by the vulnerability, including their public or private IP addresses. |
Severity | The severity of the vulnerability is calculated based on its CVSS score, asset importance, and other factors. The levels include:
|
Details | You can go to the Vulnerabilities page, click the name of a target vulnerability in the Vulnerability column, and then on the Unhandled Vulnerabilities tab, click Details in the Actions column of the vulnerability to view information such as affected assets, remediation commands, and impact descriptions.
|
