A DB instance is an isolated database environment in the cloud. This guide walks you through creating an ApsaraDB RDS for SQL Server instance using the Alibaba Cloud console.
Prerequisites
Before you begin, ensure that you have:
(RAM users only) The AliyunRDSFullAccess and AliyunBSSOrderAccess policies attached to your Resource Access Management (RAM) user. For details, see Use RAM for resource authorization
Create an instance
Go to the ApsaraDB RDS instance creation page.
Select a Billing Method.
Start with Pay-as-you-go and convert to Subscription once your requirements are finalized.
Billing method Best for Key benefit Subscription Long-term, stable workloads. Specify a Subscription Duration when selecting this option. Significant discounts for longer commitments. Pay-as-you-go Short-term use, testing, or unpredictable workloads. Billed hourly. Release the instance at any time to stop charges. Select a Region.
ESSDs are supported. We recommend that you select disk encryption to enhance data security. For more information, see disk encryption. For more information, see Storage types.
ImportantThe region cannot be changed after the instance is created. Select the same region as your ECS instances to minimize latency and enable internal network connectivity.
- To connect an ECS instance to an RDS instance over the internal network, both instances must be in the same region and Virtual Private Cloud (VPC). - To connect from on-premises servers or local devices, select the region geographically closest to you. After creation, apply for a public endpoint.
Configure the database engine, edition, and storage type.
For Database Engine, select Microsoft SQL Server. Supported versions: 2012, 2016, 2017, 2019, and 2022.
Select an Edition. The right edition depends on your availability and scalability needs.
Edition
Architecture
Best for
Basic Edition
Single-node. Compute is decoupled from storage. Does not support read-only instances.
Dev/test environments or non-critical workloads. Recovery time during failures is longer.
High-availability Edition (Recommended)
Primary + secondary node. Supports automatic failover. The secondary node is for standby only and is not accessible. Does not support read-only instances.
Production environments requiring high availability (HA). Covers approximately 80% of use cases.
Cluster Edition (Recommended)
Primary + secondary node (readable). Supports automatic failover. The secondary node is accessible for read operations. Supports 1–7 read-only instances (read-only instances do not participate in primary node election or switchover).
Workloads requiring HA with read scaling. Supports readable secondary databases and flexible cost control.
For a full comparison of editions, see Editions overview.
Select a Storage Type. Enterprise SSD (ESSD) is recommended for high performance. For details, see Introduction to storage classes. Enable Cloud Disk Encryption to protect data at rest. For details, see Disk encryption.
Configure network settings. Network Type defaults to VPC.
For VPC, select the VPC where your application (for example, your ECS instance) resides. > Note: Instances must be in the same VPC to communicate over the internal network. They can reside in different vSwitches within that VPC.
For Add to Whitelist, select Yes (recommended) to automatically add the VPC CIDR block to the RDS whitelist, allowing internal access from ECS instances in the VPC. > Note: If you select No, set the whitelist manually after the instance is created.
Select the zone, vSwitch, and Deployment Method.
Zone: A physical location within a region. Performance differences between zones in the same region are negligible. Colocate your ECS and RDS instances in the same zone for minimal network latency, though cross-zone latency is negligible for most workloads.
vSwitch: A logical sub-network within a VPC. Select an existing vSwitch or click Create vSwitch. For details, see Create and manage a vSwitch.
Deployment Method:
Deployment method
Description
Notes
Multi-zone Deployment (Recommended)
Primary and secondary nodes are in different zones.
Configure zone and network settings for both nodes. Enables cross-zone disaster recovery.
Single-zone Deployment
Both nodes are in the same zone.
Minimal replication latency, but no cross-zone redundancy. Basic Edition supports this option only.
- For instances with primary and secondary nodes, select Multi-zone Deployment to enable cross-zone disaster recovery. - If a zone is sold out, select a different zone.
Select an Instance Type.
Select a Category. Available options vary by region and edition — the console shows only what is available for your current configuration.
Category
Dedicated resources
Shared resources
Best for
General-purpose
Memory and I/O
CPU and storage
Balanced workloads requiring cost-efficiency.
Dedicated
CPU, memory, storage, and I/O (exclusively reserved)
None
Production workloads requiring consistent, predictable performance. Not available for Basic Edition.
Shared
Memory and storage
CPU
Entry-level applications or development environments.
Select a specific instance type (CPU cores, memory, maximum connections, and other specifications). For the full list, see ApsaraDB RDS for SQL Server primary instance types.
Set the Storage Capacity in increments of 5 GB. This capacity covers data, system files, transaction logs, and temporary files.
Local SSD capacity is tied to the instance type. Enterprise SSD (ESSD) and standard SSD capacities can be scaled independently.
(Subscription only) Specify the Duration. Different durations offer different discounts. Hover over View Details next to Configuration Fee to see the pricing breakdown.
(Optional) Configure additional parameters.
Parameter Description Port Custom database port. Default: 1433. Range: 1000–5999. Release Protection Pay-as-you-go only. Prevents accidental instance termination. For details, see Enable or disable release protection. Resource Group Logical grouping for permission management and billing. Instance Name A custom name to identify the instance. Character Set Collation Rule Default: Chinese_PRC_CI_AS. Can be modified after creation. Tags Add tags for categorized management across many instances. For details, see Filter instances by tag. Privileged Account The superuser account. Select Configure Now or Configure Later (create the account manually after creation). Each instance supports only one privileged account, and it cannot be deleted. In the upper-right corner of the page, set the Quantity. The default is 1. You can purchase up to 20 instances at a time.
Review your order, click Confirm Order, and complete the payment.
- For Subscription instances, select Enable Auto-renewal to prevent service interruptions due to expiration. - If you purchase on a monthly basis, the auto-renewal cycle is one month. If you purchase on a yearly basis, the cycle is one year. The actual cycle depends on your order. Disable auto-renewal at any time. For details, see Renew an expired resource and Auto-renewal.
View the instance status. Go to the Instances list and select the region you used. Provisioning typically takes 1–10 minutes. Refresh the page to check the status.
What's next
FAQ
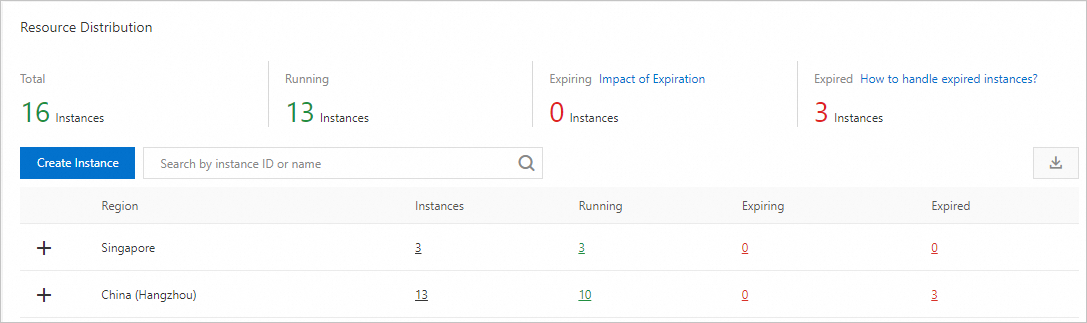
How do I view the total number of RDS instances under my Alibaba Cloud account?
Log on to the RDS Overview page. It shows the total number of RDS instances for all database engines under your account, the regions where they are located, and the number of running instances per region.
Why can't I see the instance I just created in the instance list?
| Cause | Description | Resolution |
|---|---|---|
| Incorrect region | The current region does not match the region selected during instance creation. | Switch to the correct region in the upper-left corner of the page. |
| Insufficient resources in the zone | The instance failed to create due to insufficient resources. A refund appears in the Orders list if creation fails. | Select a different zone and try again. |
| RAM policy prohibits unencrypted instances | A RAM policy is configured to block unencrypted RDS instance creation. This affects: (1) instances with a high-performance local disk — disk encryption cannot be set at creation time; (2) instances with a cloud disk where disk encryption was not enabled. For details, see Use a RAM policy to restrict RAM user permissions. | Set the storage type to cloud disk, enable Disk Encryption, select a key, and try again. |
References
To create an instance using the API, see Create an RDS instance.
To create an instance for a different database engine, see Create an ApsaraDB RDS for MySQL instance, Create an ApsaraDB RDS for PostgreSQL instance, or Create an ApsaraDB RDS for MariaDB instance.