Retrieval-Augmented Generation (RAG) connects large language models (LLMs) to private knowledge bases, improving response accuracy with domain-specific data. This guide walks you through developing and deploying a RAG application in LangStudio.
Background
RAG models combine information retrieval with generative AI to deliver more precise, contextually relevant answers. In domains like finance and healthcare, where accurate information drives critical decisions, traditional generative models may lack the required domain-specific knowledge. RAG bridges this gap by connecting models to external knowledge bases. This guide walks through a RAG solution for finance and healthcare built on Platform for AI (PAI).
Prerequisites
-
LangStudio supports Faiss and Milvus as vector databases. If you want to use Milvus, you must first create a Milvus instance.
NoteFaiss is suitable for test environments and requires no additional database setup. For production, use Milvus, which supports larger-scale data.
-
The corpus for your RAG knowledge base must be uploaded to OSS. The following sample corpora are provided for finance and healthcare use cases:
-
Financial News: Data in PDF format, containing news reports from public news websites.
-
Disease Introductions: Data in CSV format, containing disease information from Wikipedia.
-
1. (Optional) Deploy LLM and embedding models
A RAG application flow requires both an LLM service and an embedding model service. You can deploy the required services from the Model Gallery as described below, or skip this step if you already have OpenAI API-compatible model services.
Go to QuickStart > Model Gallery and deploy models for the following two scenarios. For details, see Model deployment and training.
Select an instruction-tuned large language model. Base models cannot reliably follow user instructions.
-
For the Scenario, select Large Language Models and deploy DeepSeek-R1-Distill-Qwen-7B.

-
For the Scenario, select embedding and deploy the bge-m3 general vector model.

2. Create connections
The LLM and embedding model connections in this section use EAS services deployed from QuickStart > Model Gallery. For other connection types, see Configure connections.
2.1 Create an LLM service connection
In LangStudio, select a workspace, navigate to the Configure Service Connection > Model Service tab, and click New Connection to create a generic LLM model service connection.
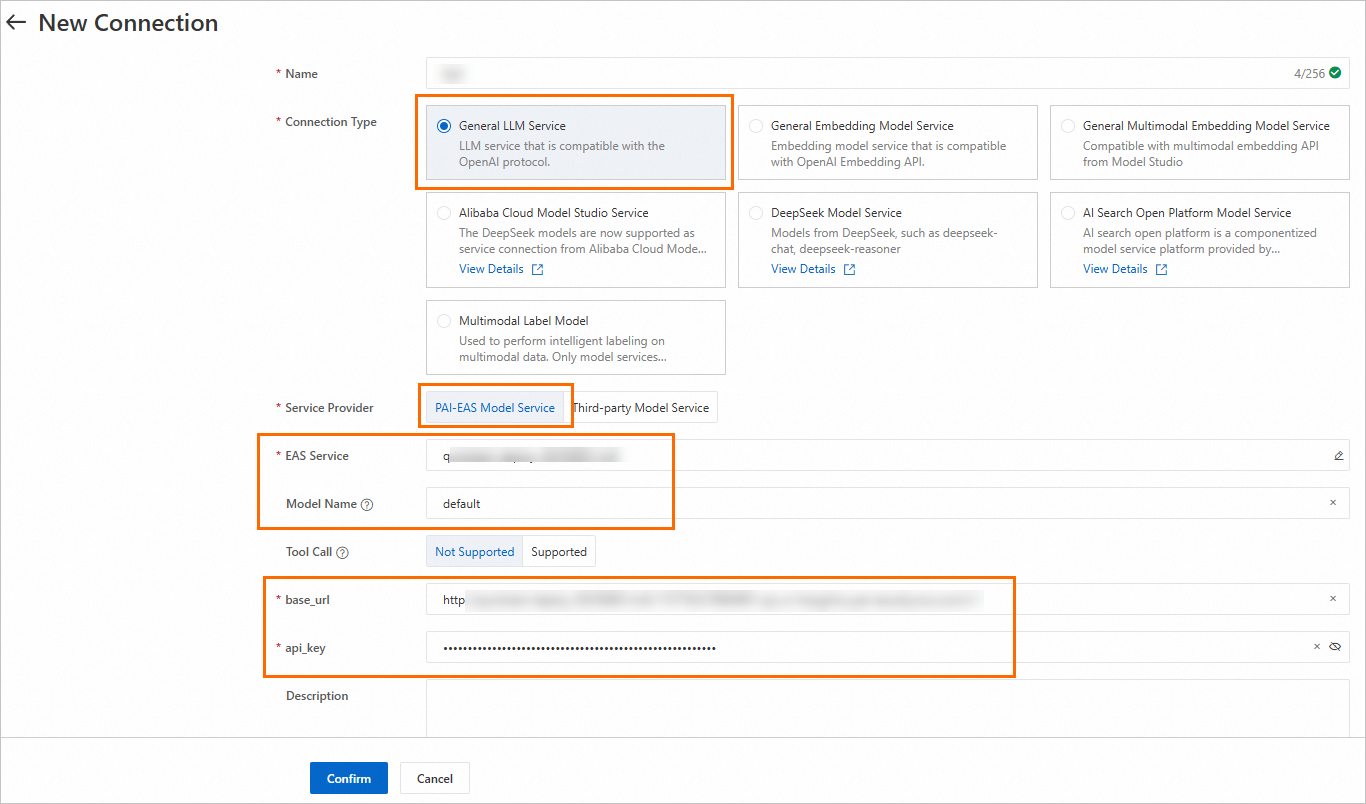
Key parameters:
|
Parameter |
Description |
|
Model name |
If you deployed the model from the Model Gallery, find the model name on its details page by clicking the model card on the Model Gallery page. For details, see Create a connection - Model Service. |
|
Service provider |
|
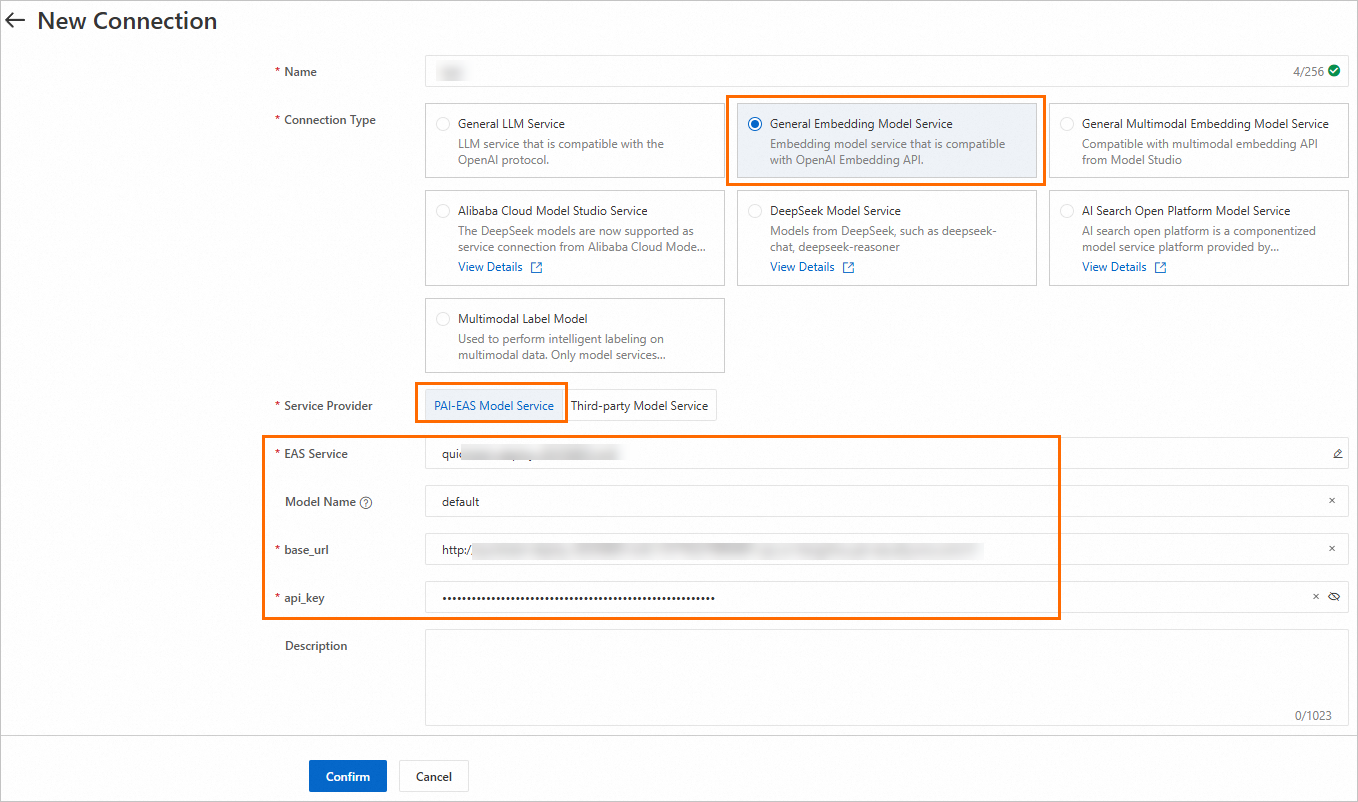
2.2 Create an embedding model service connection
Create a generic embedding model service connection, following the same procedure as in Step 2.1.
2.3 Create a vector database connection
On the Configure Service Connection > Database tab, click New Connection to create a Milvus database connection.

Key parameters:
|
Parameter |
Description |
|
uri |
The Milvus instance endpoint in the format |
|
token |
The username and password for the Milvus instance: |
|
database |
The name of the database. This topic uses the default database |
3. Create a knowledge base index
Create a knowledge base index. LangStudio parses the corpus, chunks and vectorizes it, and stores the results in the vector database. The following table describes key parameters. For other configurations, see Manage knowledge bases.
|
Parameter |
Description |
|
Basic configurations |
|
|
Data source OSS path |
Set this parameter to the OSS path of the RAG knowledge base corpus described in Prerequisites. |
|
Output OSS path |
Specify a path to store intermediate results and index metadata from document parsing. Important
If you use Faiss as the vector database, the application flow saves the generated index files to OSS. By default, if you use the default PAI role (the Instance RAM Role set when you start the runtime), the application flow has access to your workspace's default storage bucket. Therefore, we recommend setting this parameter to a directory in the OSS bucket that contains the current workspace's default storage path. If you use a custom role, grant it OSS access permissions. We recommend the AliyunOSSFullAccess permission. For more information, see Manage permissions for a RAM role. |
|
Embedding model and database |
|
|
Embedding type |
Select General Embedding Model. |
|
Embedding connection |
Select the embedding model service connection that you created in Step 2.2. |
|
Vector database type |
Select Vector database Milvus. |
|
Vector database connection |
Select the Milvus database connection that you created in Step 2.3. |
|
Table name |
Set this parameter to the name of the Collection that you created in your Milvus database, as described in Prerequisites. |
|
VPC configuration |
|
|
VPC configuration |
Select a VPC that is the same as, or can communicate with, the VPC of the Milvus instance. |
4. Create and run a RAG application flow
-
Go to LangStudio, select a workspace, and then on the Application Flow tab, click New Application Flow to create a RAG application flow.

-
Start the runtime. In the upper-right corner, click Create Runtime and configure the parameters. Note: The runtime must be running before you can parse Python nodes or access more tools.

Key parameter:
VPC Configuration: Select the VPC that was used to create the Milvus instance in Prerequisites, or ensure that the selected VPC can communicate with the Milvus instance's VPC.
-
Develop the application flow.

Keep the default settings for other nodes or adjust them as needed. Configure the key nodes as follows:
-
Knowledge Retrieval: Retrieves text from the knowledge base relevant to the user's question.
-
Knowledge base index name: Select the knowledge base index that you created in Step 3.
-
Top K: Returns the top K matching results.
-
-
LLM node: Uses the retrieved documents as context, sends them to the large language model along with the user's question, and generates a response.
-
Model configuration: Select the connection that you created in Step 2.1.
-
Chat history: Specifies whether to enable chat history and use past conversations as input variables.
-
For details about each component, see Pre-built Component Library.
-
-
Debug or run the flow. In the upper-right corner, click Run to execute the flow. For information about common runtime issues, see FAQ.

-
View the traces. Below the generated answer, click View Traces to view the trace details or topology.

5. Deploy the application flow
On the application flow development page, click Deploy in the upper-right corner to deploy the application flow as an EAS service. Keep other deployment settings as default or adjust them as needed. Configure the following key parameters:
-
Resource deployment > Instances: Configure the number of service instances. This deployment is for testing purposes, so set the number of instances to 1. For production, we recommend using multiple service instances to mitigate the risk of a single point of failure (SPOF).
-
VPC > VPC: Select the VPC where the Milvus instance resides, or ensure that the selected VPC can communicate with the VPC where the Milvus instance resides.
For more deployment details, see Deploy an application flow.
6. Call the service
After deployment, you are redirected to the PAI-EAS console. On the Debug tab, configure and send a request. The key in the request body must match the "Dialogue input" parameter in the "Start" node of the application flow. This guide uses the default field question.

For other methods of calling the service, such as using an API, see Call the service.