Build a Chat Assistant with Web Search and RAG application flow in LangStudio. This flow integrates live web search and Retrieval-Augmented Generation (RAG) to give the model access to both a domain-specific knowledge base and real-time web data for more accurate answers.
Background
This application flow combines RAG and live web search to deliver precise answers. The model retrieves domain-specific knowledge and supplements it with real-time web data — particularly effective in high-precision domains such as finance and healthcare.
Prerequisites
-
Register on the official SerpApi website and obtain your api_key.
-
To use Milvus, create a Milvus instance.
NoteFaiss is for testing and does not require a separate database. For production, use Milvus for large-scale data.
-
Upload the RAG knowledge base corpus to OSS.
1. (Optional) Deploy LLM and embedding models
Deploy the required model services from Model Gallery. Skip this step if you already have compatible model services.
Go to Quick Start > Model Gallery and deploy models for the following two scenarios. Model Deployment and Training.
Use an instruction-tuned LLM. Base models cannot follow user instructions correctly.
-
For Scenario, select Large Language Models. This example uses DeepSeek-R1. One-click deployment of DeepSeek-V3 and DeepSeek-R1 models.
-
For Scenario, select Embedding. This example uses the bge-m3 general-purpose vector model.
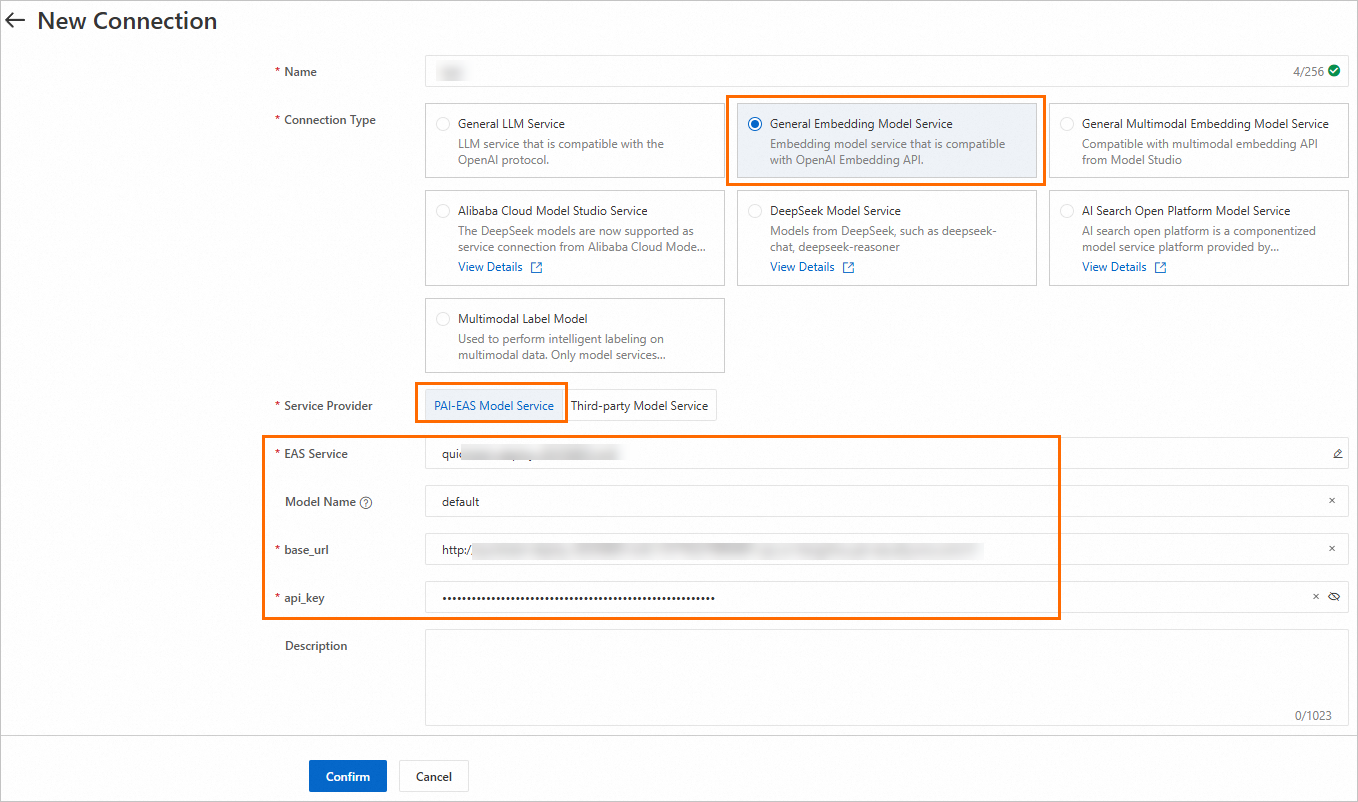
2. Create connections
The LLM and embedding model service connections in this guide are based on EAS services deployed from QuickStart > Model Gallery. Other connection types and configurations are covered in Connection Configuration.
2.1 Create an LLM connection
-
Go to LangStudio and select a region and workspace.
-
On the Connection > Model Service tab, click New Connection and set the following parameters:
-
Connection Type: Select General LLM Service.
-
Service Provider: Select PAI-EAS Model Service.
-
EAS Service: Select the LLM service you deployed in Step 1.
After you select the service, LangStudio automatically populates the
base_urlandapi_keyfields with the VPC endpoint and token of the deployed LLM. -
Model Name: The
modelparameter value in an OpenAI API request. Find it on the model details page by clicking the model card in Model Gallery. -
Tool Call, Structured output, Deep Reasoning, Vision: Enable these options based on your model's capabilities.
-
2.2 Create an embedding model connection
Create an embedding model connection using the same process as Section 2.1.
2.3 Create a SerpApi connection
On the Connection > Custom tab, click New Connection to create a SerpApi connection. Configure the api_key you obtained in the Prerequisites section.

3. Create a knowledge base index
Create a knowledge base index to parse, chunk, and vectorize your corpus into a vector database. Key parameters are listed below. Knowledge Base Management.
|
Parameter |
Description |
|
Basic configuration |
|
|
Data source OSS path |
Specify the OSS path to the RAG knowledge base corpus from the Prerequisites section. |
|
Output OSS path |
Path for intermediate results and index data generated during document parsing. Important
When you use FAISS, the flow saves index files to OSS. With the default PAI role (the Instance RAM Role set when starting the runtime), the flow can access your workspace's default storage bucket. Set this parameter to a directory within the same OSS bucket as your workspace's default storage path. If you use a custom role, grant it OSS access (AliyunOSSFullAccess recommended). Manage RAM Role Permissions. |
|
Embedding model and database |
|
|
Embedding type |
Select General Embedding Model Service. |
|
Embedding connection |
Select the embedding model service connection you created in Section 2.2. |
|
Vector database type |
Select FAISS. This guide uses FAISS as an example. |
4. Create and run the application flow
-
Go to LangStudio, select a workspace, navigate to the Application Flows tab, and click New Application Flow to create a Chat Assistant with Web Search and RAG flow.
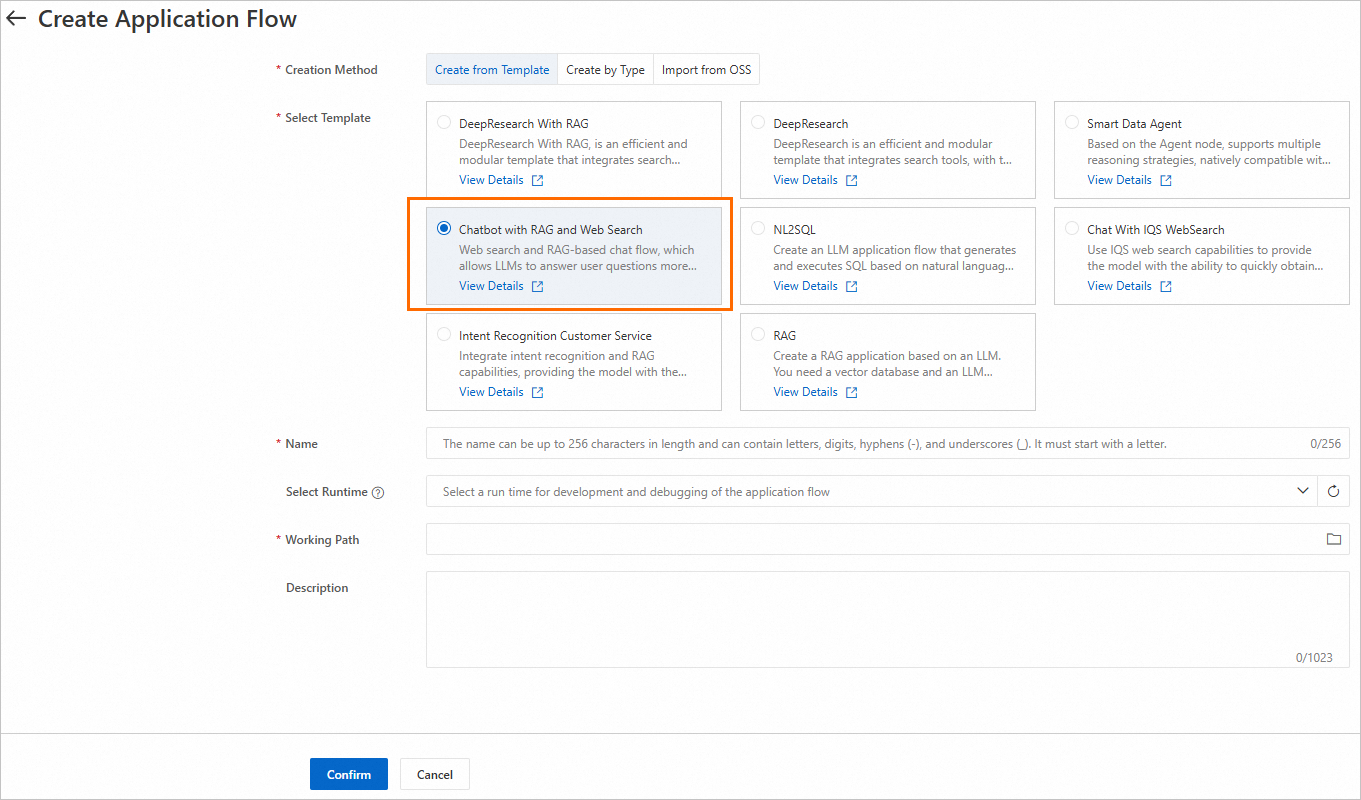
-
In the upper-right corner, click Select Runtime and select a runtime. A running runtime is required to parse Python nodes or view more tools.
If no runtimes are available, go to the Runtime tab on the LangStudio page and click New Runtime to create one.
 Key parameter:
VPC Configuration: If you selected Milvus in Step 3, use the same VPC as the Milvus instance or an interconnected one. FAISS requires no VPC configuration.
-
Develop the application flow.

Leave the remaining settings at their defaults or adjust as needed. Key node configurations:
-
Knowledge Base Retrieval: Retrieves relevant text from the knowledge base.
-
Knowledge Base Index Name: Select the knowledge base index you created in Step 3.
-
Top K: Returns the top K matching results.
-
-
Serp Search: Searches the web via SerpApi and returns results.
-
SerpApi Connection: Select the SerpApi connection you created in Section 2.3.
-
Search Engine: Supports Bing, Google, Baidu, Yahoo, and custom inputs. Supported engines and parameters are documented on the official SerpApi website.
-
-
Large Model Node: Sends retrieved documents and search results as context with the user's query to the LLM for response generation.
-
Model Settings: Select the connection you created in Section 2.1.
-
Conversation History: Enables conversation history as an input variable.
-
-
-
In the upper-right corner, click Run to run the application flow. Troubleshoot common issues in the FAQ.

-
Below the generated answer, click View Traces to view trace details or the topology view.

5. Deploy the application flow
On the application flow development page, click Deploy in the upper-right corner to deploy the flow as an EAS service. Key parameters:
-
Resource Information > Instances: Configure the number of service instances. For testing, set to 1. For production, use multiple instances to prevent a single point of failure.
-
VPC > VPC: SerpApi requires public internet access, so configure a VPC with this capability — EAS services lack it by default. Enable EAS Services to Access Public or Internal Resources. If you selected Milvus in Step 3, use the same VPC as the Milvus instance or ensure the VPCs are interconnected.
6. Call the service
After deployment, you are redirected to the PAI-EAS console. On the Debug tab, send a request. The request body key must match the Conversation Input field in the application flow's Start node. The default field name is question.

Other calling methods, including API calls, are covered in Deploying Application Flows - Calling the Service.