By default, when you mount a File Storage NAS (NAS) file system on an Elastic Compute Service (ECS) instance, the NAS file system and the ECS instance must reside in the same virtual private cloud (VPC) in the same region and belong to the same Alibaba Cloud account. If your ECS instance and NAS file system are deployed in different VPCs in the same region and within the same Alibaba Cloud account, you can use Cloud Enterprise Network (CEN) to establish a private connection between the ECS instance and the NAS file system. This way, you can mount the NAS file system across VPCs in the same region. This topic describes how to use CEN to mount a file system across VPCs in the same region.
Feature description
CEN is a highly available network built on the global private network of Alibaba Cloud. CEN uses transit routers to establish cross-region connections between VPCs. This enables VPCs to communicate with data centers and establish flexible, reliable, and enterprise-level networks in the cloud.
Transit routers are available in two editions: Basic Edition and Enterprise Edition. Enterprise Edition is an upgraded version of Basic Edition and supports all features of Basic Edition. In addition, Enterprise Edition supports custom routing policies. For more information, see How transit routers work. For more information about the regions supported by each edition of transit routers, see Transit router editions.
Sample scenario
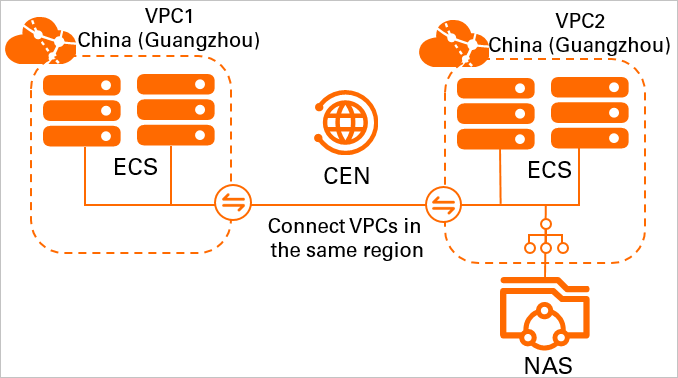
Two VPCs are created for an enterprise in the China (Guangzhou) region, and ECS instances are deployed in the VPCs. A NAS file system is created in VPC 2. The two VPCs cannot communicate with each other. The ECS instance in VPC 1 needs to access the NAS file system in VPC 2 due to business requirements.
You can use CEN to connect the two VPCs to the Basic Edition transit router in the China (Guangzhou) region. Then, you can mount a NAS file system on the ECS instance for the ECS instance to access the NAS file system across VPCs.
The following table lists the CIDR blocks that are allocated to the VPCs. Make sure that the CIDR blocks do not overlap.
Network instance | CIDR block | Region | IP address of the ECS instance |
VPC 1 |
| China (Guangzhou) | 192.168.0.239 |
VPC 2 |
| China (Guangzhou) | 10.0.0.97 |
Prerequisites
Two VPCs are created in the China (Guangzhou) region and an ECS instance is created in each VPC. For more information, see Create a VPC with an IPv4 CIDR block.
You are familiar with the security group rules that are applied to the ECS instances in the two VPCs. Make sure that the security group rules allow the VPCs to communicate with each other. For more information, see View security group rules and Add a security group rule.
A CEN instance is created within your Alibaba Cloud account. A Basic Edition transit router exists in the China (Guangzhou) region of the CEN instance. If you do not have a Basic Edition transit router, you can use an Enterprise Edition transit router. For more information, see Use CEN and Enterprise Edition transit routers to enable intra-region communication between on-premises and cloud networks.
A NAS file system is created in VPC 2. For more information, see Create a file system.
Step 1: Connect the VPCs to the transit router
Connect the VPCs to the transit router in the China (Guangzhou) region. Then, the VPCs automatically learn routes from each other to establish network communication.
On the Instances page, click the ID of the CEN instance.
On the tab, click the Transit Router tab. Click Create Connection in the Actions column of the transit router in the region.
On the Connection with Peer Network Instance page, configure the following parameters and then click OK.
Instance Type: Select Virtual Private Cloud (VPC).
Region: Select the region where the network instance is deployed. In this example, select China (Guangzhou).
Transit Router: The system automatically creates a transit router in the selected region.
Resource Owner ID: Select the Alibaba Cloud account to which the VPC belongs. In this example, select Current Account.
Network Instance: Select the ID of the network instance. In this example, select VPC 1.
Repeat Step 3 to connect VPC 2 to the transit router in the China (Guangzhou) region.
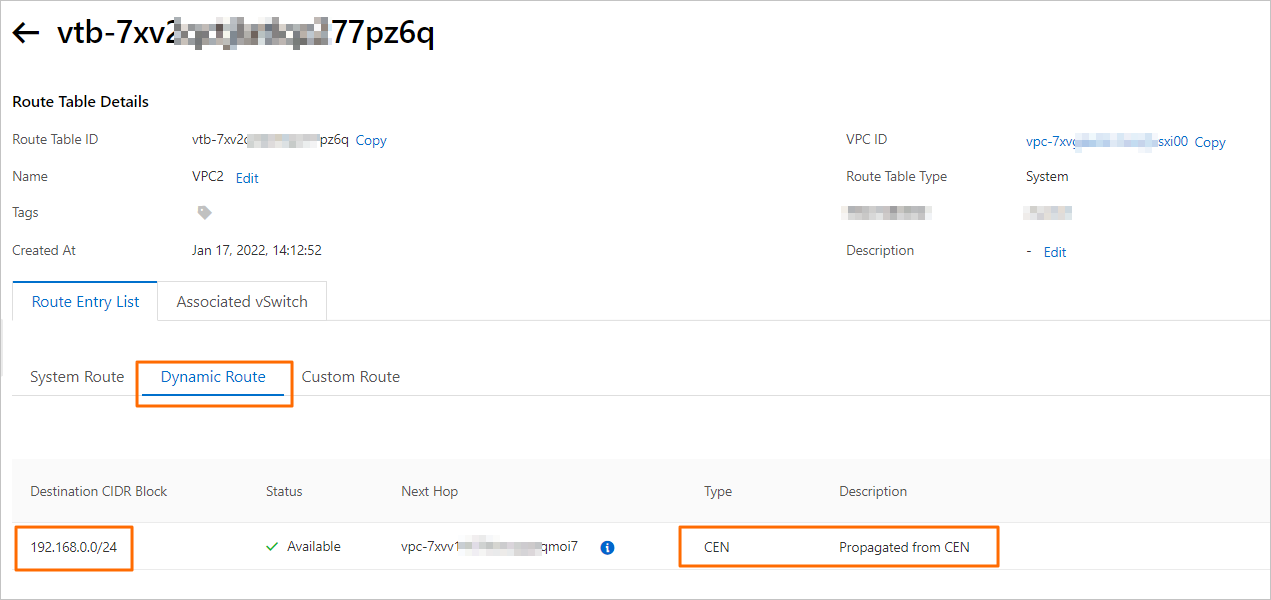
After both VPCs are connected to the transit router, they can automatically learn routes from each other, as shown in the following figures. You can manage the routes of the VPCs in the VPC console. For more information, see Create and manage a route table.
Figure 1. Routes learned by VPC 1
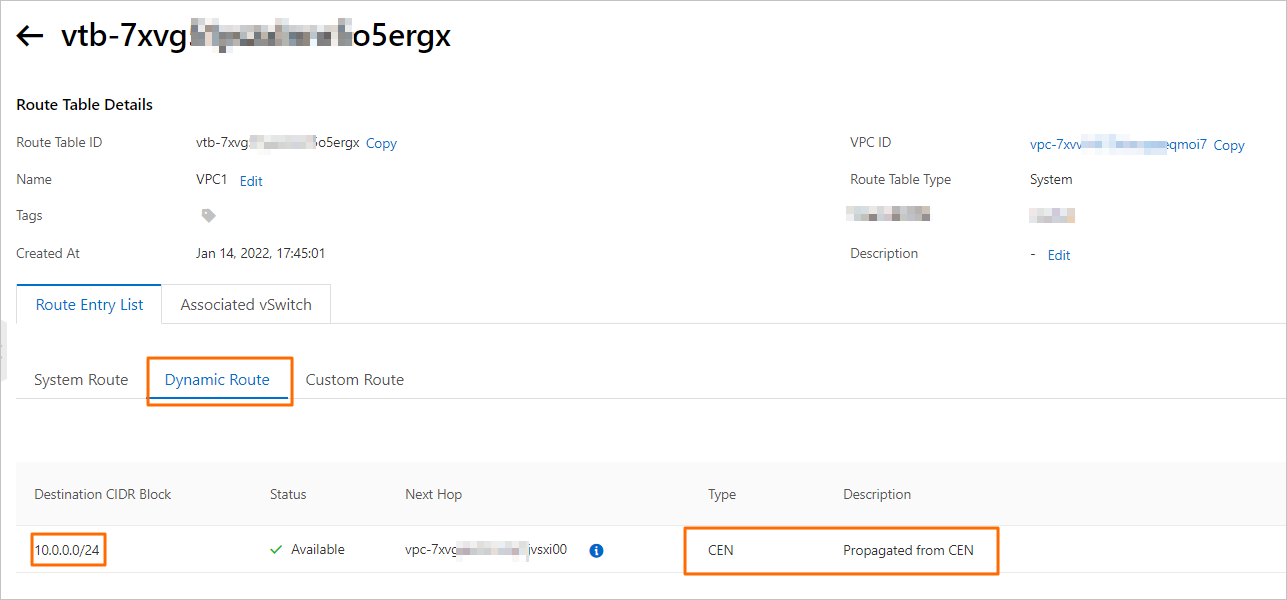
Figure 2. Routes learned by VPC 2
Step 2: Test network connectivity
After VPC 1 and VPC 2 are connected to the transit router, they can communicate with each other. In this example, VPC 1 is used to test the network connectivity between VPC 1 and VPC 2.
Log on to an ECS instance in VPC 1. For more information, see Connection method overview.
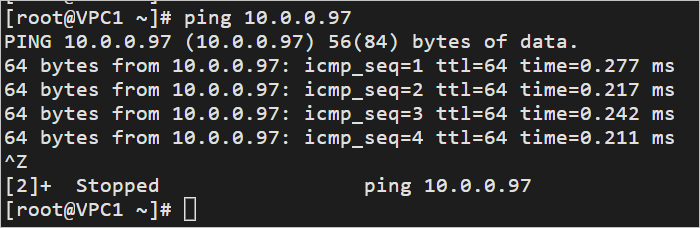
On the ECS instance, run the ping command to test whether VPC 1 can communicate with VPC 2.
NoteIn this example, VPC 1 runs the Alibaba Cloud Linux operating system. For more information about how to use the ping command in other operating systems, see the manual of the operating system that you use.
Before you run the
pingcommand, check the security group rule of your ECS instance. Make sure that ICMP is enabled and the IP address or CIDR block is added to the security group rule. For more information, see View security group rules and Add a security group rule.
ping <IP address of the ECS instance in VPC 2>The following echo reply packet indicates that VPC 1 and VPC 2 can communicate with each other.
Step 3: Mount the file system
Before you mount a file system, make sure that the corresponding CIDR block is configured in the rule of the permission group. Otherwise, the file system cannot be accessed. For more information, see Manage permission groups.
After you complete the preceding configurations, mount the file system on an ECS instance across VPCs.
For information about how to mount a Network File System (NFS) file system on a Linux ECS instance, see Mount an NFS file system on a Linux ECS instance.
For information about how to mount a Server Message Block (SMB) file system on a Windows ECS instance, see Mount an SMB file system on a Windows ECS instance.
References
You can also use PrivateLink to mount a file system across VPCs in the same region. The difference is that you do not need to transfer data over the Internet. For more information, see Use PrivateLink to mount a NAS file system across VPCs in the same region.
For information about how to mount a file system across regions or accounts, see Use CEN to mount a NAS file system across accounts and regions.
For information about how to mount a file system in an on-premises data center, see Access file systems in on-premises data centers.
For information about how to migrate data from an on-premises storage system or OSS bucket to a NAS file system, see Data migration.