By default, you can mount a NAS file system only on an ECS instance that is in the same account, region, and VPC. If your ECS instance and NAS file system are in different accounts, regions, or VPCs, you can use Cloud Enterprise Network (CEN) to establish a private connection between them. This topic describes how to use Alibaba Cloud CEN to mount a file system across accounts, regions, and VPCs.
Features
Cloud Enterprise Network (CEN) is a highly available network built on the private global network of Alibaba Cloud. CEN uses a Transit Router (TR) to establish private connectivity between VPCs across regions, and between VPCs and on-premises data centers. This allows you to create a flexible, reliable, and large-scale enterprise cloud network.
A TR is available in Basic Edition and Enterprise Edition. The Enterprise Edition is an upgraded version of the Basic Edition. In addition to all the features of the Basic Edition, the Enterprise Edition supports flexible routing policies. For more information, see How a TR works. For the regions that support each TR edition, see Regions and availability zones that support a TR.
Sample scenario
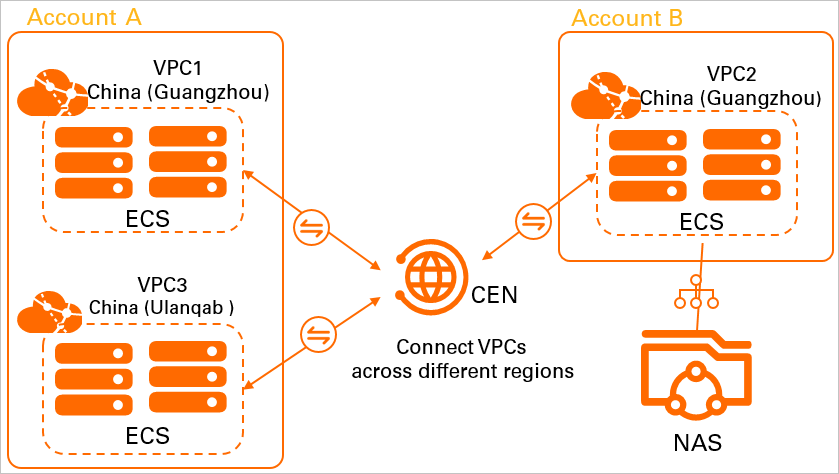
An enterprise uses Account A to create VPC1 in the China (Guangzhou) region and VPC3 in the China (Ulanqab) region. The enterprise uses Account B to create VPC2 and a NAS file system in the China (Guangzhou) region. Services are deployed on ECS instances in the three VPCs, but the VPCs are isolated from each other. Due to business growth, the ECS instances in Account A now need to mount and access the NAS file system.
The enterprise can use CEN to connect VPC1 and VPC2 to the Basic Edition TR instance that belongs to Account A in the China (Guangzhou) region, and connect VPC3 to the Basic Edition TR instance that belongs to Account A in the China (Ulanqab) region. Then, using a bandwidth plan and an inter-region connection, the enterprise enables network communication between the China (Guangzhou) and China (Ulanqab) regions under Account A. This allows all three VPCs to communicate with each other, enabling the ECS instances to mount and access the NAS file system.
The following table outlines the network plan for the three VPCs in this example. When you plan your network, ensure that the CIDR blocks of the VPCs that need to communicate do not overlap.
|
Item |
VPC1 |
VPC2 |
VPC3 |
|
Network instance CIDR blocks |
|
|
|
|
Network instance regions |
China (Guangzhou) |
China (Guangzhou) |
China (Ulanqab) |
|
Network instance owner account |
Account A |
Account B |
Account A |
|
ECS instance IP address |
192.168.0.239 |
10.0.0.121 |
172.16.0.201 |
Prerequisites
You have used Account A to create one VPC in the China (Guangzhou) region and another in the China (Ulanqab) region. You have used Account B to create one VPC in the China (Guangzhou) region. Services are deployed on ECS instances in all three VPCs. For more information, see Create a VPC with an IPv4 CIDR block.
You are familiar with the security group rules that apply to the ECS instances in the three VPCs and have ensured that the rules allow the resources in the VPCs to access each other. For more information, see View security group rules and Add a security group rule.
You have used Account A to create a CEN instance, and Basic Edition TRs for this CEN instance exist in the China (Guangzhou) and China (Ulanqab) regions. If no Basic Edition TR instance exists in your account, use an Enterprise Edition TR for this scenario. For more information, see Connect VPCs across accounts.
You have used Account B to create a file system in the China (Guangzhou) region. For more information, see Create a file system.
Step 1: Authorize the cross-account VPC
Before you can connect VPC2 that belongs to Account B to the transit router that belongs to Account A, you must grant the required permissions to Account A. Otherwise, the transit router that belongs to Account A cannot connect to VPC2.
-
Log on to the VPC console with Account B.
-
In the top navigation bar, select the region where VPC2 is deployed. In this example, China (Guangzhou) is selected.
-
On the VPC page, find and click the ID of VPC2.
Click the Cross-account Authorization tab, then click Cross-account Authorization.
In the Attach to CEN dialog box, configure the following parameters and click OK.
Parameter
Description
Peer Account UID
The ID of the Alibaba Cloud account (main account) that owns the TR instance.
In this example, this is the ID of Account A.
Peer CEN Instance ID
The ID of the CEN instance to which the TR instance belongs.
In this example, this is the ID of the CEN instance in Account A.
Payer
Select the account that pays the fees.
CEN Instance Owner (default): The account that owns the TR instance pays the connection and traffic processing fees for the VPC instance.
VPC Users: The account that owns the VPC instance pays the connection and traffic processing fees for the VPC instance.
This example uses the default value.
NoteWhen you use a Basic Edition TR instance to connect a VPC instance, no connection or traffic processing fees are generated, and this parameter does not take effect.
Step 2: Connect the VPC instances
After Account B authorizes the connection, you must log on to Account A to connect VPC1, VPC2, and VPC3 to the TR instance.
Log on to the CEN console by using Account A.
On the CEN Instance page, click the ID of the target CEN instance.
-
On the Basic Information tab, click
 in the VPC section.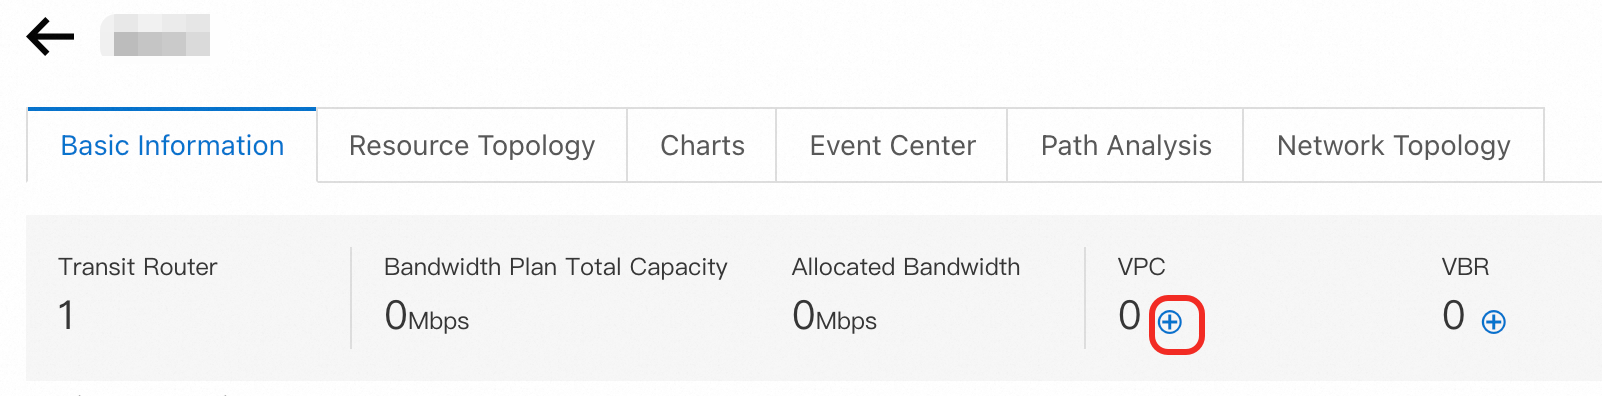
-
On the Connection with Peer Network Instance page, configure the following parameters and click OK:
-
Network Type: Select the type of network instance that you want to attach.
-
Region: Select the region where the network instance is deployed.
-
Transit Router: The transit router in the selected region is automatically displayed.
-
Resource Owner ID: Select the Alibaba Cloud account to which the network instance belongs.
-
Network Instance: Select the ID of the network instance that you want to attach.
The system connects VPC1, VPC2, and VPC3 to the transit router that belongs to Account A based on the preceding settings. The following table lists the settings of each VPC.
Parameter
VPC1
VPC2
VPC3
Network Type
VPC
VPC
VPC
Region
China (Guangzhou)
China (Guangzhou)
China (Ulanqab)
Resource Owner ID
Current Account
Different Account
If you select Different Account, you must specify the ID of Account B.
Current Account
Network Instance
VPC1
VPC2
VPC3
After you complete the preceding steps, VPC1, VPC2, and VPC3 automatically learn routes from each other. VPC1 and VPC2 can communicate with each other. Inter-region connections are established between VPC1 and VPC3, and between VPC2 and VPC3. By default, CEN provides 1 Kbit/s of bandwidth for connectivity testing (IPv4 addresses). The bandwidth is used only for testing and does not support service-level inter-region connections. For example, you can create an ECS in each VPC and run the
pingcommand in ECS instances to test connectivity. -
Step 3: Purchase a bandwidth plan
To establish connections between VPC1 and VPC3, and between VPC2 and VPC3, you must purchase a bandwidth plan that provides bandwidth for inter-region connections.
Log on to the CEN console by using Account A.
On the CEN Instance page, click the ID of the target CEN instance.
On the instance details page, navigate to and click Purchase Bandwidth Plan (Subscription).
Set the following parameters for the bandwidth plan, then click Buy Now and complete the payment.
Parameter
Description
CEN
Select the CEN instance for which you are purchasing the bandwidth plan.
After the payment is complete, the bandwidth plan is automatically bound to this CEN instance.
In this example, select the CEN instance under Account A.
Area A
Select the area where one of the connected network instances is located.
In this example, select Mainland China.
NoteYou cannot change the connected areas after the bandwidth plan is created.
For more information about the areas and regions supported by bandwidth plans, see Work with bandwidth plans.
Area B
Select the area where the other connected network instance is located.
In this example, select Mainland China.
Billing Method
The billing method for the bandwidth plan. The default is Pay-By-Bandwidth.
For more information, see Billing.
Bandwidth
Select a bandwidth value for the bandwidth plan based on your business needs. Unit: Mbps.
Bandwidth Plan Name
Enter a name for the bandwidth plan.
Subscription Duration
Select a subscription duration for the bandwidth plan.
Select Auto-renewal to enable automatic renewal for the bandwidth plan.
Resource Group
Select the Resource Group to which the bandwidth plan belongs.
You can configure this parameter only when you purchase a Chinese mainland-to-Chinese mainland Bandwidth Plan.
Step 4: Create an inter-region connection
Log on to the CEN console by using Account A.
On the CEN Instance page, click the ID of the target CEN instance.
-
Go to the tab and click Allocate Bandwidth for Inter-region Communication.
On the Connection with Peer Network Instance page, configure the inter-region connection and click OK.
Parameter
Description
Network Type
Select Inter-region Connection.
Region
A region to connect.
In this example, select China (Guangzhou).
Transit Router
The system automatically displays the ID of the TR instance in the current region.
Peer Region
The other region to connect.
In this example, select China (Ulanqab).
Transit Router
The system automatically displays the ID of the TR instance in the current region.
Bandwidth Plan
Select the bandwidth plan instance that is bound to the CEN instance.
Bandwidth
Enter the bandwidth for the inter-region connection. Unit: Mbps.
Step 5: Test network connectivity
After you complete the preceding steps, VPC1, VPC2, and VPC3 are connected to each other. This section describes how to test the network connectivity between the VPCs.
In this example, ECS instances in VPC1, VPC2, and VPC3 run the Alibaba Cloud Linux operating system. For more information about how to use the ping command on other operating systems, see the manual of the operating system that you use.
-
Test the network connectivity between VPC1 and VPC2.
-
Log on to an ECS instance in VPC 1. For more information, see Remote connection methods for ECS instances.
-
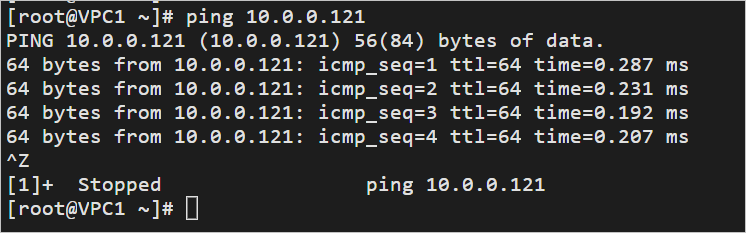
On the ECS instance, run the ping command to test whether you can access the ECS instance in VPC2.
ping
<The IP address of the ECS instance in VPC2>The following echo reply packet indicates that VPC1 can communicate with VPC2.
-
-
Test the network connectivity between VPC1 and VPC3.
-
Log on to an ECS instance in VPC 3.
-
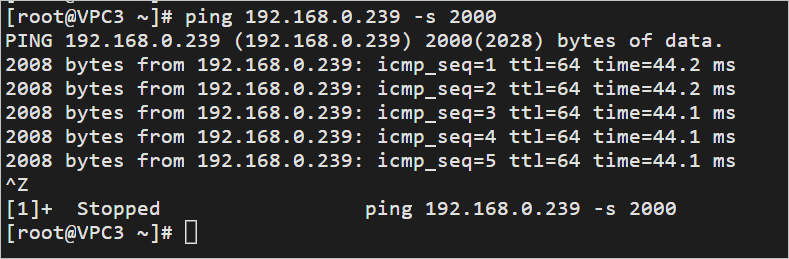
On the ECS instance, run the ping command to test whether you can access an ECS instance in VPC1.
# Send a ping packet that is 2,000 bytes in length to test whether VPC1 and VPC3 can communicate with each other across regions.
ping <The IP address of the ECS instance in VPC1>  -s 2000
The following echo reply packet indicates that VPC1 can communicate with VPC3.
-
-
Test the network connectivity between VPC2 and VPC3.
-
Log on to an ECS instance in VPC 3.
-
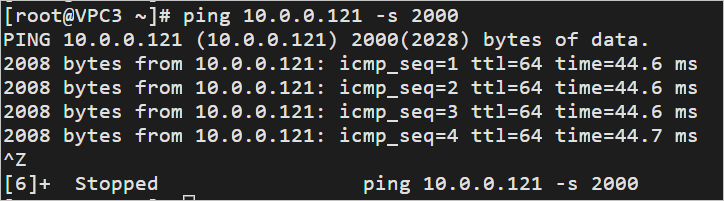
On the ECS instance, run the ping command to test whether you can access an ECS instance in VPC2.
# Send a ping packet that is 2,000 bytes in length to test whether VPC2 and VPC3 can communicate with each other across regions.
ping <The IP address of the ECS instance in VPC2>   -s 2000
The following echo reply packet indicates that VPC2 can communicate with VPC3.
-
Step 6: Mount the file system
After you configure the CEN instance, you can mount the file system across accounts and regions.
To mount a file system that uses the NFS protocol on a Linux system, see Mount an NFS file system on a Linux ECS instance.
To mount a file system that uses the SMB protocol on a Windows system, see Mount an SMB file system on a Windows ECS instance.
Related documents
To mount a NAS file system across VPCs, use PrivateLink or CEN. For more information, see Use PrivateLink to mount a NAS file system across VPCs in the same region or Use CEN to mount a NAS file system across VPCs in the same region.
To mount and access a file system from an on-premises data center, see Access a file system from an on-premises data center.
To migrate data from on-premises systems, data centers, local NAS devices, or OSS to a NAS file system, see Data migration.