Mount a NAS file system that supports the SMB protocol on a Windows ECS instance to share files across the network.
Prerequisites
-
An ECS instance running Windows is created. Create an ECS instance.
-
A General-purpose NAS file system using the SMB protocol is created in the same region and VPC as the ECS instance, and you have the mount target address. Create a General-purpose NAS file system in the console.
-
Network connectivity is established.
-
For classic network mounts, the ECS instance and NAS file system must belong to the same Alibaba Cloud account.
-
The permission group for the file system grants access to the Windows ECS instance.
-
TCP port 445 is open (required by SMB).
If port 445 is closed, Add a security group rule to allow traffic on this port.
-
Step 1: Prepare the environment
Complete these steps once per Windows server before the first mount.
-
Windows supports mounting only General-purpose NAS file systems.
-
To mount from a non-Alibaba Cloud node (on-premises server or personal computer), use Access a file system from a data center.
-
For OS selection guidance, refer to Recommended images for SMB file systems.
-
Allow insecure guest logons for the following OS versions.
-
For Windows Server 2016 and later, run the following command.
REG ADD HKEY_LOCAL_MACHINE\SYSTEM\CurrentControlSet\services\LanmanWorkstation\Parameters /f /v AllowInsecureGuestAuth /t REG_DWORD /d 1 -
For Windows Server 2025, you also need to disable SMB signing. You can use one of the following methods:
-
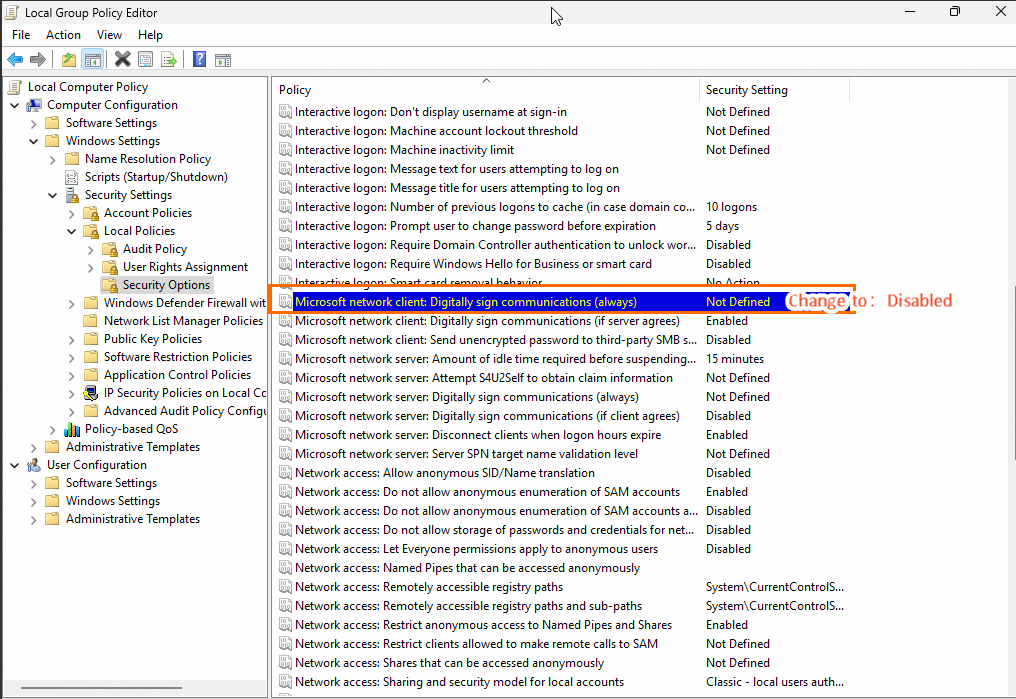
Method 1: Use Group Policy (GUI)
-
Press
Win+R, entergpedit.msc, and press Enter to open the Local Group Policy Editor. -
Navigate to . Double-click Microsoft network client: Digitally sign communications (always), select Disabled, and then click OK.
-
-
Method 2: Use the registry
If Group Policy is unavailable, disable SMB signing through the registry:
Registry editor
-
Press Win+R, enter regedit, and press Enter to open the Registry Editor.
-
Navigate to the following key:
HKEY_LOCAL_MACHINE\SYSTEM\CurrentControlSet\Services\LanmanWorkstation\Parameters. -
Find the
RequireSecuritySignatureentry and set its value to 0. -
Restart the computer for the change to take effect.
CLI
-
Open Command Prompt as an administrator and run the following command:
reg add "HKLM\SYSTEM\CurrentControlSet\Services\LanmanWorkstation\Parameters" /v RequireSecuritySignature /t REG_DWORD /d 0 /f -
Restart the computer for the change to take effect.
-
-
-
-
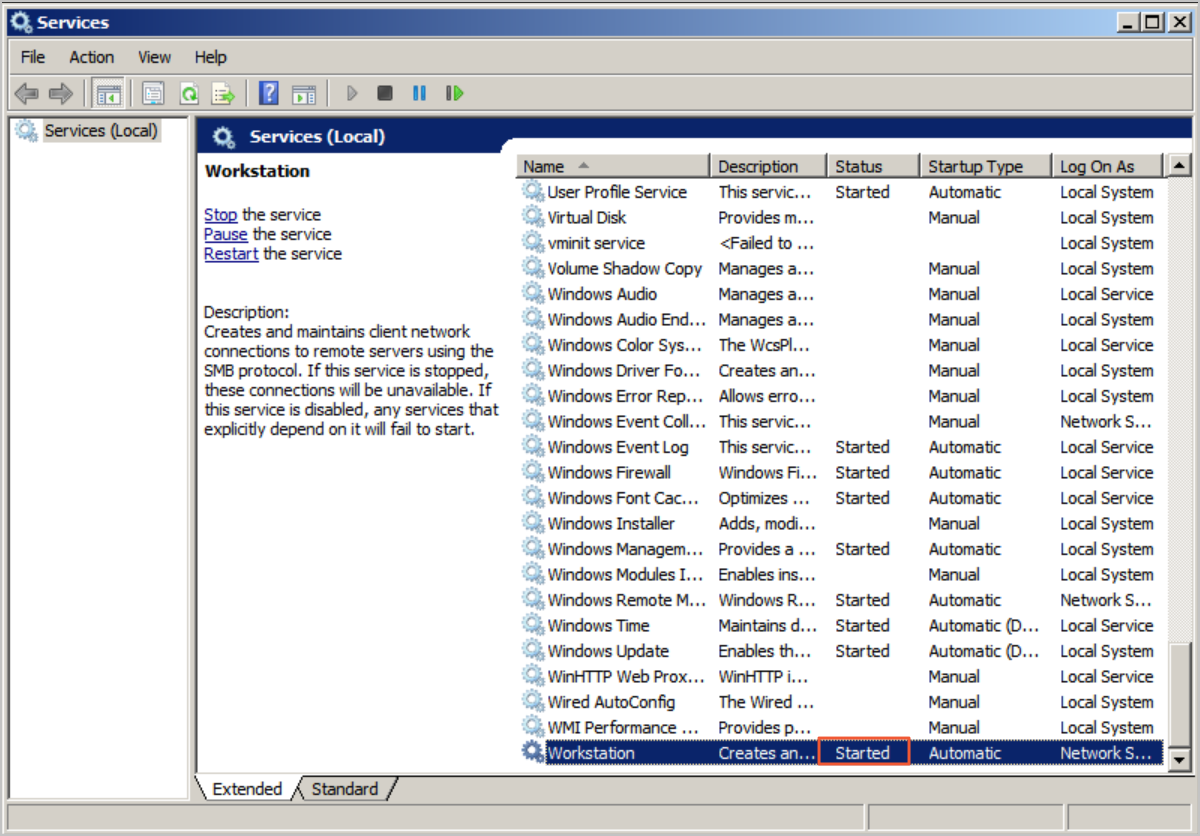
Enable the Workstation service.
-
Navigate to , or press
Win+R. In the Run dialog box, enterservices.msc, and press Enter to open the Services console. -
In the list of services, find Workstation. Verify that its status is Running and its startup type is Automatic.
By default, the Workstation service is running.
-
-
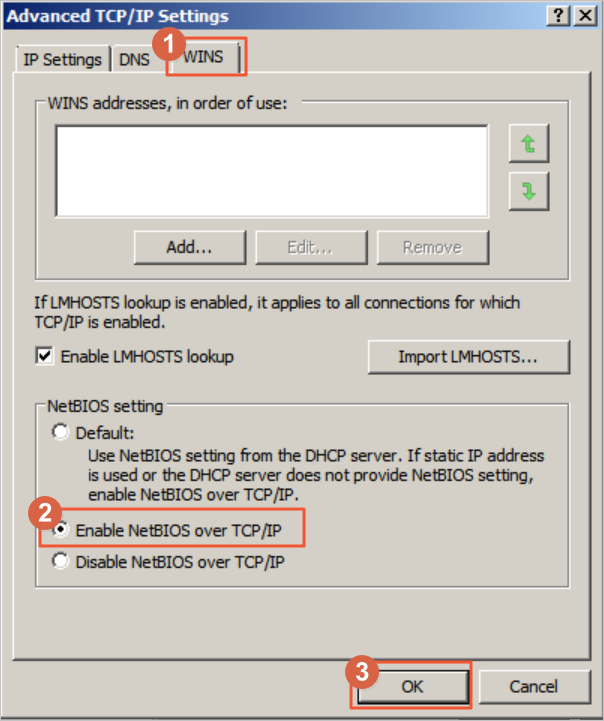
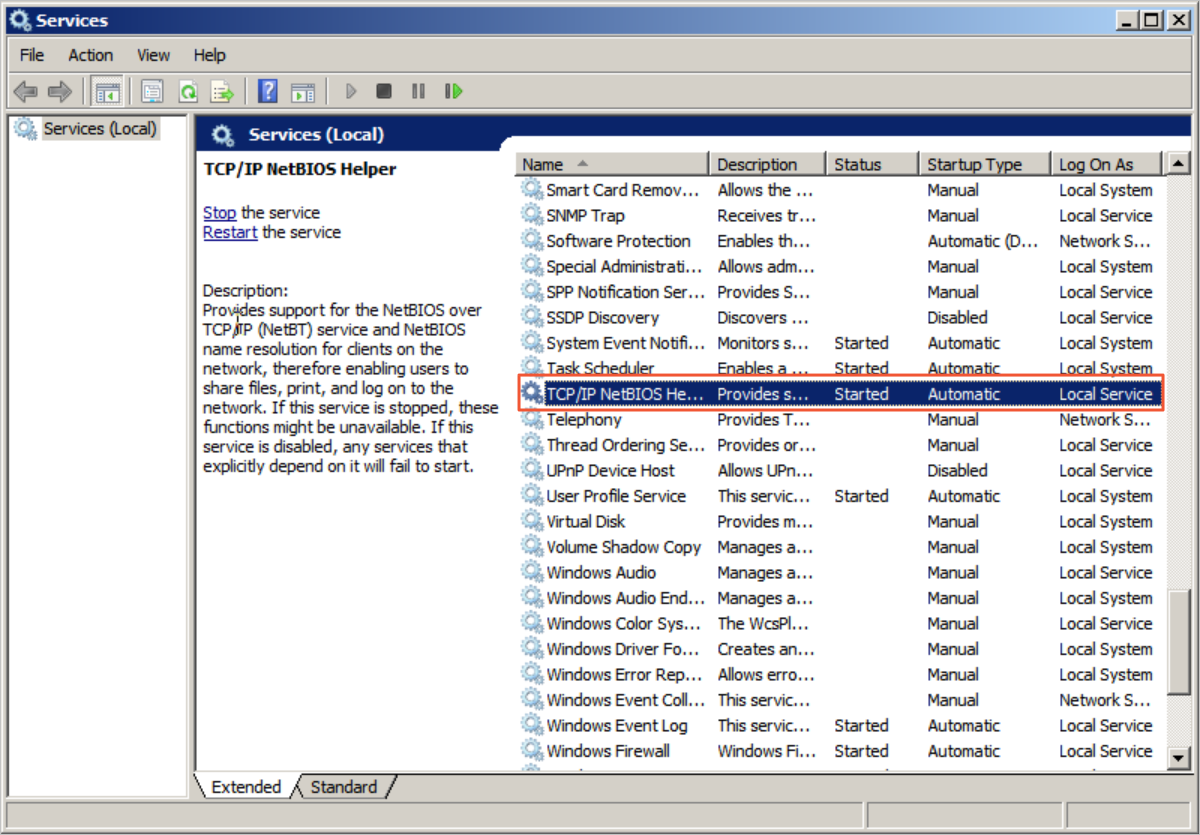
Enable the TCP/IP NetBIOS Helper service.
-
Open the Network and Sharing Center and click the active network connection.
-
Click Properties, double-click Internet Protocol Version 4 (TCP/IPv4), and then click Advanced.
-
In the Advanced TCP/IP Settings dialog box, go to the tab and select Enable NetBIOS over TCP/IP.
-
Navigate to , or press
Win+R. In the Run dialog box, enterservices.msc, and press Enter to open the Services console. -
In the list of services, find TCP/IP NetBIOS Helper. Verify that its status is Running and its startup type is Automatic.
By default, the TCP/IP NetBIOS Helper service is running.
-
Step 2: Mount the NAS SMB file system
You can mount an SMB file system manually or automatically. A manual mount does not persist across restarts. After verifying a manual mount, configure an automatic mount for persistence.
Manual mount
Mount the NAS SMB file system to your Windows ECS instance using the mount target address.
-
Open a Command Prompt window and run the following command to mount the SMB file system.
net use Z: \\file-system-id.region.nas.aliyuncs.com\myshareParameter
Description
Z
Drive letter for the mapped file system. Use another letter if Z: is taken.
file-system-id.region.nas.aliyuncs.com
Mount target address generated when you created the SMB file system. Replace with your actual address.
In the NAS console, click the target file system, and then click Mount Targets. Hover over the
 icon in the Mount Target Address column to obtain the address.
myshare
The SMB share name. Do not change this name.
For Windows Server 2019 and later, use the
New-SmbGlobalMappingPowerShell cmdlet to make the mount point accessible to all users:If prompted for credentials, enter valid workgroup credentials. For example, use workgroup\administrator with the ECS administrator password.
-
Mount command
New-SmbGlobalMapping -LocalPath z: -RemotePath \\file-system-id.region.nas.aliyuncs.com\myshare -Persistent $true -
Unmount command
Remove-SmbGlobalMapping -LocalPath z: -
Verification command
Get-SmbGlobalMapping
-
-
Verify that the NAS SMB file system is mounted.
-
Run the following command:
net use -
Example output
Output similar to the following indicates a successful mount:

If the mount fails, use Use a script for automatic troubleshooting to diagnose the issue, or check FAQ about mounting and access for common error solutions.
-
(Optional) Automatic mount
Create a startup script at c:\ProgramData\Microsoft\Windows\Start Menu\Programs\StartUp\auto_mount.bat to auto-mount the SMB file system on restart.
-
To create the
auto_mount.batscript, open a Command Prompt window and run the following command.echo %HOMEPATH%\mount.bat > auto_mount.bat -
Run the following three commands to move the script to the startup folder, grant the required permissions, and add a registry entry to run the script at logon.
MOVE auto_mount.bat "c:\ProgramData\Microsoft\Windows\Start Menu\Programs\StartUp"icacls "c:\ProgramData\Microsoft\Windows\Start Menu\Programs\StartUp\auto_mount.bat" /grant everyone:rxREG ADD HKEY_LOCAL_MACHINE\Software\Microsoft\Windows\CurrentVersion\Run /f /v MyMount /t REG_SZ /d "c:\ProgramData\Microsoft\Windows\Start Menu\Programs\StartUp\auto_mount.bat" -
To configure the
mount.batscript, run the following command.Mount without authentication
For scenarios that do not require authentication, use the following command:
echo net use z: \\file-system-id.region.nas.aliyuncs.com\myshare > "%HOMEPATH%\mount.bat"Mount with authentication
If your SMB file system uses an AD domain and ACLs, run the following command to mount the file system with specific domain credentials.
echo net use z: \\file-system-id.region.nas.aliyuncs.com\myshare /user:user@domain password > "%HOMEPATH%\mount.bat"Replace the drive letter
z, mount target addressfile-system-id.region.nas.aliyuncs.com, AD domain usernameuser@domain, and domain user passwordpasswordwith your actual values. -
Restart the ECS instance.
After the instance restarts and you log back in, run the
net usecommand to verify the mount.ImportantRestarting an ECS instance interrupts services. Perform this during off-peak hours.
Next steps
-
Configure permission groups for your NAS file system. Manage permission groups.
-
Learn about NAS performance. NAS performance overview.
-
Mount from Linux, containers, or other clients. Usage notes.
-
Set up ACLs with user-specific permissions (read-only or read-write): Build an AD domain on a Windows instance, Join an SMB file system mount target to an AD domain, and Mount and use an SMB file system on a Windows client as an AD domain user.
-
Build Windows applications on NAS. Windows applications.
-
Use NAS for content management and web service applications. Web services and content management.
-
Explore more NAS use cases. Best practices.