Microservices Engine (MSE) allows you to implement an end-to-end canary release based on MSE Ingress gateways. This way, you can implement end-to-end traffic throttling without modifying business code.
Prerequisites
-
An ACK cluster or ACK Serverless cluster is created. For more information, see Create an ACK managed cluster.
-
Microservices Governance Professional Edition is activated. For more information, see Activate Microservices Governance.
-
The MSE Ingress Controller component is installed and relevant permissions are granted to the component. For more information, see Manage components and Authorize the MSE Ingress controller.
Usage limits
The end-to-end canary release feature is integrated with the tag-based routing feature. If you use Microservices Governance to implement the end-to-end canary release feature for your applications, we recommend that you do not configure canary release rules and tag-based routing rules for the applications.
For more information about the Java versions and frameworks supported by end-to-end canary release, see Java frameworks supported by Microservices Governance.
Background information
In microservices scenarios with Spring Cloud or Dubbo applications, traffic is randomly distributed across application versions by default. This means traffic with specific characteristics may not reach the intended version. The end-to-end canary release feature addresses this by isolating specific application versions into lanes — independent runtime environments — and routing traffic that matches defined rules to the desired version. You can create lanes to isolate application versions and configure routing rules for MSE Ingress gateways to route traffic.
Scenario
This example demonstrates an end-to-end canary release from an MSE Ingress gateway to backend microservices in an e-commerce order placement scenario. The architecture consists of an MSE Ingress gateway and a Spring Cloud backend with three applications: a transaction center (Application A), a commodity center (Application B), and an inventory center (Application C). A client or HTML page accesses these backend applications, which are registered with a Nacos instance.
After a customer places an order, traffic flows through the MSE Ingress gateway and is routed to Application A, Application B, and Application C in sequence: Customer -> MSE Ingress gateway -> Application A -> Application B -> Application C.
Before releasing new versions of Application A and Application C, you must test the new version on both applications using a canary release. After the version is proven to be stable, you can release the version for both Application A and Application C. The end-to-end canary release feature, built on MSE Ingress gateways and Microservices Governance, ensures that canary traffic with specific characteristics is always routed to the canary versions across multiple applications. If an application does not have a canary version, traffic is automatically routed to its base environment.
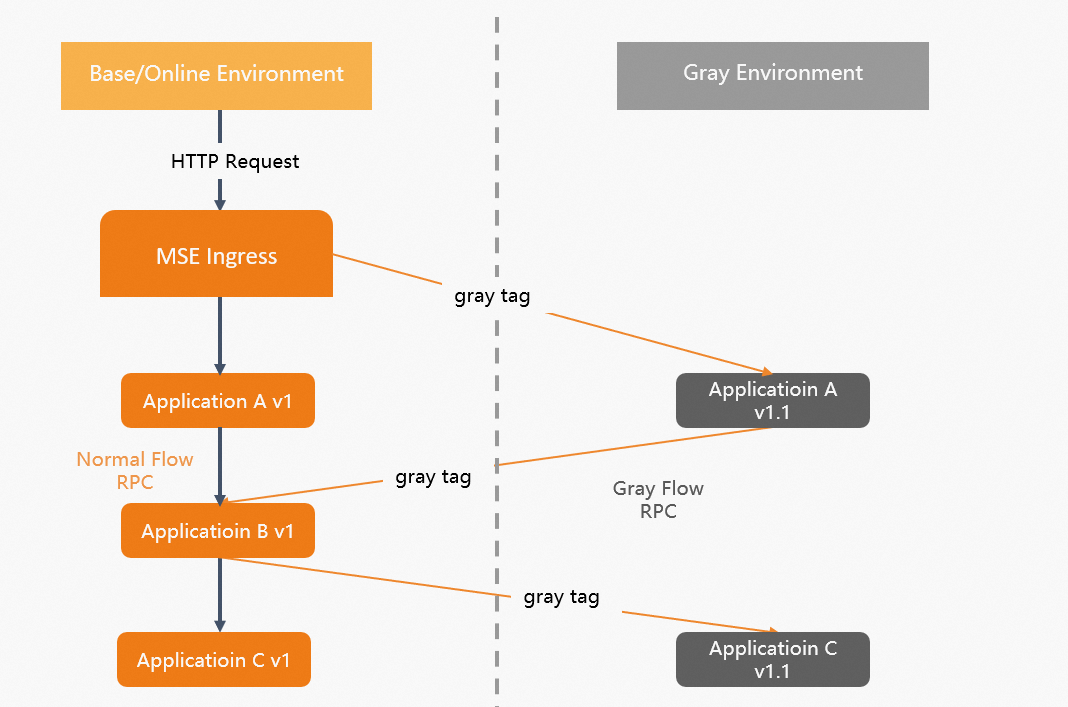
Terms
-
Lane
An isolated environment defined for applications of the same version. Only traffic that matches specific traffic control rules is routed to the applications in a lane. An application can belong to multiple lanes, and a lane can contain multiple applications. Applications have a many-to-many relationship with lanes.
-
Lane group
A collection of lanes, used to distinguish between different teams or scenarios.
-
MSE Ingress gateway
An MSE Ingress gateway manages Ingress traffic based on MSE cloud-native gateways. It is compatible with NGINX Ingress and supports over 50 NGINX Ingress annotations, enabling canary releases for multiple service versions simultaneously. With flexible service governance and comprehensive security protection, it meets the traffic governance demands of large-scale, cloud-native distributed applications.
Prerequisites
Enable Microservices Governance for applications
-
Activate MSE Microservices Governance Professional Edition.
For more information, see Activate Microservices Governance.
-
Enable Microservices Governance for applications.
Log on to the MSE console.
In the left-side navigation pane, choose . Find the cluster that you want to manage, and click Manage in the Actions column.
On the cluster details page, find the namespace that you want to manage, and click Activate Microservices Governance in the Operation column. In the message that appears, click OK.
Deploy demo applications
Log on to the Container Service Management Console.
-
In the left-side navigation pane, click Clusters.
On the Cluster List page, click the name of the destination cluster or click Details in the Actions column.
In the left navigation pane of the cluster management page, choose .
-
On the Stateless page, select a Namespaces and click Create from YAML.
-
Configure the template and click Create.
In this example, a Nacos Server application is deployed for service discovery. Applications A, B, and C are deployed. Base and canary versions are deployed for Applications A and C, and a base version is deployed for Application B.
Deploy the nacos-server application.
-
Deploy Application A.
-
YAML code for the base version
-
YAML code for the canary version
-
-
Deploy Application B.
-
YAML code for the base version
-
-
Deploy Application C.
-
YAML code for the base version
-
YAML code for the canary version
-
-
-
Configure two Kubernetes services for Application A, which is an ingress application.
Log on to the ACK console.
In the left navigation pane of the cluster management page, choose .
-
On the Service page, select a Namespaces, click Create from YAML, configure the template, and then click Create.
-
YAML code for the spring-cloud-a-base service that is deployed for the base version of Application A
-
YAML code for the spring-cloud-a-gray service that is deployed for the canary version of Application A
-
Step 1: Create a lane group
-
Log on to the MSE console, and select a region in the top navigation bar.
-
In the left-side navigation pane, choose Microservices Governance > Full link Grayscale.
-
On the End-to-end Canary Release page, click Create Lane Groups and Lanes. If a lane group already exists in the selected microservice namespace, click +Create Lane Group.
-
In the Create Lane Group panel, set the lane group parameters and click OK.
Parameter
Description
Name of Lane Group
Enter a name for the lane group.
Entry Type
Select Other Gateways.
For other gateways, such as NGINX Ingress gateways, APISIX gateways, and self-managed Java gateways, you must implement canary forwarding rules on the gateways.
Lane group involves application
Select all services involved in your ingress application or Ingress gateway.
After the lane group is created, verify that the ingress application and all involved applications are correct. You can view the lane group in the Lane Groups and Involved Applications section of the End-to-end Canary Release page. To modify the lane group information, click the
 icon on the right and update the information.
Step 2: Create a lane
-
At the top of the End-to-end canary release page, select the same region as your lane group, and then click Create First Split Lane at the bottom of the page.
If a lane already exists in the selected microservice namespace, click Create Lane.
ImportantIf the end-to-end canary release feature is enabled for applications, we recommended that you do not use the canary release and tag-based routing features for these applications.
-
In the Create Lane panel, set the parameters for the lane and click OK.
ImportantIf your gateway is an Ingress gateway, you must configure Ingress routing rules in the ACK console.
Parameter
Description
Add Node Tag
-
Configuration method: In the ACK console, add
alicloud.service.tag: ${tag}tospec.template.metadata.labelsin the YAML file of the application. -
Add a tag: Add the following key-value pairs to
spec.template.metadata.labels.-
msePilotCreateAppName:${AppName} -
alicloud.service.tag:{tag}
-
Lane Name
Enter a name for the lane.
Lane Tag
After you Add Node Tag, a list of the corresponding tags appears in the drop-down list. When you select a tag, the corresponding application is automatically added.
After the lane is created, you can view or configure its information in the Traffic Distribution section of the End-to-end Canary Release page.
-
Click the
 icon to view the traffic percentage of the lane.
-
Click the
 icon in the Actions column of the lane list to set the status of the application in the lane.
-
Enable lane: Click Enable. This activates the lane, and traffic is routed according to the lane configuration. Matching traffic is preferentially routed to the application version with the corresponding lane tag. If no tagged version exists, traffic is routed to the untagged version.
-
Disable lane: Click Close. Traffic for this application is routed to the untagged version.
-
Modify lane: Click Edit to modify the lane configuration.
-
Delete lane: Click Delete to delete the lane.
-
-
Step 3: Configure Ingress rules for base versions
If the service domain name is example.com and you want to route traffic to only base versions (online versions), use the following YAML to configure Ingress rules for the base versions.
Use the curl command to access example.com and route traffic to the base versions.
curl -H "host: example.com" http://47.98.xxx.xx/aSample result:
A[192.168.0.98][config=base] -> B[192.168.0.157] -> C[192.168.0.161]
Step 4: Configure Ingress routing rules for the canary versions
You use a header-based routing rule to distinguish base traffic from canary traffic. To route requests with the HTTP header x-user-id: 100 to canary versions when accessing example.com, configure the following Ingress routing rule. Requests are preferentially routed to the canary version of each application. If an application has no canary version, requests are routed to its base version.
The preceding code uses annotations to implement canary release, header configuration, and header control. For more information about these annotations, see Container Service for Kubernetes:Advanced usage of MSE Ingress.
Run the curl command to access example.com and route requests with the HTTP header x-user-id: 100 to the canary versions.
curl -H "host: example.com" -H "x-user-id: 100" http://47.98.xxx.xx/aSample result: canary traffic is routed to the canary versions of Applications A and C. Application B receives traffic on its base version because no canary version is available.
Agray[192.168.0.128][config=base] -> B[192.168.0.152] -> Cgray[192.168.0.151]
View the traffic monitoring charts of applications in the MSE console
-
View the monitoring chart of a single application.
-
On the Full link grayscale page, click the tab of the lane group whose monitoring information you want to view.
-
In the Lane Groups and Involved Applications section, click the name of the application whose monitoring information you want to view. The queries per second (QPS) data is displayed in the QPS data section on the right of the page.
-
-
View the monitoring charts of all applications in the lane group.
-
On the Full link grayscale page, click the tab of the lane group whose monitoring information you want to view.
-
To the right of the Application QPS Monitoring section, click View Traffic Details to see the traffic monitoring charts for all applications in the lane group.
-