When your Spring Boot application needs distributed task scheduling -- such as recurring data syncs, periodic cleanup, or timed notifications -- SchedulerX provides centralized scheduling, execution monitoring, and failure alerting without requiring you to build scheduling infrastructure. After completing this guide, your application is registered as a SchedulerX worker, and the connected instance count appears in the MSE console.
Before you begin
Make sure that you have:
A Spring Boot 2.x or 3.x project with Maven configured
(Optional) A namespace created in the MSE console to isolate resources and services across environments. For details, see Create a namespace
Workflow overview
Create a SchedulerX application in the MSE console to get connection parameters (endpoint, namespace, GroupID, and AppKey).
Add the dependency and configure your Spring Boot project with the connection parameters and a job processor class.
Verify the connection by checking the instance count in the console.
Step 1: Create a SchedulerX application
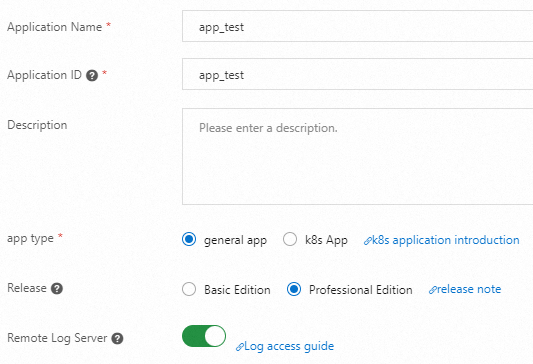
1.1 Configure basic settings
Log on to the MSE SchedulerX console and select a region in the top navigation bar.
In the left navigation pane, click Application Management. Select a Namespace, then click Create Application.
Enter the Application Name and Application ID, select the Application Type, and configure any advanced settings. Then click Next.
Make sure that resources are created in the selected region and namespace and that the resource information is valid.
The following table describes each field:
| Field | Description | Default |
|---|---|---|
| Application Name | A custom name for the application. | None |
| Application ID | The GroupID for client access. Must be unique within the namespace. Can be the same as Application Name. | None |
| Application Type | Regular App: not deployed in Kubernetes and does not use Kubernetes jobs. k8s App: deployed in Kubernetes and uses Kubernetes jobs. | Regular App |
| Edition | Select an edition based on your requirements. | Professional Edition |
| Simple Log Service | View scheduling logs (including distributed job logs) in the console. Requires a Log4j or Logback configuration in your application. | Off |
| load5 | The 5-minute load average threshold. Cannot exceed the number of CPU cores on the client machine. | 0 |
| Memory Usage | If the average memory usage in the past 5 minutes exceeds this threshold, the worker is considered busy. | 90% |
| Disk Usage | If disk usage exceeds this threshold, the client machine is considered busy. | 95% |
| Trigger Busy Machine | Whether to continue triggering job execution when the machine is busy. | On |
Expand Advanced Configuration to access additional settings:
| Field | Description | Default |
|---|---|---|
| Maximum Number Of Jobs | The maximum number of jobs supported in a group. | 1000 |
| Automatic Scale-out | Automatically scale out resources. Requires setting Global Job Count. | Off |
| Traffic Throttling | Throttle traffic to prevent overload. Requires setting Task Instance Concurrency. | Off |
| Calendar | Schedule based on Financial Day (trading days for financial business) or Workday (standard working days). | 0 |
1.2 Configure notifications
On the Notification Configuration page, select a Notification Channel and set Contacts. Supported notification channels: Text Message, Email, Webhook, and Phone. For webhook configuration details, see Webhook configuration description.
Add notification recipients: The following table describes each contact field:
Contact Group: all members receive notifications. To create a group, see Create a notification contact or notification contact group.
Contact: add individual recipients. Click Add Contact, then click Go To Create Contact and fill in the contact details.
Field Description Notification Channel Supported channels: Text Message, Email, Webhook, and Phone. Email The email address of the contact. Webhook Webhook URL for WeCom, Lark, or DingTalk. Separate multiple URLs with commas (,). For DingTalk, add the case-sensitive keyword "SchedulerX" to the robot configuration. For details, see DingTalk Developer Documentation, WeCom Developer Documentation, and Lark Developer Documentation. Mobile Phone Number The mobile phone number of the contact. 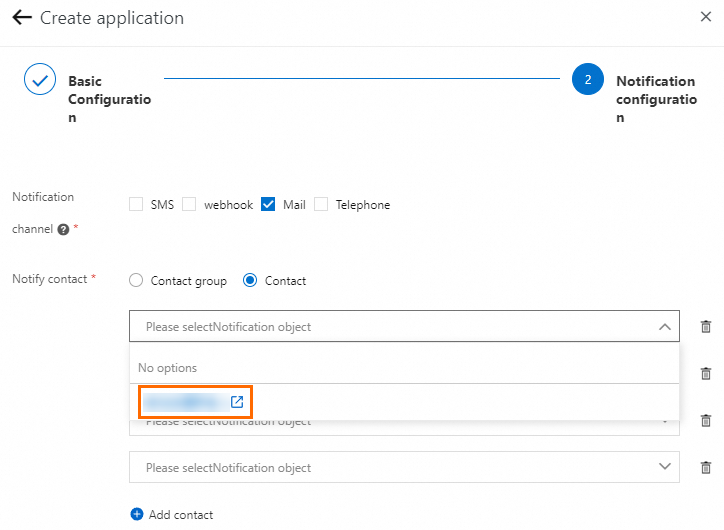

After completing the notification configuration, refresh the Application Management page and verify that the new application appears in the list under the selected region and namespace.
Step 2: Connect your Spring Boot application
2.1 Add the Maven dependency
Add the schedulerx2-spring-boot-starter dependency to your pom.xml:
<dependency>
    <groupId>com.aliyun.schedulerx</groupId>
    <artifactId>schedulerx2-spring-boot-starter</artifactId>
    <version>1.11.5</version> <!-- Replace with the latest version -->
    <!-- Exclude Log4j if you use Logback -->
    <exclusions>
        <exclusion>
            <groupId>org.apache.logging.log4j</groupId>
            <artifactId>log4j-api</artifactId>
        </exclusion>
        <exclusion>
            <groupId>org.apache.logging.log4j</groupId>
            <artifactId>log4j-core</artifactId>
        </exclusion>
        <exclusion>
            <groupId>log4j</groupId>
            <artifactId>log4j</artifactId>
        </exclusion>
    </exclusions>
</dependency>Replace 1.11.5 with the latest client version. For version information, see Client version release notes.
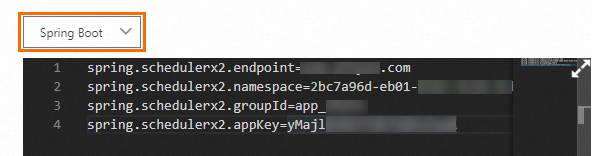
2.2 Configure connection parameters
Add the following properties to your application.properties file. Four parameters are required to connect SchedulerxWorker to SchedulerX:
# --- Required ---
spring.schedulerx2.endpoint=<your-endpoint>       # Regional endpoint (see table below)
spring.schedulerx2.namespace=<your-namespace-id>   # Namespace UID from the Namespaces page
spring.schedulerx2.groupId=<your-group-id>         # Application ID from Application Management
spring.schedulerx2.appKey=<your-app-key>           # Application key (agent 1.2.1+)

# --- Alternative authentication (if not using appKey) ---
# spring.schedulerx2.aliyunAccessKey=<your-access-key-id>
# spring.schedulerx2.aliyunSecretKey=<your-access-key-secret>
# spring.schedulerx2.stsToken=<your-sts-token>
Replace the placeholders with your actual values:
| Placeholder | Description | Where to find it |
|---|---|---|
<your-endpoint> | The regional endpoint for SchedulerX. | Endpoint list |
<your-namespace-id> | The namespace UID. | Namespaces page in the console |
<your-group-id> | The application ID (GroupID). | Application Management page in the console |
<your-app-key> | The application key. | Application Management page in the console |
To quickly find your connection parameters, go to the Application Management page, click Access Configuration in the Actions column for your application, then select Spring Boot.
The SchedulerX region and the agent region must match. Otherwise, the agent cannot connect.
If your application runs on a non-Alibaba Cloud server or in an on-premises environment, enable Internet access and create the SchedulerX application in the Internet region. For details, see Connect to SchedulerX over the Internet from an on-premises environment.
To manage multiple application groups within a single client, use comma-separated GroupIDs: spring.schedulerx2.groupId=animals.dog,animals.cat. Create each group separately in the console -- they share the same client instance.
2.3 Create a job processor
Extend JavaProcessor to handle scheduled tasks. The following example prints a message each time the job runs:
package com.aliyun.schedulerx.test.job;

import com.alibaba.schedulerx.worker.domain.JobContext;
import com.alibaba.schedulerx.worker.processor.JavaProcessor;
import com.alibaba.schedulerx.worker.processor.ProcessResult;
import org.springframework.stereotype.Component;

@Component
public class MyHelloJob extends JavaProcessor {

    @Override
    public ProcessResult process(JobContext context) throws Exception {
        System.out.println("hello schedulerx2.0");
        return new ProcessResult(true);  // Return true to indicate success
    }
}
Step 3: Verify the connection
Start your Spring Boot application.
Log on to the MSE SchedulerX console.
In the left navigation pane, click Application Management. Select the correct region and namespace.
Check the Total Instances column for your application:
Total Instances > 0: the application connected successfully. The number reflects the count of connected worker instances.
Total Instances = 0: the connection failed. Check your configuration parameters and network connectivity.

What to do next
After a successful connection, create scheduled tasks in the SchedulerX console. For details, see Create a scheduling task.
Configuration reference
All spring.schedulerx2.* properties are listed below. Only endpoint, namespace, groupId, and appKey are required.
| Property | Description | Default | Since |
|---|---|---|---|
spring.schedulerx2.enabled | Enable or disable the SchedulerX 2.0 starter. | true | 0.1.7 |
spring.schedulerx2.endpoint | Regional endpoint. See Endpoint list. | N/A | 0.1.7 |
spring.schedulerx2.namespace | Namespace UID, from the Namespaces page. | None | 0.1.7 |
spring.schedulerx2.groupId | Application ID, from the Application Management page. | N/A | 0.1.7 |
spring.schedulerx2.appKey | Application key, from the Application Management page. | N/A | 1.2.1 |
spring.schedulerx2.host | Actual IP address when multiple IPs exist (VPN, multiple NICs). | N/A | 0.1.7 |
spring.schedulerx2.port | Custom port for the client listener. A random available port is used if not set. | None | 0.1.7 |
spring.schedulerx2.blockAppStart | Block application startup if SchedulerX initialization fails. | true | 1.1.0 |
spring.schedulerx2.shareContainerPool | Share a thread pool across all task executions on the client. | false | 1.2.1.2 |
spring.schedulerx2.sharePoolSize | Thread pool size when shareContainerPool is enabled. | 64 | 1.2.1.2 |
spring.schedulerx2.label | Tags for the client. Use with task management for canary releases or stress testing. | N/A | 1.2.2.2 |
spring.schedulerx2.enableCgroupMetrics | Collect metrics using cgroup. Enable manually in Kubernetes container environments. | false | 1.2.2.2 |
spring.schedulerx2.cgroupPathPrefix | Cgroup path in the container. | /sys/fs/cgroup/cpu/ | 1.2.2.2 |
spring.schedulerx2.enableHeartbeatLog | Write heartbeat logs to ${user.home}/logs/schedulerx/heartbeat.log. | true | 1.2.4 |
spring.schedulerx2.mapMasterStatusCheckInterval | Interval (ms) for checking whether all sub-tasks are complete in the Map model. Lower values increase scheduling frequency for second-granularity jobs. | 3000 | 1.2.5.2 |
spring.schedulerx2.enableSecondDelayCycleIntervalMs | Interpret second_delay latency in milliseconds instead of seconds, increasing scheduling frequency. | false | 1.2.5.2 |
spring.schedulerx2.broadcastMasterExecEnable | Whether the primary node participates in broadcast task execution. | true | 1.8.13 |
spring.schedulerx2.broadcastDispatchRetryTimes | Maximum retries after a broadcast dispatch failure. Retry interval is fixed at 2 seconds. | 3 | 1.8.13 |
spring.schedulerx2.enableSecondDelayStandaloneDispatch | Dispatch standalone jobs every second. | false | 1.8.13 |
FAQ
For alert handling, see FAQ about alerts.
For Spring job integration issues, see Spring job issues.
For permission and connectivity troubleshooting, see FAQ about permissions and FAQ about connections.
Related topics
For other client connection methods, see Quickly connect a client to SchedulerX.