When multiple departments within an enterprise use separate Alibaba Cloud accounts, a unified data protection policy is required for centralized management. The cross-account backup feature enables a backup management account to centrally back up and restore data from cloud resources in resource accounts. This provides account-level isolation between raw data and backup data, supports centralized data protection, and meets compliance auditing requirements. Because the backup management account handles all operations, other accounts do not need to learn how to use the backup solution. This reduces overall enterprise O&M costs and improves O&M efficiency.
How it works
Cloud Backup supports two methods to authorize resource accounts for cross-account backup: resource directory-based authorization and RAM role-based authorization. The following table describes the working principles and use cases for each method.
Configure cross-account backup based on a resource directory: The backup management account and the resource accounts belong to the same resource directory. The backup management account must be either the management account of the resource directory or a delegated administrator account for the Cloud Backup service. With one click, the backup management account can add accounts from the resource directory to back up their cloud resources. The process is simple and visual. This method is suitable for enterprises with a multi-account architecture built on a resource directory and is ideal for industries such as finance and government that require strong compliance and centralized management.
Configure cross-account backup based on RAM role-based authorization: Create a RAM role in the resource account and grant permissions to the backup management account. This allows Cloud Backup to temporarily assume the role of the resource account through the service-linked role AliyunServiceRoleForHbrCrossAccountBackup of the backup management account to access the resources that need to be backed up. This method is suitable for scenarios where a resource directory is not used or when temporary or phased authorization through RAM is needed for cross-account backup.
Both methods enable the backup management account to provide unified data protection for resource accounts. You can apply a single backup policy across multiple accounts and restore backup data to any managed account as needed. Backup tasks and backup data are managed exclusively within the backup management account. Resource accounts do not need to enable or operate the Cloud Backup service. Only the backup management account can use or delete the backup data, ensuring account-level data isolation.

In a cross-account backup scenario, the backup management account and the managed resource accounts can perform the following operations:
Resource type | Operations allowed for the backup management account | Permissions for Accounts to Be Backed Up |
Entire ECS instance |
|
|
Other resource types |
|
|
Quotas and limits
Cross-account backup is supported for ECS instance backup, ECS file backup, NAS backup, OSS backup, Tablestore backup, ECS database backup, and SAP HANA backup. After an ECS instance is backed up across accounts, it can only be restored to the original Alibaba Cloud account. For specific supported scenarios, refer to the prompts in the Cloud Backup console.
The backup points of an ECS instance belong to the backup management account, but the generated ECS snapshots are stored in the resource account. This incurs ECS snapshot fees in the resource account. For more information, see Billing.
Cross-account backup does not affect backup performance, data deduplication, or network transfer efficiency.
When you configure cross-account backup based on a resource directory, the backup management account must be the management account of the resource directory or a delegated administrator account for the Cloud Backup service. You can assign up to three delegated administrator accounts for the Cloud Backup service.
For information about supported regions, see Features by region.
Prerequisites
Prepare a backup management account and one or more resource accounts.
If you want to configure cross-account backup based on a resource directory, ensure the backup management account and the resource accounts are in the same resource directory. For more information, see Enable a resource directory and Invite an Alibaba Cloud account to join a resource directory.
Decide whether to configure cross-account backup based on a resource directory or RAM role-based authorization according to your use case.
Add Accounts for Backup Using the Resource Directory
(Optional) Step 1: Set a delegated administrator account for the Cloud Backup service
If you use the management account of the resource directory as the backup management account, skip this step.
To use a member account of the resource directory as the backup management account, set this account as the delegated administrator account for the Cloud Backup service in the trusted services of the resource directory in the Resource Management console. For more information, see Manage a delegated administrator account.
Log on to the Resource Management console using the management account of the resource directory.
In the navigation pane on the left, choose .
On the Trusted Services page, click Manage in the Actions column for the Cloud Backup service.
In the Delegated Administrator Account section, click Add.
In the Add Delegated Administrator Account panel, select the backup management account.
Click OK.
After the account is added, the Cloud Backup service appears in the trusted services of the resource directory when you log on to the Resource Management console using the delegated administrator account.
Step 2: Add a resource account in the backup management account
Log on to the using the backup management account. Log on to the Cloud Backup console.
In the navigation pane on the left, choose .
On the Cross-Account Backup page, switch to the region where the resources of the resource account are located.
Click the Add Account To Back Up button.
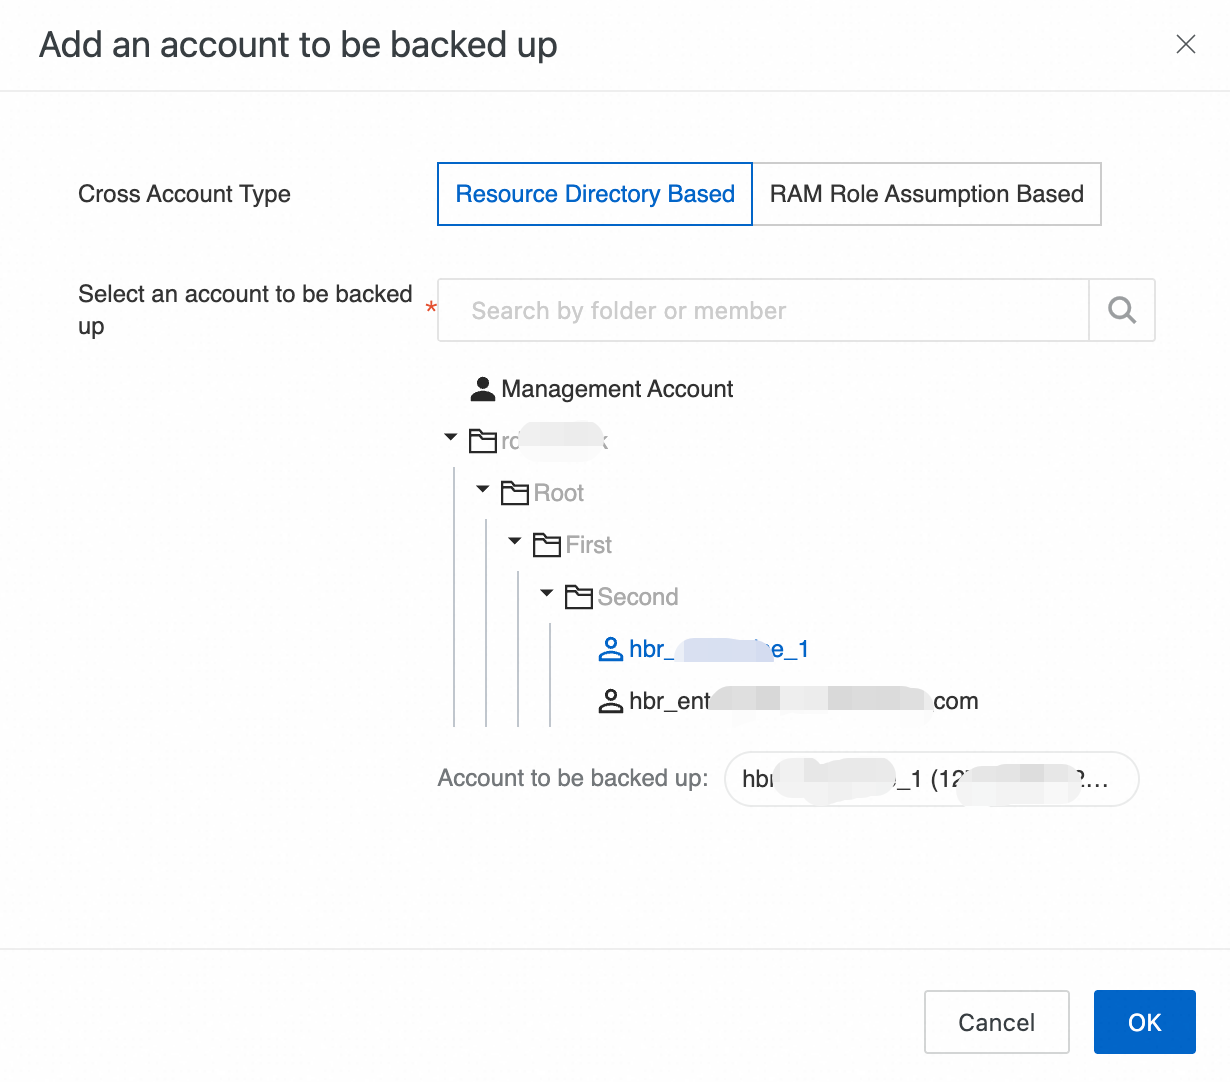
In the Add Resource Account panel, configure the following parameters and click OK.
Parameter
Description
Cross-account type
Select Based on Resource Directory.
Select Account To Back Up
Select a resource account from the resource directory.
You can select only one account at a time. You can enter a keyword to quickly find the member account.
NoteFor accounts that are in a resource directory, we recommend that you configure cross-account backup based on the resource directory. You can also configure cross-account backup based on RAM role-based authorization. For more information, see Add a resource account based on RAM role-based authorization.
After the account is added, you can see the resource account in the account list.
 When a resource account is managed for the first time, Cloud Backup automatically creates the service-linked role AliyunServiceRoleForHbrRd:
Role name: AliyunServiceRoleForHbrRd
Access policy: AliyunServiceRolePolicyForHbrRd
Description: Allows the backup service to access resources of other authorized accounts for cross-account backup and recovery.
The following actions can affect cross-account authorization and cause cross-account backups to fail. Proceed with caution.
Delete the resource account from the cross-account backup list of the backup management account.
The backup management account is no longer the management account of the resource directory or the delegated administrator account for the Cloud Backup service.
The resource account no longer belongs to the resource directory managed by the backup management account.
Delete the service-linked role AliyunServiceRoleForHbrRd from the resource account.
Existing backup data is not affected. If you want to cancel cross-account backup, see How to cancel cross-account backup.
Add a resource account based on RAM role-based authorization
Step 1: Create a service-linked role for the backup management account
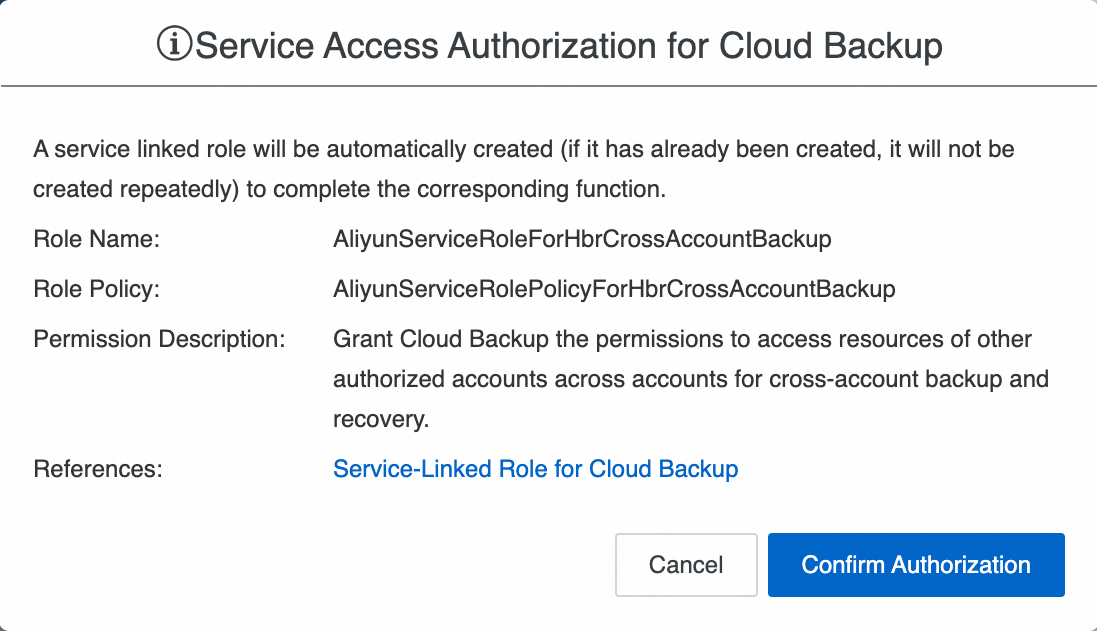
You must grant the service-linked role AliyunServiceRoleForHbrCrossAccountBackup to the backup management account.
Role name: AliyunServiceRoleForHbrCrossAccountBackup
Access policy: AliyunServiceRolePolicyForHbrCrossAccountBackup
Description: Allows the backup service to access resources of other authorized accounts for cross-account backup and recovery.
This operation is required only for the first time. If you have already granted the permissions, go to Step 2.
Log on to the using the backup management account. Log on to the Cloud Backup console.
In the navigation pane on the left, choose Backup > Cross-Account Backup.
On the Cross-Account Backup page, switch to the region where the resources to be backed up are located.
Click Add Resource Account. In the Add Resource Account panel, set Cross-account type to Based on RAM Role.
In the Cloud Backup Authorization dialog box, click OK.
 For more information, see Service-linked roles for Cloud Backup.
Step 2: Create a RAM role in the resource account
Log on to the RAM console using the resource account.
In the navigation pane on the left, choose .
On the Roles page, click Create Role.
On the Create Role page, set Select Trusted Entity to Alibaba Cloud Account. Set Select Trusted Alibaba Cloud Account to Other Alibaba Cloud Account. Enter the ID of the backup management account and click OK.
 Note
NoteGo to the Security Settings page to view your Alibaba Cloud account ID.
In the Create Role dialog box, enter a RAM role name, such as hbrcrossrole, and click OK.
Step 3: Grant permissions to the RAM role in the resource account
After you create the RAM role, you must grant a system policy or a custom policy to the role. On the Grant Permission page, RAM provides two system policies. Select one of them.
AdministratorAccess: Grants the destination account permissions to manage all cloud resources.
AliyunHBRRolePolicy: (Recommended) Grants the system permissions for Cloud Backup.
The AliyunHBRRolePolicy system policy includes the following permissions:
{
  "Version": "1",
  "Statement": [
    {
      "Action": [
        "nas:DescribeFileSystems",
        "nas:CreateMountTargetSpecial",
        "nas:DeleteMountTargetSpecial",
        "nas:DescribeMountTargets",
        "nas:DescribeAccessGroups"
      ],
      "Resource": "*",
      "Effect": "Allow"
    },
    {
      "Action": [
        "ecs:RunCommand",
        "ecs:CreateCommand",
        "ecs:InvokeCommand",
        "ecs:DeleteCommand",
        "ecs:DescribeCommands",
        "ecs:StopInvocation",
        "ecs:DescribeInvocationResults",
        "ecs:DescribeCloudAssistantStatus",
        "ecs:DescribeInstances",
        "ecs:DescribeInstanceRamRole",
        "ecs:DescribeInvocations",
        "ecs:CreateSnapshotGroup",
        "ecs:DescribeSnapshotGroups",
        "ecs:DeleteSnapshotGroup",
        "ecs:CopySnapshot"
      ],
      "Resource": "*",
      "Effect": "Allow"
    },
    {
      "Action": "bssapi:QueryAvailableInstances",
      "Resource": "*",
      "Effect": "Allow"
    },
    {
      "Action": [
        "ecs:AttachInstanceRamRole",
        "ecs:DetachInstanceRamRole"
      ],
      "Resource": [
        "acs:ecs:*:*:instance/*",
        "acs:ram:*:*:role/aliyunecsaccessinghbrrole"
      ],
      "Effect": "Allow"
    },
    {
      "Action": [
        "ram:PassRole",
        "ram:GetRole",
        "ram:GetPolicy",
        "ram:ListPoliciesForRole"
      ],
      "Resource": "*",
      "Effect": "Allow"
    },
    {
      "Action": [
        "hcs-sgw:DescribeGateways"
      ],
      "Resource": "*",
      "Effect": "Allow"
    },
    {
      "Action": [
        "oss:ListBuckets",
        "oss:GetBucketInventory",
        "oss:ListObjects",
        "oss:HeadBucket",
        "oss:GetBucket",
        "oss:GetBucketAcl",
        "oss:GetBucketLocation",
        "oss:GetBucketInfo",
        "oss:PutObject",
        "oss:CopyObject",
        "oss:GetObject",
        "oss:AppendObject",
        "oss:GetObjectMeta",
        "oss:PutObjectACL",
        "oss:GetObjectACL",
        "oss:PutObjectTagging",
        "oss:GetObjectTagging",
        "oss:InitiateMultipartUpload",
        "oss:UploadPart",
        "oss:UploadPartCopy",
        "oss:CompleteMultipartUpload",
        "oss:AbortMultipartUpload",
        "oss:ListMultipartUploads",
        "oss:ListParts"
      ],
      "Resource": "*",
      "Effect": "Allow"
    },
    {
      "Effect": "Allow",
      "Action": [
        "ots:ListInstance",
        "ots:GetInstance",
        "ots:ListTable",
        "ots:CreateTable",
        "ots:UpdateTable",
        "ots:DescribeTable",
        "ots:BatchWriteRow",
        "ots:CreateTunnel",
        "ots:DeleteTunnel",
        "ots:ListTunnel",
        "ots:DescribeTunnel",
        "ots:ConsumeTunnel",
        "ots:GetRange",
        "ots:ListStream",
        "ots:DescribeStream",
        "ots:CreateIndex",
        "ots:CreateSearchIndex",
        "ots:DescribeSearchIndex",
        "ots:ListSearchIndex"
      ],
      "Resource": "*"
    },
    {
      "Effect": "Allow",
      "Action": [
        "cms:QueryMetricList"
      ],
      "Resource": "*"
    },
    {
      "Action": [
        "ecs:DescribeSecurityGroups",
        "ecs:DescribeImages",
        "ecs:CreateImage",
        "ecs:DeleteImage",
        "ecs:DescribeSnapshots",
        "ecs:CreateSnapshot",
        "ecs:DeleteSnapshot",
        "ecs:DescribeSnapshotLinks",
        "ecs:DescribeAvailableResource",
        "ecs:ModifyInstanceAttribute",
        "ecs:CreateInstance",
        "ecs:DeleteInstance",
        "ecs:AllocatePublicIpAddress",
        "ecs:CreateDisk",
        "ecs:DescribeDisks",
        "ecs:AttachDisk",
        "ecs:DetachDisk",
        "ecs:DeleteDisk",
        "ecs:ResetDisk",
        "ecs:StartInstance",
        "ecs:StopInstance",
        "ecs:ReplaceSystemDisk",
        "ecs:ModifyResourceMeta"
      ],
      "Resource": "*",
      "Effect": "Allow"
    },
    {
      "Action": [
        "vpc:DescribeVpcs",
        "vpc:DescribeVSwitches"
      ],
      "Resource": "*",
      "Effect": "Allow"
    },
    {
      "Action": [
        "kms:ListKeys",
        "kms:ListAliases"
      ],
      "Resource": "*",
      "Effect": "Allow"
    }
  ]
}
The following example shows how to grant the AliyunHBRRolePolicy policy to the RAM role hbrcrossrole:
Log on to the RAM console using the resource account.
In the navigation pane on the left, choose .
Find the destination RAM role hbrcrossrole and go to its details page.
On the Permissions tab, click Grant Permission.
In the Grant Permission dialog box, set the permission type to System Policy, enter AliyunHBRRolePolicy as the policy name, and then click OK.
A message appears indicating that the permission is granted. Click Close.
Modify the trust policy of the RAM role.
On the details page of the current role, click the Trust Policy tab.
Click Edit Trust Policy.
Click the Script tab and copy the following code to the text box. Replace ID of the destination account with the ID of the backup management account.
This policy allows the backup management account to obtain a temporary token through Cloud Backup to operate on the resources of the resource account.
NoteYou can go to the Security Settings page to view your Alibaba Cloud account ID.
{
 "Statement": [
     {
         "Action": "sts:AssumeRole",
         "Effect": "Allow",
         "Principal": {
             "RAM": [
                 "acs:ram::ID of the destination account:role/AliyunServiceRoleForHbrCrossAccountBackup"
             ]
         }
     }
 ],
 "Version": "1"
}
Click OK.
Step 4: Add the resource account in the backup management account
Log on to the using the backup management account. Log on to the Cloud Backup console.
In the navigation pane on the left, choose Backup > Cross-Account Backup.
On the Cross-Account Backup page, switch to the region where the resources to be backed up are located.
ImportantThe backup management account must add the resource account in the same region where the ECS files, NAS, OSS, Tablestore, ECS databases, or ECS instances to be backed up are located. Otherwise, Cloud Backup cannot find the resources, and backup plan configuration or backup job execution will fail.
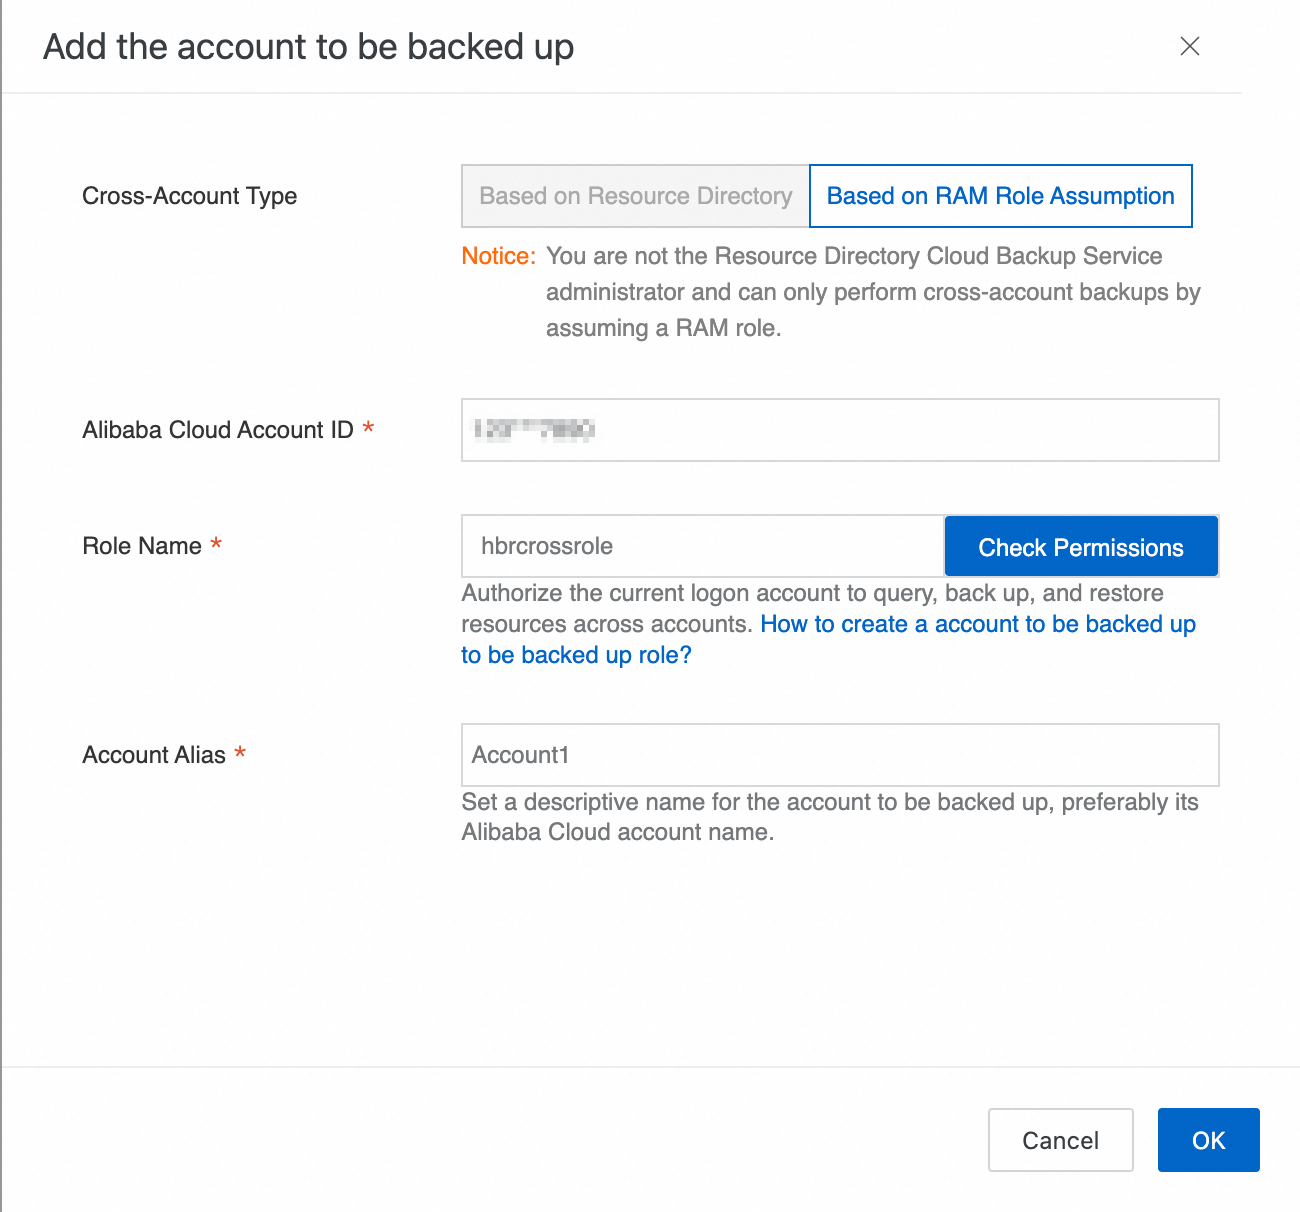
Click Add Accounts To Back Up, select Cross-account Type as Based On RAM Role Assumption in the Add Accounts To Back Up panel, configure the following parameters, and then click OK.
Parameter
Description
Cross-account type
Select Based on RAM Role. If the backup management account is a delegated administrator account for the Cloud Backup service in a resource directory, we recommend that you see Add a resource account based on a resource directory.
Alibaba Cloud Account ID
Enter the Alibaba Cloud account ID. This is the ID of the resource account.
NoteYou can go to the Security Settings page to view your Alibaba Cloud account ID.
Role Name
Enter the name of the RAM role created in the resource account, such as hbrcrossrole.
ImportantClick Check Permissions to verify the permission settings. If an error is reported, check the settings and try again. If the check is successful, the message You are authorized to access the resources of this role. appears.
Account Alias
Set an easy-to-identify name for the backup account. We recommend that you use the Alibaba Cloud account name of the resource account.
After you successfully add the account, you can view its record in the account list. This record requires a backup.

The following actions can affect cross-account authorization and cause cross-account backups to fail. Proceed with caution:
Delete the resource account from the cross-account backup list of the backup management account.
Delete the service-linked role AliyunServiceRoleForHbrCrossAccountBackup from the backup management account.
Delete the RAM role used for cross-account backup from the resource account.
The resource account does not grant the necessary permissions to the RAM role used for cross-account backup.
Existing backup data is not affected. If you want to cancel cross-account backup, see How to cancel cross-account backup.
Configure cross-account backup
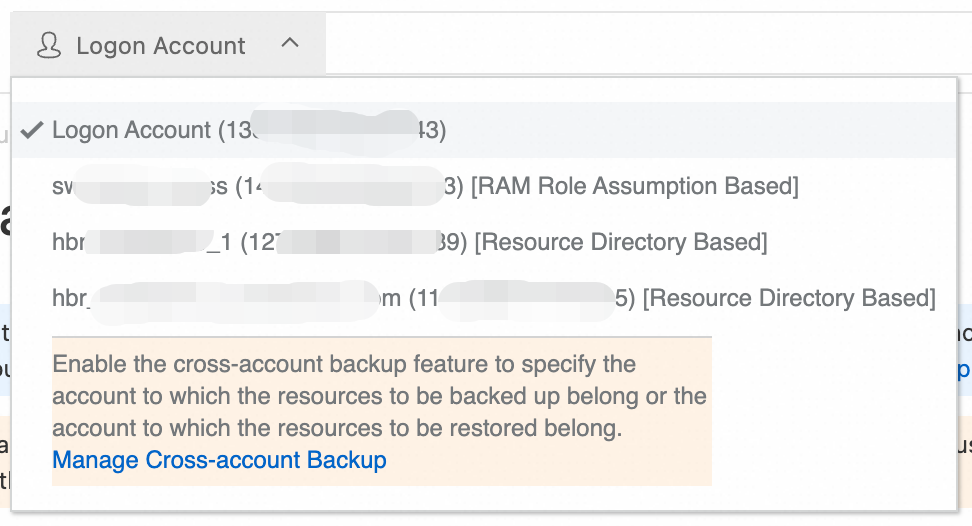
After you add a resource account, log on to the console using the backup management account and switch to the resource account from the cross-account list to configure cross-account backup for its resources.
Log on to the using the backup management account. Log on to the Cloud Backup console.
In the top menu bar, select the region where the resources to be backed up are located.
Click Logon Account and select the added resource account.
In the navigation pane on the left, select a backup feature to perform a cross-account backup.
ImportantCross-account backup is supported for ECS file backup, ECS instance backup, NAS backup, OSS backup, Tablestore backup, ECS database backup, and SAP HANA backup. After an ECS instance is backed up across accounts, it can only be restored to the original Alibaba Cloud account. For specific supported scenarios, refer to the prompts in the Cloud Backup console.
Take ECS file backup as an example. First, switch the resource account in the upper-left corner to the account where the ECS instance to be backed up is located. Then, in the ECS instance list, select the ECS instance. Create a new backup policy or select an existing one and attach it to the ECS instance of the resource account to complete the backup plan configuration. After the backup job is successfully executed, the ECS file data of the resource account is backed up to the backup vault of the backup management account.
ImportantA backup vault can store backup data from different accounts at the same time. A backup policy can be attached to data sources from different accounts at the same time to achieve unified data protection for resources of different types across multiple accounts. Before you configure a cross-account backup plan, make sure that all prerequisites are met.
Cross-account restoration
The backup vault of the backup management account stores the backup data of the management account or resource accounts. You can restore data from any historical backup point in the backup vault to the backup management account or any resource account as needed. The following example shows how to restore data to a resource account:
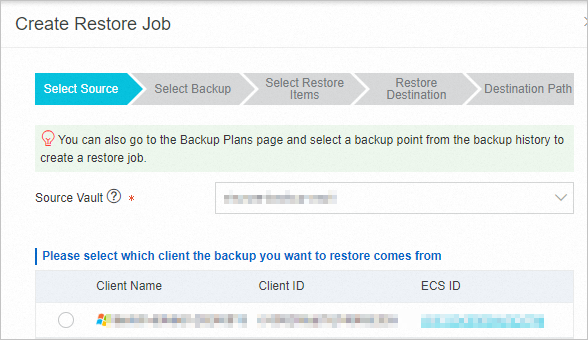
Switch to the destination account to which you want to restore the backup data.
Create a restore job. The steps to create a restore job are the same as the steps to restore each data source.
Restore an ECS database (Restore MySQL, Restore Oracle, Restore SQL Server)
Usage recommendations
Cross-account type selection: Choose a suitable cross-account configuration method based on your enterprise's account structure. For multi-account scenarios that do not use a resource directory or for cross-enterprise collaboration, we recommend that you configure cross-account backup based on RAM role-based authorization. For multi-account architectures within an enterprise that use a resource directory, we recommend that you configure cross-account backup based on the resource directory for unified control and permission management.
Least privilege configuration: Use the AliyunHBRRolePolicy system policy instead of AdministratorAccess to avoid security risks from excessive permissions. Grant only the minimum set of permissions required for backup and recovery. We recommend that you regularly review the cross-account backup permission settings and promptly revoke unnecessary cross-account access permissions.
Region planning: Add cross-account configurations based on the regions where the resources to be backed up are located to ensure backup performance and data transfer efficiency. Prioritize configuring cross-account backup capabilities in regions with a high concentration of resources.
Cost control: The cross-account backup feature itself is free. For other fees, see Billing. Plan your backup policies and retention periods reasonably to control storage costs.
How to cancel cross-account backup
After you cancel cross-account backup, the backup management account can no longer back up data from the resource account. Evaluate the impact before you proceed.
If the backup management account only adds a resource account but does not perform any backup or recovery operations, no fees are incurred.
After you cancel cross-account backup, the existing backup data remains in the backup vault of the backup management account and can be restored to the current account or other managed accounts. This data continues to occupy storage capacity, and Cloud Backup will continue to charge for the capacity. If you want to stop billing, see How do I stop billing for Cloud Backup?. Note that data cannot be recovered after it is deleted.
Switch to the resource account. On the page for the corresponding data source, delete backup plans, uninstall backup clients (if any), unregister instances, and delete backup vaults. For more information, see How do I stop billing for Cloud Backup?.
Switch to the backup management account. On the Cross-Account Backup page of the Cloud Backup console, delete the resource account.

If cross-account backup was configured based on a resource directory, delete the service-linked role AliyunServiceRoleForHbrRd from the resource account.
You can log on to the Resource Access Management (RAM) console with the account that requires backup.
In the navigation pane on the left, choose .
Find the service-linked role AliyunServiceRoleForHbrRd created for the resource account. In the Actions column, click Delete Role and confirm the deletion.
If cross-account backup was configured based on RAM role-based authorization, delete the RAM role created in the resource account.
Log on to the RAM console using the resource account.
In the navigation pane on the left, choose .
Find the RAM role created for the resource account, such as hbrcrossrole. In the Actions column, click Delete Role and confirm the deletion.
Billing
The cross-account backup feature provided by Cloud Backup is free of charge. However, fees are incurred for backup and recovery. For more information, see the following table. For more information, see Billing methods and billable items.
Resources to back up in the account | Billable items for the backup management account | Billing Item for Accounts Requiring Backup |
Entire ECS instance |
|
|
ECS file |
| Resource fees for cloud disks that are used after data is restored from a backup point |
NAS |
|
|
OSS |
|
|
Tablestore |
|
|
ECS database |
| Resource fees for cloud disks that are used after data is restored from a backup point |
SAP HANA |
| Resource fees for cloud disks that are used after data is restored from a backup point |
FAQ
Is the cross-account backup feature free?
The feature itself is free. The backup management account is responsible for the fees incurred during backup and recovery. However, the resource account is still responsible for the snapshot service fees for ECS instance backups and OSS request fees. For more information, see Billing.
What is the difference between cross-account replication of backup vaults and cross-account backup? What are their respective scenarios?
Cross-account replication of backup vaults: The source account has already performed backups and generated backup data. The source account copies the data from its own backup vault to another Alibaba Cloud account. In this case, both accounts have a copy of the backup data. This achieves data redundancy or allows cross-account use.
Cross-account backup: The backup management account centrally issues backup policies to resource accounts. The backup data from the resource accounts is stored in the backup management account. The backup management account can use this data for on-demand recovery operations, achieving centralized management of backup data. The resource accounts cannot view or manage the backed-up data.
Both methods are widely used in enterprise data security and compliance scenarios. Both support account-level data isolation for accounts within and outside a resource directory. Choose the method based on your enterprise's specific needs. You can also use both methods together to achieve both centralized management and redundancy of backup data.