If a system fault or accidental operation damages data in a Tablestore instance, you can restore table data from a backup vault to the original instance or a different instance in the same account and region. Each restore job restores one table at a time, including both table data and, optionally, search indexes.
Prerequisites
You have created a Tablestore backup plan and completed a backup.
Billing details
-
Restoring data to Tablestore incurs data write throughput fees charged by Tablestore. For more information, see Tablestore billing methods.
-
For the first 30 days, Cloud Backup offers Tablestore backup free of charge. After 30 days, Tablestore backup is billed as follows:
-
During backup: Cloud Backup charges for backup storage capacity. Tablestore does not charge for read traffic.
-
During restoration: Cloud Backup does not charge for restoration. Tablestore charges fees for data restoration.
-
Usage notes
-
If you use a KMS key for encryption during a backup, you cannot restore the backup data from the backup vault if the KMS key is disabled or deleted. Make sure that the KMS key remains active before you start a restore job.
-
Cloud Backup does not support restoring data directly to a table that contains a secondary index. To restore data, you must delete the secondary index from the destination table before you run the restore job. After the data is restored, you can recreate the secondary index. Recreating a secondary index is free of charge.
After you create a backup plan, the first backup job is a full backup. Subsequent backup jobs are incremental backups by default.
Procedure
Step 1: Open the Create Restore Job panel
Log on to the Cloud Backup console.
-
In the navigation pane on the left, choose .
In the top navigation bar, select a region.
-
In the Actions column of the desired instance, click Restore or choose ... > Restore to This Instance.
-
If you click Restore, the source instance is the current instance and cannot be changed.
-
If you choose Restore to This Instance, the destination instance is automatically set to the source instance, but you can change it as needed.
-
Step 2: Configure the data restoration parameters
In the Create Restore Job panel, configure the restoration parameters. The available parameters depend on how you opened the panel.
Parameters when you click Restore
| Parameter | Description |
|---|---|
| Source Database | The Tablestore instance from which to restore. This field is set automatically and cannot be changed. Note
For Tablestore, this refers to the Tablestore instance, not a relational database. |
Parameters when you choose Restore to This Instance
| Parameter | Description |
|---|---|
| Source Vault | The backup vault that contains the data you want to restore. |
| Backed Up Instance | The backed-up instance to restore from the specified backup vault. |
Common parameters
| Parameter | Description |
|---|---|
| Recoverable Tables | Select the table to restore. The list shows only tables that were included in the backup plan. Tables that were not backed up do not appear. A single restore job can restore the data and search indexes of only one table. Note
If the destination table does not exist, the restore job creates a new table based on the schema of the backed-up table. |
| Recoverable Time Point | Select a time range. Available time points are based on the backup plan schedule. |
| Choose Recovery Point | Select a point in time within the chosen range by dragging the timeline slider. |
Step 3: Configure the restore options
Configure the restore options, then click Next.
By default, the system regenerates auto-increment primary key columns and restores search indexes.
| Restore option | Default | Description |
|---|---|---|
| Regenerate Auto-increment Columns | Enabled (cannot be changed) | Regenerates the auto-increment primary key column for the data table during restoration. If the table did not have an auto-increment primary key column when it was backed up, this setting has no effect. |
| Restore Search Indexes | Enabled (can be disabled) | Restores the search indexes associated with the table. If the table did not have a search index when it was backed up, this setting has no effect. |
| Search Index Suffix | Auto-generated timestamp (optional) | Suffix appended to search index names during restoration. The system generates a timestamp-based suffix by default. |
Auto-increment column behavior during restore: When you restore a table with an auto-increment column, only putRow operations are restored. In an incremental backup, Cloud Backup ignores updateRow and deleteRow operations on tables with auto-increment columns. If you performed multiple putRow operations on the same row in the source table (where the values of other primary key columns are the same), each putRow operation creates a new row after restoration because the values of the auto-increment column are regenerated.
Step 4: Set the destination instance
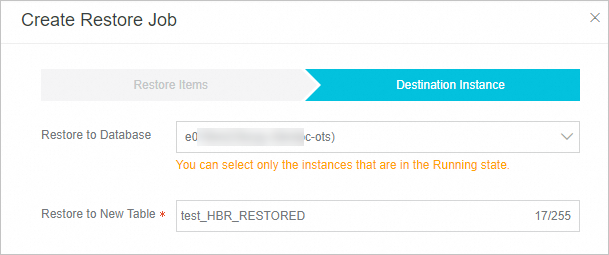
| Parameter | Description |
|---|---|
| Restore to Database | Select the destination Tablestore instance. The list shows all Tablestore instances in the Running state under your account. Selecting a different instance restores data across instances within the same account and region. Note
For Tablestore, this refers to the Tablestore instance, not a relational database. |
| Restore to New Table | The system generates a new table name by default. Change the table name as needed. |
-
When restoring to the source table, select the same table name as the backup.
-
When restoring across Tablestore instances, do not use the name of an existing table for the new table.
-
The restore job overwrites rows in the destination table that have the same primary key. Other rows are not affected.
-
If you restore to an existing table, the schema of the destination table must be the same as the source table. You also need to set a proper max version offset and time to live for the destination table to prevent write failures during restoration or data from expiring immediately after restoration. If the schema of the destination table is different from the backed-up table, the restoration may fail.
-
Cloud Backup does not support restoring data directly to a table that contains a secondary index. Delete any secondary indexes on the destination table before you start the restore job. You can recreate them after the restoration completes, free of charge.
Step 5: Submit the restore job
Click OK.
Verify the restore result
After the restore job is created, track its progress and verify the restored data.
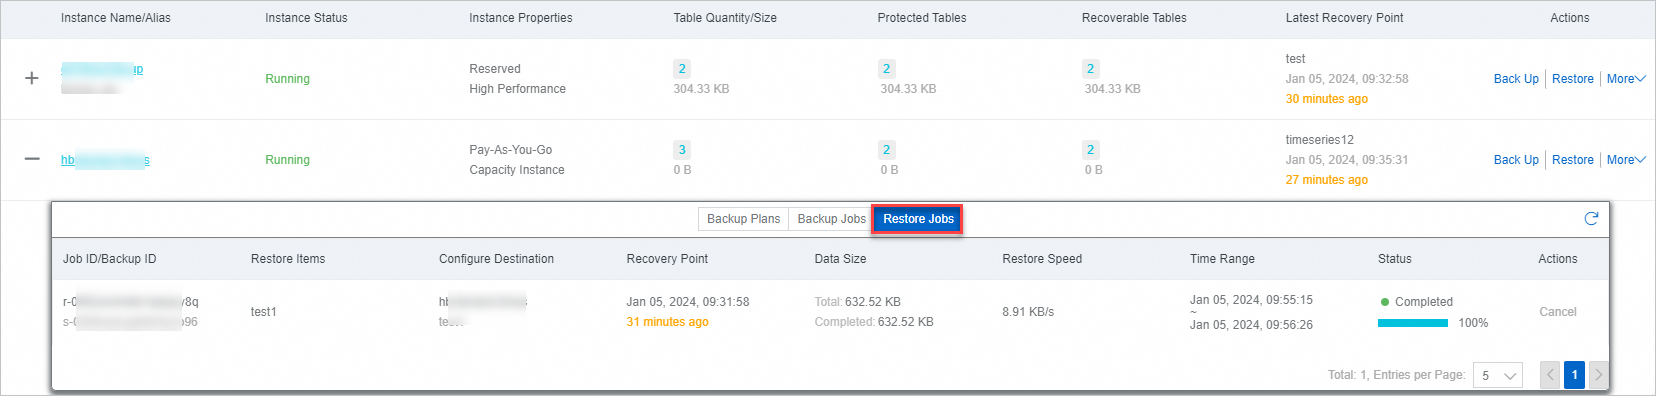
-
In the Cloud Backup console, go to the Restore Jobs tab. Check the Status column for the restore job you created. When the Status changes to Completed and the progress reaches 100%, the data restoration is complete.
-
Log on to the Tablestore console to verify the restored data in the destination instance. Confirm that the expected table exists and that the data is correct.
-
If you disabled Restore Search Indexes during the restore or if you had to delete a secondary index before the restore, recreate the indexes as needed.
References
-
Cloud Backup offers discounted resource plans for various backup scenarios. For more information, see Purchase a resource plan.
-
For an overview of Cloud Backup, see What is Cloud Backup?.