To prevent data loss from events such as accidental file deletion or server viruses, use Cloud Backup to back up all directories and files on your ECS instances. Cloud Backup uses flexible backup policies to back up data to the cloud, where you can view and restore it at any time. This topic describes how to use Cloud Backup to back up files on an ECS instance.
Prerequisites
You have activated the Alibaba Cloud Cloud Backup service. Activating Cloud Backup is free of charge, but you are charged software usage fees (file backup software usage fees) and storage capacity fees when you use the ECS file backup feature of Cloud Backup. For more information, see ECS file backup pricing.
Usage notes
For optimal backup speed, run the backup client on a machine with a 64-bit dual-core CPU or higher and more than 8 GB of available memory.
The backup capacity is determined by the available system memory. A system with 4 GB of available memory can back up a maximum of 1 million files, with a total data size of up to 8 TB. If a directory contains tens of millions of files or more, we recommend that you use a system with at least 16 GB of available memory.
When you create a backup plan or bind a backup policy for the first time, Cloud Backup automatically creates the AliyunServiceRoleForHbrEcsBackup service-linked role to obtain permissions to access related resources. A dialog box appears for role authorization. Grant the permissions as prompted.
The ECS backup client requires Cloud Assistant. For ECS instances purchased before December 1, 2017, you must manually install the Cloud Assistant Agent.
Starting from backup client v2.31.0, the system automatically excludes specific directories and their contents during ECS file backups. The default exclusion rules are as follows:
NoteYou can view the list of default excluded directories by clicking the tooltip icon next to the Exclude system folders option when you create a backup plan.
For Linux file systems, the following directories are excluded by default:
/bin/,/usr/bin/,/sbin/,/usr/sbin/,/srv/,/selinux/,/lib/,/lib32/,/lib64/,/boot/,/run/,/dev/,/proc/,/sys/,/var/run/,/lost+found/, and the client installation directory.For Windows file systems, the following paths are excluded by default:
Windows\,python27\,Program Files (x86)\,Program Files\,ProgramData\,Boot\,$RECYCLE.BIN\,System Volume Information\,Users\Administrator\NTUSER.DAT,Users\Administrator\ntuser.dat.LOG*,Users\Administrator\UsrClass.dat,Users\Administrator\AppData\Local\Microsoft\Windows\UsrClass.dat,$Recycle.Bin,hiberfil.sys,pagefile.sys, and the client installation directory.
Create a backup plan
Log on to the Cloud Backup console.
In the left-side navigation pane, choose .
In the top navigation bar, select a region.
On the ECS File Backup page, click the ECS Instances tab. Find the target instance and click Back Up in the Actions column.
In the Create backup plan panel, configure the parameters as described in the following table and click OK.
ImportantIn regions that support backup policies, you can create a backup plan only by associating it with a backup policy. Cloud Backup then uses that policy to periodically back up the ECS files.
In the left-side navigation pane of the console, click Policy Center to view the regions that support backup policies. To learn how to create a backup policy, see Create a backup policy.
Parameter
Description
Backup Folder Rule
Specify the directories to back up. Cloud Backup includes all files and subdirectories within the selected directories.
Select All Folders or Specified Folders.
If you select All Folders, select whether to enable Exclude System Folders.
If you enable Exclude System Folders, Cloud Backup omits the default system directories for Windows and Linux from the backup plan.
Click the
 icon next to Exclude System Folders to view the details of the excluded system directories.
If Exclude System Folders is not enabled, all directories are included in the backup plan.
If you select Specified Folders, you must specify the Source Paths. Click Add Folder to add multiple backup directories.
The source path rules are as follows:
Without using a wildcard character (*), you can enter up to eight paths.
When using a wildcard character (*), you can enter only one path. Wildcards such as
/*/*are supported.Each line must be an absolute path, such as a path that starts with
/,\\,C:\, orD:\.Volume Shadow Copy Service (VSS) does not support multiple paths, UNC paths, wildcards, or file exclusions.
UNC paths do not support VSS, wildcards, or file exclusions. If the backup source includes a UNC path, Windows ACLs are not backed up.
Exclude System Folders
Turn on the Exclude System Folders switch to exclude system directories from the backup.
Backup File Type
Select All Types or Specified Type.
If you select All Types, all file types are backed up.
If you select Specified Type, you must specify the file types to back up in the Select File Type box.
Backup Policy
Select a backup policy from the drop-down list.
Cloud Backup automatically backs up your data source based on the selected backup policy. A backup policy defines key settings such as the encryption method for the backup vault, backup interval, retention period, cross-region replication, automatic archiving, and backup point virus detection. This allows you to flexibly manage your data source assets.
If the default backup policy does not meet your requirements, click Create policy or Edit policy to manage your backup policies. For more information about the parameters in a backup policy, see Policy center.
Enable Bandwidth Throttling
Bandwidth throttling helps you control backup traffic during peak business hours to avoid affecting your services.
To use this feature, turn on the Use bandwidth throttling switch, select a Time Range based on your business needs, enter the Max bandwidth (MByte/s) for the backup job, and then click Add.
Successful backups
At the scheduled time, Cloud Backup runs the backup job.
NoteThe backup progress percentage is a dynamic estimate based on the current data volume and is for reference only. It does not represent the exact completion ratio. During the backup process, the total scanned size displayed may be smaller than the actual total data volume because the data scan may not be complete. Rely on the final job status to confirm completion.
On the Backup jobs tab, if the Status of a backup job is Completed, the backup is successful.
You can view details about the backup job, such as Total scanned size, Backup completion size, Backup vault written size, and Backup speed. For more information about these metrics, see the tooltips in the Cloud Backup console.
NoteFor backup jobs completed on or after June 1, 2025, Cloud Backup displays statistics for both data volume and file count for Total scanned size, Backup completion size, and Backup vault written size. For backup jobs completed before this date, these metrics show only data volume statistics.
The job list displays only backup job records from the last six months. To view older jobs, export them from the Audit Report page.

On the Backup Plans tab, click the
 icon next to the target ECS instance to view the backup records and the generated backup points in the Backup history. You can use these historical backup points to restore ECS files.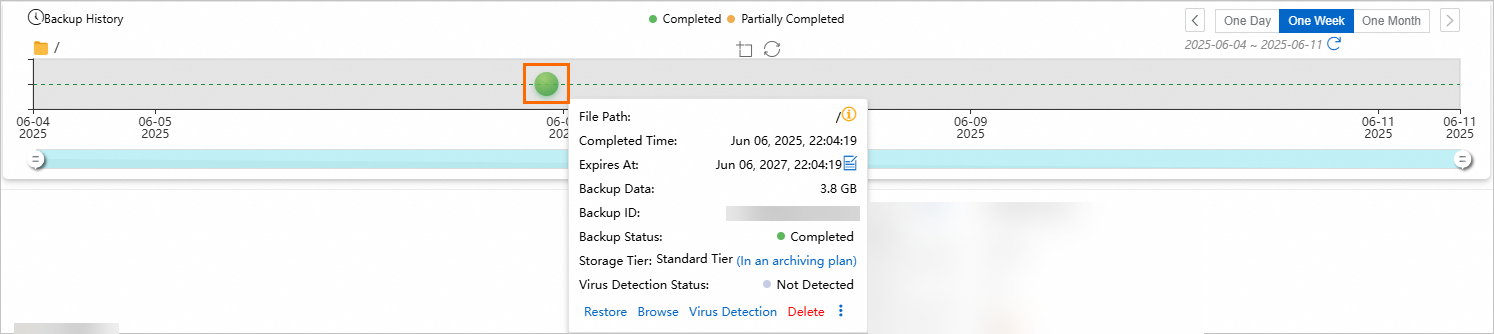
Troubleshooting
If the Status of the client or a backup job is abnormal, refer to the following suggestions.
Client Status: Not Installed
If the backup client is not installed on the ECS instance, the instance is not protected by backups. We strongly recommend creating backups for important data.
You do not need to manually install the backup client to back up files on an ECS instance. When you create a backup plan for the ECS instance, Cloud Assistant automatically installs the client. After installation, the Client Status changes to Activated, and the client version number is displayed.
The backup status is Failed.
Follow the prompts on the interface to check and correct the configuration.
Check the logs to find the specific ErrorCode.
NoteThe default installation paths for the backup client are for reference only. Use the actual installation path in your operations.
Windows log path: Local Disk (C) > Program Files > Aliyun Hybrid Backup Service Client > logs
Linux log path: /opt/alibabacloud/hbrclient/logs
The backup status is Partially Completed.
Download the list of files that failed to back up, resolve the errors for each file based on the messages, and then run the backup job again.
NoteIf you use the VSS feature when backing up files on a Windows ECS instance, the file path in the error message may include
shadow_ali_ids. This is an internal path used for VSS snapshots and can be safely ignored. For example, if the error message shows the pathE:\shadow_ali_ids\test, the actual file path isE:\test.
Browse and download backup files
Browse backup files
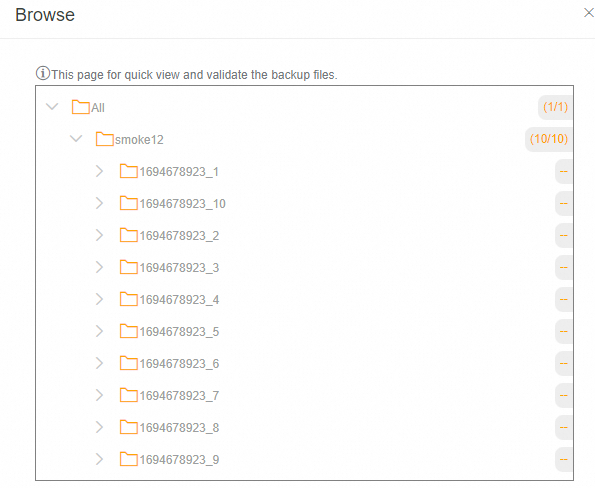
The Browse feature lets you view backed-up files. If a virus scan was performed on the backup point you are browsing, Cloud Backup marks any files that are infected.
On the Backup Plans tab, find the target client and click
 .
.In the Backup History, find the backup point for the desired time, click the backup point, and select Browse.
Download backup files
Backed-up files cannot be downloaded directly. To retrieve them, you must first restore them to a specific location. For example, during a restore job, set Restore Path Type to Specify Path and set Destination Path to
/temp/path. You must create this path before you start the restore job, or the job will fail. After the restore job completes, the files appear in the destination path.
Extend backup point retention
To store historical backup data for longer, you can extend the retention period of a backup point.
The retention period of a backup point can only be extended, not shortened.
You cannot extend the retention period for backup points that are set to be retained permanently.
On the Backup Plans tab, click the
 icon next to the target ECS instance.
In the Backup History, click the backup point you want to extend. Set a specific time or select Never Expire.
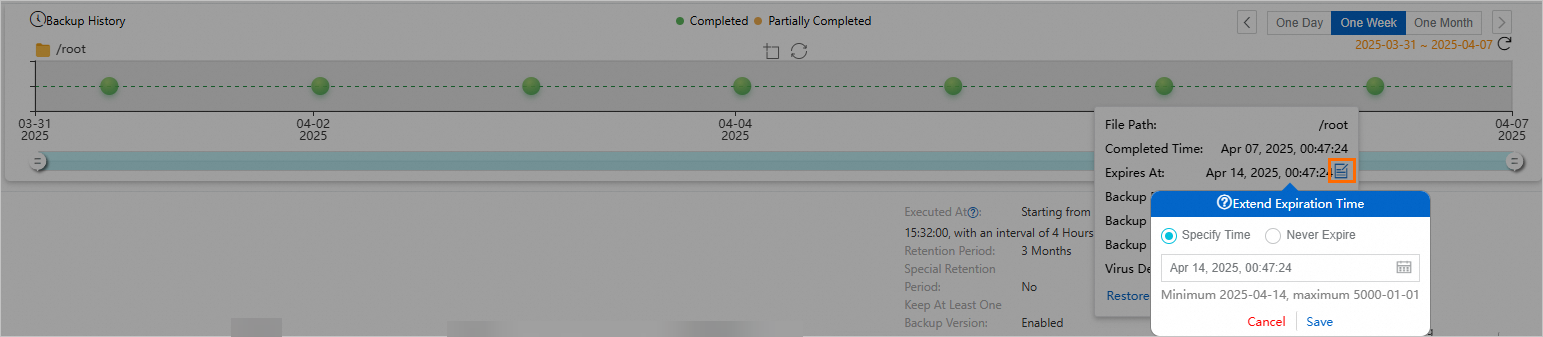
Click Save.
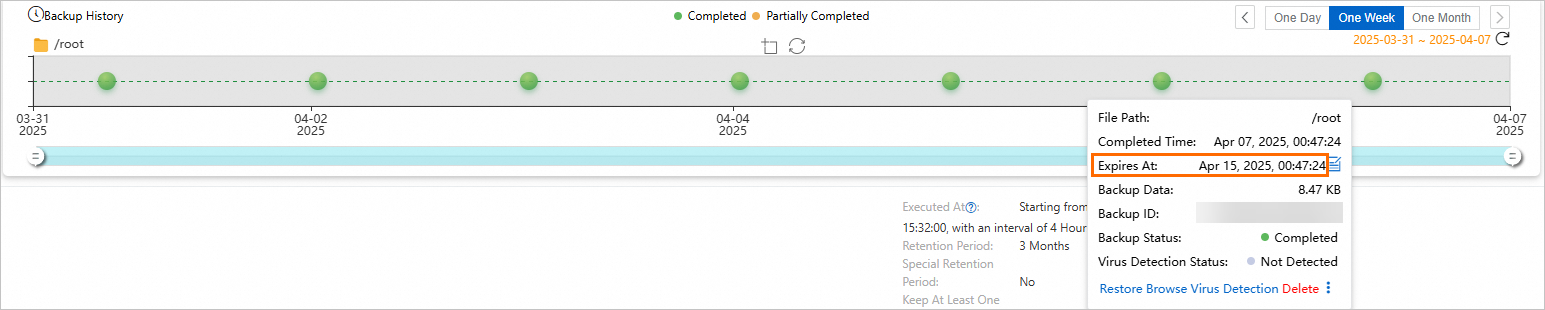
After the setting is complete, you can view the new expiration time in the Expires at column.
Virus scan
To prevent files that contain viruses from being restored to your production environment, the Cloud Backup service provides the Backup Point Virus Detection feature. This feature scans for viruses so you can select a clean backup point for restoration. You can click Virus Detection to check files for viruses. For more information, see Backup point virus detection.
Reinstall the backup client
Before you install the client, check the client installation path:
If a NAS directory is mounted to the installation path, you must use the
umountcommand to unmount the NAS directory to prevent accidental deletion of NAS files.If the installation path contains other important directories and files, move them to another directory to prevent accidental deletion.
Method 1: Quick installation from the console
On the ECS Instances tab, find the target instance. In the Actions column, choose . After the installation is complete, the client status updates to Activated.

Method 2: Manual installation
Download the backup client.
Open the Cloud Backup console. On the On-premises file backup page, go to the Clients tab and click Add client.
In the Add client panel, download the Windows or Linux client based on the operating system of your ECS instance.
Install the backup client on the target ECS instance.
Upload the downloaded client to the ECS instance. For more information, see Upload or download files on the instance details page.
Follow the installation method corresponding to the operating system of your ECS instance.
Windows: After decompressing the client installation package, double-click the installer and follow the on-screen instructions. During the installation process, select ECS file backup client as the client installation type.
Linux: After you connect to the instance by using Workbench, decompress the client installation package, navigate to the directory where the installation file is located, and run the
./setupcommand to complete the installation.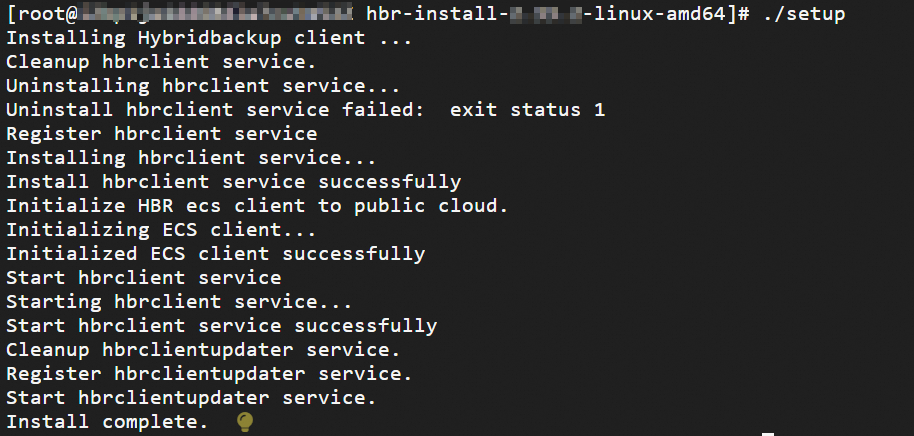
Check the status of the backup client on the ECS instance.
Open the Cloud Backup console. On the Ecs file backup page, go to the Ecs instances tab and verify that the Client status of the target ECS instance is Activated.

If the client status is abnormal, refer to the following documents for troubleshooting.
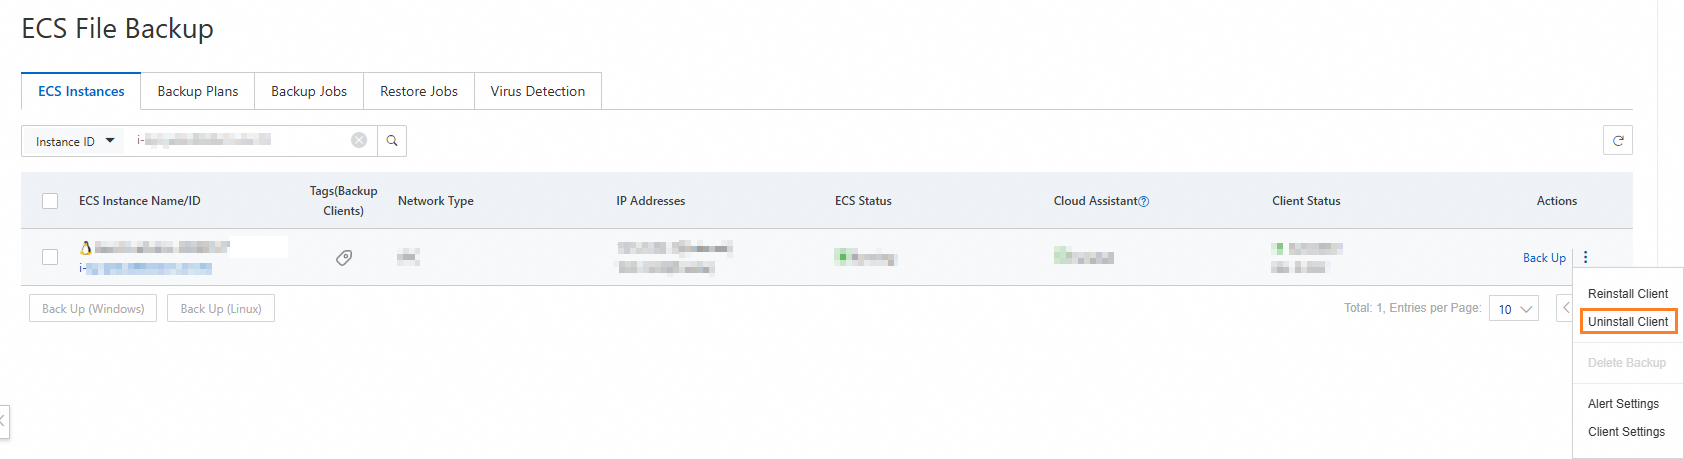
Uninstall the client
Before you uninstall the client, check the client installation path:
If a NAS directory is mounted to the installation path, you must use the
umountcommand to unmount the NAS directory to prevent accidental deletion of NAS files.If the installation path contains other important directories and files, move them to another directory to prevent accidental deletion.
On the ECS Instances tab, find the target instance. In the Actions column, choose to uninstall the backup client. After the uninstallation is complete, the client status updates to Not Installed.
Delete a backup
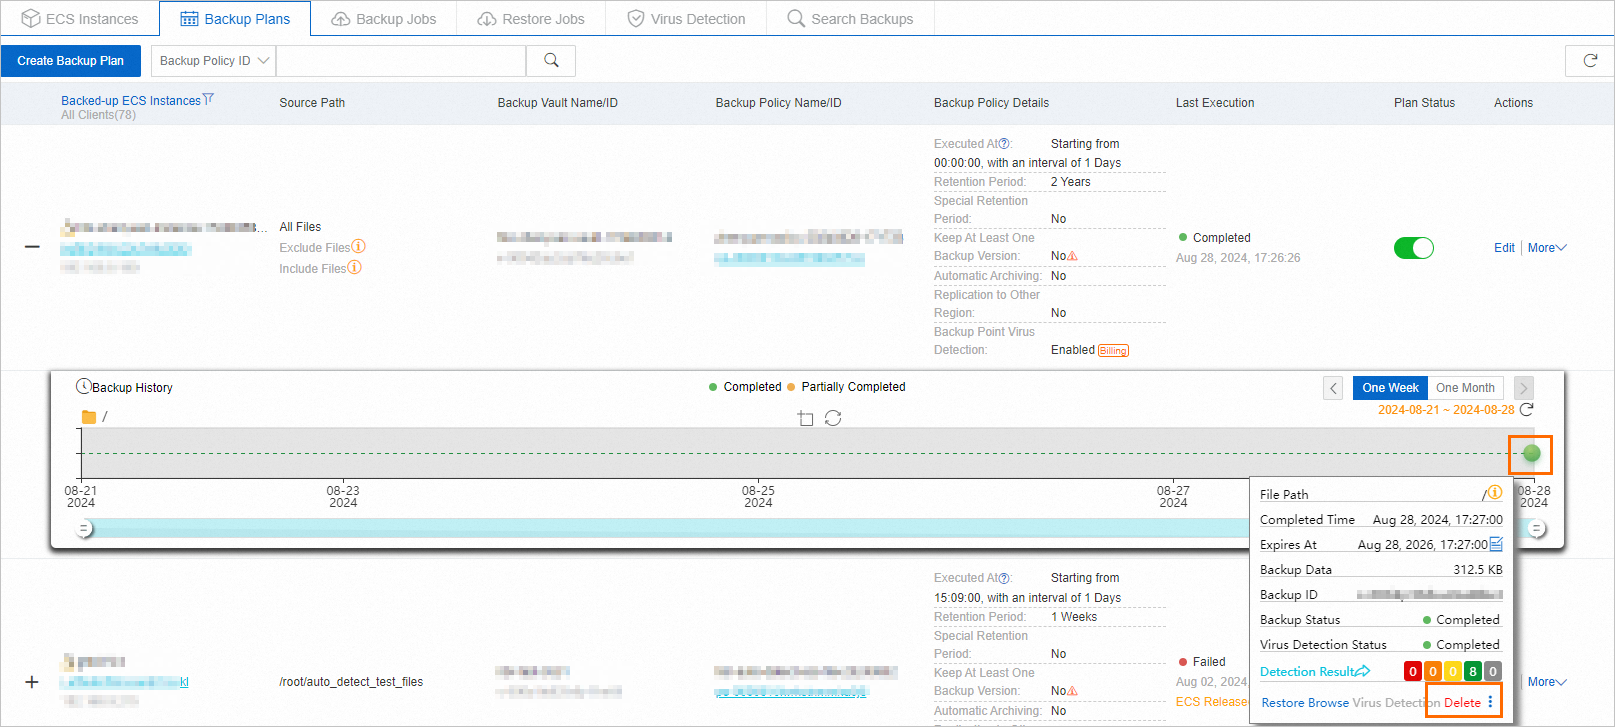
You can delete backup data that a client has generated.
Deleting a backup also deletes the data from that client and causes any running backup or restore jobs to fail. Before you delete a backup, make sure that you no longer need the backup data and that no backup or restore jobs are running on the client.
On the Backup Plans tab, click the
icon next to the target ECS instance.In the Backup History, find the backup point you want to delete, click the backup point, select Delete, and then confirm the deletion.
Configure alerts
If an issue occurs with the backup client or a backup or restore job, you can configure alerts to receive prompt notifications about exceptions. On the ECS Instances tab, find the target instance. In the Actions column, choose .

Alert method | Description |
Disabled | No alert notifications are sent for this client. |
Same as Backup Vault | This client uses the same alert method as the backup vault. |
Notify Alibaba Cloud Account | Backup alert notifications for this client are sent by email to the Alibaba Cloud account. |
Custom | Select one or more contacts or contact groups. After the configuration is complete, Cloud Backup sends alerts for this client to the selected contacts or contact groups. For more information, see Manage alert contacts. |
Client settings
To optimize client performance, find the target instance on the ECS Instances tab. In the Actions column, choose . We recommend that you use the default settings.

Client settings | Description |
Use HTTPS | Select whether to use the HTTPS protocol for data transmission. Because HTTPS involves encryption and decryption, it might affect transmission performance. If you change this setting, the change takes effect on the next backup or restore job. Note This setting affects only data security during network transmission. Regardless of whether you enable HTTPS, backup data is encrypted when it is stored in the backup vault. |
Data Network | Select whether to transmit data over a VPC or the public network. If your client is deployed in an Alibaba Cloud VPC or connected to an Alibaba Cloud VPC through a leased line, select VPC as the transmission network. |
Maximum number of worker threads | Set the maximum number of worker threads for the backup client. A larger number of threads consumes more host resources and has a greater impact on host performance. Evaluate your resource usage before you change this parameter. |
Maximum CPU Cores | Set the maximum number of CPU cores that the backup client can use. A larger number of CPU cores consumes more host resources and has a greater impact on host performance. Evaluate your resource usage before you change this parameter. |
Restore ECS files
For more information, see Restore ECS files.
Backup vault replication
To prevent regional disasters or account management risks from affecting business continuity, Cloud Backup allows you to configure cross-region backup or cross-account replication for backup vaults where the Backup Vault Type is Standard. After you complete the configuration, data in the source backup vault is automatically synchronized to the destination backup vault to ensure data consistency between the two locations. You can also perform on-demand cross-region data recovery from the destination backup vault.
For general-purpose backup vaults that store ECS files, configuring backup vault replication provides disaster recovery across regions or accounts. In addition, ECS file backup supports enterprise-grade features such as cross-account backup, automatic archiving, KMS encryption, backup lock, backup point virus detection, and tag-based automatic resource association for backups.
Configure retry parameters
If a file backup job fails due to factors such as an unstable network, you can configure retry parameters.
Log on to the server whose files you want to back up.
Switch to the default installation directory of the Cloud Backup client.
In the
clientdirectory, create a file namedhbr.config.NoteThe
hbr.configfile must be in the same directory as thehbrclientandidsexecutables.In the
hbr.configfile, add the following parameters.Parameter
Description
retry_times
For clients of version 2.16.0 and later, this parameter specifies the number of data backup retries. The default value is 30.
retry_interval
For clients of version 2.16.0 and later, this parameter specifies the data backup retry interval. The default value is 1,000 milliseconds.
skip_error_files
Specifies whether to skip files that fail to be backed up.
false (default): Does not skip files that fail to be backed up.
true: Skips files that fail to be backed up.
The following code block shows a sample configuration of the hbr.config file:
retry_times=30
retry_interval=1000
skip_error_files=false
Related topics
To back up ECS instances in batches, either locally or to a different region, or to quickly set up and replicate an ECS development and testing environment, use ECS instance backup.
Disk backup creates crash-consistent backups for all types of disks of an ECS instance, including system disks and data disks. Use this feature to back up or restore an entire disk. For more information, see Create a disk backup.
Cloud Backup provides resource plans for various backup scenarios. These plans offer significant discounts to help you save on costs. For more information, see Resource plan purchasing guide.
To back up MySQL, Oracle, or SQL Server databases on an ECS instance, see Back up a MySQL database, Back up an Oracle database, and Back up an SQL Server database. Before you back up a database, you must register it in the Cloud Backup console.
To back up files from an on-premises server to the cloud, see Back up on-premises files.