Connect Hologres to Quick BI for visual analytics
Quick BI connects directly to a Hologres instance as a native data source, letting you run high-performance queries and build interactive dashboards without exporting data. This topic walks through adding the data source, choosing a visualization method, and configuring time-filter controls that take advantage of Hologres Segment_key optimization.
Prerequisites
Before you begin, make sure you have:
-
An active Hologres instance. See Purchase a Hologres instance
-
An active Quick BI subscription (Pro or Professional Edition for native Hologres support). See Purchase, upgrade, renew, or handle overdue payments for Quick BI
-
The Hologres instance endpoint, port, database name, AccessKey ID, and AccessKey secret
Usage notes
-
Edition compatibility: Quick BI Pro and Professional Edition support the native Hologres data source. Other editions must use a PostgreSQL data source instead. See Alibaba Cloud data source - PostgreSQL.
-
Whitelist: No whitelist configuration is required on the Hologres side to connect to Quick BI. Quick BI supports whitelist restrictions only when connecting over a public network or a specified Virtual Private Cloud (VPC).
-
Data source type: Select the data source type that matches your Quick BI edition. Use the Hologres data source when your edition supports it.
The following steps use Quick BI Pro as an example.
Connect to Hologres
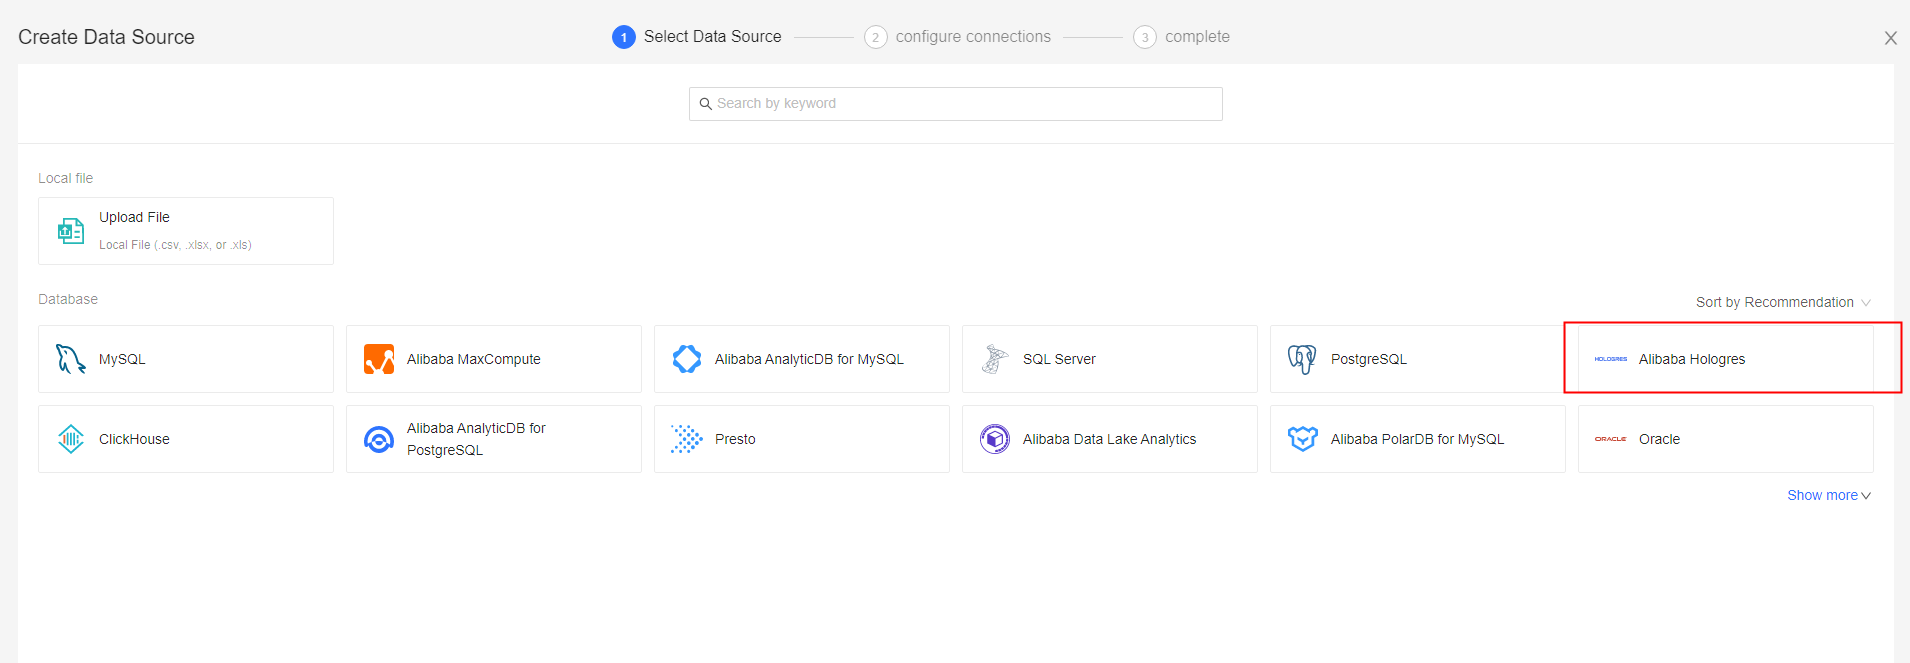
Add a data source
-
Log on to the Quick BI console.
-
In the top menu bar, click Workspace.
-
In the left navigation pane, click Data Source.
-
In the upper-right corner of the Data Source page, click New Data Source.
-
Select Alibaba Hologres as the data source type.
-
Configure the connection parameters based on your network type.
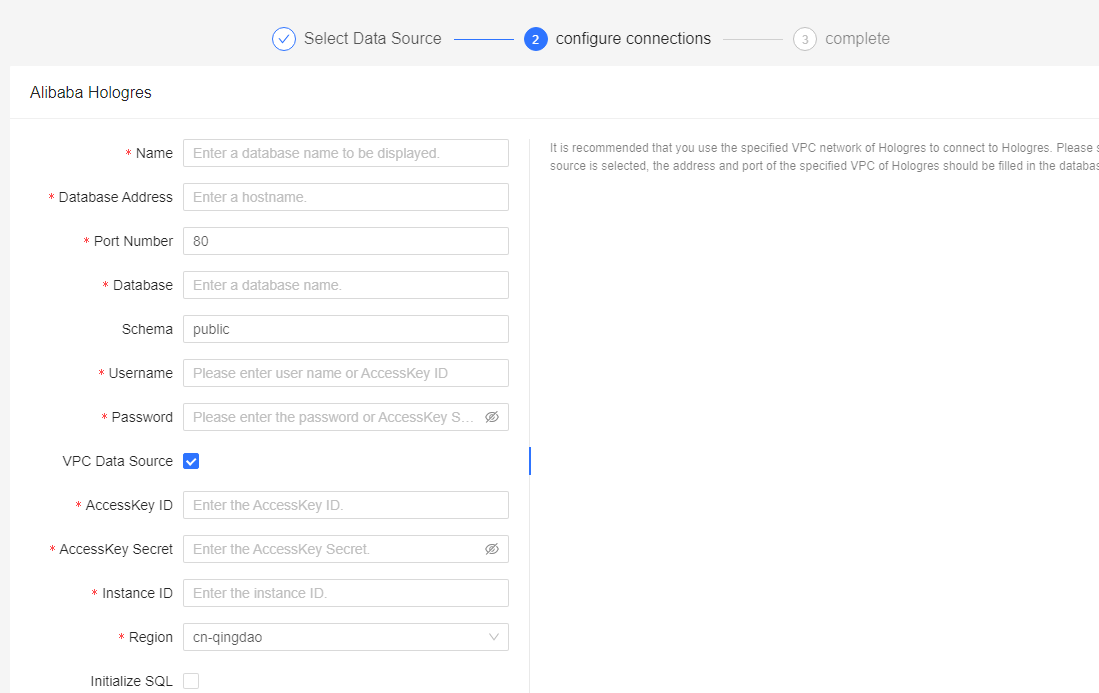
VPC network (recommended) Use this option when Quick BI and your Hologres instance are in the same VPC.
Parameter Description Display Name A name to identify this data source in Quick BI. Database Address The VPC endpoint of the Hologres instance. Find it in the Hologres console under Instance Details > Network Information > Domain Name. Do not include the port number. Example: hgpostcn-cn-nwy364b5v009-cn-shanghai-vpc-st.hologres.aliyuncs.comPort The VPC port. Find it in the same Domain Name column. Database The database name. Find it on the Database Management page in the Hologres console. Schema The schema to expose in Quick BI. Defaults to public. If you specify a non-default schema, all tables in that schema are displayed. When running ad hoc SQL queries against a non-default schema, prefix table names with the schema name in schema.tableformat.Username Your AccessKey ID. Get it from AccessKey Management. Password Your AccessKey secret. Get it from AccessKey Management. VPC Data Source Switch Turn on. Purchaser AccessKey ID The AccessKey ID of the account used to purchase the Hologres instance. Buyer Access Key The AccessKey secret of the account used to purchase the Hologres instance. Instance ID The ID of the Hologres instance. Region The region where the Hologres instance resides. SSL (Optional) Enable to encrypt the connection with SSL. Initialization SQL (Optional) SQL statements to run each time a connection is established. Only SET statements are supported. Separate multiple statements with a semicolon ( ;).Enable File Upload (Optional) Enable to allow file uploads. Public network Use this option when connecting over the internet. Quick BI whitelist restrictions apply.
Parameter Description Display Name A name to identify this data source in Quick BI. Database Address The public endpoint of the Hologres instance. Find it in the Hologres console under Instance Details > Network Information > Domain Name. Do not include the port number. Port The public port. Find it in the same Domain Name column. Database The database name. Find it on the Database Management page. Schema Defaults to public. See the VPC network table for schema behavior details. Username Your AccessKey ID. Password Your AccessKey secret. VPC Data Source Switch Turn off. SSL (Optional) Enable to encrypt the connection with SSL. Initialization SQL (Optional) SET statements only; semicolon-separated. Enable File Upload (Optional) Classic network Use this option for Hologres instances on the classic network.
Parameter Description Display Name A name to identify this data source in Quick BI. Database Address The classic network endpoint of the Hologres instance. Find it in the Hologres console under Instance Details > Network Information > Domain Name. Do not include the port number. Example: hgpostcn-cn-nwy364b5v009-cn-shanghai-vpc.hologres.aliyuncs.comPort The classic network port. Find it in the same Domain Name column. Database The database name. Find it on the DB Management page. Schema Defaults to public. See the VPC network table for schema behavior details. Username Your AccessKey ID. Password Your AccessKey secret. VPC Data Source Switch Turn off. SSL (Optional) Enable to encrypt the connection with SSL. Initialization SQL (Optional) SET statements only; semicolon-separated. Enable File Upload (Optional) -
Click Test Connection to verify the configuration.
-
If The data source is connected. appears, the connection succeeded.
-
If The data source connection failed. Check if the parameters are correct. appears, verify that the endpoint, port, database name, and credentials are correct. For VPC connections, also check that the instance ID, region, and purchaser AccessKey values are accurate. If the issue persists, confirm that the Hologres instance is running and reachable from the network type you selected.
-
-
Click OK to save the data source.
Visualize data
After saving the data source, go to Data Source > My Data Sources and click the data source you created. All tables in the configured database and schema are listed.
Choose one of the following methods to visualize data.
Drag-and-drop method
-
In the Actions
-
In the Create Dataset dialog box, set the Name and Location, then click OK.
-
On the My Datasets page, use the icons in the Actions column to work with the dataset: For details on each feature, see Overview.
-
Click
 to preview the data.
 -
Click
 to create a dashboard and generate charts.
 -
Click
 to create a workbook.
 -
Click
 for more options, such as data masking and cache management.
-
Ad hoc SQL analysis method
-
On the Data Source page, click Ad Hoc SQL Analysis in the upper-right corner.
-
Enter an SQL statement and click Upload.
-
After the query returns results, click Create Dataset.
-
In the Save Custom SQL dialog box, set the Name, Location, and SQL
After saving, the dataset is available in Datasets. See Use a custom SQL statement to create a dataset for details.
Optimize time-filter performance with Segment_key
Hologres uses the Segment_key property (also aliased as event_time_column) to index data by time, eliminating full table scans when time ranges are used as filter conditions. By default, Hologres sets the first timestamp-type column as the Segment_key.
Quick BI supports SQL placeholders for time controls. When a dashboard filter maps to an SQL placeholder, Quick BI substitutes the selected time range into the query. If the filtered column is the Segment_key, Hologres applies the segment index for faster query execution.
Set up a time-filter control
The following steps require an internal table named LINEITEM in your Hologres instance, loaded with data from the public.odps_lineitem_10g table in the MaxCompute public space MAXCOMPUTE_PUBLIC_DATA. See Getting started with Hologres queries for setup instructions.
-
On the Data Source page of the Quick BI console, click Create Dataset with SQL in the upper-right corner. The New Snippet dialog box appears.
-
Enter the following SQL statement to query the
LINEITEMtable using time-range placeholders.SELECT * FROM "public"."lineitem" AS AME_T_1_ WHERE AME_T_1_."l_shipdate" >= TO_TIMESTAMP('${report_date.get(0)}', 'yyyy-MM-dd hh24:mi:ss') AND AME_T_1_."l_shipdate" <= TO_TIMESTAMP('${report_date.get(1)}', 'yyyy-MM-dd hh24:mi:ss')The placeholders
${report_date.get(0)}and${report_date.get(1)}represent the start and end of the selected date range. -
Click Parameter Settings to configure the SQL placeholder.
-
For Variable Type, select Date-YearMonthDayHourMinuteSecond > YYYY-MM-DD HH-MI-SS.
-
Click OK, then click Confirm Edit.
-
On the Dashboard editing page, click New Filter. In the Query Condition Settings dialog box, select the SQL placeholder you configured.
-
To inspect the resolved SQL, click View SQL on the Dashboard editing page. The query should resemble:
SELECT
  AME_T_1_."l_shipmode" AS T_A0_2_,
  AME_T_1_."l_shipinstruct" AS T_A1_3_,
  SUM(AME_T_1_."l_extendedprice") AS T_A2_4_
FROM
  "public"."lineitem" AS AME_T_1_
WHERE
  AME_T_1_."l_shipdate" >= TO_TIMESTAMP('1993-01-01 00:00:00', 'yyyy-MM-dd hh24:mi:ss')
  AND AME_T_1_."l_shipdate" <= TO_TIMESTAMP('1998-12-31 23:59:59', 'yyyy-MM-dd hh24:mi:ss')
GROUP BY
  AME_T_1_."l_shipmode",
  AME_T_1_."l_shipinstruct"
LIMIT
  1000 OFFSET 0
Verify that Segment_key is effective
Run EXPLAIN on the query and check the execution plan for the Segment Filter keyword. Its presence confirms that Hologres is using the segment index for the time-range filter.
-
Log on to the Hologres console and click Instances in the left navigation pane.
-
On the Instance Details page, click Database Management in the left navigation pane.
-
On the DB Authorization page, click SQL Editor.
-
Click New SQL Window in the upper-left corner.
-
On the Ad-hoc Query page, select your Instance Name and Database, then run the following statement.
EXPLAIN SELECT
  AME_T_1_."l_shipmode" AS T_A0_2_,
  AME_T_1_."l_shipinstruct" AS T_A1_3_,
  SUM(AME_T_1_."l_extendedprice") AS T_A2_4_
FROM
  "public"."lineitem" AS AME_T_1_
WHERE
  AME_T_1_."l_shipdate" >= TO_TIMESTAMP('1993-01-01 00:00:00', 'yyyy-MM-dd hh24:mi:ss')
  AND AME_T_1_."l_shipdate" <= TO_TIMESTAMP('1998-12-31 23:59:59', 'yyyy-MM-dd hh24:mi:ss')
GROUP BY
  AME_T_1_."l_shipmode",
  AME_T_1_."l_shipinstruct"
LIMIT
  1000 OFFSET 0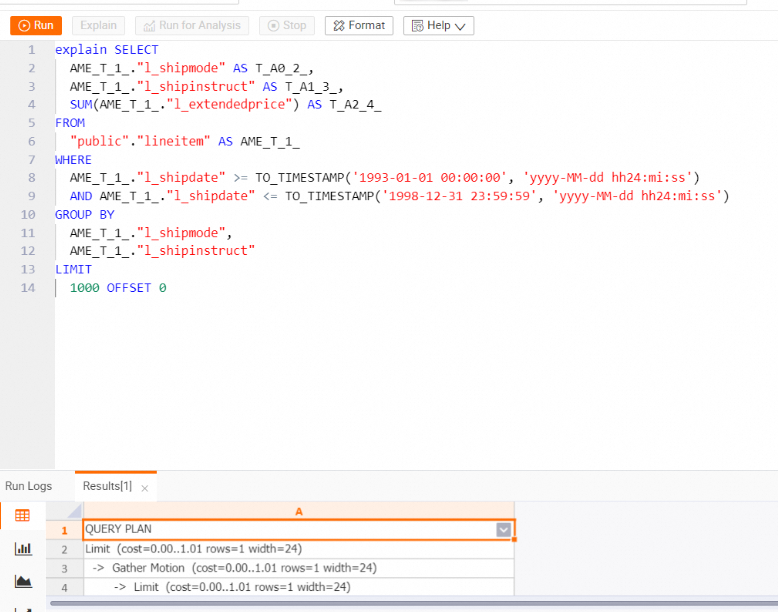
-
On the Result tab, review the execution plan.
->  Limit  (cost=0.00..1.01 rows=1 width=24)
      ->  Partial HashAggregate  (cost=0.00..1.01 rows=1 width=24)
            Group Key: l_shipmode, l_shipinstruct
            ->  Redistribute Motion  (cost=0.00..1.01 rows=10 width=24)
                  ->  Result  (cost=0.00..1.01 rows=10 width=24)
                        ->  Partial HashAggregate  (cost=0.00..1.01 rows=10 width=24)
                              Group Key: l_shipmode, l_shipinstruct
                              ->  Parallelism (Gather Exchange)  (cost=0.00..1.01 rows=32 width=24)
                                    ->  Result  (cost=0.00..1.01 rows=32 width=24)
                                          ->  DecodeNode  (cost=0.00..1.01 rows=32 width=24)
                                                ->  Partial HashAggregate  (cost=0.00..1.01 rows=32 width=24)
                                                      Group Key: l_shipmode, l_shipinstruct
                                                      ->  Index Scan using holo_index:[1] on lineitem  (cost=0.00..1.00 rows=1000 width=24)
                                                            Segment Filter: ((l_shipdate >= '1993-01-01 00:00:00+08'::timestamp with time zone)
The
Segment Filterline confirms that theSegment_keyindex is active. The time-filter control works as expected.