Quick BI is a tool that provides real-time online analysis and a wide range of visualizations for large datasets. You can use its drag-and-drop tools or SQL statements to easily analyze data, explore business information, and create reports. This topic describes how to connect Quick BI to a Hologres instance for visual analytics.
Prerequisites
-
You have activated Hologres. For more information, see Purchase a Hologres instance.
-
You have activated Quick BI. For more information, see Purchase, upgrade, renew, or handle overdue payments for Quick BI.
Background information
Hologres integrates seamlessly with Quick BI. You can directly connect Quick BI to a Hologres data source to visualize data from high-performance queries.
Currently, Quick BI Pro and Professional Edition support Hologres data sources. For other editions, you can use a PostgreSQL data source. For more information about operations on PostgreSQL data sources, see Alibaba Cloud data source - PostgreSQL.
This topic uses Quick BI Pro as an example to demonstrate how to connect to a Hologres instance and perform visual analytics.
Limits
-
You do not need to configure a whitelist in your Hologres instance to connect to Quick BI.
-
When you connect a Hologres instance to Quick BI, you must select the data source that corresponds to your Quick BI edition. We recommend that you use the Hologres data source.
-
Quick BI currently supports whitelist restrictions only when you use a public network or a specified VPC.
Use Quick BI for visual analytics
-
Log on to the Quick BI console.
-
Add a data source.
-
On the Quick BI console page, click Workspace in the top menu bar.
-
In the left navigation pane of the Workspace page, click Data Source.
-
On the Data Source page, click New Data Source in the upper-right corner.
-
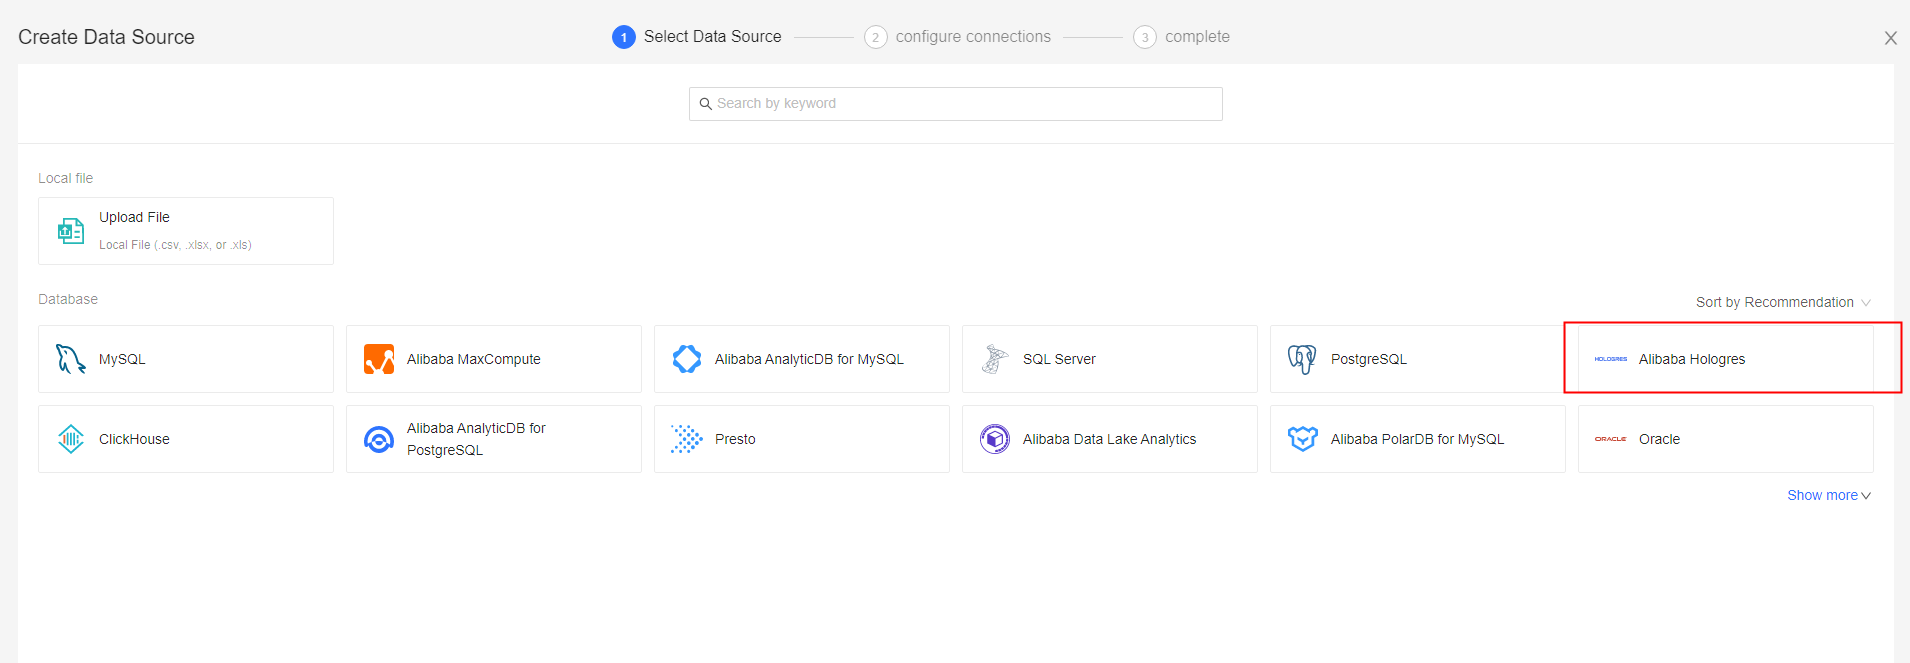
Select the destination data source and configure its parameters.
-
Select the Alibaba Hologres data source.
-
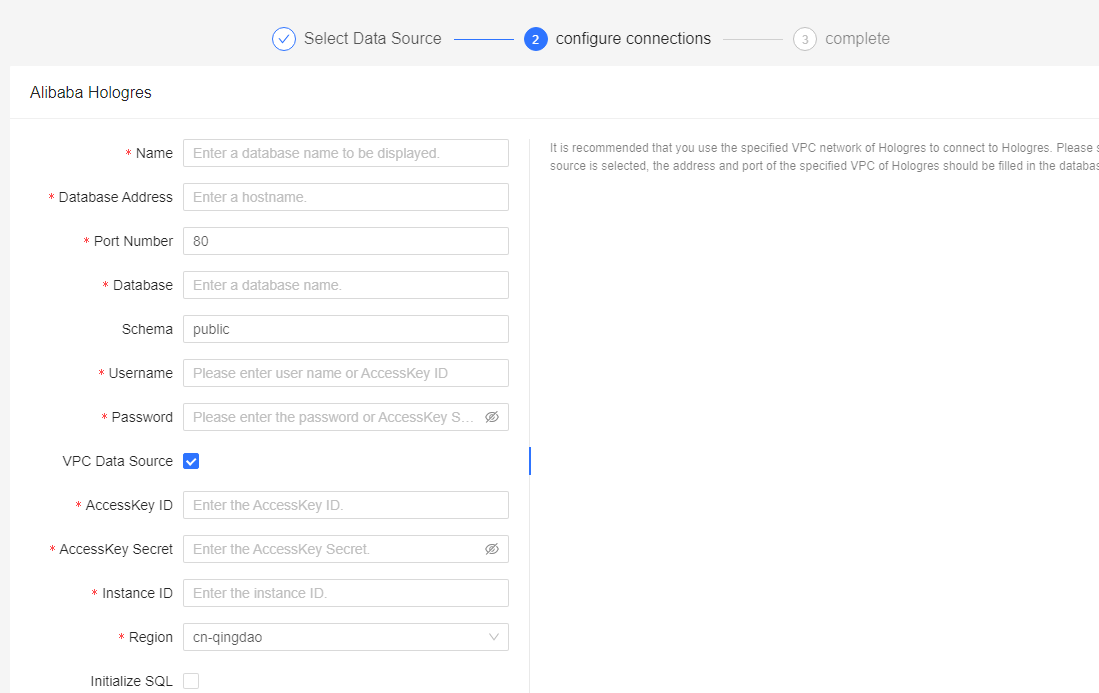
To add a Hologres data source, configure the parameters.
Connect to Hologres over a specified VPC network
Parameter Name
Description
Details
Display Name
Enter a name for the data source. This name helps you identify the data source.
None
Database Address
The VPC endpoint of the Hologres instance.
Log on to the console. On the instance details page, find the Network Information section. The endpoint for the specified VPC is listed in the Domain Name column.
NoteDo not include the port number. For example:
hgpostcn-cn-nwy364b5v009-cn-shanghai-vpc-st.hologres.aliyuncs.comPort
The VPC port of the Hologres instance.
Log on to the console. On the instance details page, obtain the port for the specified VPC from the Domain Name column in the Network Information section.
Database
The name of the database to which you want to connect.
Log on to the console. On the instance details page, obtain the database name from the Database Management page.
Schema
The default schema is public.
You can use a newly created schema. After you configure a schema for the data source, all tables in this schema are displayed. However, when you run ad hoc SQL queries, you must manually add the schema name before the table name in the `schema.table` format to ensure the table is correctly referenced.
Username
The AccessKey ID of your Alibaba Cloud account.
Click AccessKey Management to obtain the AccessKey ID.
Password
The AccessKey secret of your Alibaba Cloud account.
Click AccessKey Management to obtain the AccessKey secret.
VPC Data Source Switch
Turn on this switch.
None.
Purchaser AccessKey ID
The AccessKey ID of the account that was used to purchase the instance.
None.
Buyer Access Key
The AccessKey secret of the account that was used to purchase the instance.
None.
Instance ID
The ID of the Hologres instance.
None.
Region
The region where the Hologres instance resides.
None.
SSL
If the destination data source is configured with SSL, you can select this option to enable the SSL security protocol to protect your data.
None.
Initialization SQL
Select this option to set initialization SQL statements.
These SQL statements run for initialization each time a connection to the data source is established. Only SET statements are allowed. Use a semicolon (;) to separate multiple statements.
None.
Enable File Upload
Select this option to enable file uploads.
None.
Connect to Hologres over the public network
Parameter name
Description
Details
Display Name
Enter a name for the data source. This name helps you identify the data source.
None
Database Address
The public endpoint of the Hologres instance.
Log on to the console. On the instance details page, obtain the public endpoint from the Domain Name column in the Network Information section.
NoteDo not include the port number.
Port
The public port of the Hologres instance.
Log on to the console. On the instance details page, obtain the public network port from the Domain Name column in the Network Information section.
Database
The name of the database to which you want to connect.
Log on to the console. On the instance details page, find the database name on the DB Management page.
Schema
The default value is the public schema.
You can use a newly created schema. After you configure a schema for the data source, all tables in this schema are displayed. However, when you run ad hoc SQL queries, you must manually add the schema name before the table name in the `schema.table` format to ensure the table is correctly referenced.
Username
The AccessKey ID of your Alibaba Cloud account.
Click AccessKey Management to obtain the AccessKey ID.
Password
The AccessKey secret of your Alibaba Cloud account.
Click AccessKey Management to obtain the AccessKey secret.
VPC Data Source Switch
Turn off this switch.
None.
SSL
If the destination data source is configured with SSL, you can select this option to enable the SSL security protocol to protect your data.
None.
Initialization SQL
Select this option to set initialization SQL statements.
These SQL statements run for initialization each time a connection to the data source is established. Only SET statements are allowed. Use a semicolon (;) to separate multiple statements.
None.
Enable File Upload
Select this option to enable file uploads.
None.
Connect to Hologres over the classic network
Parameter name
Description
Details
Display Name
Enter a name for the data source. This name helps you identify the data source.
None
Database Address
The classic network endpoint of the Hologres instance.
Log on to the console. On the instance details page, retrieve the classic network endpoint from the Domain Name column in the Network Information section.
NoteDo not include the port number. For example:
hgpostcn-cn-nwy364b5v009-cn-shanghai-vpc.hologres.aliyuncs.comPort
The classic network port of the Hologres instance.
Log on to the console. On the instance details page, obtain the classic network port from the Domain Name column in the Network Information section.
Database
The name of the database to which you want to connect.
Log on to the console. On the instance details page, obtain the database name from the DB Management page.
Schema
The default value is the public schema.
You can use a newly created schema. After you configure a schema for the data source, all tables in this schema are displayed. However, when you run ad hoc SQL queries, you must manually add the schema name before the table name in the `schema.table` format to ensure the table is correctly referenced.
Username
The AccessKey ID of your Alibaba Cloud account.
Click AccessKey Management to obtain the AccessKey ID.
Password
The AccessKey secret of your Alibaba Cloud account.
Click AccessKey Management to obtain the AccessKey secret.
VPC Data Source Switch
Turn off this switch.
None.
SSL
If the destination data source is configured with SSL, you can select this option to enable the SSL security protocol to protect your data.
None.
Initialization SQL
Select this option to set initialization SQL statements.
These SQL statements run for initialization each time a connection to the data source is established. Only SET statements are allowed. Use a semicolon (;) to separate multiple statements.
None.
Enable File Upload
Select this option to enable file uploads.
None.
-
-
After you configure the parameters, click Test Connection to check the connectivity between Quick BI and Hologres:
-
If The data source is connected. appears, the connection is successful.
-
If the message The data source connection failed. Check if the parameters are correct. appears, the connection has failed. Troubleshoot the issue based on the error message.
-
-
Click OK to complete the configuration.
-
-
Visualize the data.
After you connect to the data source, go to the page and click the data source that you created. All tables in the current database are displayed.
-
To visualize data using the UI, you can use the drag-and-drop method.
-
To visualize data using SQL statements, you can use the ad hoc SQL analysis method.
The following sections describe the operations for each method.
-
Drag-and-drop method
-
In the Actions column of the target table, click the
 icon to create a dataset.
 -
In the Create Dataset dialog box, configure the Name and Location parameters.
-
Click OK.
-
On the My Datasets page, you can click an icon in the Actions column for a target dataset to perform an operation:
-
Click the
 icon to view the data in the current dataset.
 -
Click the
 icon to create a dashboard, import the table data, and generate a chart for visualization.
 -
Click the
 icon to create a workbook, import the target table data, and generate a workbook for visualization.
 -
Click the
 icon to perform more operations, such as data masking, configuring the cache, and clearing the cache.
For more information about the operations for specific features, see Overview.
The following figure shows an example of how to create a dashboard, create a stacked column chart on the dashboard editing page, and design the chart style to display data.
-
-
-
Ad hoc SQL analysis method
-
On the Data Source page, click Ad Hoc SQL Analysis in the upper-right corner to go to the Ad Hoc SQL Analysis page.
-
You can enter an SQL statement and click Upload.
-
After the data is returned, click Create Dataset.
-
In the Save Custom SQL dialog box, configure the Name, Location, and SQL parameters.
-
Click OK.
After you create the dataset, you can visualize the table data in Datasets. For more information, see Use a custom SQL statement to create a dataset.
-
-
Best practices for time filter controls
When you create a table in a Hologres instance, you can set the Segment_key (aliased as event_time_column) property to optimize indexes for time-based filter conditions. This setting prevents full table scans and accelerates queries. By default, Hologres uses the first column of the timestamp type in the table as the Segment_key.
Quick BI supports advanced SQL placeholders. You can use SQL placeholders to set time controls. For more information about SQL placeholders, see Use a custom SQL statement to create a dataset.
-
Set a placeholder for the time filter field.
Before you perform the following steps, you must create an internal table named LINEITEM in your Hologres instance and import data from the public.odps_lineitem_10g table in the MaxCompute public space MAXCOMPUTE_PUBLIC_DATA into the LINEITEM table. For more information, see Getting started with Hologres queries.
-
On the Data Source page of the Quick BI console, click Create Dataset with SQL in the upper-right corner. The New Snippet dialog box appears.
-
Enter the following SQL statement to retrieve timestamp data from the LINEITEM table.
SELECT * FROM "public"."lineitem" AS AME_T_1_ WHERE AME_T_1_."l_shipdate" >= TO_TIMESTAMP('${report_date.get(0)}', 'yyyy-MM-dd hh24:mi:ss') AND AME_T_1_."l_shipdate" <= TO_TIMESTAMP('${report_date.get(1)}', 'yyyy-MM-dd hh24:mi:ss') -
Click Parameter Settings to set the SQL placeholder.
-
For Variable Type, select "Date-YearMonthDayHourMinuteSecond > YYYY-MM-DD HH-MI-SS".
-
Click OK and then click Confirm Edit.
-
On the Dashboard editing page, click New Filter. In the Query Condition Settings dialog box, select the SQL placeholder that you set for the field.
-
On the Dashboard editing page, click View SQL to retrieve the following SQL statement.
SELECT
  AME_T_1_."l_shipmode" AS T_A0_2_,
  AME_T_1_."l_shipinstruct" AS T_A1_3_,
  SUM(AME_T_1_."l_extendedprice") AS T_A2_4_
FROM
  "public"."lineitem" AS AME_T_1_
WHERE
  AME_T_1_."l_shipdate" >= TO_TIMESTAMP('1993-01-01 00:00:00', 'yyyy-MM-dd hh24:mi:ss')
  AND AME_T_1_."l_shipdate" <= TO_TIMESTAMP('1998-12-31 23:59:59', 'yyyy-MM-dd hh24:mi:ss')
GROUP BY
  AME_T_1_."l_shipmode",
  AME_T_1_."l_shipinstruct"
LIMIT
  1000 OFFSET 0
-
-
Verify that the Segment_key is effective.
You can check whether the Segment Filter keyword is displayed in the execution plan of the SQL statement to verify that the Segment_key is effective.
-
Log on to the Hologres console and click Instances in the navigation pane on the left.
-
On the Instance Details page, in the navigation pane on the left, click Database Management.
-
On the DB Authorization page, click SQL Editor.
-
On the SQL Editor page, click New SQL Window in the upper-left corner.
-
On the new Ad-hoc Query page, select the Instance Name and Database that you created. Then, enter the following statement in the SQL editor and click Run.
The following SQL statement is used to view the execution plan and verify that the Segment_key is effective.
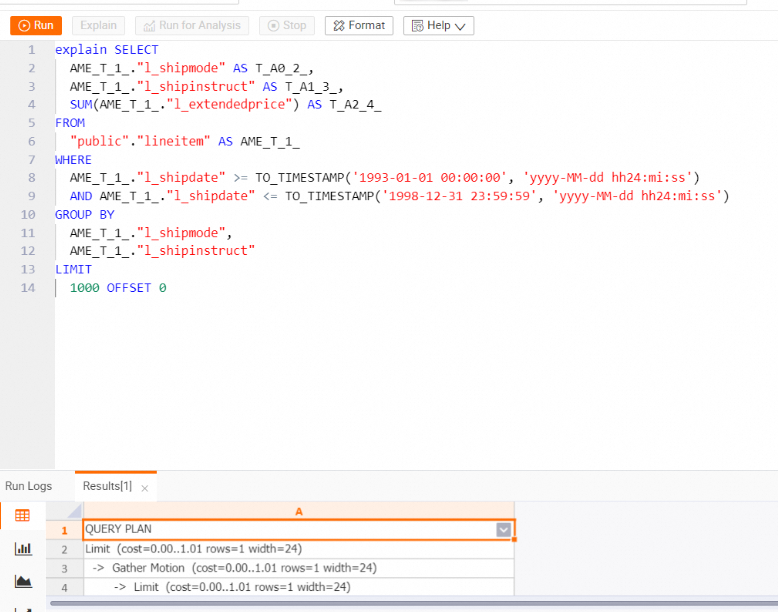
explain SELECT AME_T_1_."l_shipmode" AS T_A0_2_, AME_T_1_."l_shipinstruct" AS T_A1_3_, SUM(AME_T_1_."l_extendedprice") AS T_A2_4_ FROM "public"."lineitem" AS AME_T_1_ WHERE AME_T_1_."l_shipdate" >= TO_TIMESTAMP('1993-01-01 00:00:00', 'yyyy-MM-dd hh24:mi:ss') AND AME_T_1_."l_shipdate" <= TO_TIMESTAMP('1998-12-31 23:59:59', 'yyyy-MM-dd hh24:mi:ss') GROUP BY AME_T_1_."l_shipmode", AME_T_1_."l_shipinstruct" LIMIT 1000 OFFSET 0 -
On the Result tab, you can view the execution plan, as shown in the following figure.
->  Limit  (cost=0.00..1.01 rows=1 width=24)
      ->  Partial HashAggregate  (cost=0.00..1.01 rows=1 width=24)
            Group Key: l_shipmode, l_shipinstruct
            ->  Redistribute Motion  (cost=0.00..1.01 rows=10 width=24)
                  ->  Result  (cost=0.00..1.01 rows=10 width=24)
                        ->  Partial HashAggregate  (cost=0.00..1.01 rows=10 width=24)
                              Group Key: l_shipmode, l_shipinstruct
                              ->  Parallelism (Gather Exchange)  (cost=0.00..1.01 rows=32 width=24)
                                    ->  Result  (cost=0.00..1.01 rows=32 width=24)
                                          ->  DecodeNode  (cost=0.00..1.01 rows=32 width=24)
                                                ->  Partial HashAggregate  (cost=0.00..1.01 rows=32 width=24)
                                                      Group Key: l_shipmode, l_shipinstruct
                                                      ->  Index Scan using holo_index:[1] on lineitem  (cost=0.00..1.00 rows=1000 width=24)
                                                            Segment Filter: ((l_shipdate >= '1993-01-01 00:00:00+08'::timestamp with time zone)
The execution plan contains the Segment Filter keyword. This indicates that the Segment_key is effective and you can use the time control that is created with the SQL placeholder.
-