This topic describes how to use a Function Compute node in DataWorks to call a Function Compute service and periodically add watermarks to incremental PDF files in Object Storage Service (OSS).
Background information
DataWorks allows you to use a Function Compute node to call a Function Compute service. You can perform custom configurations for various features in a Function Compute service and then use a Function Compute node in DataWorks to call the service.
Prerequisites
DataWorks is activated. For more information, see Purchase guide.
Function Compute is activated. For more information, see Quickly create a function.
You have activated OSS. For more information, see Activate OSS. Create an OSS bucket and upload the PDF files that require watermarks. In this example, create a directory named 2023-08-15 in the bucket
bucket-testxxxx, and uploadexample.pdfto that directory.
Limits
Feature limits
DataWorks supports invoking only event functions. It does not support invoking HTTP functions. Therefore, if you want to periodically schedule functions in DataWorks, you must create an event function that handles event requests. For more information about function types, see Function types.
Region availability
Function Compute nodes are available in workspaces in the following regions: China (Hangzhou), China (Shanghai), China (Beijing), China (Shenzhen), China (Chengdu), China (Hong Kong), Singapore, Malaysia (Kuala Lumpur), Indonesia (Jakarta), Germany (Frankfurt), UK (London), US (Silicon Valley), and US (Virginia).
Step 1: Deploy the PDF watermarking application
Log on to the Function Compute console. In the navigation pane on the left, click Applications.
On the Applications page, click Create Application. Select Create Application from Template. On the File Processing tab, find PDF Watermarking. Hover over the card and click Create Now.
 Note
NoteThe source code for the PDF Watermarking application is available on GitHub. This application adds watermarks to PDF files in OSS and writes them back to the same OSS path.
On the Create Application page, select Deploy Directly. Then select a Region and an OSS bucket name. Keep all other settings at their defaults unless you have specific requirements. Click Create and Deploy Default Environment.
Parameter
Description
Deployment type
In this example, select Deploy Directly.
Application name
A valid name is generated automatically. Change it as needed.
Role name
The default role is AliyunFCServerlessDevsRole. Configure its policy as needed.
When you deploy applications in Serverless Application Center, make sure that Function Compute is granted with the required permissions. For example, some permissions are required when you deploy specific service and function resources and access other Alibaba Cloud services, such as Virtual Private Cloud (VPC), File Storage NAS (NAS), and Simple Log Service. First of all, you must associate a RAM role with the application or environment and set Function Compute as the trusted service. Then, Service Application Center can call the AssumeRole operation to obtain a Security Token Service (STS) token and assume the RAM role to access Alibaba Cloud services.
To simplify authorization, Serverless Application Center provides the default role AliyunFCServerlessDevsRole. This role has the permissions on some Alibaba Cloud resources that are accessed by Service Application Center. You can log on to the Resource Access Management (RAM) console to view the permissions of the AliyunFCServerlessDevsRole role.
Region
The region where you create the application. When you select an OSS bucket name later, you can choose only buckets in this region.
Service name
A valid name is generated automatically. Change it as needed. (This parameter is not required for FC 3.0.)
Function name
A valid name is generated automatically. Change it as needed.
Time zone
The time zone for the selected region is selected automatically. Change it as needed.
OSS bucket name
Select only buckets in the same region as the application.
RAM role ARN
The default role is AliyunFcDefaultRole. Change it as needed.
To simplify authorization, Function Compute provides a system default service role: AliyunFcDefaultRole. This role includes permissions for Function Compute to access some cloud resources. For instructions on creating and attaching the default role AliyunFcDefaultRole, see Step 1: Activate Function Compute.
NoteIf the application requires additional permissions during creation, click Go to Authorization.
On the application details page, wait until the Deployment Status shows Deployed Successfully.

Prepare test data in OSS. Go to the Bucket List page and select the OSS bucket name you entered when creating the application.
On the file list page, create a directory named
DataworksPDFand uploadexample.pdfto it.
On the application details page, click the function name under Function Resources to open the Function Details page.

On the Test Function tab of the Function Details page, select Configure Test Event.
In the Configure Test Parameters panel, select Create New Test Event or Edit Existing Test Event, then enter the parameters.

Event name: Enter an event name.
Event content: Enter JSON-formatted content. Example:
ImportantIf you copy the JSON example below, remove the
//comments before testing. Otherwise, the JSON will fail validation.// Adds a watermark to DataworksPDF/example.pdf. Uses "DataWorks" as text, Helvetica font at 30 pt. { "pdf_file": "DataworksPDF/example.pdf", // Path to the PDF file in the OSS bucket "mark_text": "DataWorks", // Watermark text. Required for PDF watermarking "pagesize": [595.275590551181, 841.8897637795275], // Optional. Default is A4 size (21 cm × 29.7 cm). 1 cm = 28.346456692913385 "font": "Helvetica", // Font. Optional. Default is Helvetica. For Chinese, use zenhei or microhei "font_size": 20, // Font size. Optional. Default is 30 "font_color": [0, 0, 0], // Font color in RGB format. Default is black "rotate": 30, // Rotation angle. Optional. Default is 0 "opacity": 0.1, // Opacity. Optional. Default is 0.1 (1 = opaque) "density": [198.4251968503937, 283.46456692913387] // Spacing between watermark characters. Default is [141.73228346456693, 141.73228346456693] (7 cm × 10 cm) }Click the Test Function button. After a successful execution, you can view the watermarked PDF file in the source file's path in OSS.
This example generates the
example-out.pdffile.
View the file in OSS:

Step 2: Create and configure a Function Compute node in the DataWorks console
Log on to the DataWorks console.
In the top navigation bar, select the region that you specify in Step 1: Create a Function Compute application.
In the left-side navigation pane, choose Data Development and O&M > Data Development. On the Data Development page, select the desired workspace from the drop-down list and click Go to Data Development.
In the Scheduled Workflow pane of the DataStudio page, find the desired workflow, click its name, right-click General, and then choose Create Node > Function Compute. In the Create Node dialog box, configure the Name parameter and click Confirm. A Function Compute node is created.
On the configuration tab of the Function Compute node, configure the parameters.
Parameter
Description
Select Function
Select the function name that you specify in Substep 3 in Step 1. For information about how to create a function, see Manage functions.
NoteDataWorks supports invoking only event functions. It does not support invoking HTTP functions. Therefore, if you want to periodically schedule functions in DataWorks, you must create an event function that handles event requests. For more information about function types, see Function types.
Select Version Or Alias
Select the version or alias of the service that you want to use for subsequent function invocation. If you select Default Version, the Version parameter is displayed, and the value of the Version parameter is fixed as LATEST. In this example, Default Version is selected.
Service version
Function Compute provides a versioning feature at the service level. This feature lets you publish one or more versions of your service. When you publish a version, Function Compute creates a snapshot of the service. The snapshot includes the service configurations, function code, and function configurations, but does not include triggers. Function Compute automatically assigns a version number to the snapshot for future use. For more information about how to publish a version, see Publish a version.
Version alias
Function Compute lets you create an alias for a service version. An alias points to a specific version. You can use aliases to easily implement features such as publishing, rollbacks, and canary releases. An alias cannot exist without a service or version. When you use an alias to access a service or function, Function Compute resolves the alias to the version it points to. The caller does not need to know the specific version that the alias points to. For more information about how to create an alias, see Create an alias.
Invocation Method
In this example, Synchronous Invocation is selected. For more information about invocation methods, see Synchronous calls and the topics in the Asynchronous invocation directory.
Synchronous call: The event directly triggers the function. Function Compute runs the function and waits for a response. After the function is invoked, Function Compute directly returns the execution result.
Asynchronous invocation: Function Compute persists the event request and immediately returns a response, instead of waiting for the request to be executed.
If a function takes a long time to run, consumes a large amount of resources, or has error-prone logic, you can use asynchronous invocation to improve the program's response speed and handle burst traffic more reliably.
For Function Compute tasks that run for more than 1 hour, use asynchronous invocation.
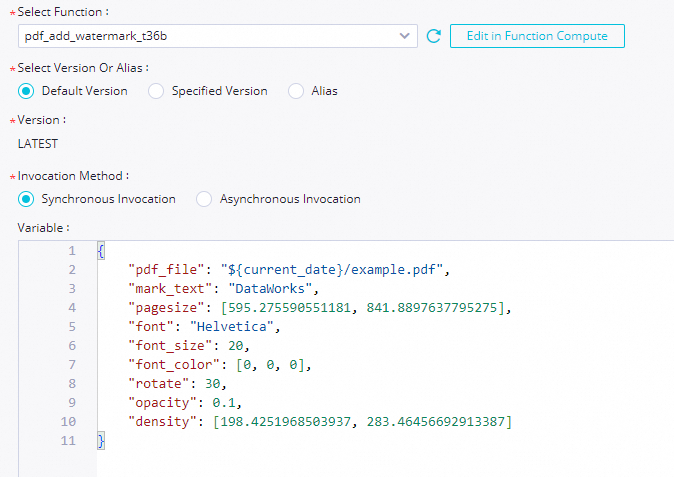
Variable
The parameters that are assigned to variables used in the code for invoking the function as values. In this example, the JSON content that you configure in Substep 7 in Step 1 is modified and used to add watermarks to incremental PDF files in OSS on a daily basis.
// The following code provides an example on how to add a watermark to a PDF file named example.pdf in a path that is in the ${current_date}/ format. { "pdf_file": "${current_date}/example.pdf", // The path of the PDF file in the OSS bucket. "mark_text": "DataWorks", // The watermark text. If you want to add a watermark to a PDF file, this parameter is required. "pagesize": [595.275590551181, 841.8897637795275], // Optional. The default value is the A4 paper size (21 cm, 29.7 cm). 1 cm is equivalent to 28.346456692913385 points. "font": "Helvetica", // Optional. The font of the watermark. The default value is Helvetica. If you want to add a watermark in Chinese to the PDF file, you can set this parameter to zenhei or microhei. "font_size": 20, // Optional. The font size of the watermark. The default value is 30. "font_color": [0, 0, 0], // The font color of the watermark, in the RGB format. The default color is black. "rotate": 30, // Optional. The rotation angle of the watermark. The default value is 0. "opacity": 0.1, // Optional. The transparency of the watermark. The default value is 0.1. The value 1 indicates that the watermark is not transparent. "density": [198.4251968503937, 283.46456692913387] // The density of the watermark. The default value is [141.73228346456693, 141.73228346456693], which indicates an interval of 7 cm on the X-axis and an interval of 10 cm on the Y-axis exist between watermark texts. }NoteThe value of
pdf_fileis in the${current_date}/example.pdfformat.${current_date}indicates that a variable namedcurrent_dateis used.When DataWorks runs a task on the Function Compute node, DataWorks replaces
${current_date}with an actual value. You can configure the variable when you configure scheduling parameters for the Function Compute node. For example, if DataWorks runs a task on the Function Compute node on August 15, 2023, the value ofpdf_fileis2023-08-15/example.pdf. If DataWorks runs a task on the Function Compute node on August 16, 2023, the value ofpdf_fileis2023-08-16/example.pdf.DataWorks can run a task on the Function Compute node to add watermarks to incremental PDF files every day only if the business system generates incremental PDF files in the specified OSS path every day based on specific time-related rules before the scheduling time of the Function Compute node.
For this example, you must upload a PDF file to a path that is in the
/${current_date}/format in OSS before DataWorks starts to run a task on the Function Compute node. For example, you can upload a PDF file named example.pdf to the2023-08-15/path.
Optional. Debug and run a task on the Function Compute node. After the configuration is complete, click the
 icon in the top toolbar of the configuration tab of the Function Compute node. In the Runtime Parameters dialog box, select a resource group that you want to use to run a task on the Function Compute node, assign constants to the variables that you use as values, and then click Confirmation to test whether the code logic of the Function Compute node is correct. For example, if you assign 2023-08-15 to the
 ${current_date}variable as the value, DataWorks runs a task on the Function Compute node to add a watermark to the example.pdf file stored in the2023-08-15/path.Configure scheduling properties for the Function Compute node to periodically schedule and run a task on the node. DataWorks provides scheduling parameters, which are used to implement dynamic parameter passing in node code in scheduling scenarios. You can click Properties in the right-side navigation pane of the configuration tab of the Function Compute node. In the Scheduling Parameter section of the Properties tab, you can configure scheduling parameters for the Function Compute node. In this example, the
current_datescheduling parameter is added, and$[yyyy-mm-dd]is assigned to the scheduling parameter as the value. yyyy-mm-dd indicates the year, month, and day when a task is run on the Function Compute node. For more information about scheduling parameter configurations, see Supported formats for scheduling parameters. For more information about scheduling properties, see Overview.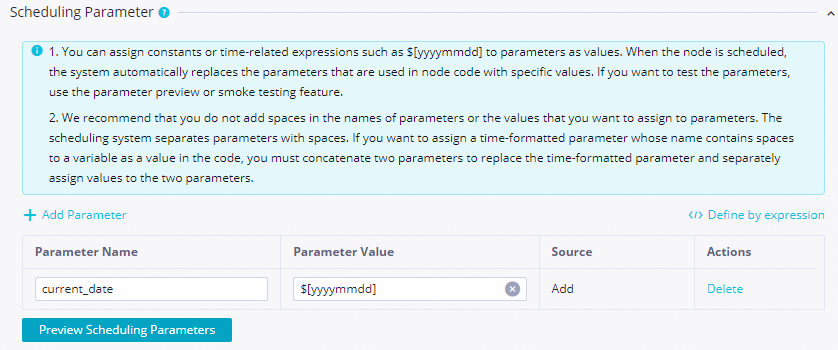
Step 3: Commit and publish the node
A Function Compute node must be committed and published to the production environment before it can be automatically scheduled and run.
Save and commit the node.
Click the
 and
and  icons in the toolbar to save and commit the node. When you commit the node, enter a change description as prompted. You can also choose whether to perform code review and smoke testing.Note
You must set the Rerun Property and Upstream Dependencies for the node in the scheduling configuration before you can commit the node.
If you enable code review, the node code submitted by a developer must be approved by a reviewer before it can be published. For more information, see Code review.
To ensure that the scheduled node task runs as expected, we recommend that you perform a smoke test on the task before publishing it. For more information, see Smoke testing.
Optional: Publish the node.
If you use a workspace in standard mode, click Publish in the upper-right corner to publish the node after it is committed. For more information, see Workspaces in standard mode and Publish a task.
What to do next
After the task is committed and published to the Operation Center for scheduling, you can perform operations and maintenance (O&M) tasks in the DataWorks Operation Center. For more information, see Operation Center.
After you learn how to create and use a Function Compute node, you can explore best practices to learn about more advanced scenarios. For more information, see Dynamically add watermarks to PDFs using a Function Compute node in DataWorks.