PyFlink job
This topic explains how to deploy and start streaming and batch PyFlink jobs, covering the development workflow in Realtime Compute for Apache Flink.
Prerequisites
-
If you use a RAM user or a RAM role to access the console, ensure the identity has the required permissions. For more information, see Permission Management.
-
A workspace is created. For more information, see Activate Realtime Compute for Apache Flink.
Step 1: Prepare Python code files
The management console of Realtime Compute for Apache Flink does not provide a Python development environment. Develop your jobs locally. For more information about job debugging and connectors, see Develop PyFlink jobs.
Ensure the Flink version for local development matches the engine version you select in Step 3: Deploy a PyFlink job. For information about how to use other dependencies, such as custom Python virtual environments, third-party Python packages, JAR packages, and data files, see Use Python dependencies.
To help you get started quickly, this topic provides sample Python files for a word count job and a sample data file. You can download and use them in the following steps.
-
Download the appropriate sample Python job file.
-
Streaming job: word_count_streaming.py.
-
Batch job: word_count_batch.py.
-
-
Click Shakespeare to download the sample data file.
Step 2: Upload Python and data files
-
Log on to the Realtime Compute console.
-
Find the target Flink workspace and click Console in the Actions column.
-
In the left-side navigation pane, click Artifacts.
-
Click Upload Artifact to upload the Python and data files.
Upload the sample Python and data files that you downloaded in Step 1. For more information about file storage paths, see Artifacts.
Step 3: Deploy a PyFlink job
Streaming
-
On the page, click .
-
Configure the deployment parameters.
Parameter
Description
Example
Deployment mode
Select stream mode.
stream mode
Deployment name
Enter a name for the Python deployment.
flink-streaming-test-python
Engine version
The Flink engine version for the deployment.
We recommend that you use a version with the RECOMMENDED or STABLE tag for better reliability and performance. For more information, see Release Notes and Engine Versions.
vvr-8.0.9-flink-1.17
Python URI
Download the word_count_streaming.py sample file. Then, click the upload
 icon to select and upload the file.
If the file already exists in Artifacts, you can select it directly without re-uploading.
-
Entry module
The entry point module of the program.
-
This parameter is not required if the PyFlink job is a .py file.
-
If the PyFlink job is a .zip file, you must enter the entry module. Example:
word_count.
Not required
Entry point main arguments
The arguments to pass to the main method.
For this tutorial, enter the storage path of the input data file, Shakespeare.
--input oss://<Your-OSS-Bucket-Name>/artifacts/namespaces/<Your-Workspace-Name>/ShakespeareYou can copy the full path of the Shakespeare file from the Artifacts page.
Deployment target
From the drop-down list, select the target queue or session cluster. Session clusters are not recommended for production. For more information, see Manage queues and Create a session cluster.
ImportantDeployments on a session cluster do not support monitoring metrics, alert configuration, or Autopilot. Use session clusters for development and testing only; do not use them in production environments. For more information, see Debug deployments.
default-queue
For more information about other configuration parameters, see Deploy a job.
-
-
Click Deploy.
Batch
-
On the page, click Create Deployment and select Python Deployment.
-
Configure the deployment parameters.
Parameter
Description
Example
Deployment mode
Select batch mode.
batch mode
Deployment name
Enter a name for the Python deployment.
flink-batch-test-python
Engine version
The Flink engine version for the deployment.
We recommend that you use a version with the RECOMMENDED or STABLE tag for better reliability and performance. For more information, see Release Notes and Engine Versions.
vvr-8.0.9-flink-1.17
Python URI
Download the word_count_batch.py sample file. Then, click the upload
icon to select and upload the file.-
Entry module
The entry point module of the program.
-
This parameter is not required if the PyFlink job is a .py file.
-
If the PyFlink job is a .zip file, you must enter the entry module. Example:
word_count.
Not required
Entry point main arguments
The arguments to pass to the main method.
For this tutorial, enter the storage paths for the input file Shakespeare and the output directory
python-batch-quickstart-test-output.NoteYou only need to specify the output directory path. The output directory must be in the same parent directory as the input file. You do not need to create the output directory in advance.
--input oss://<Your-OSS-Bucket-Name>/artifacts/namespaces/<Your-Workspace-Name>/Shakespeare--output oss://<Your-OSS-Bucket-Name>/artifacts/namespaces/<Your-Workspace-Name>/python-batch-quickstart-test-outputYou can copy the full path of the Shakespeare file from the Artifacts page.
Deployment target
From the drop-down list, select the target queue or session cluster. Session clusters are not recommended for production. For more information, see Manage queues and Create a session cluster.
ImportantDeployments on a session cluster do not support monitoring metrics, alert configuration, or Autopilot. Use session clusters for development and testing only; do not use them in production environments. For more information, see Debug deployments.
default-queue
For more information about other configuration parameters, see Deploy a job.
-
-
Click Deploy.
Step 4: Start deployment and view results
Streaming
-
On the page, find the target deployment and click Start in the Actions column.
-
In the Start Job dialog box, select Initial Mode and click Start. For more information, see Start a deployment.
After you click Start, a status of RUNNING or FINISHED indicates the deployment is running as expected. If you use the sample file from this topic, the final status is FINISHED.
-
After the deployment status changes to RUNNING, view the results of the streaming deployment.
ImportantIf you use the sample Python file from this topic, the results are deleted when the streaming deployment enters the FINISHED state. Therefore, you can view the results only when the deployment is in the RUNNING state.
In the TaskManager log file that ends with .out, search for
shakespeareto find the computation result.On the Logs tab, click the Running Task Managers tab. For the relevant TaskManager, click the Log List sub-tab. Open the
flink.outfile and entershakespearein the search box in the upper-right corner to locate the word count result, such as(shakespeare,1).
Batch
-
On the page, find the target deployment and click Start in the Actions column.
To filter the list, select Batch Deployment from the type drop-down list.
-
In the Start Job dialog box, click Start. For more information, see Start a deployment.
-
After the deployment status changes to FINISHED, view the results of the batch deployment.
Log on to the OSS console. Navigate to the oss://<Your-OSS-Bucket-Name>/artifacts/namespaces/<Your-Workspace-Name>/python-batch-quickstart-test-output directory. Click the folder named after the deployment's start date and time, click the target file, and then click Download in the panel that appears.
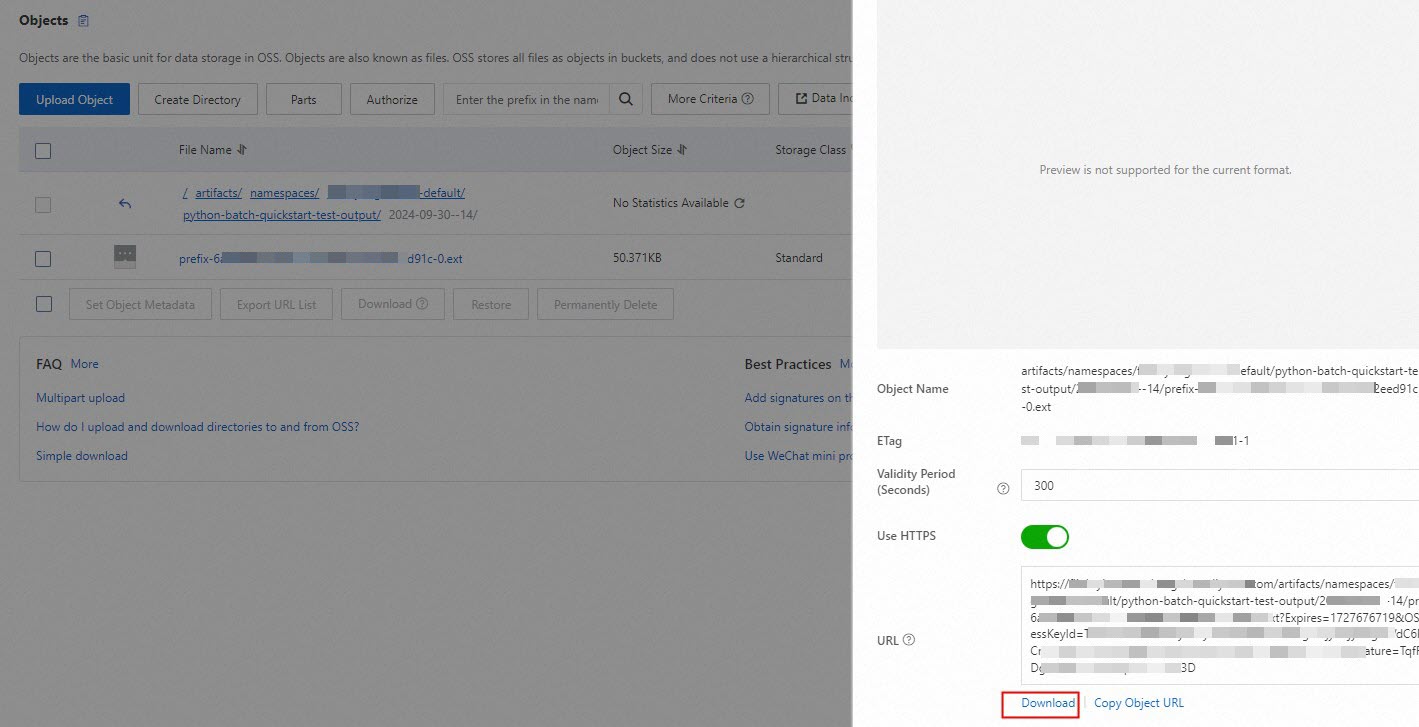
The batch deployment produces an .ext file. After downloading the file, open it with a text editor or Microsoft Word to view the results. The output is similar to the following:
(As,40)
(At,5)
(Ay,1)
(Be,9)
(By,14)
(Do,4)
(He,7)
(I,,4)
(If,34)
(In,36)
(Is,10)
(It,6)
(Optional) Step 5: Stop a deployment
To apply changes to a job (such as code modifications, WITH parameter updates, or version changes), you must redeploy, stop, and then restart it. A restart is also required for a stateless start or to apply non-dynamic configuration changes. For more information about stopping a job, see Stop a job.
Related topics
-
You can configure resources for a deployment before you start it or modify the resources after the deployment is running. Two resource configuration modes are supported: basic (coarse-grained) and expert (fine-grained). For more information, see Configure deployment resources.
-
Realtime Compute for Apache Flink supports dynamic updates to deployment parameters. This allows configurations to take effect faster and reduces service downtime caused by stopping and starting deployments. For more information, see Dynamic scaling and parameter updates.
-
Configure deployment log levels and specify different outputs for different log levels. For more information, see Configure Log Output.
-
For a walkthrough of the SQL development workflow, see Flink SQL job.