When slow queries on PolarDB for MySQL affect application performance, you can use Data Transmission Service (DTS) to replicate production data to an Alibaba Cloud Elasticsearch cluster in real time. Once the data is in Elasticsearch, you can run fast full-text searches and analytics without loading the source database.
How it works
DTS captures row-level changes from the PolarDB for MySQL binary log (binlog) and streams them to Elasticsearch. The sync runs in two sequential phases:
| Phase | Trigger | What DTS does |
|---|---|---|
| Full data sync | Task start | Reads a snapshot of the source tables and indexes all existing rows into Elasticsearch |
| Incremental data sync | After full sync completes | Replays INSERT, DELETE, and UPDATE operations from the binlog in real time |
Because DTS relies on the binlog for incremental sync, binary logging must be enabled on the PolarDB cluster before the task starts. DTS does not capture DDL operations (such as DROP COLUMN or RENAME TABLE) — only DML operations (INSERT, DELETE, UPDATE). This distinction matters: if you run a DDL operation on a source table while the sync is running, the Elasticsearch index goes out of sync and requires manual recovery. See Limitations for recovery steps.
Prerequisites
Before you begin, make sure you have:
-
A PolarDB for MySQL 8.0.1 Enterprise Edition cluster with binary logging enabled
-
An Alibaba Cloud Elasticsearch V7.10 cluster with Auto Indexing enabled
-
Access to the new DTS console
Limitations
| Limitation | Impact | Recovery |
|---|---|---|
| DDL operations are not replicated | If you run a DDL statement (such as dropping or renaming a column) on a source table while the task is running, the Elasticsearch index goes out of sync. This can cause data loss or query errors on the destination. | Remove the table from the sync task, delete the corresponding index from Elasticsearch, then re-add the table. See Remove an object from a data synchronization task and Add an object to a data synchronization task. |
| Adding columns requires extra steps | Adding a column is a DDL operation. If you run ALTER TABLE without updating the Elasticsearch mapping first, the new field will not appear in the index, causing incomplete data on the destination. | Update the index mapping in Elasticsearch to include the new field first. Then run ALTER TABLE on the source. After the DDL completes, pause the sync task and restart it. |
| Full sync increases load on source and destination | DTS reads from PolarDB and writes to Elasticsearch simultaneously during the initial full sync. This can degrade application performance on both ends if resources are already under load. | Run the full sync during off-peak hours when CPU utilization on both the source and destination is below 30%. If the full sync fails during peak hours, restart the task. Incremental sync during peak hours may cause replication lag but will not fail. |
Set up and run the sync
This example uses a PolarDB for MySQL 8.0.1 Enterprise Edition cluster as the source and an Alibaba Cloud Elasticsearch V7.10 cluster as the destination.
Step 1: Prepare the source database
-
Create a PolarDB for MySQL 8.0.1 Enterprise Edition cluster. For details, see Purchase an Enterprise Edition cluster.
-
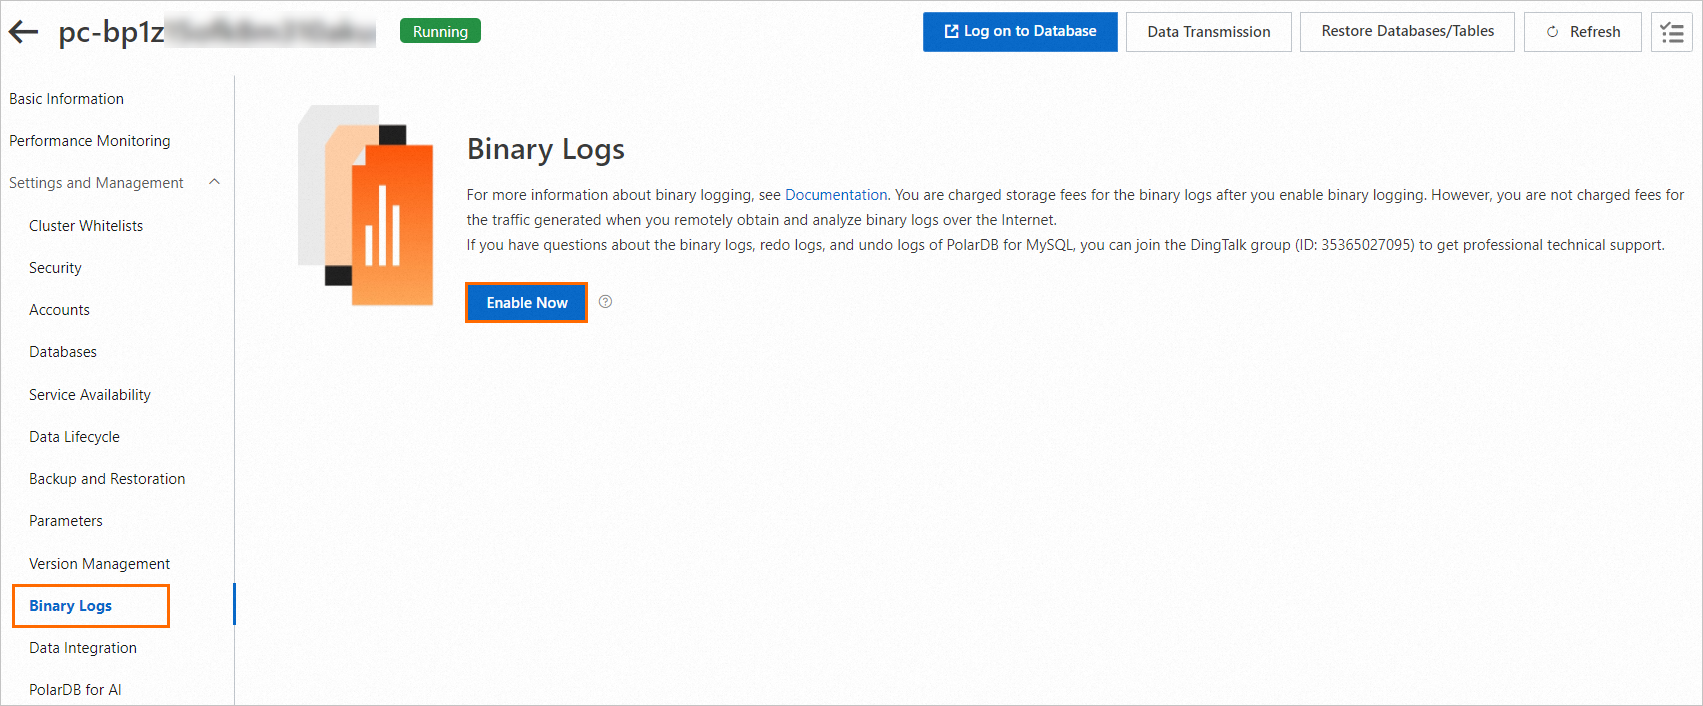
Enable binary logging on the cluster. Binary logging is required for incremental sync — DTS reads the binlog to capture INSERT, DELETE, and UPDATE changes in real time. For details, see Enable binary logging.
-
Create a database account and a database named
test_polardb. For details, see Create and manage a database account and Database management operations. -
In the
test_polardbdatabase, create a table namedproduct:CREATE TABLE `product` ( `id` bigint(32) NOT NULL AUTO_INCREMENT, `name` varchar(32) NULL, `price` varchar(32) NULL, `code` varchar(32) NULL, `color` varchar(32) NULL, PRIMARY KEY (`id`) ) ENGINE=InnoDB DEFAULT CHARACTER SET=utf8; -
Insert test data into the table:
INSERT INTO `test_polardb`.`product` (`id`,`name`,`price`,`code`,`color`) VALUES (1,'mobile phone A','2000','amp','golden');
INSERT INTO `test_polardb`.`product` (`id`,`name`,`price`,`code`,`color`) VALUES (2,'mobile phone B','2200','bmp','white');
INSERT INTO `test_polardb`.`product` (`id`,`name`,`price`,`code`,`color`) VALUES (3,'mobile phone C','2600','cmp','black');
INSERT INTO `test_polardb`.`product` (`id`,`name`,`price`,`code`,`color`) VALUES (4,'mobile phone D','2700','dmp','red');
INSERT INTO `test_polardb`.`product` (`id`,`name`,`price`,`code`,`color`) VALUES (5,'mobile phone E','2800','emp','silvery');
Step 2: Prepare the destination Elasticsearch cluster
-
Create an Alibaba Cloud Elasticsearch V7.10 cluster. For details, see Create an Alibaba Cloud Elasticsearch cluster.
-
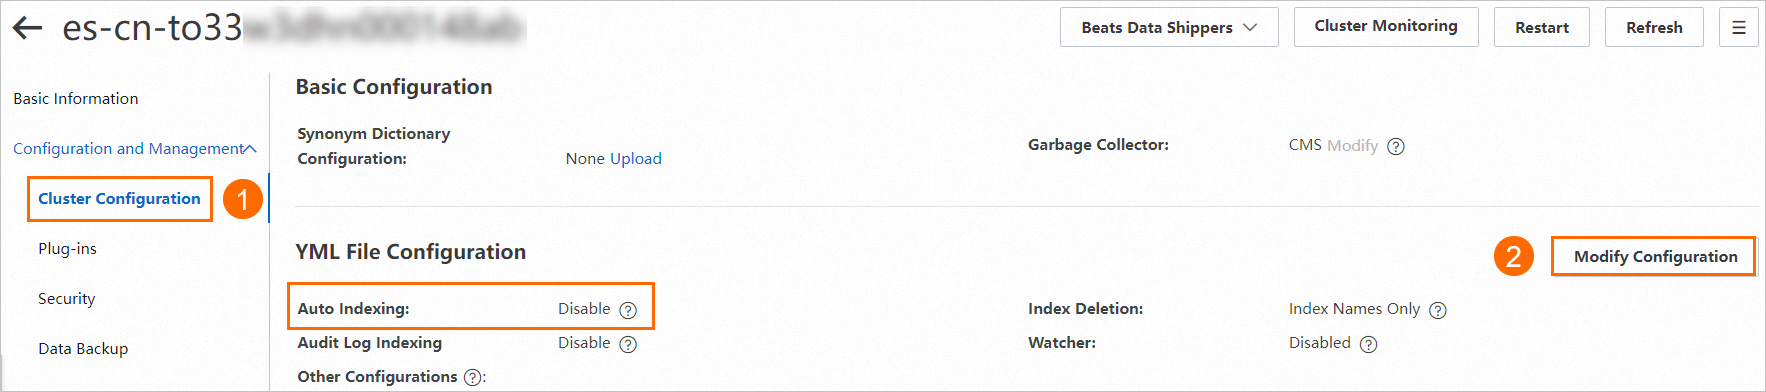
Enable Auto Indexing on the cluster. DTS creates Elasticsearch indexes automatically when it writes data — Auto Indexing must be on for this to work. For details, see Configure the YML file.
Step 3: Create a DTS sync task
-
Click Create Task.
-
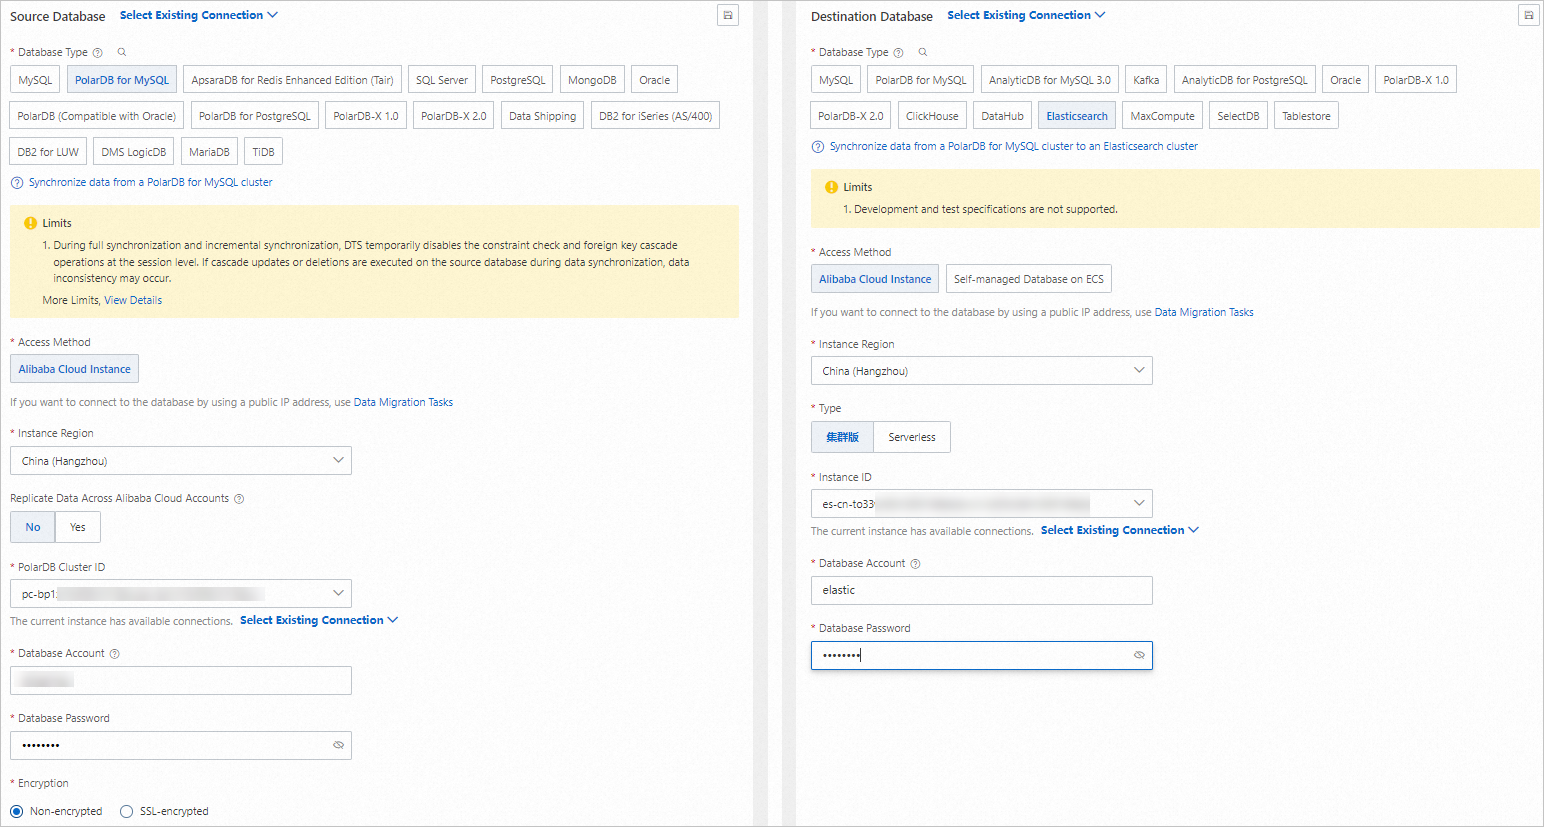
Configure the task. For a full description of each parameter, see Synchronize data from a PolarDB for MySQL cluster.
-
Configure the source (PolarDB for MySQL cluster) and destination (Elasticsearch cluster). Key parameters:
Parameter Where to set it What to enter Source type Source configuration PolarDB for MySQL Destination type Destination configuration Alibaba Cloud Elasticsearch Cluster endpoint and credentials Source and destination sections Connection details for your PolarDB cluster and Elasticsearch cluster Click Test Connectivity and Proceed to validate the connection.
-
Select the objects to synchronize — choose the
test_polardbdatabase and theproducttable.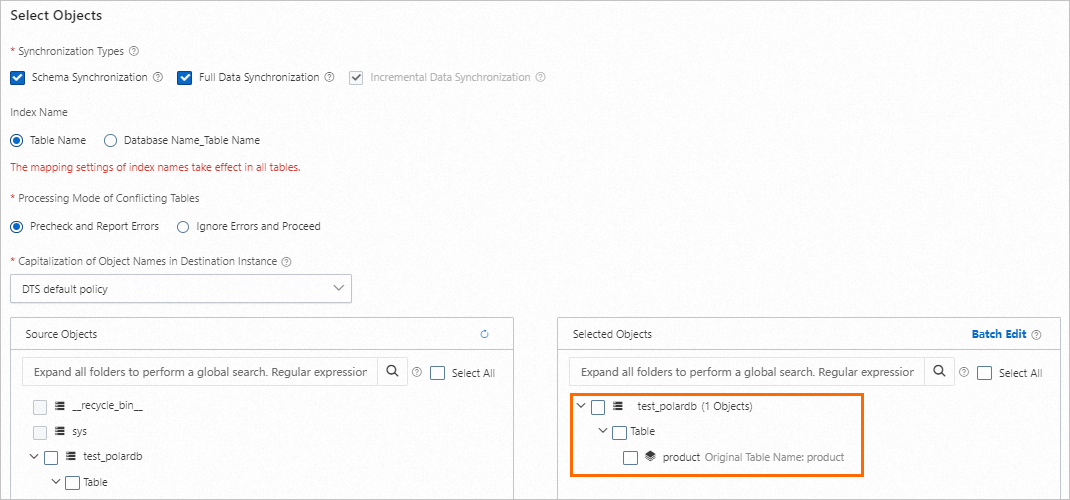
-
Keep the default advanced settings.
-
In the Data Verification substep, select Apply _routing Policy to No Tables. > Note: For Elasticsearch V7.X clusters, you must select Apply _routing Policy to No Tables.
-
-
Save the task, complete the pre-check, and purchase a DTS instance to start the sync. After the DTS instance is purchased, the full data sync starts automatically. Monitor progress on the Data Synchronization page. After the full sync completes, DTS switches to incremental sync and begins streaming binlog changes to Elasticsearch in real time.

Verify the sync results (optional)
Use the Kibana console to confirm that data from PolarDB was replicated correctly.
-
Log on to the Kibana console of the Elasticsearch cluster. For details, see Log on to the Kibana console.
-
In the upper-left corner, choose
 > Management > Dev Tools, then click the Console tab.
 -
Verify the full sync result. Run:
GET /product/_searchThe response should show all 5 records inserted in Step 1:
{ "took" : 3, "timed_out" : false, "_shards" : { "total" : 5, "successful" : 5, "skipped" : 0, "failed" : 0 }, "hits" : { "total" : { "value" : 5, "relation" : "eq" }, "max_score" : 1.0, "hits" : [ { "_index" : "product", "_type" : "product", "_id" : "3", "_score" : 1.0, "_source" : { "id" : 3, "name" : "mobile phone C", "price" : "2600", "code" : "cmp", "color" : "black" } }, { "_index" : "product", "_type" : "product", "_id" : "5", "_score" : 1.0, "_source" : { "id" : 5, "name" : "mobile phone E", "price" : "2800", "code" : "emp", "color" : "silvery" } }, { "_index" : "product", "_type" : "product", "_id" : "4", "_score" : 1.0, "_source" : { "id" : 4, "name" : "mobile phone D", "price" : "2700", "code" : "dmp", "color" : "red" } }, { "_index" : "product", "_type" : "product", "_id" : "2", "_score" : 1.0, "_source" : { "id" : 2, "name" : "mobile phone B", "price" : "2200", "code" : "bmp", "color" : "white" } }, { "_index" : "product", "_type" : "product", "_id" : "1", "_score" : 1.0, "_source" : { "id" : 1, "name" : "mobile phone A", "price" : "2000", "code" : "amp", "color" : "golden" } } ] } } -
Verify incremental sync. Insert a new record into the source table:
INSERT INTO `test_polardb`.`product` (`id`,`name`,`price`,`code`,`color`) VALUES (6,'mobile phone F','2750','fmp','white');After the record is replicated, run
GET /product/_searchagain. The response should now show 6 hits, including the new record:{ "took" : 439, "timed_out" : false, "_shards" : { "total" : 5, "successful" : 5, "skipped" : 0, "failed" : 0 }, "hits" : { "total" : { "value" : 6, "relation" : "eq" }, "max_score" : 1.0, "hits" : [ { "_index" : "product", "_type" : "product", "_id" : "3", "_score" : 1.0, "_source" : { "id" : 3, "name" : "mobile phone C", "price" : "2600", "code" : "cmp", "color" : "black" } }, { "_index" : "product", "_type" : "product", "_id" : "5", "_score" : 1.0, "_source" : { "id" : 5, "name" : "mobile phone E", "price" : "2800", "code" : "emp", "color" : "silvery" } }, { "_index" : "product", "_type" : "product", "_id" : "4", "_score" : 1.0, "_source" : { "id" : 4, "name" : "mobile phone D", "price" : "2700", "code" : "dmp", "color" : "red" } }, { "_index" : "product", "_type" : "product", "_id" : "2", "_score" : 1.0, "_source" : { "id" : 2, "name" : "mobile phone B", "price" : "2200", "code" : "bmp", "color" : "white" } }, { "_index" : "product", "_type" : "product", "_id" : "6", "_score" : 1.0, "_source" : { "code" : "fmp", "color" : "white", "price" : "2750", "name" : "mobile phone F", "id" : 6 } }, { "_index" : "product", "_type" : "product", "_id" : "1", "_score" : 1.0, "_source" : { "id" : 1, "name" : "mobile phone A", "price" : "2000", "code" : "amp", "color" : "golden" } } ] } }
What's next
-
To search and analyze data in your Elasticsearch cluster, see What is Alibaba Cloud Elasticsearch?
-
To remove an object from a running sync task, see Remove an object from a data synchronization task.
-
To add objects back to a running sync task, see Add an object to a data synchronization task.