DataWorks Data Integration lets you synchronize large volumes of MaxCompute data to an Alibaba Cloud Elasticsearch cluster in offline (batch) mode. After you configure the synchronization task, data transfer typically completes within a few minutes, making the synchronized data immediately available for full-text search, multi-dimensional queries, and statistical analysis.
Prerequisites
Before you begin, make sure you have:
-
A MaxCompute project. For more information, see Create a MaxCompute project.
-
An Alibaba Cloud Elasticsearch cluster with Auto Indexing enabled. For more information, see Create an Alibaba Cloud Elasticsearch cluster and Configure the YML file.
-
A DataWorks workspace. For more information, see Create a workspace.
The following constraints apply:
Data synchronization supports Alibaba Cloud Elasticsearch instances only. Self-managed Elasticsearch clusters are not supported.
The MaxCompute project, Elasticsearch instance, and DataWorks workspace must be in the same region.
All three resources must be in the same time zone. A time zone mismatch causes incorrect timestamps after time-related data is synchronized.
Billing
-
For Elasticsearch cluster pricing, see Elasticsearch billable items.
-
For exclusive resource group pricing, see Billing of exclusive resource groups for Data Integration (subscription).
Supported data sources
DataWorks Data Integration supports synchronizing data from the following sources to Alibaba Cloud Elasticsearch:
-
Alibaba Cloud databases: ApsaraDB RDS for MySQL, ApsaraDB RDS for PostgreSQL, ApsaraDB RDS for SQL Server, ApsaraDB for MongoDB, and ApsaraDB for HBase
-
Alibaba Cloud PolarDB for Xscale (PolarDB-X) (formerly DRDS)
-
Alibaba Cloud MaxCompute
-
Alibaba Cloud Object Storage Service (OSS)
-
Alibaba Cloud Tablestore
-
Self-managed databases: HDFS, Oracle, FTP, Db2, MySQL, PostgreSQL, SQL Server, MongoDB, and HBase
Supported synchronization modes:
-
Offline (batch): Synchronize an entire database or table. See Create a batch synchronization task to synchronize all data in a database to Elasticsearch.
-
Real-time: Synchronize full and incremental data continuously. See Create a real-time synchronization task to synchronize data to Elasticsearch.
What you'll create
This tutorial creates the following resources:
-
An exclusive resource group for Data Integration, attached to the virtual private cloud (VPC) of your Elasticsearch cluster
-
A MaxCompute data source and an Elasticsearch data source in Data Integration
-
An offline synchronization node that reads from MaxCompute and writes to Elasticsearch
Step 1: Prepare source data
Create a table in MaxCompute and import data. For more information, see Create tables and Import data to tables.
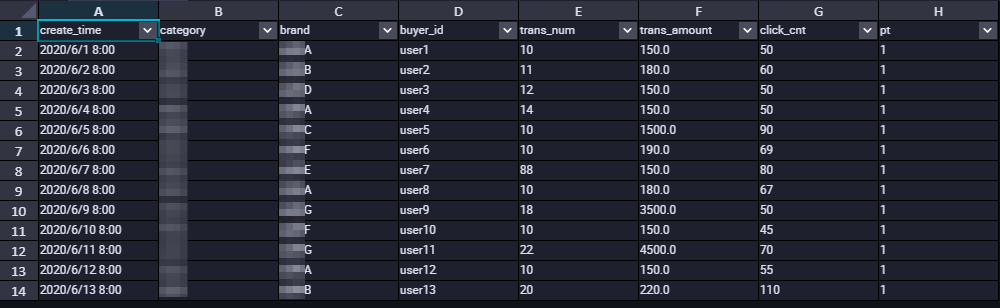
This tutorial uses the following table schema and data:
-
Table schema
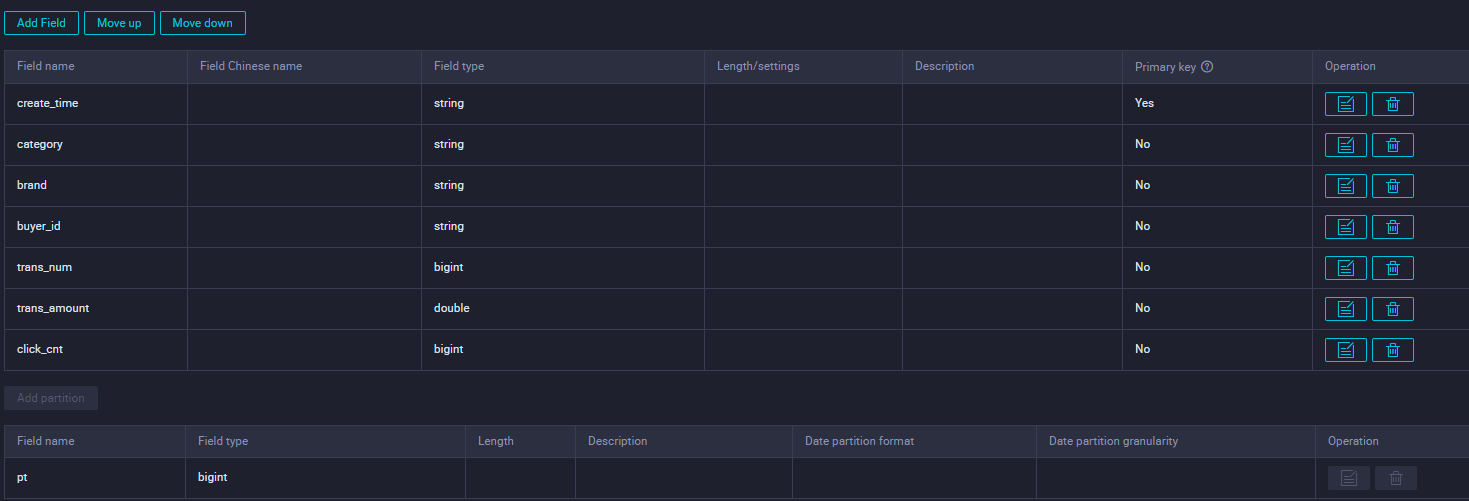
-
Sample table data
Step 2: Purchase and configure an exclusive resource group
An exclusive resource group for Data Integration handles data transfer between your source and destination, providing fast and stable throughput. In this tutorial, the resource group connects to your Elasticsearch cluster over a VPC.
-
Log on to the DataWorks consoleDataWorks consoleDataWorks console.
-
In the top navigation bar, select a region. In the left navigation pane, click Resource Group.
-
On the Exclusive Resource Groups tab, click Create Legacy Resource Group > Data Integration Resource Group.
-
On the DataWorks Exclusive Resource (Subscription) purchase page, set Exclusive Resource Type to Exclusive Resource For Data Integration, enter a name, and click Buy Now. For details, see Step 1: Create an exclusive resource group for Data Integration.
-
Find the resource group you created. In the Actions column, click Network Settings to attach a VPC. For details on attaching a VPC, see Attach a VPC.
ImportantThe resource group must connect to the VPC where your Elasticsearch cluster resides. Associate the resource group with the VPC, Zone, and vSwitch of the Elasticsearch cluster. To look up these values, see View the basic information of a cluster. After you associate the VPC, add the vSwitch CIDR Block to the VPC internal-facing access whitelist of the Elasticsearch instance. For more information, see Configure a public or internal-facing access whitelist for an Elasticsearch instance.
This tutorial synchronizes data over a VPC. To synchronize over the Internet instead, see Configure an IP address whitelist.
-
Click the back icon in the upper-left corner to return to the Resource Group List page.
-
In the Operation column of the resource group, click Attach Workspace to associate it with your target workspace. For details, see Step 2: Associate the exclusive resource group for Data Integration with a workspace.
Step 3: Add data sources
Add MaxCompute and Elasticsearch as data sources in DataWorks Data Integration.
-
Go to the Data Integration page.
-
Log on to the DataWorks consoleDataWorks consoleDataWorks console.
-
In the left navigation pane, click Workspaces.
-
In the Operation column of your workspace, choose Quick Access > Data Integration.
-
-
In the left navigation pane, click Data Source.
-
Add a MaxCompute data source.
-
On the Data Source List page, click Add Data Source.
-
Search for and select MaxCompute.
-
In the Add MaxCompute Data Source dialog box, configure the parameters in the Basic Information section. For details, see Add a MaxCompute data source.
-
In the Connection Configuration section, click Test Connectivity. Confirm the status shows Connected.
-
Click Complete.
-
-
Add an Elasticsearch data source the same way. For details, see Add an Elasticsearch data source.
Step 4: Configure and run a data synchronization task
The synchronization task uses the exclusive resource group to read data from MaxCompute and write it to Elasticsearch.
You can configure the task using the codeless UI or the code editor. This tutorial uses the codeless UI with legacy Data Development (DataStudio). For code editor instructions, see Configure a batch synchronization task using the code editor and Elasticsearch Writer.
-
Go to the Data Development page.
-
Log on to the DataWorks consoleDataWorks consoleDataWorks console.
-
In the left navigation pane, click Workspaces.
-
In the Operation column of your workspace, choose Quick Access > Data Development.
-
-
Create a batch synchronization task.
-
In the left navigation pane, choose Create > Create Workflow.
-
Right-click the new workflow and choose Create Node > Offline synchronization.
-
In the Create Node dialog box, set Name and click Confirm.
-
-
Configure the network and resource group.
-
In the Data Source section, set Source to MaxCompute (ODPS) and Data Source Name to your MaxCompute data source.
-
In the My Resource Group section, select the exclusive resource group you created.
-
In the Data Destination section, set Destination to Elasticsearch and Data Source Name to your Elasticsearch data source.
-
-
Click Next.
-
Configure the task settings. For full parameter details, see Configure a batch synchronization task using the codeless UI.
Setting Description Data Source (source) Select the source table in MaxCompute Data Destination Configure the target Elasticsearch index and related parameters Field Mapping Map each Source Field to the corresponding Destination Field Channel Control Configure parallelism and bandwidth limits for the data transfer -
Save and run the task. When the task succeeds, the log contains
Shell run successfully!:-
(Optional) Configure scheduling. In the right navigation pane, click Properties and set the scheduling parameters. For details, see Scheduling configuration.
-
Click the Save icon in the upper-right corner.
-
Click the Submit icon. If you configured scheduling, the task runs automatically on schedule. To run it immediately, click the Run icon.
2023-10-31 16:52:35 INFO Exit code of the Shell command 0 2023-10-31 16:52:35 INFO --- Invocation of Shell command completed --- 2023-10-31 16:52:35 INFO Shell run successfully! 2023-10-31 16:52:35 INFO Current task status: FINISH 2023-10-31 16:52:35 INFO Cost time is: 33.106s -
Step 5: Verify the data synchronization result
Use the Kibana console to confirm data was written to Elasticsearch and run sample queries.
-
Log on to the Kibana console of your Elasticsearch instance. For details, see Log on to the Kibana console.
-
Click the
 icon in the upper-left corner and select Dev Tools.
 -
In the Console, run the following command to view all synchronized documents.
odps_indexis the value of theindexfield you set in the synchronization task. If the data synchronized successfully, the response contains the matching documents.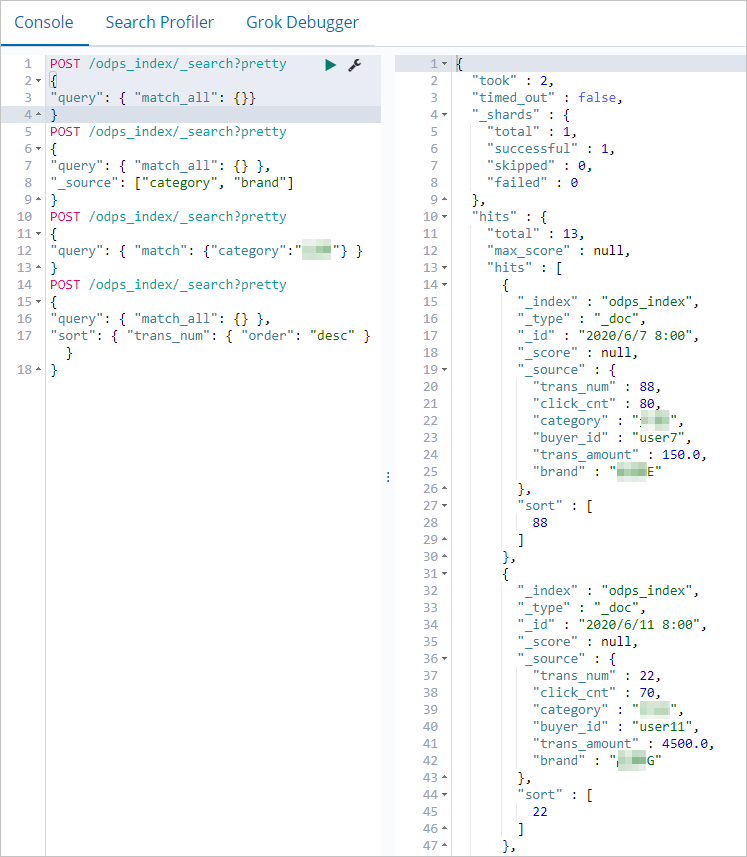
POST /odps_index/_search?pretty { "query": { "match_all": {} } } -
Run the following command to retrieve only the
categoryandbrandfields.POST /odps_index/_search?pretty { "query": { "match_all": {} }, "_source": ["category", "brand"] } -
Run the following command to filter documents where
categoryisfresh produce.POST /odps_index/_search?pretty { "query": { "match": { "category": "fresh produce" } } } -
Run the following command to sort documents by
trans_numin descending order.POST /odps_index/_search?pretty { "query": { "match_all": {} }, "sort": { "trans_num": { "order": "desc" } } }
For more Elasticsearch query syntax and examples, see the Elastic.co Help Center.