Share snapshots with other Alibaba Cloud accounts or a resource directory for cross-account disk creation and batch deployment.
Before sharing, verify that the snapshot contains no sensitive data. Recipients get full read access to all snapshot data.
How it works
Snapshot sharing uses Resource Sharing from Resource Management. The workflow has three stages:
-
The sharer adds the snapshot to a resource share and specifies recipients.
-
The recipient accepts the sharing invitation.
-
The recipient creates cloud disks from or copies the shared snapshot.
Sharing methods
Choose a method based on your scenario:
|
Method |
Scope |
Best for |
|
Share with specific accounts |
Any Alibaba Cloud account |
Cross-department sharing, partner collaboration |
|
Share within a resource directory |
Accounts in a resource directory |
Enterprise-wide sharing, automatic access for new members |
When you share within a resource directory, all accounts in the directory or folder get access automatically. New accounts inherit access; removed accounts lose access.
Prerequisites
Ensure that you have:
-
A snapshot with no sensitive data
-
The target information ready:
-
To share with a specific account: The recipient's Alibaba Cloud account ID. Hover over the profile picture in the upper-right corner of the console. If the account type is Alibaba Cloud Account, the displayed ID is the Alibaba Cloud account ID.
-
To share within a resource directory: An Alibaba Cloud account that meets one of these conditions:
-
The account has not enabled a resource directory but belongs to one
-
The account has passed enterprise verification, enabled the resource directory feature, and enabled resource sharing
-
-
-
(For encrypted snapshots using a CMK) The
AliyunECSShareEncryptSnapshotDefaultRoleRAM role created with required permissions. See Share encrypted resources across accounts.
Share a snapshot
Console
-
Open the ECS console - Snapshots page.
-
In the top navigation bar, select the region and resource group.

-
On the Disk Snapshots tab, find the snapshot and choose
 > Share Snapshot in the Actions column.
 -
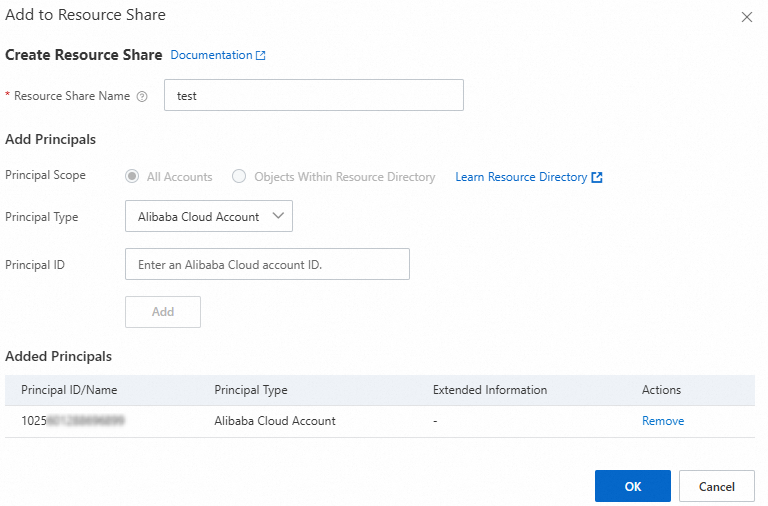
In the Add to Resource Share dialog box, set Method to Existing Resource Share or New Resource Share:
NoteSnapshot sharing uses Resource Sharing from Resource Management. A resource share groups resources and principals together.
-
(For New Resource Share only) Set the Principal Scope:
-
All Accounts: Share with any Alibaba Cloud account.
-
Objects Within Resource Directory: Share only within your resource directory. The management account or members can share with the directory, its folders, and its members.
-
-
Click Add Principals and configure the recipients. Share with a specific Alibaba Cloud account: Set Principal Type to Alibaba Cloud Account and enter the recipient's Alibaba Cloud account ID in Principal ID. Share within a resource directory:
-
If the sharer has not enabled the resource directory feature but belongs to one: Set Principal Type to Resource Directory or Folder (Organizational Unit). For folders, enter the folder ID.
After you select Resource Directory, the Resource Directory ID automatically shows the current directory ID. Note: The resource is shared with the entire organization, including all folders and member accounts. Click OK to complete.
-
If the sharer has enabled the resource directory feature: Select the target directory or folder from the list, or add them manually.
Note- If Principal Scope is Objects Within Resource Directory, only accounts within the directory are available. - To share with multiple accounts, add each one separately.
Note- You can also share snapshots from the Resource Management console. See Manage shared resources as a resource owner. - When you share with an entire resource directory or folder, all accounts in it can access the snapshot. New accounts automatically receive access. Removed accounts automatically lose access.
-
-
Click OK.
API
A Java SDK sample project demonstrates cross-account snapshot sharing and disk creation from a shared snapshot.
-
Download the snapshot sharing sample project. It includes three code samples:
Sample
Description
CreateResourceShareThe sharer creates a resource share and initiates snapshot sharing
ReceiveResourceShareThe recipient accepts the sharing invitation
UseResourceShareThe recipient creates a cloud disk from the shared snapshot
-
Configure SDK dependencies in
pom.xml. See Java SDK call examples.NoteSDK packages are updated frequently. Get the latest version from the GitHub links in SDK overview.
<!--Resource Sharing SDK--> <dependency> <groupId>com.aliyun</groupId> <artifactId>resourcesharing20200110</artifactId> <version>${lastVersion}</version> </dependency> <!--ECS SDK--> <dependency> <groupId>com.aliyun</groupId> <artifactId>alibabacloud-ecs20140526</artifactId> <version>${lastVersion}</version> </dependency> -
Set the
ALIBABA_CLOUD_ACCESS_KEY_IDandALIBABA_CLOUD_ACCESS_KEY_SECRETenvironment variables to your AccessKey ID and AccessKey secret. -
Replace placeholder variables with your actual values, such as the snapshot ID, recipient's account UID, and disk type.
-
Compile and run each sample as needed.
-
Verify the results. The sharer can check the Resource Management console for the new resource share, and the recipient can check the ECS console for the shared snapshot and created disk.
Accept and use a shared snapshot
After the sharer completes sharing, the recipient must accept the invitation before using the snapshot.
Accept the sharing invitation
Required the first time a new or existing resource share is used.
-
Open the Resource Management console.
-
In the left-side navigation pane, choose Resource Sharing > Resources Shared To Me.
-
In the top navigation bar, select the region of the shared snapshot.
-
On the Shared To Me page, find the resource share and click Accept in the Status column.
-
In the Accept Resource Sharing Invitation dialog box, click OK.
After you accept, new resources added to this resource share are accepted by default.
View the shared snapshot
-
Open the ECS console - Snapshots page.
-
In the top navigation bar, select the region of the shared snapshot.
-
Find the shared snapshot. Identify it by the following indicators, or choose
> View Shared Snapshot in the Actions column to view details in the Resource Management console:-
Hover over the
 icon to view a tag in the format
 acs:ecs:sharedFrom:<UID of the sharer>:<Region>:<Source snapshot ID>. -
The Creation Method column showing Shared Snapshot.
-
Hover over the
 icon to view the sharer's account UID and source snapshot ID.
-
Use the shared snapshot
Create a data disk from the shared snapshot or copy it.
For encrypted shared snapshots, change the encryption key when creating a disk or copying the snapshot.
Disks created from a shared encrypted snapshot are limited to ESSD, ESSD AutoPL, and ESSD Entry. To create other disk types, copy the snapshot first and create a disk from the copy.
Unshare a snapshot
When a snapshot is unshared, recipients can no longer query it through the ECS console or API, or re-initialize disks created from it. Previously copied snapshots are not affected.
-
Open the ECS console - Snapshots page.
-
In the top navigation bar, select the region and resource group.
-
On the Disk Snapshots tab, find the snapshot. Choose
> Share Snapshot in the Actions column. -
In the Principals section, click Modify.
-
In the Principals section, click Remove in the Actions column for the recipient to remove.

-
Click OK.
Limitations
Billing
-
Sharing a snapshot is free.
-
Recipients are charged for resources created from a shared snapshot, such as cloud disks or cross-region snapshot copies.
-
A shared snapshot that expires but remains shared is not automatically released and continues to incur storage charges.
Quotas
|
Resource |
Limit |
|
Maximum accounts per shared snapshot |
64 |
|
Maximum snapshots shared per account |
1,024 |
Account restrictions
Cross-site sharing (between China site and international site accounts) is not supported.
Sharer restrictions
-
Cannot delete a shared snapshot. Unshare it first.
-
Cannot share snapshots created from imported custom images.
-
Cannot share snapshots encrypted with a service key. To share such a snapshot, copy the snapshot to change the encryption to a CMK, then share the copy. See Disk encryption.
Recipient restrictions
-
Cannot create custom images from shared snapshots.
-
Cannot roll back disks using shared snapshots because the shared snapshot ID differs from the source snapshot ID.
-
Cannot delete shared snapshots. The sharer must unshare them first.
-
Cannot archive shared snapshots.
-
Cannot re-share shared snapshots. Workarounds:
-
Create a disk from the shared snapshot, create a new snapshot from that disk, and share the new snapshot.
-
Copy the shared snapshot and share the copy.
-
-
Cannot extend the retention period of a shared snapshot.
-
If the original has permanent retention, the shared copy retains for 1,096 days.
-
If the original has a custom retention period, the shared copy follows the same period.
-