Public images may have known security vulnerabilities or configuration issues. Understanding these issues can help you identify potential security risks and take appropriate measures to quickly locate and resolve them.
Known issues for Windows
Specific features do not work as expected on Windows instances with 512 MB of memory
Resolving the termdd blue screen issue in Windows Server 2008 R2
A June 2022 Microsoft patch causes RRAS issues on servers with NAT enabled
A January 2022 patch causes abnormal behavior on Windows Server domain controllers
Windows Server 2012 R2: .NET Framework 3.5 installation fails
Mismatch between vCPU count and specification in a Windows instance
Known issues of Linux images
CentOS issues
Debian issues
Debian 9.6: Network configuration issues on instances in the classic network
Fedora CoreOS issues
Hostnames are not applied to instances created from Fedora CoreOS custom images
OpenSUSE issues
OpenSUSE 15: Kernel updates may cause the system to hang during startup
Red Hat Enterprise Linux issues
Red Hat Enterprise Linux 8 64-bit: The kernel version cannot be updated using the yum update command
SUSE Linux Enterprise Server issues
Other issues
Known issues for the Windows operating system
Windows: Functional issues on instances with 512 MB of memory
Problem description
When you use the Windows Server Version 2004 Datacenter 64-bit (Simplified Chinese, Without UI) operating system on an Elastic Compute Service (ECS) instance that has 512 MB of memory, issues may occur. For example, the password configured during instance creation does not take effect, the instance password cannot be changed, or commands fail to run.
Cause
Virtual memory cannot be allocated because the paging file is not enabled. As a result, exceptions may occur when you run programs.
Solution
Because of the small memory size, you cannot attach Pre-installation Environment (PE) disks to the instance. You also cannot log on to the instance because the password that you configured during instance creation is not effective. Therefore, you can enable the paging file for the instance only using Cloud Assistant.
You can use one of the following methods to run commands using Cloud Assistant.
Use Session Manager to connect to the instance without a password and then run commands. For more information, see Connect to an instance using Session Manager.
Use Cloud Assistant to send commands to the instance. For more information, see Send remote commands.
Run the following command to enable automatic management of the paging file.
Wmic ComputerSystem set AutomaticManagedPagefile=TrueNoteThe command may fail to run. If it fails, retry the command until it runs successfully.
You can also run the
Wmic ComputerSystem get AutomaticManagedPagefilecommand to check whether the paging file is enabled. If the following message is returned, the paging file is enabled.AutomaticManagedPagefile TRUE
Restart the instance for the changes to take effect.
Windows Server 2016: Software installation package is unresponsive
Problem description
When a software installation package is downloaded and run in Windows Server 2016, the operating system becomes unresponsive.
Cause
For security reasons, the Windows operating system enables a ProtectYourPC security configuration during the Sysprep phase of startup. After the operating system starts, it runs the SmartScreen system process. The SmartScreen system process is designed to protect you from malicious websites and insecure downloads.
When you try to download or run a software package from the Internet, the package includes a web identifier. This identifier triggers the system's SmartScreen process. SmartScreen recognizes that the software originates from the Internet and may lack sufficient reputation information, and as a result, blocks the software.
Solution
You can use one of the following methods to resolve the issue:
Unblock the software package
In the properties of the software package, select Unblock.
Run the software package again.
Disable the SmartScreen filter
Go to the
C:\Windows\System32directory.Double-click the
SmartScreenSettings.exefile.In the Windows SmartScreen dialog box, select Don't Do Anything (turn Off Windows SmartScreen) and click OK.
Run the software package again.
Modify the group policy configuration
Open the Run window and enter
gpedit.msc.In the Local Group Policy Editor, navigate to Computer Configuration > Windows Settings > Security Settings > Local Policies > Security Options.
Find the User Account Control: Admin Approval Mode For The Built-in Administrator Account policy, right-click it, and then select Properties.
On the Local Security Setting tab, select Enabled and click OK.
Restart the system for the configuration to take effect.
Run the software package again.
Windows Server 2022: The KB5034439 patch fails to install
Problem description
The KB5034439 patch fails to install on the Windows Server 2022 operating system.
Cause
KB5034439 is an update for the Windows Recovery Environment released by Microsoft in January 2024. If you use the official Microsoft Windows Update service as the update source, the system searches for and tries to install this patch, which may cause the installation to fail. By default, images use the Alibaba Cloud WSUS update server, which does not provide this patch. This behavior is expected and does not affect normal use. For more information, see the official Microsoft document KB5034439: Windows Recovery Environment update for Windows Server 2022: January 9, 2024.
A June 2022 Microsoft patch causes RRAS issues on servers with NAT enabled
Problem description: According to a Microsoft announcement on June 23, 2022, after you install a security patch released by Microsoft in June 2022 on a Windows device, the following risks may occur: Routing and Remote Access Service (RRAS) servers with Network Address Translation (NAT) enabled may lose connectivity, and devices connected to the server may be unable to connect to the Internet.
Affected versions:
Windows Server 2022
Windows Server 2019
Windows Server 2016
Windows Server 2012 R2
Windows Server 2012
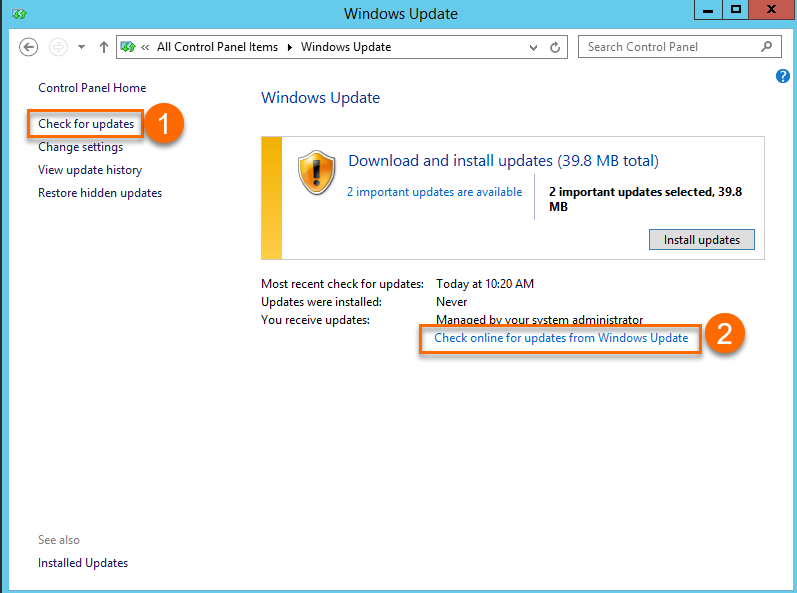
When you check for system updates for Windows Server 2012 R2 and Windows Server 2012, make sure to select the Check for updates option that is marked with ①. The update source linked to ① is the internal Alibaba Cloud Windows WSUS server. The update source linked to ② is the official Microsoft Windows Update server. In special cases, security updates may cause potential issues. To prevent these issues, we check the Windows security updates from Microsoft and release the updates that pass the check to the internal WSUS server.
Solution: The relevant problematic patches have been removed from the WSUS service provided by Alibaba Cloud. To ensure that your operating system is not affected, check whether the problematic patches are installed on your Windows device. You can run the CMD command that matches your Windows Server version to check for the patches.
Windows Server 2012 R2: wmic qfe get hotfixid | find "5014738"
Windows Server 2019: wmic qfe get hotfixid | find "5014692"
Windows Server 2016: wmic qfe get hotfixid | find "5014702"
Windows Server 2012: wmic qfe get hotfixid | find "5014747"
Windows Server 2022: wmic qfe get hotfixid | find "5014678"
If the check result shows that you have installed a problematic patch and your Windows server experiences issues such as NAT or RRAS failures, we recommend that you uninstall the patch to restore the device to a normal state. You can run the CMD command that matches your Windows Server version to uninstall the patch.
Windows Server 2012 R2: wusa /uninstall /kb:5014738 Windows Server 2019: wusa /uninstall /kb:5014692 Windows Server 2016: wusa /uninstall /kb:5014702 Windows Server 2012: wusa /uninstall /kb:5014747 Windows Server 2022: wusa /uninstall /kb:5014678NoteFor further updates and operational guidance on this issue, refer to the official Microsoft documentation. For more information, see RRAS Servers can lose connectivity if NAT is enabled on the public interface.
A January 2022 patch causes abnormal behavior on Windows Server domain controllers
Problem description: According to a Microsoft announcement on January 13, 2022, after you install a security patch released by Microsoft in January 2022 on a Windows device, the following risks may occur: The domain controller cannot be restarted or enters a restart loop, virtual machines (VMs) in Hyper-V may fail to start, or IPsec VPN connections may fail.
Affected versions:
Windows Server 2022
Windows Server, version 20H2
Windows Server 2019
Windows Server 2016
Windows Server 2012 R2
Windows Server 2012
When you check for system updates for Windows Server 2012 R2 and Windows Server 2012, make sure to select the Check for updates option that is marked with ①. The update source linked to ① is the internal Alibaba Cloud Windows WSUS server. The update source linked to ② is the official Microsoft Windows Update server. In special cases, security updates may cause potential issues. To prevent these issues, we check the Windows security updates from Microsoft and release the updates that pass the check to the internal WSUS server.
Solution: The relevant problematic patches have been removed from the WSUS service provided by Alibaba Cloud. To ensure that your operating system is not affected, check whether the problematic patches are installed on your Windows device. You can run the CMD command that matches your Windows Server version to check for the patches.
Windows Server 2012 R2: wmic qfe get hotfixid | find "5009624"
Windows Server 2019: wmic qfe get hotfixid | find "5009557"
Windows Server 2016: wmic qfe get hotfixid | find "5009546"
Windows Server 2012: wmic qfe get hotfixid | find "5009586"
Windows Server 2022: wmic qfe get hotfixid | find "5009555"
If the check result shows that you have installed a problematic patch and your Windows device cannot use the domain controller or start VMs, we recommend that you uninstall the patch to restore the device to a normal state. You can run the CMD command that matches your Windows Server version to uninstall the patch.
Windows Server 2012 R2: wusa /uninstall /kb:5009624 Windows Server 2019: wusa /uninstall /kb:5009557 Windows Server 2016: wusa /uninstall /kb:5009546 Windows Server 2012: wusa /uninstall /kb:5009586 Windows Server 2022: wusa /uninstall /kb:5009555NoteFor further updates and operational guidance on this issue, refer to the official Microsoft documentation. For more information, see RRAS Servers can lose connectivity if NAT is enabled on the public interface.
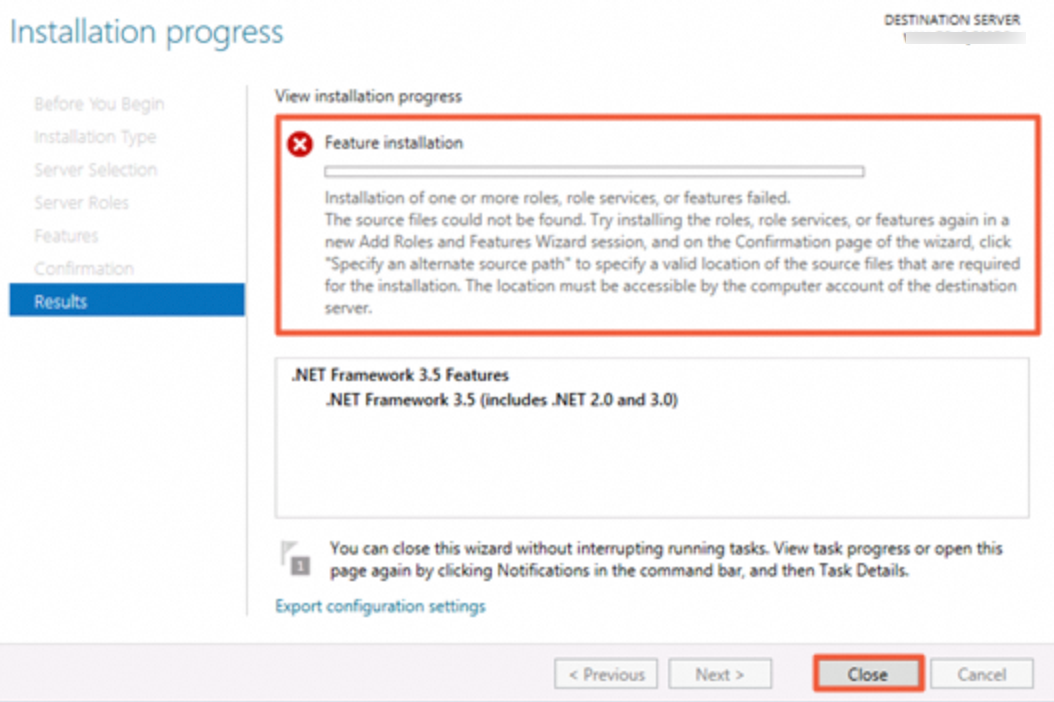
Windows Server 2012 R2: .NET Framework 3.5 fails to install
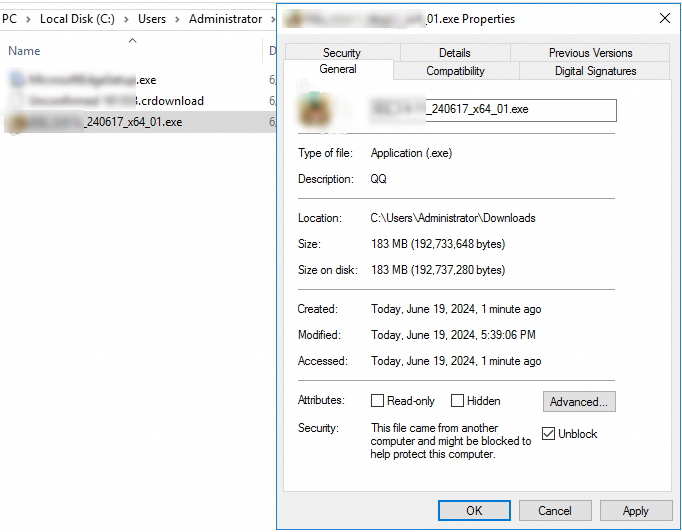
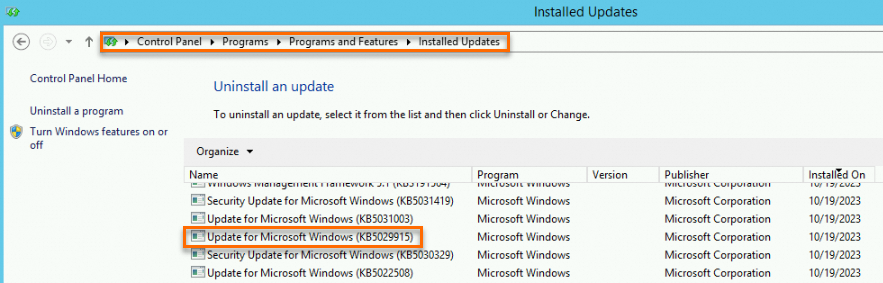
Issue: On Windows Server 2012 R2, you cannot install .NET Framework 3.5 if you use an image where the June 2023 patch KB5027141, the July 2023 patch KB5028872, the August 2023 patch KB5028970, or the September 2023 patch KB5029915 is installed by default.
ImportantIf you want to continue using the Windows Server 2012 R2 operating system, we recommend that you go to the ECS console and use a Windows Server 2012 R2 community image in which .NET Framework 3.5 is pre-installed to create an ECS instance. The image names are win2012r2_9600_x64_dtc_zh-cn_40G_.Net3.5_alibase_20231204.vhd and win2012r2_9600_x64_dtc_en-us_40G_.Net3.5_alibase_20231204.vhd. For information about how to find these two images, see Find an image.
Solution:
In Control Panel, find the KB5027141, KB5028872, KB5028970, or KB5029915 patch, right-click the patch, and then select Uninstall to manually uninstall it. For example, you can uninstall the KB5029915 patch from the path shown in the following figure.
Restart the ECS instance.
For more information, see Restart an instance.
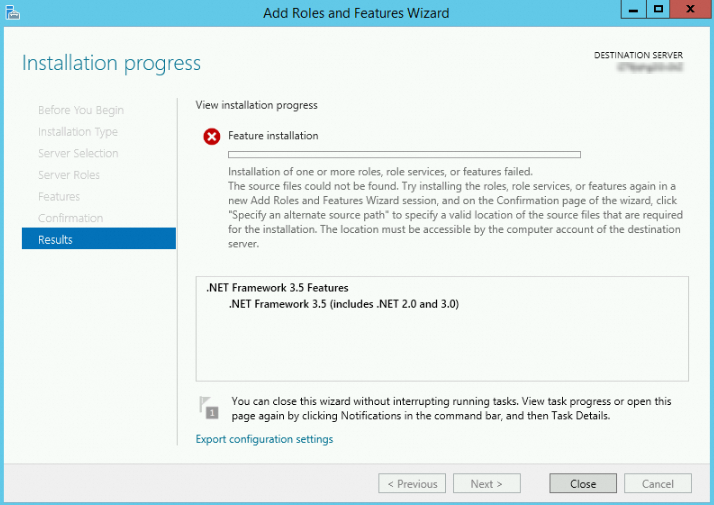
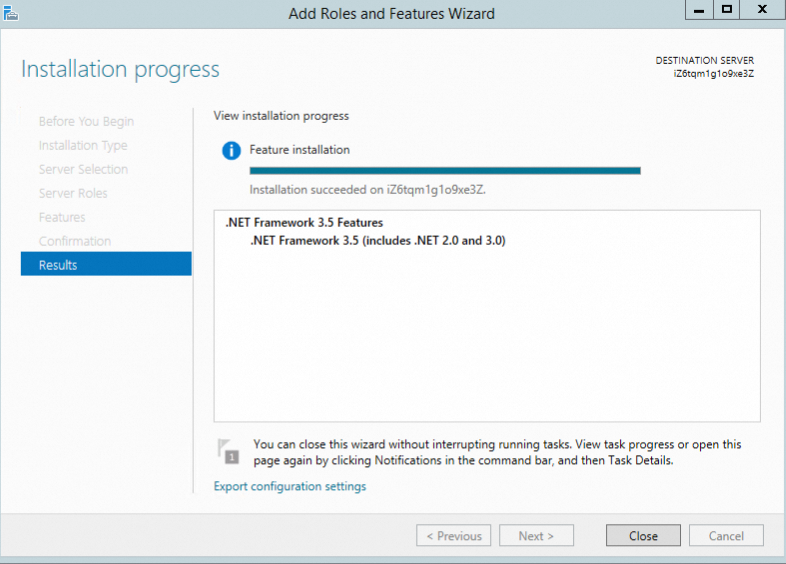
You can install .NET Framework 3.5 using one of the following methods.
Install from the Server Manager UI
In Server Manager, click Add Roles And Features.
Follow the wizard and use the default configurations. On the Features page, select .NET Framework 3.5 Features.
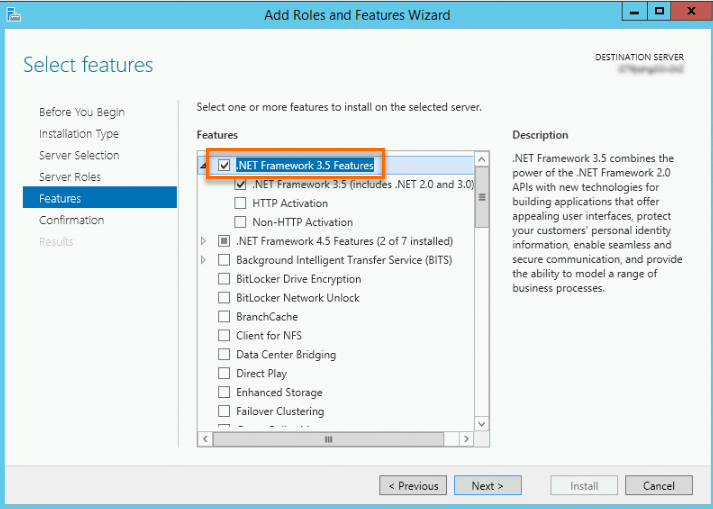
Continue to follow the wizard to confirm the result until the installation is complete.
Install by running a PowerShell command
You can run one of the following commands:
Dism /Online /Enable-Feature /FeatureName:NetFX3 /All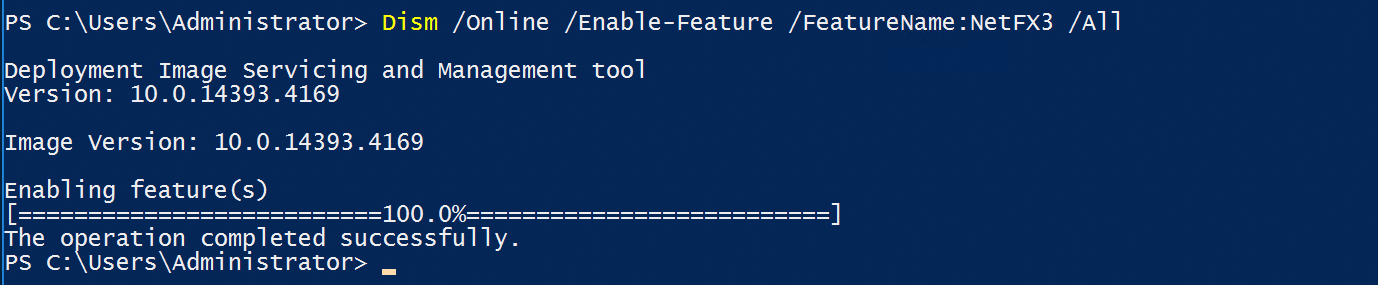
Install-WindowsFeature -Name NET-Framework-Features
Windows Server 2025: .NET Framework 3.5 fails to install
Problem description: When you try to install .NET Framework 3.5 in Windows Server 2025, the installation fails.
Solution: Windows Server 2025 uses the Alibaba Cloud WSUS update source. This update source does not support feature updates for Windows Server 2025. For more information about the solution, see How do I resolve the issue that .NET Framework 3.5 or a language pack fails to be installed on an instance that runs Windows Server 2012 R2 or later?.
Windows SSDs are displayed as HDDs
Description:
You purchase a Windows instance in the console and attach a standard SSD. In the Task Manager of the operating system, the SSD is identified as an HDD.
Cause:
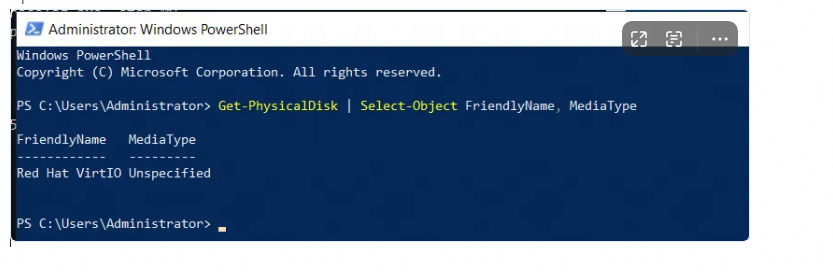
Windows determines the disk type based on the MEDIUM ROTATION RATE value that is returned by the INQUIRY command. The driver must correctly report this value for the system to identify the disk as an SSD or an HDD. If the MEDIUM ROTATION RATE is not reported, the system displays the disk type as Unspecified, which defaults to HDD. The issue where the Task Manager in Windows Server 2025 displayed SSDs as HDDs was a bug in a Microsoft patch. Microsoft fixed this bug in the June 2025 patch.
Solution:
This issue is caused by a limitation in the underlying protocol. The virtio block driver cannot determine whether the disk is an SSD or an HDD. In such cases, the operating system displays the disk as an HDD. The instance actually uses a standard SSD. The disk performance and usage are not affected.
Known issues of Linux images
CentOS issues
CentOS 8.0 public image naming issue
Problem description: After you connect to an instance created from the centos_8_0_x64_20G_alibase_20200218.vhd public image, you find that the operating system version of the instance is CentOS 8.1.
testuser@ecshost:~$ lsb_release -a
LSB Version:    :core-4.1-amd64:core-4.1-noarch
Distributor ID:    CentOS
Description:    CentOS Linux release 8.1.1911 (Core)
Release:    8.1.1911
Codename:    Core
Cause: The image is available in the public image list and has been updated with the latest community update packages. The version has also been upgraded to 8.1. Therefore, the actual version is 8.1.
Affected image ID: centos_8_0_x64_20G_alibase_20200218.vhd.
Solution: To use CentOS 8.0, you can call an API operation, such as RunInstances, and set
ImageId=centos_8_0_x64_20G_alibase_20191225.vhdto create an ECS instance.
CentOS 7: An issue may be caused by updates of specific image IDs
Problem description: The IDs of specific CentOS 7 public images were updated. This may affect policies for obtaining image IDs during automated O&M.
Affected images: CentOS 7.5 and CentOS 7.6
Cause: The image IDs used by the latest versions of CentOS 7.5 and CentOS 7.6 public images are in the following format:
%OS type%_%Major version%_%Minor version%_%Special field%_alibase_%Date%.%Format%. For example, the image ID prefix of CentOS 7.5 is updated fromcentos_7_05_64tocentos_7_5_x64. You must adjust any automated O&M policies that may be affected by the image ID change. For more information about image IDs, see Release notes for 2023.
CentOS 7: The hostname changes from uppercase letters to lowercase letters after an instance is restarted
Problem description: The first time some instances that run CentOS 7 are restarted, their hostnames change from uppercase to lowercase. The following table describes some examples.
Example hostname
Example after the first restart
Remains in lowercase in subsequent restarts
iZm5e1qe*****sxx1ps5zX
izm5e1qe*****sxx1ps5zx
Yes
ZZHost
zzhost
Yes
NetworkNode
networknode
Yes
Affected images: The following CentOS public images and any custom images created from them.
centos_7_2_64_40G_base_20170222.vhd
centos_7_3_64_40G_base_20170322.vhd
centos_7_03_64_40G_alibase_20170503.vhd
centos_7_03_64_40G_alibase_20170523.vhd
centos_7_03_64_40G_alibase_20170625.vhd
centos_7_03_64_40G_alibase_20170710.vhd
centos_7_02_64_20G_alibase_20170818.vhd
centos_7_03_64_20G_alibase_20170818.vhd
centos_7_04_64_20G_alibase_201701015.vhd
Affected hostname types: If your application is sensitive to the case of the hostname, your business may be affected after you restart the instance. You can use the following solution to fix these types of hostnames.
Hostname type
Affected
When it is affected
Continue reading this document
The hostname contains uppercase letters when you create the instance in the console or by calling an API operation.
Yes
The first time the instance is restarted.
Yes
The hostname contains only lowercase letters when you create the instance in the console or by calling an API operation.
No
Not applicable
No
The hostname contains uppercase letters, and you modified the hostname after you logged on to the instance.
No
Not applicable
Yes
Solution: To retain the hostname with uppercase letters after you restart the instance, perform the following steps.
Connect to the instance.
For more information, see Select a connection tool.
View the current hostname.
[testuser@izbp193*****3i161uynzzx ~]# hostname
izbp193*****3i161uynzzx
Run the following command to persist the hostname.
hostnamectl set-hostname --static iZbp193*****3i161uynzzXRun the following command to view the updated hostname.
[testuser@izbp193*****3i161uynzzx ~]# hostname
iZbp193*****3i161uynzzX
What to do next: If you are using a custom image, update the cloud-init software to the latest version and then create another custom image. This prevents the same issue from occurring when you use the problematic custom image to create new instances. For more information, see Install cloud-init and Create a custom image from an instance.
CentOS 6.8: An instance on which the NFS client is installed crashes
Problem description: A CentOS 6.8 instance with the NFS client loaded enters an extended wait state. The issue can be resolved only by restarting the instance.
Cause: When you use the NFS service on a kernel version from 2.6.32-696 to 2.6.32-696.10, the kernel nfsclient proactively disconnects the TCP connection if a communication latency glitch (electronic pulse) occurs. If the NFS server responds slowly, the connection initiated by the nfsclient may get stuck in the FIN_WAIT2 state. Normally, a connection in the FIN_WAIT2 state times out and is reclaimed after one minute by default, and the nfsclient can re-initiate the connection. However, because of a defect in the TCP implementation of these kernel versions, the connection in the FIN_WAIT2 state never times out. As a result, the nfsclient TCP connection can never be closed, a new connection cannot be initiated, and user requests hang and can never be recovered. The only way to fix this is to restart the ECS instance.
Affected image IDs: centos_6_08_32_40G_alibase_20170710.vhd and centos_6_08_64_20G_alibase_20170824.vhd.
Solution: You can run the yum update command to upgrade the system kernel to version 2.6.32-696.11 or later.
ImportantBefore you perform operations on an instance, make sure that you have created a snapshot to back up its data. For more information, see Create a snapshot.
Debian issues
Debian 9.6: Instances in the classic network have network configuration issues
Problem description: Instances of the classic network type that are created from a Debian 9 public image cannot be pinged.
Cause: The systemd-networkd service is disabled by default in the Debian system. Instances of the classic network type cannot be automatically assigned IP addresses in Dynamic Host Configuration Protocol (DHCP) mode.
Affected image ID: debian_9_06_64_20G_alibase_20181212.vhd.
Solution: You must run the following commands in sequence to resolve this issue.
systemctl enable systemd-networkdsystemctl start systemd-networkd
Fedora CoreOS issues
The hostnames of instances created from Fedora CoreOS custom images do not take effect
Problem description: You select a Fedora CoreOS image to create ECS instance A, create a custom image from instance A, and then use the custom image to create a new ECS instance B. The hostname that you set for instance B does not take effect. When you log on to instance B to check, the hostname of instance B is the same as that of instance A.
For example, you have a Fedora CoreOS ECS instance (
Instance A) with the hostnametest001. You then use the custom image of this instance to create a new ECS instance (Instance B) and set the hostname ofInstance Btotest002during instance creation. After you successfully create and remotely connect toInstance B, the hostname ofInstance Bis stilltest001.Cause: The Fedora CoreOS images provided as Alibaba Cloud public images use the official Ignition service of the operating system for instance initialization. The Ignition service is a program used by Fedora CoreOS and Red Hat Enterprise Linux CoreOS to operate disks in initramfs during system startup. When an ECS instance starts for the first time,
coreos-ignition-firstboot-complete.servicein Ignition checks for the existence of the /boot/ignition.firstboot file, which is an empty file, to determine whether to initialize the instance. If the file exists, the instance is initialized, which includes configuring the hostname, and the /boot/ignition.firstboot file is deleted.Because the Fedora CoreOS instance has been started at least once after creation, the /boot/ignition.firstboot file in the corresponding custom image has been deleted. When you use this custom image to create a new ECS instance, the instance is not initialized on its first startup, and the hostname does not change.
Solution:
NoteTo ensure data security in the instance, we recommend that you create a snapshot for the instance before performing the operation. If a data exception occurs, you can use the snapshot to roll back the disk to a normal state. For more information, see Create a snapshot.
Before you create a custom image from a Fedora CoreOS instance, use
root(administrator) permissions to create the /ignition.firstboot file in the /boot directory. The command-line operations are as follows:Remount /boot in read-write mode.
sudo mount /boot -o rw,remountCreate the /ignition.firstboot file.
sudo touch /boot/ignition.firstbootRemount /boot in read-only mode.
sudo mount /boot -o ro,remount
For more information about Ignition configurations, see Ignition configuration reference.
OpenSUSE issues
OpenSUSE 15: Kernel updates may cause the system to hang during startup
Problem description: After the OpenSUSE kernel is upgraded to version
4.12.14-lp151.28.52-default, an instance may hang on startup on certain CPU types. The known CPU type isIntel® Xeon® CPU E5-2682 v4 @ 2.50GHz. The corresponding call trace debugging result is as follows:[ 0.901281] CS: 0010 DS: 0000 ES: 0000 CR0: 0000000080050033 [ 0.901281] CR2: ffffc90000d68000 CR3: 000000000200a001 CR4: 00000000003606e0 [ 0.901281] DR0: 0000000000000000 DR1: 0000000000000000 DR2: 0000000000000000 [ 0.901281] DR3: 0000000000000000 DR6: 00000000fffe0ff0 DR7: 0000000000000400 [ 0.901281] Call Trace: [ 0.901281] cpuidle_enter_state+0x6f/0x2e0 [ 0.901281] do_idle+0x183/0x1e0 [ 0.901281] cpu_startup_entry+0x5d/0x60 [ 0.901281] start_secondary+0x1b0/0x200 [ 0.901281] secondary_startup_64+0xa5/0xb0 [ 0.901281] Code: 6c 01 00 0f ae 38 0f ae f0 0f 1f 84 00 00 00 00 00 0f 1f 84 00 00 00 00 00 90 31 d2 65 48 8b 34 25 40 6c 01 00 48 89 d1 48 89 f0 <0f> 01 c8 0f 1f 84 00 00 00 00 00 0f 1f 84 00 00 00 00 00 ** **Cause: The new kernel version is incompatible with the CPU Microcode. For more information, see Startup hang issue.
Affected image: opensuse_15_1_x64_20G_alibase_20200520.vhd.
Solution: In the /boot/grub2/grub.cfg file, add the kernel parameter
idle=nomwaitto the line that starts withlinux. The following example shows the modified file content:menuentry 'openSUSE Leap 15.1' --class opensuse --class gnu-linux --class gnu --class os $menuentry_id_option 'gnulinux-simple-20f5f35a-fbab-4c9c-8532-bb6c66ce****' { load_video set gfxpayload=keep insmod gzio insmod part_msdos insmod ext2 set root='hd0,msdos1' if [ x$feature_platform_search_hint = xy ]; then search --no-floppy --fs-uuid --set=root --hint='hd0,msdos1' 20f5f35a-fbab-4c9c-8532-bb6c66ce**** else search --no-floppy --fs-uuid --set=root 20f5f35a-fbab-4c9c-8532-bb6c66ce**** fi echo 'Loading Linux 4.12.14-lp151.28.52-default ...' linux /boot/vmlinuz-4.12.14-lp151.28.52-default root=UUID=20f5f35a-fbab-4c9c-8532-bb6c66ce**** net.ifnames=0 console=tty0 console=ttyS0,115200n8 splash=silent mitigations=auto quiet idle=nomwait echo 'Loading initial ramdisk ...' initrd /boot/initrd-4.12.14-lp151.28.52-default }
Red Hat Enterprise Linux issues
Red Hat Enterprise Linux 8 64-bit: The kernel version cannot be updated by running the yum update command
Problem description: In an ECS instance that runs the Red Hat Enterprise Linux 8 64-bit operating system, you run the yum update command to update the kernel version and restart the instance. You find that the kernel version remains the old version.
Cause: In the RHEL 8 64-bit operating system, the size of the /boot/grub2/grubenv file that stores GRand Unified Bootloader (GRUB) 2 environment variables is abnormal. The file size is not the standard 1,024 bytes, which causes the kernel version update to fail.
Solution: After you update the kernel version, you need to set the new kernel version as the default startup version. The complete operations are as follows:
Run the following command to update the kernel version.
yum update kernel -yRun the following command to obtain the kernel startup parameters of the current operating system.
grub2-editenv list | grep kerneloptsRun the following command to back up the old /grubenv file.
mv /boot/grub2/grubenv /home/grubenv.bakRun the following command to generate a new /grubenv file.
grub2-editenv /boot/grub2/grubenv createRun the following command to set the new kernel version as the default startup version.
In this example, the updated new kernel version is
/boot/vmlinuz-4.18.0-305.19.1.el8_4.x86_64.grubby --set-default /boot/vmlinuz-4.18.0-305.19.1.el8_4.x86_64Run the following command to set the kernel startup parameters.
The
- set kerneloptsparameter must be manually set to the value of the current operating system kernel startup parameters that you obtained in step 2.grub2-editenv - set kernelopts="root=UUID=0dd6268d-9bde-40e1-b010-0d3574b4**** ro crashkernel=auto net.ifnames=0 vga=792 console=tty0 console=ttyS0,115200n8 noibrs nosmt"Run the following command to restart the ECS instance to the new kernel version.
rebootWarningThe restart operation stops the instance for a short period of time and may interrupt services that are running on the instance. We recommend that you restart the instance during off-peak hours.
SUSE Linux Enterprise Server issues
SUSE Linux Enterprise Server: The SMT Server cannot be connected
Problem description: When you purchase and use a paid Alibaba Cloud image for SUSE Linux Enterprise Server or SUSE Linux Enterprise Server for SAP, the SMT Server may time out or have an exception. When you try to download or update a component, an error message similar to the following is returned:
Registration server returned 'This server could not verify that you are authorized to access this service.' (500)
Problem retrieving the respository index file for service 'SMT-http_mirrors_cloud_aliyuncs_com' location ****
Affected images: SUSE Linux Enterprise Server and SUSE Linux Enterprise Server for SAP
Solution: You need to re-register and activate the SMT service.
Run the following commands in sequence to re-register and activate the SMT service.
SUSEConnect -d
SUSEConnect --cleanup
systemctl restart guestregister
Run the following command to verify the activation status of the SMT service.
SUSEConnect -sIf a command output similar to the following is returned, the SMT service is successfully activated.
[{"identifier":"SLES_SAP","version":"12.5","arch":"x86_64","status":"Registered"}]
SUSE Linux Enterprise Server 12 SP5: Kernel updates may cause the system to hang during startup
Problem description: After a kernel version earlier than SUSE Linux Enterprise Server (SLES) 12 SP5 is upgraded to SLES 12 SP5, or after the internal kernel version of SLES 12 SP5 is upgraded, an instance may hang on startup on certain CPU types. The known CPU types are
Intel® Xeon® CPU E5-2682 v4 @ 2.50GHzandIntel® Xeon® CPU E7-8880 v4 @ 2.20GHz. The corresponding call trace debugging result is as follows:[ 0.901281] CS: 0010 DS: 0000 ES: 0000 CR0: 0000000080050033 [ 0.901281] CR2: ffffc90000d68000 CR3: 000000000200a001 CR4: 00000000003606e0 [ 0.901281] DR0: 0000000000000000 DR1: 0000000000000000 DR2: 0000000000000000 [ 0.901281] DR3: 0000000000000000 DR6: 00000000fffe0ff0 DR7: 0000000000000400 [ 0.901281] Call Trace: [ 0.901281] cpuidle_enter_state+0x6f/0x2e0 [ 0.901281] do_idle+0x183/0x1e0 [ 0.901281] cpu_startup_entry+0x5d/0x60 [ 0.901281] start_secondary+0x1b0/0x200 [ 0.901281] secondary_startup_64+0xa5/0xb0 [ 0.901281] Code: 6c 01 00 0f ae 38 0f ae f0 0f 1f 84 00 00 00 00 00 0f 1f 84 00 00 00 00 00 90 31 d2 65 48 8b 34 25 40 6c 01 00 48 89 d1 48 89 f0 <0f> 01 c8 0f 1f 84 00 00 00 00 00 0f 1f 84 00 00 00 00 00 ** **Cause: The new kernel version is incompatible with the CPU Microcode.
Solution: In the
/boot/grub2/grub.cfgfile, add the kernel parameteridle=nomwaitto the line that starts withlinux. The following example shows the modified file content:menuentry 'SLES 12-SP5' --class sles --class gnu-linux --class gnu --class os $menuentry_id_option 'gnulinux-simple-fd7bda55-42d3-4fe9-a2b0-45efdced****' { load_video set gfxpayload=keep insmod gzio insmod part_msdos insmod ext2 set root='hd0,msdos1' if [ x$feature_platform_search_hint = xy ]; then search --no-floppy --fs-uuid --set=root --hint='hd0,msdos1' fd7bda55-42d3-4fe9-a2b0-45efdced**** else search --no-floppy --fs-uuid --set=root fd7bda55-42d3-4fe9-a2b0-45efdced**** fi echo 'Loading Linux 4.12.14-122.26-default ...' linux /boot/vmlinuz-4.12.14-122.26-default root=UUID=fd7bda55-42d3-4fe9-a2b0-45efdced**** net.ifnames=0 console=tty0 console=ttyS0,115200n8 mitigations=auto splash=silent quiet showopts idle=nomwait echo 'Loading initial ramdisk ...' initrd /boot/initrd-4.12.14-122.26-default }
Other issues
A call trace may occur when instances of specific instance types that run operating systems with more recent kernel versions are started
Problem description: A call trace as shown below may occur when you start an instance of a specific instance type (for example, ecs.i2.4xlarge) that runs a system with a high-version kernel (for example, RHEL 8.3 or CentOS 8.3 with kernel version
4.18.0-240.1.1.el8_3.x86_64):Dec 28 17:43:45 localhost SELinux: Initializing. Dec 28 17:43:45 localhost kernel: Dentry cache hash table entries: 8388608 (order: 14, 67108864 bytes) Dec 28 17:43:45 localhost kernel: Inode-cache hash table entries: 4194304 (order: 13, 33554432 bytes) Dec 28 17:43:45 localhost kernel: Mount-cache hash table entries: 131072 (order: 8, 1048576 bytes) Dec 28 17:43:45 localhost kernel: Mountpoint-cache hash table entries: 131072 (order: 8, 1048576 bytes) Dec 28 17:43:45 localhost kernel: unchecked MSR access error: WRMSR to 0x3a (tried to write 0x000000000000****) at rIP: 0xffffffff8f26**** (native_write_msr+0x4/0x20) Dec 28 17:43:45 localhost kernel: Call Trace: Dec 28 17:43:45 localhost kernel: init_ia32_feat_ctl+0x73/0x28b Dec 28 17:43:45 localhost kernel: init_intel+0xdf/0x400 Dec 28 17:43:45 localhost kernel: identify_cpu+0x1f1/0x510 Dec 28 17:43:45 localhost kernel: identify_boot_cpu+0xc/0x77 Dec 28 17:43:45 localhost kernel: check_bugs+0x28/0xa9a Dec 28 17:43:45 localhost kernel: ? __slab_alloc+0x29/0x30 Dec 28 17:43:45 localhost kernel: ? kmem_cache_alloc+0x1aa/0x1b0 Dec 28 17:43:45 localhost kernel: start_kernel+0x4fa/0x53e Dec 28 17:43:45 localhost kernel: secondary_startup_64+0xb7/0xc0 Dec 28 17:43:45 localhost kernel: Last level iTLB entries: 4KB 64, 2MB 8, 4MB 8 Dec 28 17:43:45 localhost kernel: Last level dTLB entries: 4KB 64, 2MB 0, 4MB 0, 1GB 4 Dec 28 17:43:45 localhost kernel: FEATURE SPEC_CTRL Present Dec 28 17:43:45 localhost kernel: FEATURE IBPB_SUPPORT PresentCause: The community updates for these kernel versions include a patch that attempts to write to Model-Specific Registers (MSRs). However, some instance types, such as ecs.i2.4xlarge, do not support writing to MSRs because of their virtualization version, which causes this call trace.
Solution: This call trace does not affect the normal use or stability of the system. You can ignore this error.
Compatibility issues between specific Linux kernel versions and the hfg6 general-purpose instance family with high clock speeds may cause a kernel panic
Problem description: For some systems in the Linux community, such as CentOS 8, SUSE Linux Enterprise Server 15 SP2, and OpenSUSE 15.2, upgrading to a new kernel version in an instance of the hfg6 high-frequency general-purpose instance family may cause a kernel panic. An example of call trace debugging is as follows:
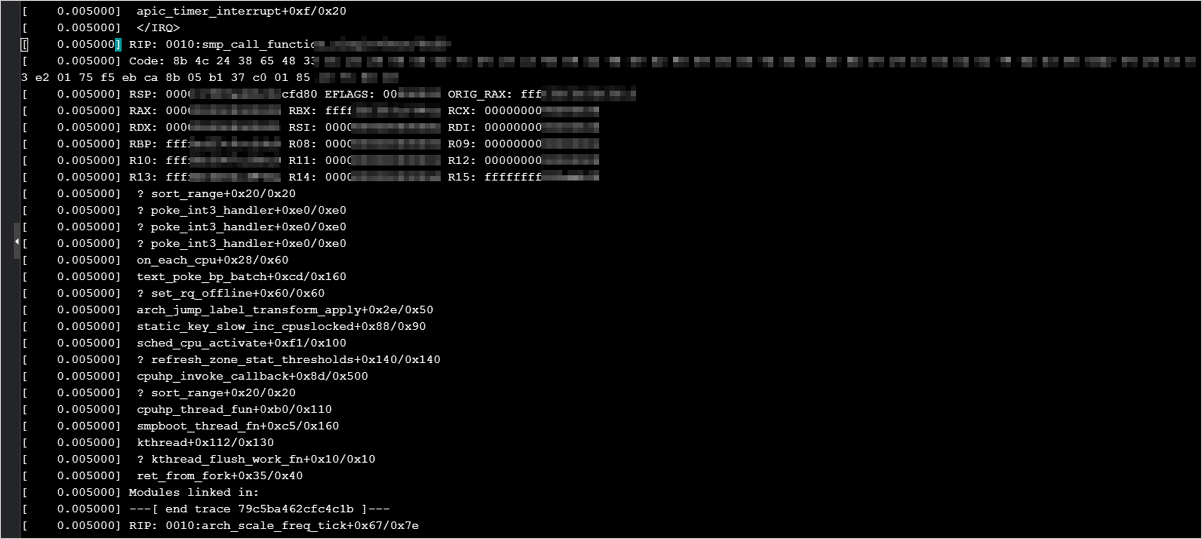
Cause: There are compatibility issues between the hfg6 high-frequency general-purpose instance family and some Linux kernel versions.
Solution:
The latest kernel versions of SUSE Linux Enterprise Server 15 SP2 and OpenSUSE 15.2 have fixed this issue. The commit content is as follows. If the latest kernel version to which you upgraded contains this content, it is compatible with the hfg6 instance family.
commit 1e33d5975b49472e286bd7002ad0f689af33fab8
Author: Giovanni Gherdovich <ggherdovich@suse.cz>
Date:   Thu Sep 24 16:51:09 2020 +0200

    x86, sched: Bail out of frequency invariance if
    turbo_freq/base_freq gives 0 (bsc#1176925).

    suse-commit: a66109f44265ff3f3278fb34646152bc2b3224a5


commit dafb858aa4c0e6b0ce6a7ebec5e206f4b3cfc11c
Author: Giovanni Gherdovich <ggherdovich@suse.cz>
Date:   Thu Sep 24 16:16:50 2020 +0200

    x86, sched: Bail out of frequency invariance if turbo frequency
    is unknown (bsc#1176925).

    suse-commit: 53cd83ab2b10e7a524cb5a287cd61f38ce06aab7

commit 22d60a7b159c7851c33c45ada126be8139d68b87
Author: Giovanni Gherdovich <ggherdovich@suse.cz>
Date:   Thu Sep 24 16:10:30 2020 +0200

    x86, sched: check for counters overflow in frequency invariant
    accounting (bsc#1176925).
If you use the yum update command to upgrade a CentOS 8 system to kernel version
kernel-4.18.0-240or later in an instance of the hfg6 high-frequency general-purpose instance family, a kernel panic may occur. If this issue occurs, roll back to the previous kernel version.
pip requests time out
Problem description: pip requests occasionally time out or fail.
Affected images: CentOS, Debian, Ubuntu, SUSE, OpenSUSE, and Alibaba Cloud Linux.
Cause: Alibaba Cloud provides the following three pip source addresses. The default endpoint is mirrors.aliyun.com. Instances that access this endpoint must be able to access the Internet. If your instance is not assigned a public IP address, pip requests will time out.
(Default) Internet: mirrors.aliyun.com
VPC internal network: mirrors.cloud.aliyuncs.com
Classic network internal network: mirrors.aliyuncs.com
Solution: You can use either of the following methods to resolve this issue.
Method 1
Assign a public IP address to your instance by attaching an EIP to it. For more information, see Attach an EIP to a cloud resource.
For subscription instances, you can also reassign a public IP address by upgrading or downgrading the instance. For more information, see Upgrade the instance type of a subscription instance.
Method 2
If a pip response is delayed, you can run the fix_pypi.sh script in the ECS instance and then retry the pip operation. The steps are as follows:
Connect to the instance.
For more information, see Connect to an instance using VNC.
Run the following command to obtain the script file.
wget http://image-offline.oss-cn-hangzhou.aliyuncs.com/fix/fix_pypi.shRun the script.
VPC instance: Run the command
bash fix_pypi.sh "mirrors.cloud.aliyuncs.com".Classic network instance: Run the command
bash fix_pypi.sh "mirrors.aliyuncs.com".
Retry the pip operation.
The content of the fix_pypi.sh script is as follows:
#!/bin/bash

function config_pip() {
    pypi_source=$1

    if [[ ! -f ~/.pydistutils.cfg ]]; then
cat > ~/.pydistutils.cfg << EOF
[easy_install]
index-url=http://$pypi_source/pypi/simple/
EOF
    else
        sed -i "s#index-url.*#index-url=http://$pypi_source/pypi/simple/#" ~/.pydistutils.cfg
    fi

    if [[ ! -f ~/.pip/pip.conf ]]; then
    mkdir -p ~/.pip
cat > ~/.pip/pip.conf << EOF
[global]
index-url=http://$pypi_source/pypi/simple/
[install]
trusted-host=$pypi_source
EOF
    else
        sed -i "s#index-url.*#index-url=http://$pypi_source/pypi/simple/#" ~/.pip/pip.conf
        sed -i "s#trusted-host.*#trusted-host=$pypi_source#" ~/.pip/pip.conf
    fi
}

config_pip $1