Install cloud-init on a Linux server to enable automatic hostname, network, and user data initialization for ECS instances.
See the official cloud-init documentation.
Use cases
cloud-init is pre-installed on all Alibaba Cloud public images. For custom images, follow the suggestions for your scenario.
-
Linux servers without cloud-init that you plan to migrate to the cloud
Install cloud-init before migrating a server to Alibaba Cloud so that the resulting ECS instance can run initialization tasks at startup.
NoteFor servers not being migrated to the cloud, cloud-init may add unnecessary complexity. Decide based on your environment.
-
Linux servers with cloud-init versions earlier than 0.7.9
Newer versions include more features and bug fixes. Upgrade to a later version for better compatibility and security.
-
ECS instances on Alibaba Cloud that do not have cloud-init installed
Manually install cloud-init to enable initialization configuration on the instance.
Step 1: Check the cloud-init version
-
Log on to the source server.
-
Check whether cloud-init is installed.
CentOS series
rpm -qa | grep -i cloud-init
pip list | grep -i cloud-init
Ubuntu series
dpkg -l | grep -i cloud-init pip list | grep -i cloud-init-
If no output is returned or the version is earlier than 0.7.9, see Step 2: Install cloud-init.
ImportantVersion 0.7.9 is an early community version not suitable for ECS initialization. Upgrade to a later version.
-
If the version is 18 or later, no installation is needed. To customize the default network configuration, see Disable automatic network initialization by Alibaba Cloud.
-
If the version is 19.1.21, upgrade to Alibaba Cloud cloud-init 23.2.2. Key improvements over 19.1.21:
-
Supports metadata access in security hardening mode. See Instance metadata.
-
Other changes include feature enhancements, performance improvements, and bug fixes. See the ChangeLog file.
-
-
Other versions: no installation needed. See Next steps.
-
-
To prevent data loss, back up your source server data before installation. For example, create a snapshot.
Step 2: Install cloud-init
-
(Recommended) Alibaba Cloud cloud-init 23.2.2: Requires Python 3.6 or later. Data source:
Aliyun. -
Alibaba Cloud cloud-init 19.1.21: Requires Python 3.6 or later. Data source:
Aliyun. Alibaba Cloud cloud-init 0.7.6a18: This version is required for some earlier operating systems, such as CentOS 6, Debian 9, and SUSE Linux Enterprise Server 12. It requires Python 2.7 and uses the
Aliyundata source.ImportantThe Python community no longer supports Python 2.7. Use a later version of cloud-init to avoid potential dependency library issues.
-
Community version of cloud-init: Maintained by the cloud-init community. The latest Alibaba Cloud version is 23.2.2. For a later version, install the community version from the official cloud-init website.
The Alibaba Cloud version is optimized for Alibaba Cloud services. Use the Alibaba Cloud version unless you need a later community release.
(Recommended) Alibaba Cloud cloud-init 23.2.2
Alibaba Cloud cloud-init 23.2.2 is distributed as a software package. Install the package for your operating system or build from source.
The following examples use Debian 12 and CentOS Stream 9 to demonstrate binary package installation.
Debian 12
-
Download the cloud-init package.
wget https://ecs-image-tools.oss-cn-hangzhou.aliyuncs.com/cloudinit/debian12/cloud-init_23.2.2-5_all.deb -
Install the package.
sudo apt-get install -y ./cloud-init_23.2.2-5_all.deb -
(Optional) To prevent upgrades to a later open source version, hold the cloud-init package at its current version.
sudo apt-mark hold cloud-init -
Verify the cloud-init version.
cloud-init --version
CentOS Stream 9
-
Download the cloud-init package.
wget https://ecs-image-tools.oss-cn-hangzhou.aliyuncs.com/cloudinit/centosstream9/cloud-init-23.2.2-5.el9.noarch.rpm -
Install the package.
sudo yum install -y ./cloud-init-23.2.2-5.el9.noarch.rpm -
(Optional) To prevent upgrades to a later open source version, lock the cloud-init package at its current version.
sudo sh -c 'echo "exclude=cloud-init" >> /etc/dnf/dnf.conf' -
Verify the cloud-init version.
cloud-init --version
By default, Alibaba Cloud cloud-init 23.2.2 no longer maps the hostname to the private IPv4 address in the /etc/hosts file. If your business requires this mapping, configure it manually. Later OS versions use the nss-myhostname component for hostname connectivity. This component is provided by the systemd-libs package (Red Hat series) or the libnss-myhostname package (Debian series) and enabled through the /etc/nsswitch.conf file. See the nss-myhostname manual.
Alibaba Cloud cloud-init 19.1.21
-
Ensure the Python PIP dependency library is installed.
Install the python3-pip dependency library on your Linux distribution:
CentOS/Red Hat Enterprise Linux
sudo yum -y install python3-pipUbuntu/Debian
sudo apt-get -y install python3-pipOpenSUSE/SUSE
sudo zypper -n install python3-pip -
Download Alibaba Cloud cloud-init.
wget https://ecs-image-tools.oss-cn-hangzhou.aliyuncs.com/cloudinit/cloud-init-19.1.21.tgz -
Decompress the cloud-init package.
tar -zxvf cloud-init-19.1.21.tgz -
Go to the cloud-init directory and install the dependency libraries.
cd ./cloud-init-19.1.21 pip3 install -r ./requirements.txt -
Go to the tools subdirectory of the cloud-init directory.
cd ./tools -
Run the deploy.sh script to install cloud-init.
sudo bash ./deploy.sh <issue> <major_version>Parameters of the deploy.sh script:
Parameter
Description
Example
<issue>
The operating system platform type. Valid values: centos, redhat, rhel, debian, ubuntu, opensuse, and sles. The parameter values are case-sensitive. sles specifies SUSE/SLES.
NoteIf the operating system is CentOS Stream, set this parameter to centos.
centos
<major_version>
The major version number of the operating system platform.
NoteYou cannot install Alibaba Cloud cloud-init 19.1.21 on Ubuntu 14.
The major version number of CentOS 7.6 is 7.
For example, if your current operating system is CentOS 7, run the command
sudo bash ./deploy.sh centos 7. -
Verify cloud-init is installed.
If
"description": "success"is returned, the installation succeeded.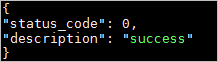
-
Verify the cloud-init version.
cloud-init --version
Sample shell scripts to install Alibaba Cloud cloud-init on different Linux distributions. Modify the script for your operating system.
CentOS 7/8
# Check and install python3-pip.
if ! python3 -c 'import setuptools' >& /dev/null; then
  yum -y install python3-pip
fi
# Back up the old version of cloud-init.
test -d /etc/cloud && mv /etc/cloud /etc/cloud-old
# Download and decompress the Alibaba Cloud cloud-init package.
wget https://ecs-image-tools.oss-cn-hangzhou.aliyuncs.com/cloudinit/cloud-init-19.1.21.tgz
tar -zxvf ./cloud-init-19.1.21.tgz
# Install cloud-init.
issue_major=$( cat /etc/redhat-release | grep -Eo '[0-9]+\.?[0-9]+' | head -1 | awk -F'.' '{printf $1}')
bash ./cloud-init-*/tools/deploy.sh centos "$issue_major"
Red Hat Enterprise Linux 7/8
# Check and install python3-pip.
if ! python3 -c 'import setuptools' >& /dev/null; then
  yum -y install python3-pip
fi
# Back up the old version of cloud-init.
test -d /etc/cloud && mv /etc/cloud /etc/cloud-old
# Download and decompress the Alibaba Cloud cloud-init package.
wget https://ecs-image-tools.oss-cn-hangzhou.aliyuncs.com/cloudinit/cloud-init-19.1.21.tgz
tar -zxvf ./cloud-init-19.1.21.tgz
# Install cloud-init.
issue_major=$( cat /etc/os-release | grep VERSION_ID | grep -Eo '[0-9]+\.?[0-9]+' | head -1 | awk -F'.' '{printf $1}')
bash ./cloud-init-*/tools/deploy.sh rhel "$issue_major"
Ubuntu 16/18/20
# Check and install python3-pip.
if ! python3 -c 'import setuptools' >& /dev/null; then
  apt-get install python36 python3-pip -y
fi
# Back up the old version of cloud-init.
test -d /etc/cloud && mv /etc/cloud /etc/cloud-old
# Download and decompress the Alibaba Cloud cloud-init package.
wget https://ecs-image-tools.oss-cn-hangzhou.aliyuncs.com/cloudinit/cloud-init-19.1.21.tgz
tar -zxvf ./cloud-init-19.1.21.tgz
# Install cloud-init.
issue_major=$( cat /etc/os-release | grep VERSION_ID | grep -Eo '[0-9]+\.?[0-9]+' | head -1 | awk -F'.' '{printf $1}')
bash ./cloud-init-*/tools/deploy.sh ubuntu "$issue_major"
Debian 9/10
# Check and install python3-pip.
if ! python3 -c 'import setuptools' >& /dev/null; then
  apt-get -y install python3-pip
fi
# Back up the old version of cloud-init.
test -d /etc/cloud && mv /etc/cloud /etc/cloud-old
# Download and decompress the Alibaba Cloud cloud-init package.
wget https://ecs-image-tools.oss-cn-hangzhou.aliyuncs.com/cloudinit/cloud-init-19.1.21.tgz
tar -zxvf ./cloud-init-19.1.21.tgz
# Install cloud-init.
issue_major=$( cat /etc/os-release | grep VERSION_ID | grep -Eo '[0-9]+\.?[0-9]+' | head -1 | awk -F'.' '{printf $1}')
bash ./cloud-init-*/tools/deploy.sh debian "$issue_major"
SUSE 12/15
# Check and install python3-pip.
if ! python3 -c 'import setuptools'>& /dev/null; then
  zypper -n install python3-pip
fi
# Back up the old version of cloud-init.
test -d /etc/cloud && mv /etc/cloud /etc/cloud-old
# Download and decompress the Alibaba Cloud cloud-init package.
wget https://ecs-image-tools.oss-cn-hangzhou.aliyuncs.com/cloudinit/cloud-init-19.1.21.tgz
tar -zxvf ./cloud-init-19.1.21.tgz
# Install cloud-init.
issue_major=$( cat /etc/os-release | grep VERSION_ID | grep -Eo '[0-9]+\.?[0-9]+' | head -1 | awk -F'.' '{printf $1}')
bash ./cloud-init-*/tools/deploy.sh sles "$issue_major"
OpenSUSE 15
# Check and install python3-pip.
if ! python3 -c 'import setuptools'>& /dev/null; then
  zypper -n install python3-pip
fi
# Back up the old version of cloud-init.
test -d /etc/cloud && mv /etc/cloud /etc/cloud-old
# Download and decompress the Alibaba Cloud cloud-init package.
wget https://ecs-image-tools.oss-cn-hangzhou.aliyuncs.com/cloudinit/cloud-init-19.1.21.tgz
tar -zxvf ./cloud-init-19.1.21.tgz
# Install cloud-init.
issue_major=$( cat /etc/os-release | grep VERSION_ID | grep -Eo '[0-9]+\.?[0-9]+' | head -1 | awk -F'.' '{printf $1}')
bash ./cloud-init-*/tools/deploy.sh opensuse "$issue_major"
Alibaba Cloud cloud-init 0.7.6a18
The Alibaba Cloud public images for CentOS 6, Debian 9, and SUSE Linux Enterprise Server 12 have cloud-init-0.7.6a18 installed by default. If you need to perform testing, first run the sudo mv /etc/cloud/cloud.cfg /etc/cloud/cloud.cfg_bak command to back up the configuration file.
-
Check whether the operating system is CentOS 6, Debian 9, or SUSE Linux Enterprise Server 12.
cat /etc/issue -
Ensure the Python PIP dependency library is installed.
Install the Python 2-pip dependency library:
CentOS 6/SUSE Linux Enterprise Server 12
sudo yum -y install python2-pipDebian 9
sudo apt-get -y install python2-pip Run the following commands to download and decompress the Alibaba Cloud cloud-init 0.7.6a18 package.
wget https://ecs-image-tools.oss-cn-hangzhou.aliyuncs.com/cloud-init-0.7.6a18.tgz
tar -zxvf cloud-init-0.7.6a18.tgz
Go to the tools subdirectory of the cloud-init directory.
cd cloud-init-0.7.6a18/tools/-
Install cloud-init.
sudo bash ./deploy.sh <issue> <major_version>For example, if your current operating system is CentOS 6, run the command
sudo bash ./deploy.sh centos 6.Parameters of the deploy.sh script:
Parameter
Description
Example
<issue>
The operating system platform type. Valid values: centos, debian, and sles. The parameter values are case-sensitive. sles specifies SUSE/SLES.
centos
<major_version>
The major version number of the operating system platform.
The major version number of CentOS 6.5 is 6.
-
Verify the cloud-init version.
cloud-init --version
Community version of cloud-init
-
Ensure Git, Python, and Python PIP dependency libraries are installed.
Install the Git, Python 3.6, and python3-pip dependency libraries:
CentOS/Red Hat Enterprise Linux
sudo yum -y install git python36 python3-pipUbuntu/Debian
sudo apt-get -y install git python36 python3-pipOpenSUSE/SUSE
sudo zypper -n install git python36 python3-pip -
Download the cloud-init source package using Git.
git clone https://git.launchpad.net/cloud-init -
Go to the cloud-init directory.
cd ./cloud-init -
Install all dependency libraries.
sudo pip3 install -r ./requirements.txt -
Install cloud-init.
python3 setup.py install -
Modify the cloud.cfg configuration file.
-
Open the configuration file.
sudo vi /etc/cloud/cloud.cfg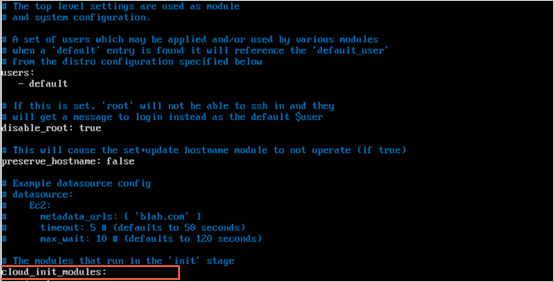
-
Replace the configuration before
cloud_init_modules:with the following content.# Example datasource config # The top level settings are used as module # and system configuration. # A set of users which may be applied and/or used by various modules # when a 'default' entry is found it will reference the 'default_user' # from the distro configuration specified below users: - default user: name: root lock_passwd: False # If this is set, 'root' will not be able to ssh in and they # will get a message to login instead as the above $user disable_root: false # This will cause the set+update hostname module to not operate (if true) preserve_hostname: false syslog_fix_perms: root:root datasource_list: [ AliYun ] # Example datasource config datasource: AliYun: support_xen: false timeout: 5 # (defaults to 50 seconds) max_wait: 60 # (defaults to 120 seconds) # metadata_urls: [ 'blah.com' ] # The modules that run in the 'init' stage cloud_init_modules:
-
-
Verify the cloud-init version.
cloud-init --version
(Optional) Step 3: Configure cloud-init
Disable automatic network initialization by Alibaba Cloud
If your cloud-init version is 18 or later, it automatically initializes the network with: BOOTPROTO=dhcp DEVICE=eth0 ONBOOT=yes STARTMODE=auto TYPE=Ethernet USERCTL=no. To customize the network configuration, modify the cloud-init configuration file.
-
Open the default cloud-init configuration file. Press the
ikey to enter insert mode.sudo vim /etc/cloud/cloud.cfg -
Before
Example datasource config, add the disabled configuration to disable the automatic network configuration feature of cloud-init.network: config: disabled
After adding this configuration, cloud-init no longer manages network configuration files, such as
ifcfg-eth0, in the /etc/sysconfig/network-scripts/ directory. Manage these files yourself. -
Press the
Esckey, enter:wq, and press theEnterkey to save and close the file. -
Customize the network configurations in the /etc/sysconfig/network-scripts/ directory, such as the IP address, subnet mask, and gateway.
Disable automatic hostname setting by Alibaba Cloud
By default, cloud-init sets the hostname and updates the /etc/hostname file at instance startup. To prevent hostname changes, modify the cloud-init configuration file.
-
Open the default cloud-init configuration file. Press the
ikey to enter edit mode.sudo vim /etc/cloud/cloud.cfg -
In the configuration file, change
preserve_hostname: falsetopreserve_hostname: true.
-
Press the
Esckey, enter:wq, and press theEnterkey to save and close the file.
Next steps
-
To migrate Linux servers to the cloud, use Server Migration Center (SMC). See Migrate servers to ECS instances.
-
For ECS instances running a Linux custom image on Alibaba Cloud, restart the system to verify the installation. If the hostname, network, and NTP are automatically configured, cloud-init was installed successfully. View the network configuration file:
sudo reboot
cat /etc/sysconfig/network-scripts/ifcfg-eth0
The following output indicates that cloud-init has configured network settings such as the DHCP protocol, network device, and device type.
BOOTPROTO=dhcp
DEVICE=eth0
ONBOOT=yes
STARTMODE=auto
TYPE=Ethernet
USERCTL=no
FAQ
-
-
-
-
-
-
Automatic partition resizing for Linux instances requires cloud-init. Ensure growpart is installed and the cloud.cfg file is correctly configured.
-
Check whether growpart is installed.
which growpart -
(Required if applicable) If not installed, install it.
-
For RHEL series:
sudo yum -y install cloud-utils-growpart -
For Debian series:
sudo apt -y install cloud-guest-utils
-
-
Check whether the /etc/cloud/cloud.cfg file contains the content shown below.
cat /etc/cloud/cloud.cfg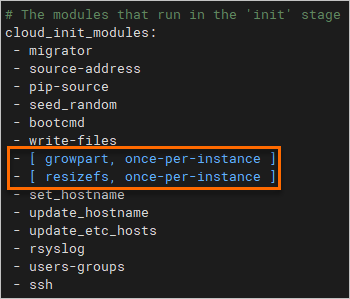
-
(Required if applicable) If the content is missing, add it to the /etc/cloud/cloud.cfg file.
-