MaxCompute, formerly known as ODPS, is a fast and fully managed data warehouse solution that can process exabytes of data. You can use Data Transmission Service (DTS) to synchronize data from an ApsaraDB RDS for MySQL or instance to MaxCompute. This helps you quickly build a real-time data analytics system.
Prerequisites
You have completed the following operations:
Precautions
During full data initialization, DTS consumes read and write resources of the source and destination databases, which may increase the database load. When the databases have low performance, low specifications, or heavy workloads (for example, a large number of slow SQL statements, tables without primary keys, or deadlocks on the destination database), the database pressure may be further increased and services may become unavailable. Therefore, you must evaluate the performance of the source and destination databases before starting data synchronization, and it is recommended that you perform data synchronization during off-peak hours (for example, when the CPU load of both the source and destination databases is below 30%).
-
Only table-level data synchronization is supported.
-
During data synchronization, do not use tools such as gh-ost or pt-online-schema-change to perform online DDL operations on synchronization objects in the source database. Otherwise, the synchronization task fails.
-
MaxCompute does not support PRIMARY KEY constraints. If DTS retransmits data because of network issues, duplicate records may appear in MaxCompute.
Billing
|
Synchronization type |
Pricing |
|
Schema synchronization and full data synchronization |
Free of charge. |
|
Incremental data synchronization |
Charged. For more information, see Billing overview. |
Supported source instance types
Data synchronization is supported for the following types of MySQL databases:
-
A self-managed database on an ECS instance
-
A self-managed database connected over a leased line, VPN Gateway, or Smart Access Gateway
-
A self-managed database connected over Database Gateway
-
An ApsaraDB RDS for MySQL instance that belongs to the same or a different Alibaba Cloud account
This topic uses an RDS Instance as an example to describe the configuration procedure. The procedure is similar for other source database instance types.
If the source database is a self-managed MySQL database, you must also complete preparation steps. For more information, see Preparation overview.
Supported SQL operations
-
DDL operations: ALTER TABLE, ADD COLUMN
-
DML operations: INSERT, UPDATE, DELETE
Synchronization process
-
Initial schema synchronization.
DTS synchronizes the schema definitions of the tables to be synchronized from the source database to MaxCompute. During initialization, DTS adds the `_base` suffix to the table names. For example, if the source table is `customer`, the table in MaxCompute becomes `customer_base`.
-
Initial full data synchronization.
DTS synchronizes all historical data from the tables in the source database to the `_base` tables in MaxCompute. For example, data is synchronized from the `customer` table in the source database to the `customer_base` table in MaxCompute. This data serves as the baseline for subsequent incremental data synchronization.
NoteThis table is also known as the full baseline table.
-
Incremental data synchronization.
DTS creates an incremental log table in MaxCompute. The table name is the name of the destination table with the `_log` suffix, such as `customer_log`. DTS then synchronizes incremental data from the source database to this table in real time.
NoteFor more information about the structure of the incremental log table, see Incremental log table schema.
Procedure
To ensure that the DTS synchronization account can be authorized, complete the following steps using your root account.
-
Purchase a data synchronization instance. For more information, see Purchase a DTS instance.
NoteWhen you purchase the instance, set the source instance to MySQL, the destination instance to MaxCompute, and the synchronization topology to One-way Synchronization.
- Log on to the Data Transmission Service console.
Note
If you are automatically redirected to the Data Management (DMS) console, you can click the
 icon in the lower-right corner and then click
  to return to the classic DTS console.
 - In the navigation pane on the left, click Data Synchronization.
- In the top navigation bar of the Data Synchronization page, select the region where the destination instance is located.
- Find the purchased data synchronization instance and click Configure Synchronization Channel.
-
Configure the source and destination instances.
Category
Configuration
Description
None
Synchronization Job Name
DTS automatically generates a name for the synchronization job. We recommend that you specify a descriptive name for easy identification. The name does not have to be unique.
Source Instance Information
Instance Type
Select RDS Instance.
Instance Region
The region of the source instance that you selected when you purchased the data synchronization instance. This cannot be changed.
Instance ID
Select the ID of the RDS instance that serves as the data source.
Database Account
Enter the database account of the source RDS instance.
NoteWhen the database type of the source RDS instance is MySQL 5.5 or MySQL 5.6, you do not need to configure the Database Account or Database Password.
Database Password
Enter the password that corresponds to the database account.
Connection Method
Select Unencrypted Connection or Secure SSL Connection as needed. If you select Secure SSL Connection, you must first enable the SSL encryption feature for the RDS instance. For more information, see Set SSL encryption.
ImportantCurrently, the Encryption can be set only in the Chinese mainland and China (Hong Kong) regions.
Destination Instance Information
Instance Type
Set to MaxCompute and cannot be changed.
Instance Region
The region of the destination instance that you selected when you purchased the data synchronization instance. This cannot be changed.
Project
Enter the Project of the MaxCompute instance. You can find it on the MaxCompute Workspace List page.

-
In the lower-right corner of the page, click Authorize Whitelist And Go To Next Step.
NoteIf the source or destination database is an Alibaba Cloud database instance, such as an ApsaraDB RDS for MySQL instance, an ApsaraDB for MongoDB instance, or a self-managed database on an ECS instance, DTS automatically adds the IP address of the DTS service in the corresponding region to the whitelist of the Alibaba Cloud database instance or the security rules of the ECS instance. You do not need to add the IP address manually. For more information, see IP address blocks of DTS servers.
-
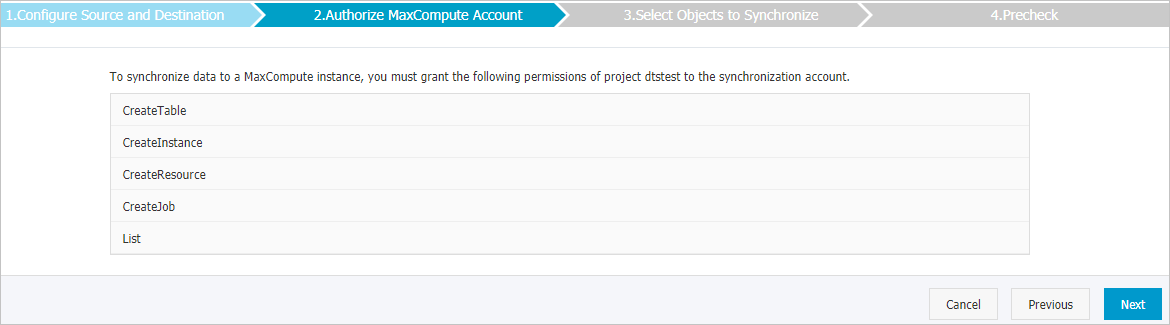
In the lower-right corner of the page, click Next. Then, grant the DTS synchronization account the permissions on the MaxCompute project, as shown in the following figure.
-
Configure the synchronization policy and objects.
Configuration
Description
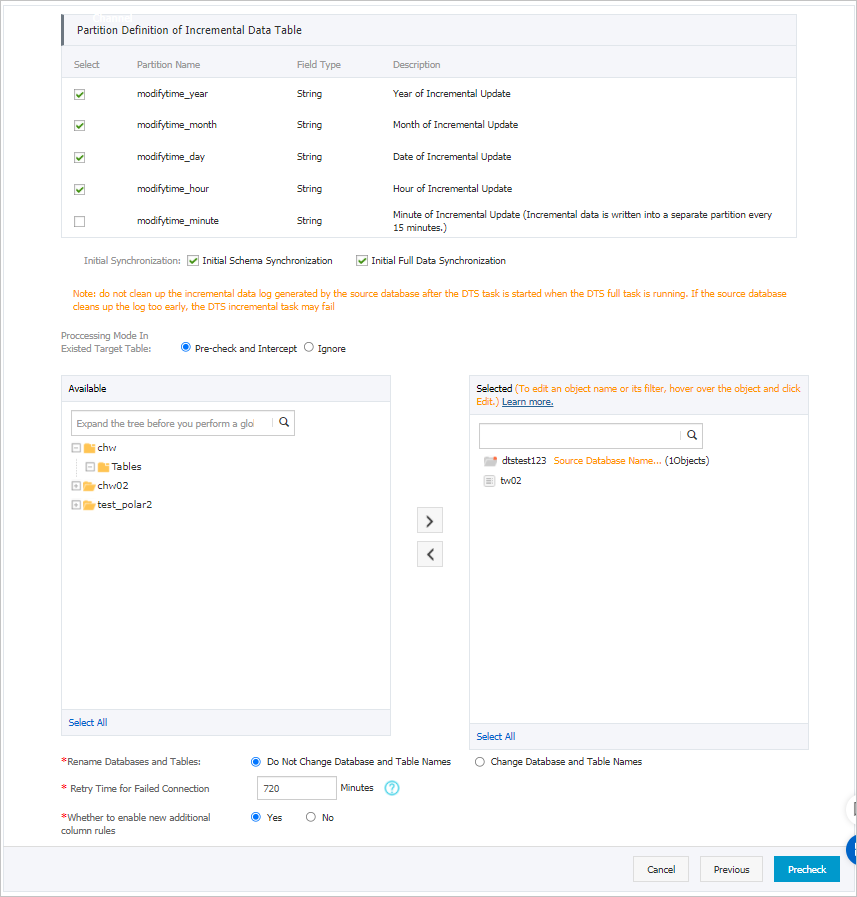
Incremental Log Table Partition Definition
Select partition names as needed. For more information about partitions, see Partition.
Synchronization Initialization
Synchronization initialization includes initial schema synchronization and initial full data synchronization.
Select both Initial Schema Synchronization and Initial Full Data Synchronization. DTS then synchronizes the schemas and historical data of the selected objects before it synchronizes incremental data.
Processing Mode for Existing Tables in the Destination
-
Precheck And Block On Error: The precheck is passed if the destination database does not contain tables that have the same names as the tables in the source database. Otherwise, an error is returned during the precheck and the data synchronization task cannot be started.
NoteIf you cannot delete or rename the table with the same name in the destination database, you can set the name of the synchronization object in the destination instance to avoid name conflicts.
-
Ignore Errors And Continue Execution: Skips the check for tables with the same names in the destination database.
WarningSelecting Ignore Errors And Continue Execution may cause data inconsistency and pose risks to your business:
-
If the table structures are consistent and a record in the destination database has the same primary key value as a record in the source database, the record in the destination database is retained during initialization. During incremental synchronization, the record in the destination database is overwritten.
-
If the table structures are inconsistent, data initialization may fail. This can result in only partial data synchronization or a complete synchronization failure.
-
Select Synchronization Objects
From the Source Objects box, select one or more tables to synchronize and click the
 icon to move them to the Selected Objects box.Note
-
You can select only tables as synchronization objects. You can select tables from multiple databases.
-
By default, the names of the synchronization objects remain unchanged. If you want the object names to be different in the destination instance, use the object name mapping feature. For more information, see Set the name of the synchronization object in the destination instance.
Select Additional Column Rule
When DTS synchronizes data to MaxCompute, it adds columns to the destination table. If the names of these additional columns conflict with existing column names, the data synchronization task fails. Based on your business requirements, set Enable New Additional Column Rule to Yes or No.
WarningBefore you select an additional column rule, evaluate whether the names of the additional columns will conflict with the names of existing columns in the destination table. Otherwise, the task may fail or data may be lost. For more information about the rules and definitions of additional columns, see Additional column names and definitions.
Change mapping name
Change the names of synchronized objects in the destination instance. For more information, see Map databases, tables, and columns.
Whether to copy temporary tables to the destination database during an online DDL operation on the source table using DMS
If you use Data Management (DMS) to perform online DDL changes on the source database, you can choose whether to synchronize the temporary tables generated by the DDL changes.
-
Yes: Synchronizes the temporary tables generated by online DDL changes.
NoteIf a large amount of temporary table data is generated by online DDL changes, the data synchronization task may be delayed.
-
No: Does not synchronize the temporary tables generated by online DDL changes. Only the original DDL operations from the source database are synchronized.
NoteThis option causes tables in the destination database to be locked.
Retry Time for Failed Connections to Source and Destination Databases
If DTS cannot connect to the source or destination instance, it retries for 720 minutes (12 hours) by default. You can also specify a custom retry duration. If DTS reconnects to the source or destination instance within the specified duration, the synchronization task automatically resumes. Otherwise, the task fails.
NoteYou are billed for task run time during connection retries. Customize the retry duration based on your business needs, or release the DTS instance as soon as the source and destination instances are released.
-
After you complete the preceding configurations, click Precheck and Start in the lower-right corner of the page.
NoteBefore the synchronization task is officially started, a precheck is performed. The synchronization task can only be started after the precheck passes.
If the precheck fails, click the
 icon next to a specific check item to view the failure details.
Follow the prompt to fix the issue and run the precheck again.
If you do not need to fix the warning check items, you can also select Ignore, Ignore Warning Items and Rerun Precheck to skip the warning check items and run the precheck again.
- After Precheck Passed is displayed in the Precheck dialog box, close the dialog box. The synchronization task starts automatically.
- Wait until the synchronization channel is initialized and the task enters the Synchronizing state.
The Data Synchronization page displays the status of data synchronization jobs.

Incremental log table schema
You need to run set odps.sql.allow.fullscan=true; in MaxCompute to set the project properties to allow full table scans.
When DTS synchronizes incremental data from MySQL to the incremental log table in MaxCompute, it stores metadata in addition to the incremental data, as shown in the following example.

In the example, modifytime_year, modifytime_month, modifytime_day, modifytime_hour, and modifytime_minute are partition fields specified in the Configure the synchronization policy and objects step.
Schema definition
|
Field |
Description |
|
record_id |
The record ID of the incremental log, which is the unique identifier for the log. Note
|
|
operation_flag |
The operation type. Valid values:
|
|
utc_timestamp |
The operation timestamp, which is the timestamp of the binary log (in UTC). |
|
before_flag |
Indicates whether all column values are the values before the update. Valid values: Y or N. |
|
after_flag |
Indicates whether all column values are the values after the update. Valid values: Y or N. |
Additional information about the before_flag and after_flag fields
For different operation types, the before_flag and after_flag fields in an incremental log are defined as follows:
-
INSERT
When the operation type is INSERT, all column values are the newly inserted record values. These are the values after the update. Therefore, the value of `before_flag` is N, and the value of `after_flag` is Y, as shown in the following example.

-
UPDATE
When the operation type is UPDATE, DTS splits the UPDATE operation into two incremental log records. These two log records have the same values for `record_id`, `operation_flag`, and `utc_timestamp`.
The first log record contains the values before the update, so the value of `before_flag` is Y and the value of `after_flag` is N. The second log record contains the values after the update, so the value of `before_flag` is N and the value of `after_flag` is Y, as shown in the following example.

-
DELETE
When the operation type is DELETE, all column values in the incremental log record are the deleted values. This means the column values do not change. Therefore, the value of `before_flag` is Y, and the value of `after_flag` is N, as shown in the following example.

Example of merging full data
After the data synchronization operation, DTS creates a full baseline table and an incremental log table for each table in MaxCompute. You can use MaxCompute SQL commands to merge these two tables to obtain the full data at a specific point in time.
This example uses the `customer` table (with the following structure) to describe the procedure.

-
Based on the structure of the table to be synchronized in the source database, create a table in MaxCompute to store the merged results.
For example, to obtain the full data of the `customer` table at the timestamp
1565944878, create the following data table for easy business identification:CREATE TABLE `customer_1565944878` ( `id` bigint NULL, `register_time` datetime NULL, `address` string);Note-
You can run SQL commands in the ad-hoc query editor of MaxCompute.
-
For more information about the data types supported by MaxCompute, see Data types.
-
-
Run the following SQL command in MaxCompute to merge the full baseline table and the incremental log table to obtain the full data of the table at a specific point in time.
set odps.sql.allow.fullscan=true; insert overwrite table <result_storage_table> select <col1>, <col2>, <colN> from( select row_number() over(partition by t.<primary_key_column> order by record_id desc, after_flag desc) as row_number, record_id, operation_flag, after_flag, <col1>, <col2>, <colN> from( select incr.record_id, incr.operation_flag, incr.after_flag, incr.<col1>, incr.<col2>,incr.<colN> from <table_log> incr where utc_timestamp< <timestamp> union all select 0 as record_id, 'I' as operation_flag, 'Y' as after_flag, base.<col1>, base.<col2>,base.<colN> from <table_base> base) t) gt where row_number=1 and after_flag='Y'Note-
<result_storage_table>: The name of the table that stores the full merged result set.
-
<col1>/<col2>/<colN>: The names of the columns in the synchronized table.
-
<primary_key_column>: The name of the primary key column in the synchronized table.
-
<table_log>: The name of the incremental log table.
-
<table_base>: The name of the full baseline table.
-
<timestamp>: The point in time for which to get the full data.
To merge the data tables and obtain the full data of the `customer` table at the timestamp
1565944878, use the following example:set odps.sql.allow.fullscan=true; insert overwrite table customer_1565944878 select id, register_time, address from( select row_number() over(partition by t.id order by record_id desc, after_flag desc) as row_number, record_id, operation_flag, after_flag, id, register_time, address from( select incr.record_id, incr.operation_flag, incr.after_flag, incr.id, incr.register_time, incr.address from customer_log incr where utc_timestamp< 1565944878 union all select 0 as record_id, 'I' as operation_flag, 'Y' as after_flag, base.id, base.register_time, base.address from customer_base base) t) gt where gt.row_number= 1 and gt.after_flag= 'Y'; -
-
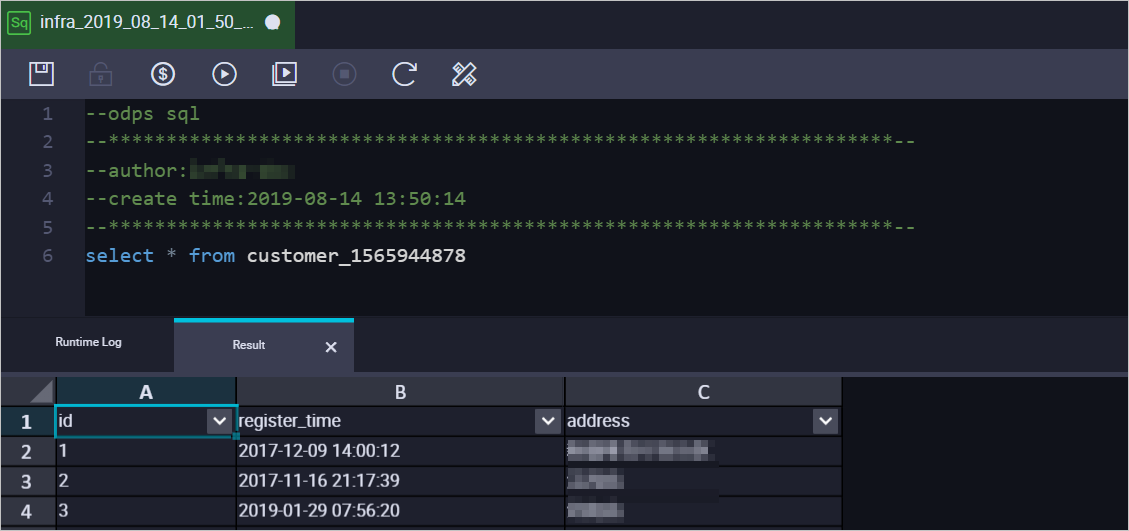
After the preceding command is executed, you can query the merged data in the `customer_1565944878` table.