This document walks you through the complete process of synchronizing data from a MySQL database using Alibaba Cloud Data Transmission Service (DTS). The entire process consists of seven core steps.
Step 1: Preparations
Before you configure your synchronization task, complete the following preparations to ensure smooth execution.
(Optional) Connect to Alibaba Cloud: Ensure that your business environment can connect to Alibaba Cloud. You can skip this step if your Alibaba Cloud instance or environment supports public network access.
Access Authorization:
Network and Security Settings: Ensure that DTS servers can access both the source and destination databases. For a complete list of IP addresses for your destination region, see Add DTS server IP addresses to the whitelist.
Source and destination databases: For information about how to configure the source and destination databases and to view usage limits, see MySQL as a source: Data synchronization limits.
Step 2: Create and Configure a Synchronization Task
Log on to the Data Transmission Service (DTS) console.
In the navigation pane on the left, click Data Synchronization. In the upper-left corner of the page, select the region where the synchronization instance is located.
Click Create Task to open the task configuration page.
Task Name: DTS automatically generates a task name. We recommend that you specify a descriptive name to make the task easy to identify. The task name does not need to be unique.
Configure the source and destination database information:
Source Database
Different Access Method have different configuration options. Select the connection type that meets your business requirements.
Alibaba Cloud Instance
Configuration
Description
Example Image
Select Existing Connection
If you want to use a database instance that has been added to the system (new or saved), select it from the drop-down list. The database information below will be auto-filled.
NoteIf you are in the DMS console, the configuration item is Select a DMS database instance..
If you have not added the database instance to the system or do not want to use an existing one, manually configure the database information below.
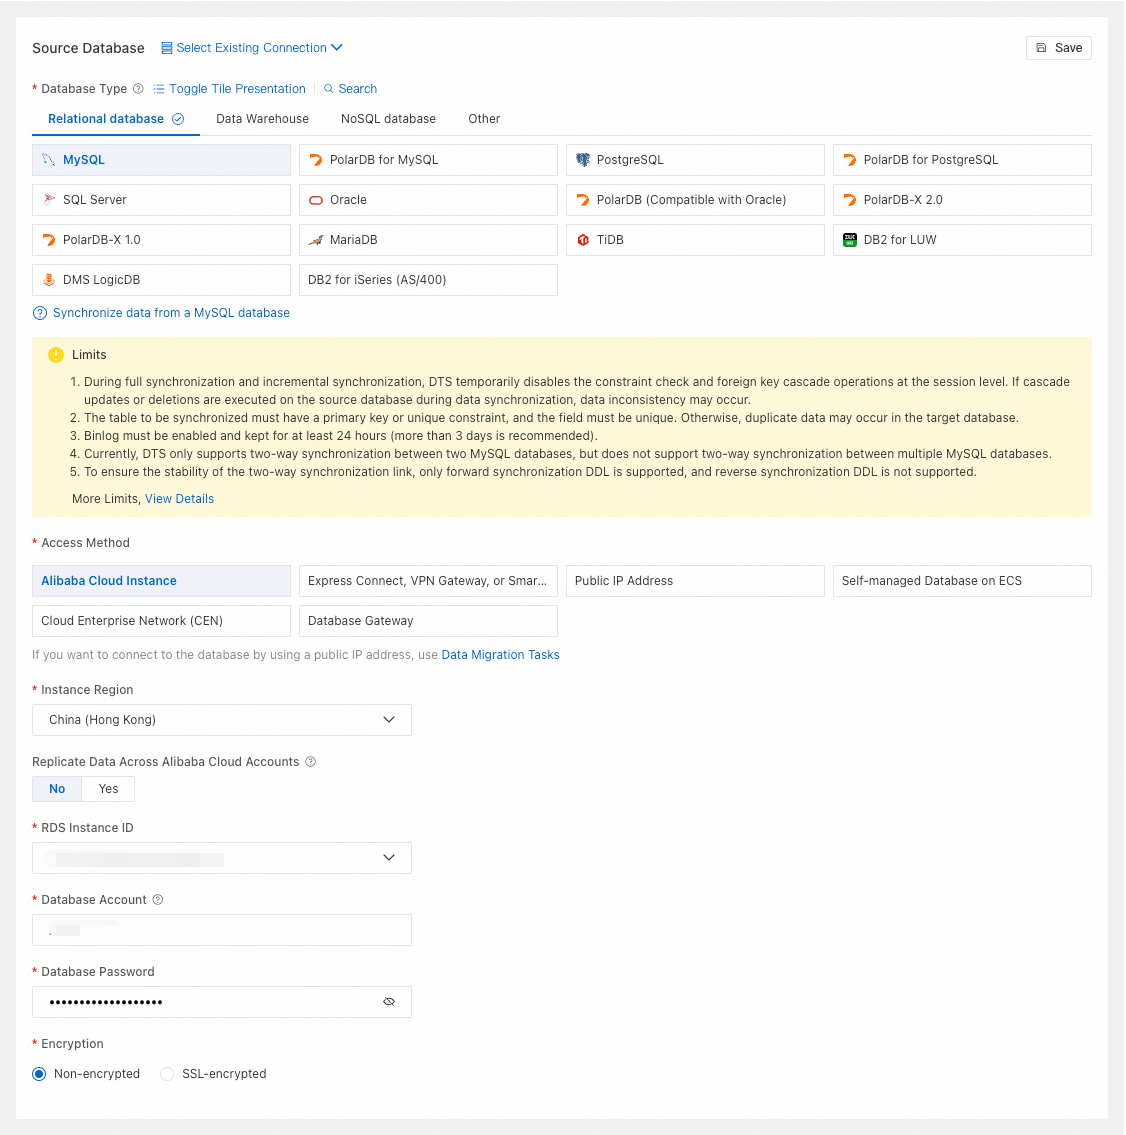
Database Type
Select MySQL.
Access Method
Select Alibaba Cloud Instance.
Instance Region
Select the region of the source RDS MySQL instance.
Replicate Data Across Alibaba Cloud Accounts
-
Choose whether to use a different Alibaba Cloud account. If you select Yes, configure Alibaba Cloud Account and RAM Role Name.
Alibaba Cloud Account
Enter the Alibaba Cloud Account ID.
RAM Role Name
Enter a RAM name.
RDS Instance ID
Select the source RDS MySQL instance ID.
Database Account
Enter the account for the source RDS MySQL instance.
Database Password
Enter the password for the database account.
Encryption
Select Non-encrypted or SSL-encrypted based on your setup.
Express Connect, VPN Gateway, or Smart Access Gateway
Configuration
Description
Example Image
Select Existing Connection
If you want to use a database instance that has been added to the system (new or saved), select it from the drop-down list. The database information below will be auto-filled.
NoteIf you are in the DMS console, the configuration item is Select a DMS database instance..
If you have not added the database instance to the system or do not want to use an existing one, manually configure the database information below.
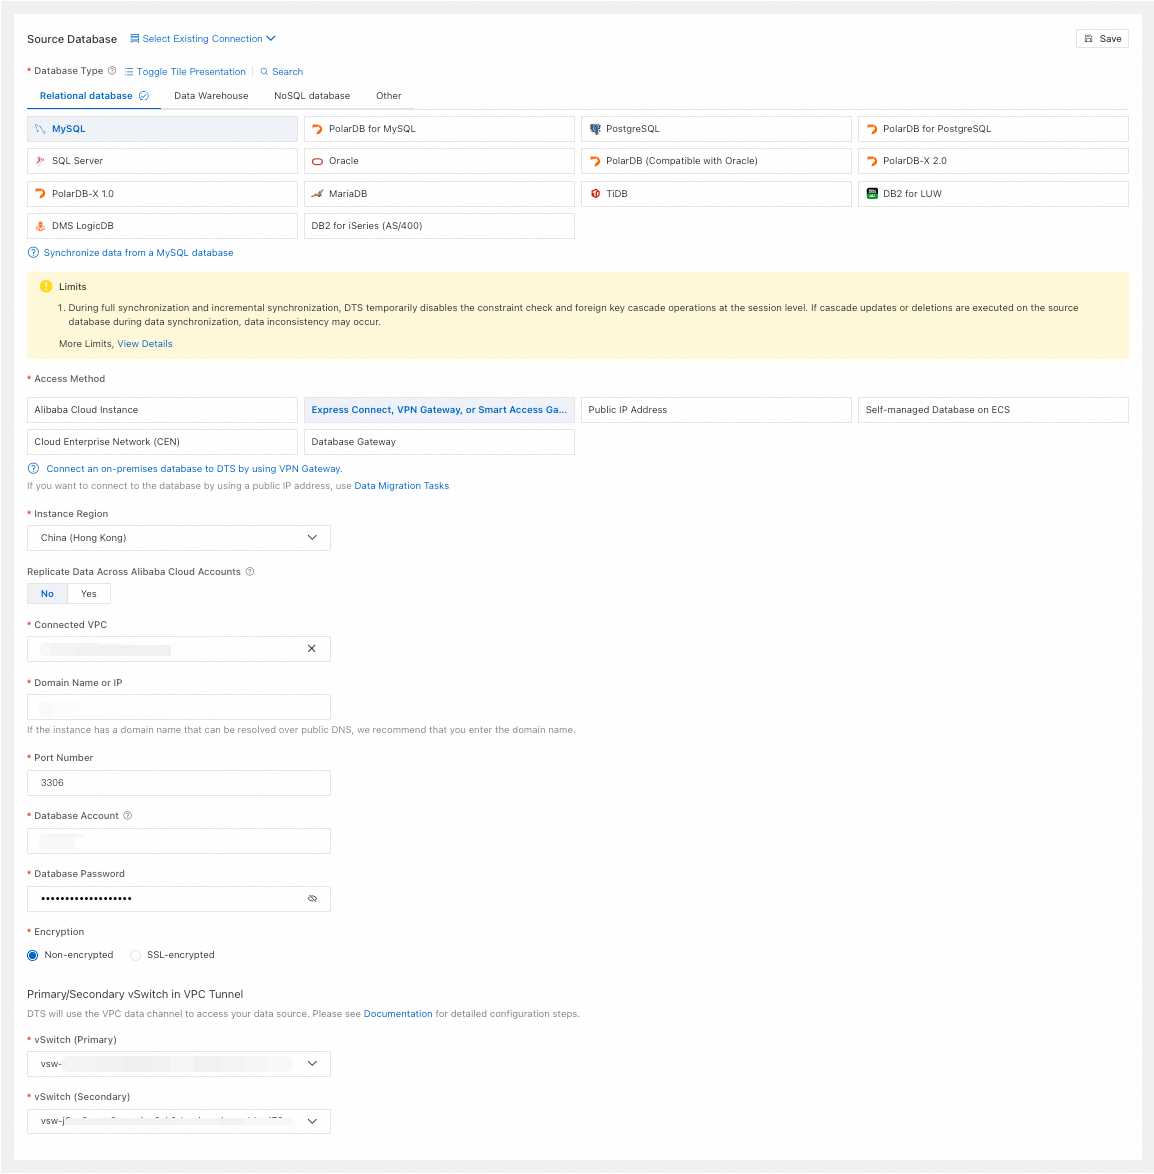
Database Type
Select MySQL.
Access Method
Select Express Connect, VPN Gateway, or Smart Access Gateway.
Instance Region
Select the region of the VPC connected to the source database.
Replicate Data Across Alibaba Cloud Accounts
-
Choose whether to use a different Alibaba Cloud account. If you select Yes, configure Alibaba Cloud Account and RAM Role Name.
Alibaba Cloud Account
Enter the Alibaba Cloud Account ID.
RAM Role Name
Enter the relevant RAM role name.
Connected VPC
Select the VPC network connected to the source database.
Domain Name or IP
Enter the connection address of the source database.
Port Number
Enter the port of the source database.
Database Account
Enter the account for the source database.
Database Password
Enter the password for the database account.
Encryption
Select Non-encrypted or SSL-encrypted based on your setup. If the source database uses SSL-encrypted, you must also upload the CA Certificate and enter the CA Key.
Primary/Secondary vSwitch in VPC Tunnel
Select the vSwitch (Primary) and vSwitch (Secondary) for the VPC data channel that DTS uses to access your data source.
Public IP Address
Configuration
Description
Example Image
Select Existing Connection
If you want to use a database instance that has been added to the system (new or saved), select it from the drop-down list. The database information below will be auto-filled.
NoteIf you are in the DMS console, the configuration item is Select a DMS database instance..
If you have not added the database instance to the system or do not want to use an existing one, manually configure the database information below.
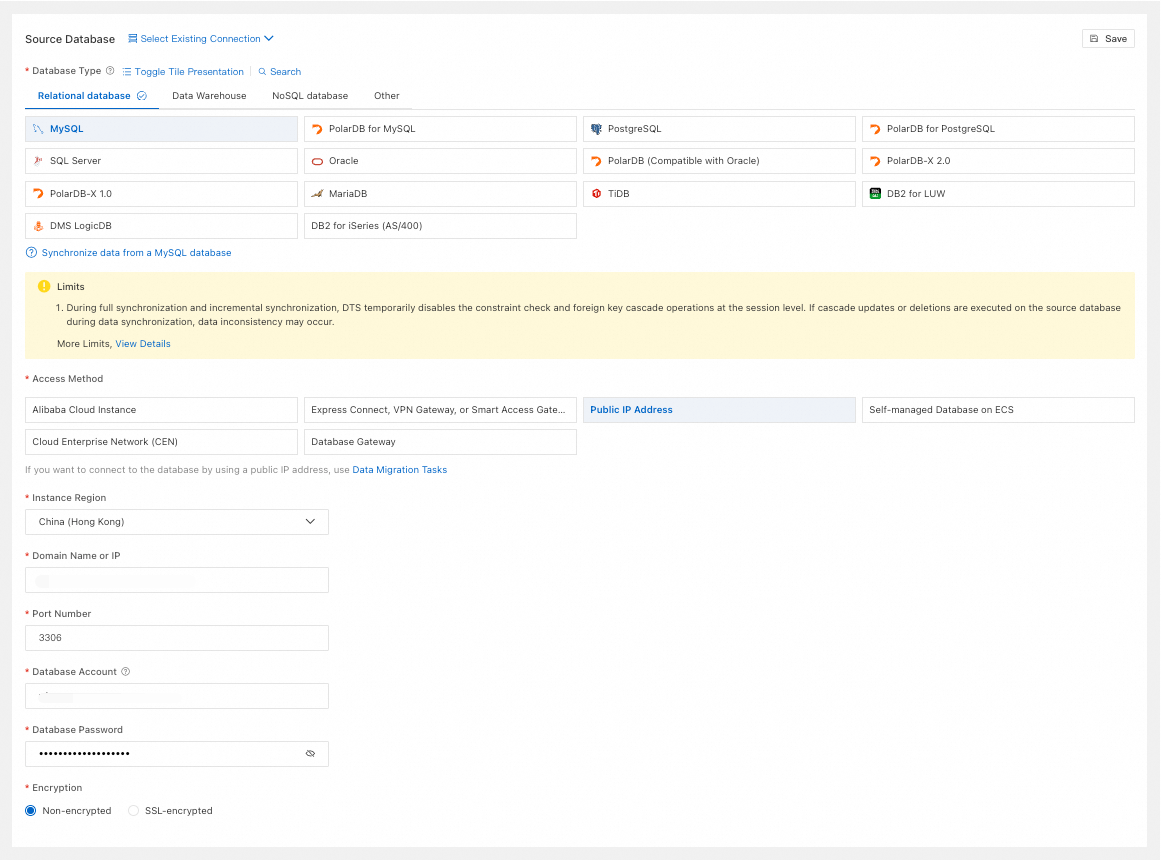
Database Type
Select MySQL.
Access Method
Select Public IP Address.
Instance Region
Select the region closest to the source database.
Domain Name or IP
Enter the connection address of the source database.
Port Number
Enter the port of the source database.
Database Account
Enter the account for the source database.
Database Password
Enter the password for the database account.
Encryption
Select Non-encrypted or SSL-encrypted based on your setup. If the source database uses SSL-encrypted, you must also upload the CA Certificate and enter the CA Key.
Self-managed Database on ECS
Configuration
Description
Example Image
Select Existing Connection
If you want to use a database instance that has been added to the system (new or saved), select it from the drop-down list. The database information below will be auto-filled.
NoteIf you are in the DMS console, the configuration item is Select a DMS database instance..
If you have not added the database instance to the system or do not want to use an existing one, manually configure the database information below.
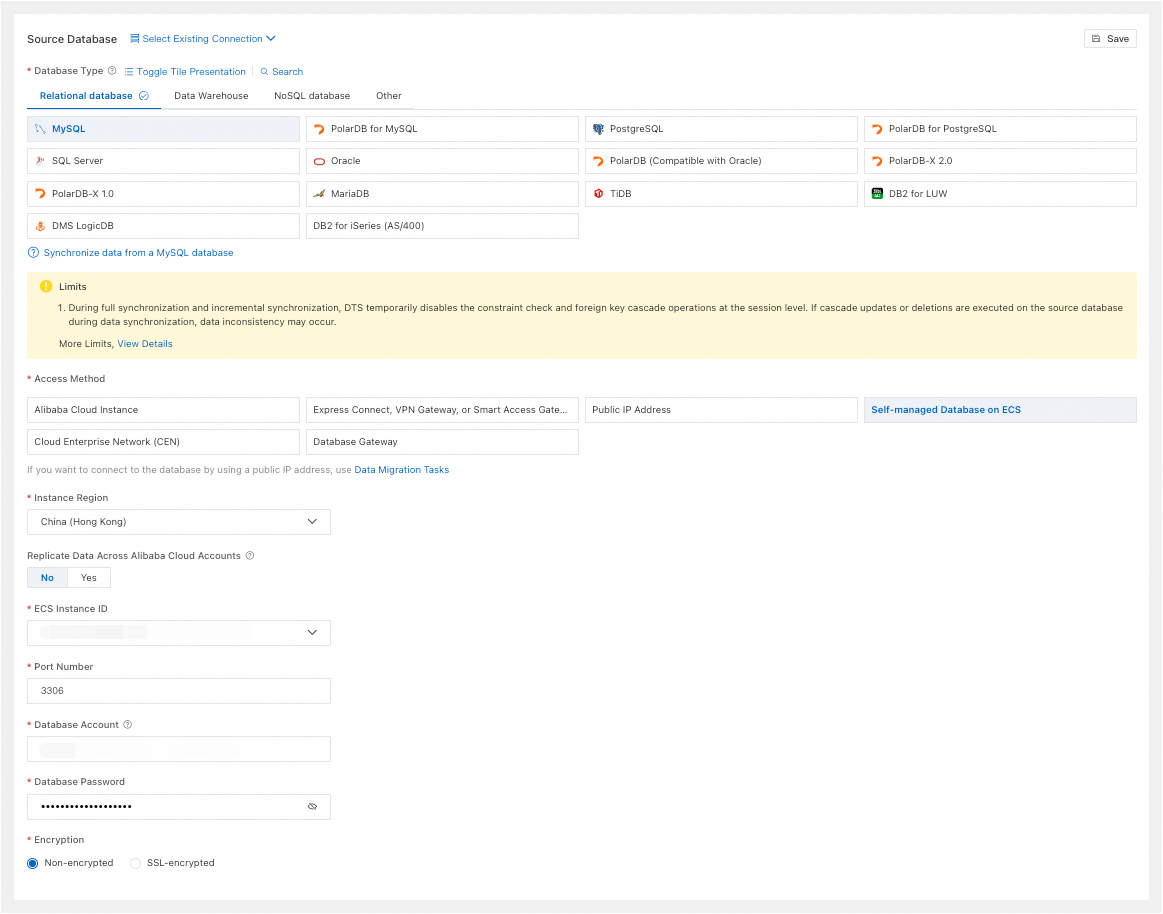
Database Type
Select MySQL.
Access Method
Select Self-managed Database on ECS.
Instance Region
Select the region of the ECS instance.
Replicate Data Across Alibaba Cloud Accounts
-
Choose whether to use a different Alibaba Cloud account. If you select Yes, configure Alibaba Cloud Account and RAM Role Name.
Alibaba Cloud Account
Enter the Alibaba Cloud Account ID.
RAM Role Name
Enter the relevant RAM role name.
ECS Instance ID
Select the ECS instance ID.
Port Number
Enter the port of the self-managed MySQL database on the ECS instance.
Database Account
Enter the account for the source database.
Database Password
Enter the password for the database account.
Encryption
Select Non-encrypted or SSL-encrypted based on your setup. If the source database uses SSL-encrypted, you must also upload the CA Certificate and enter the CA Key.
Cloud Enterprise Network (CEN)
Configuration
Description
Example Image
Select Existing Connection
If you want to use a database instance that has been added to the system (new or saved), select it from the drop-down list. The database information below will be auto-filled.
NoteIf you are in the DMS console, the configuration item is Select a DMS database instance..
If you have not added the database instance to the system or do not want to use an existing one, manually configure the database information below.
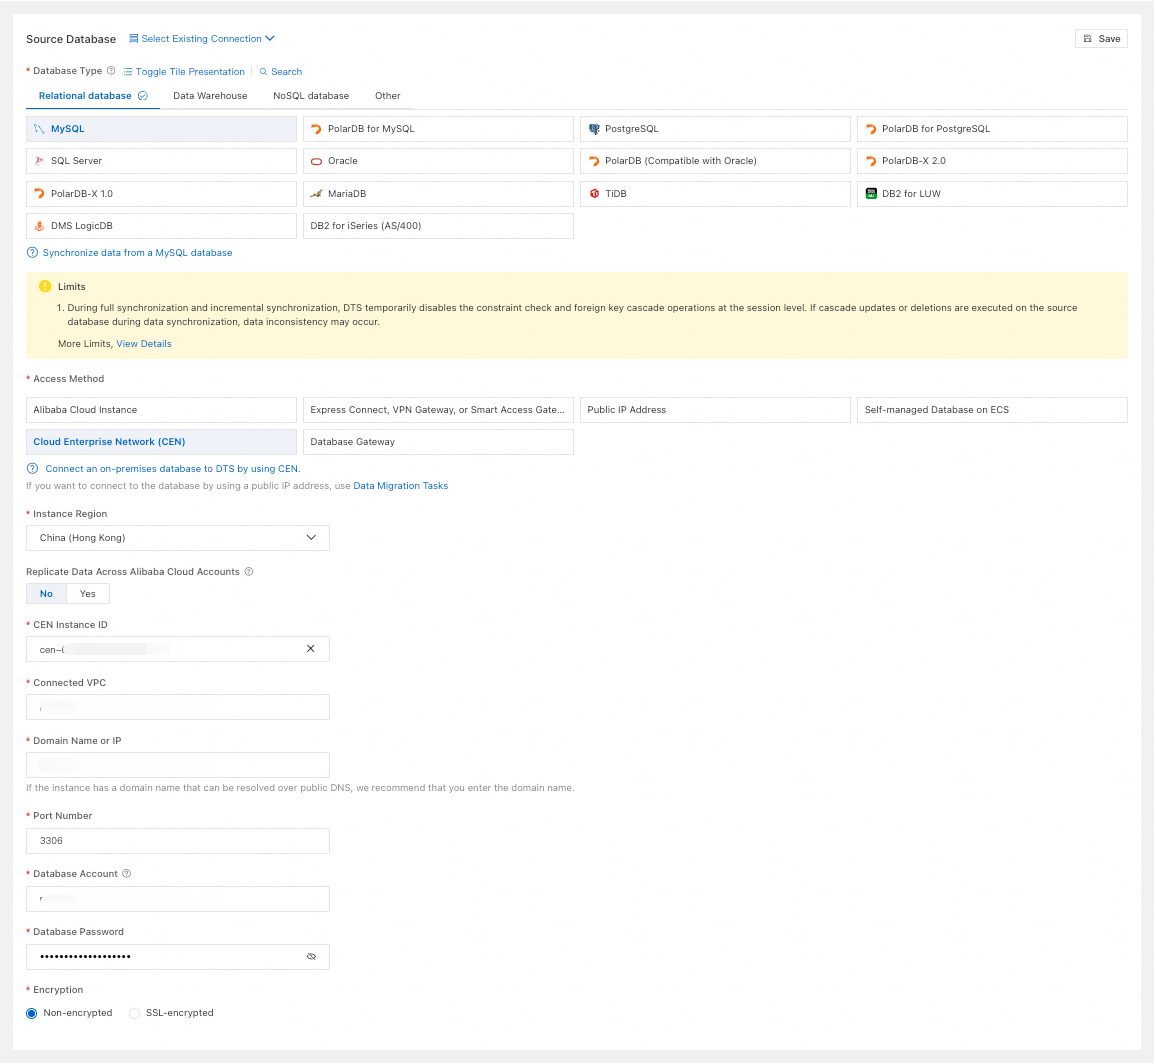
Database Type
Select MySQL.
Access Method
Select Cloud Enterprise Network (CEN).
Instance Region
Select the region of the source database.
Replicate Data Across Alibaba Cloud Accounts
-
Choose whether to use a different Alibaba Cloud account. If you select Yes, configure Alibaba Cloud Account and RAM Role Name.
Alibaba Cloud Account
Enter the Alibaba Cloud Account ID.
RAM Role Name
Enter the relevant RAM role name.
CEN Instance ID
Select the CEN instance ID.
Connected VPC
Select the VPC network in the CEN instance that is connected to the source database.
Domain Name or IP
Enter the connection address of the source database.
Port Number
Enter the port of the source database.
Database Account
Enter the account for the source database.
Database Password
Enter the password for the database account.
Encryption
Select Non-encrypted or SSL-encrypted based on your setup. If the source database uses SSL-encrypted, you must also upload the CA Certificate and enter the CA Key.
Database Gateway
Configuration
Description
Example Image
Select Existing Connection
If you want to use a database instance that has been added to the system (new or saved), select it from the drop-down list. The database information below will be auto-filled.
NoteIf you are in the DMS console, the configuration item is Select a DMS database instance..
If you have not added the database instance to the system or do not want to use an existing one, manually configure the database information below.
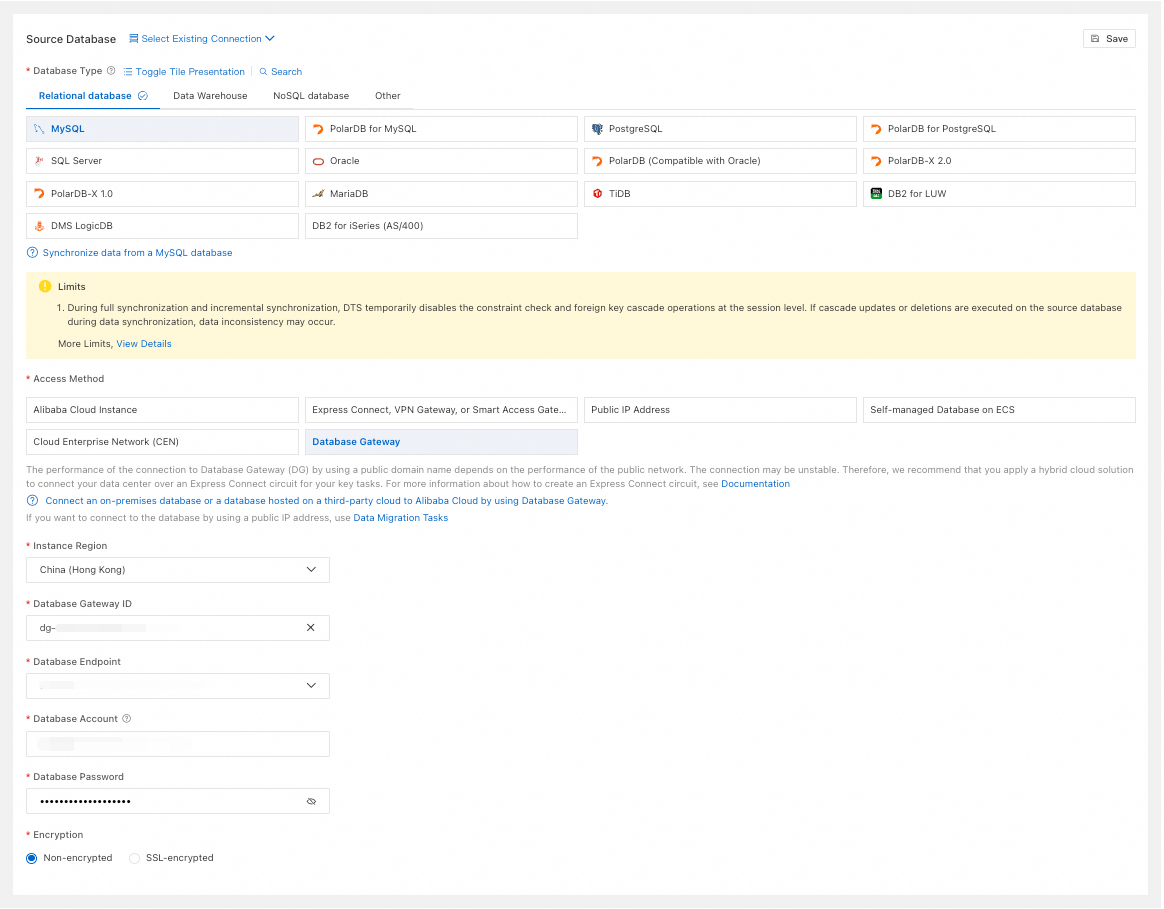
Database Type
Select MySQL.
Access Method
Select Database Gateway.
Instance Region
Select the region of the database gateway.
Database Gateway ID
Select the database gateway ID.
Database Endpoint
Select the database address under the database gateway.
Database Account
Enter the account for the source database.
Database Password
Enter the password for the database account.
Encryption
Select Non-encrypted or SSL-encrypted based on your setup. If the source database uses SSL-encrypted, you must also upload the CA Certificate and enter the CA Key.
Destination Database
The available Access Method for the destination database vary based on the Access Method of the source database. For the most accurate options, refer to the console. The following sections describe the parameters that are required for each Access Method.
NoteUsing Public IP Address as the destination connection type is not supported. To use a public IP address for the destination, create a data migration task instead.
Alibaba Cloud Instance
Configuration
Description
Example Image
Select Existing Connection
If you want to use a database instance that has been added to the system (new or saved), select it from the drop-down list. The database information below will be auto-filled.
NoteIf you are in the DMS console, the configuration item is Select a DMS database instance..
If you have not added the database instance to the system or do not want to use an existing one, manually configure the database information below.
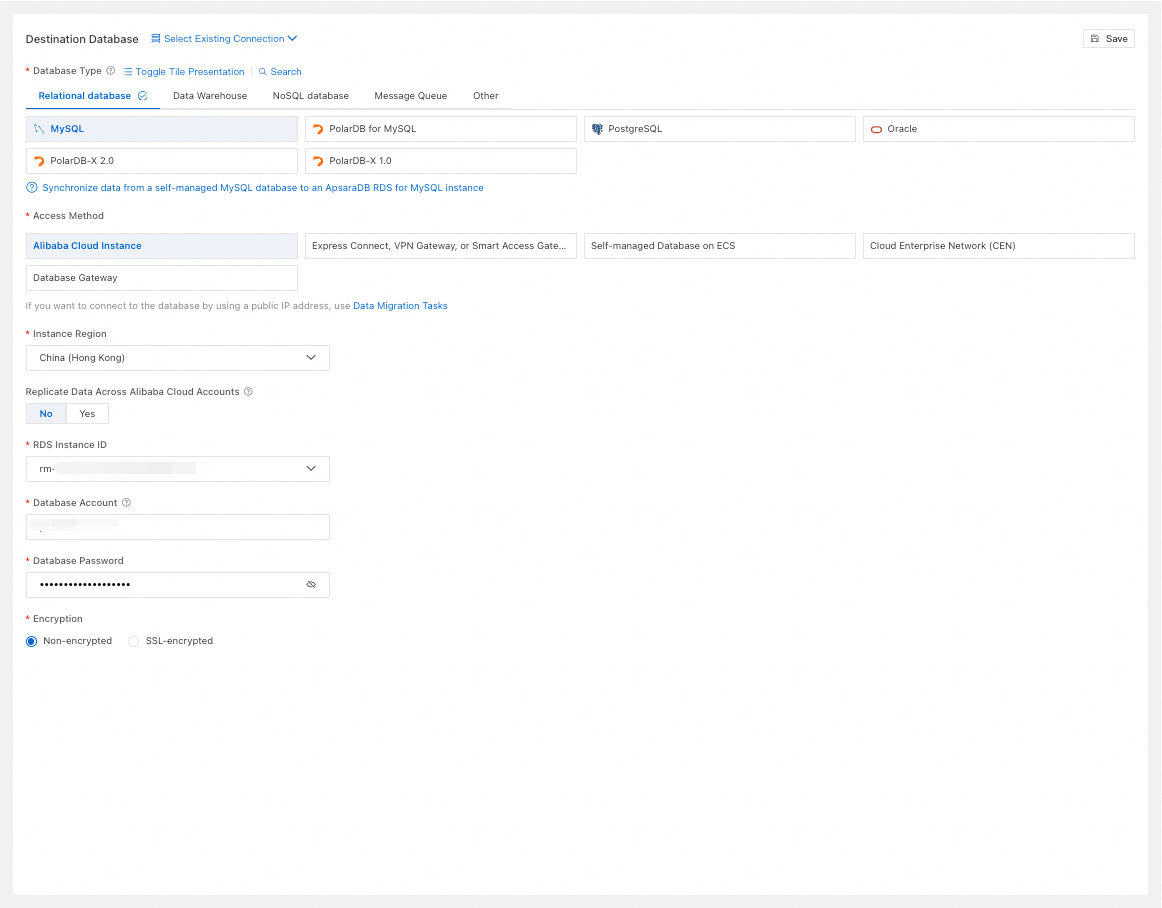
Database Type
Select based on your needs. This example uses MySQL.
Access Method
Select Alibaba Cloud Instance.
Instance Region
Select the region of the destination database.
Replicate Data Across Alibaba Cloud Accounts
-
Choose whether to use a different Alibaba Cloud account. If you select Yes, configure Alibaba Cloud Account and RAM Role Name.
Alibaba Cloud Account
Enter the Alibaba Cloud Account ID.
RAM Role Name
Enter a RAM name.
RDS Instance ID
Select the destination RDS MySQL instance ID. For other Database Type, select the corresponding instance ID.
Database Account
Enter the account for the destination RDS MySQL instance.
Database Password
Enter the password for the database account.
Encryption
Select Non-encrypted or SSL-encrypted based on your setup.
Express Connect, VPN Gateway, or Smart Access Gateway
Configuration
Description
Example Image
Select Existing Connection
If you want to use a database instance that has been added to the system (new or saved), select it from the drop-down list. The database information below will be auto-filled.
NoteIf you are in the DMS console, the configuration item is Select a DMS database instance..
If you have not added the database instance to the system or do not want to use an existing one, manually configure the database information below.
Database Type
Select based on your needs. This example uses MySQL.
Access Method
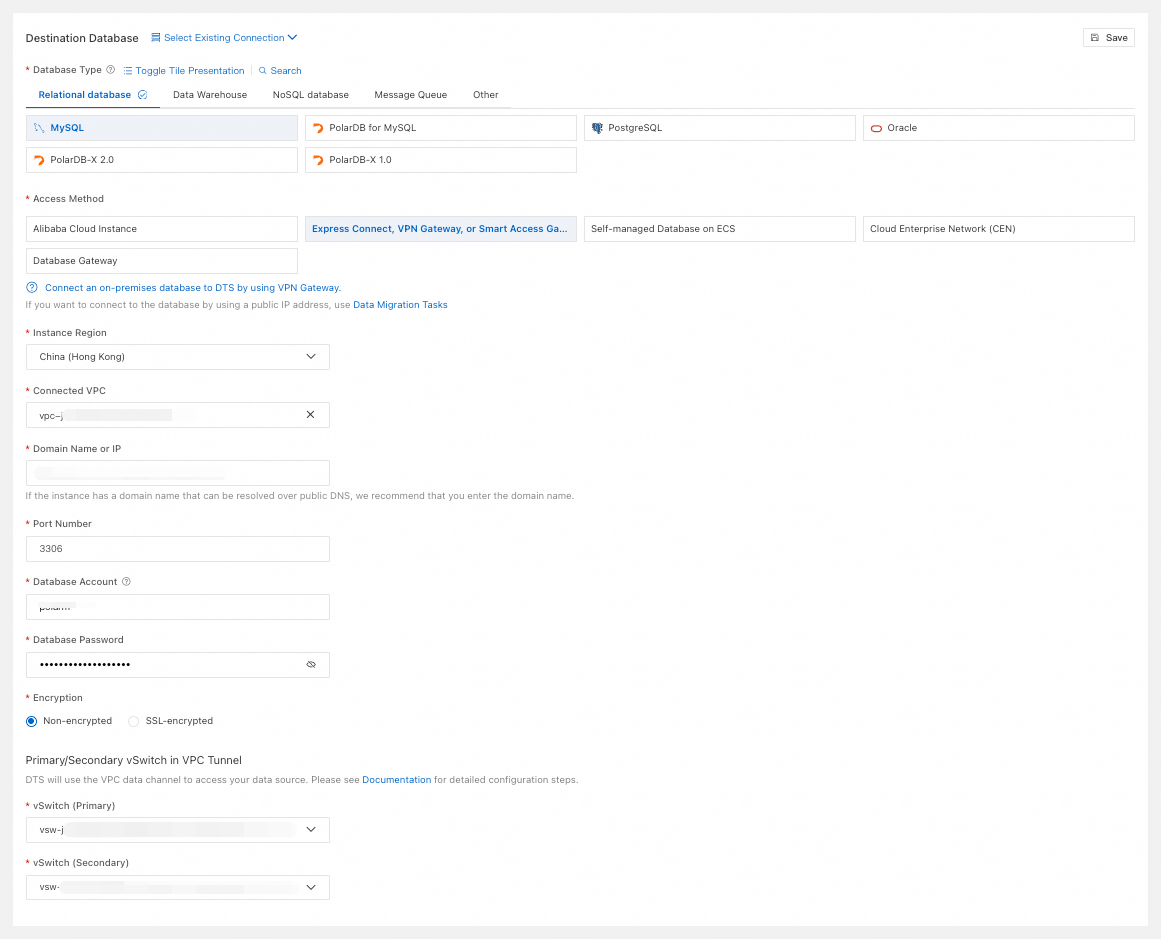
Select Express Connect, VPN Gateway, or Smart Access Gateway.
Instance Region
Select the region of the VPC connected to the destination database.
Connected VPC
Select the VPC network connected to the destination database.
Domain Name or IP
Enter the connection address of the destination database.
Port Number
Enter the port of the destination database.
Database Account
Enter the account for the destination database.
Database Password
Enter the password for the database account.
Encryption
Select Non-encrypted or SSL-encrypted based on your setup. If the destination database uses SSL-encrypted, you must also upload the CA Certificate and enter the CA Key.
Primary/Secondary vSwitch in VPC Tunnel
Select the vSwitch (Primary) and vSwitch (Secondary) for the VPC data channel that DTS uses to access your data source.
Self-managed Database on ECS
Configuration
Description
Example Image
Select Existing Connection
If you want to use a database instance that has been added to the system (new or saved), select it from the drop-down list. The database information below will be auto-filled.
NoteIf you are in the DMS console, the configuration item is Select a DMS database instance..
If you have not added the database instance to the system or do not want to use an existing one, manually configure the database information below.
Database Type
Select based on your needs. This example uses MySQL.
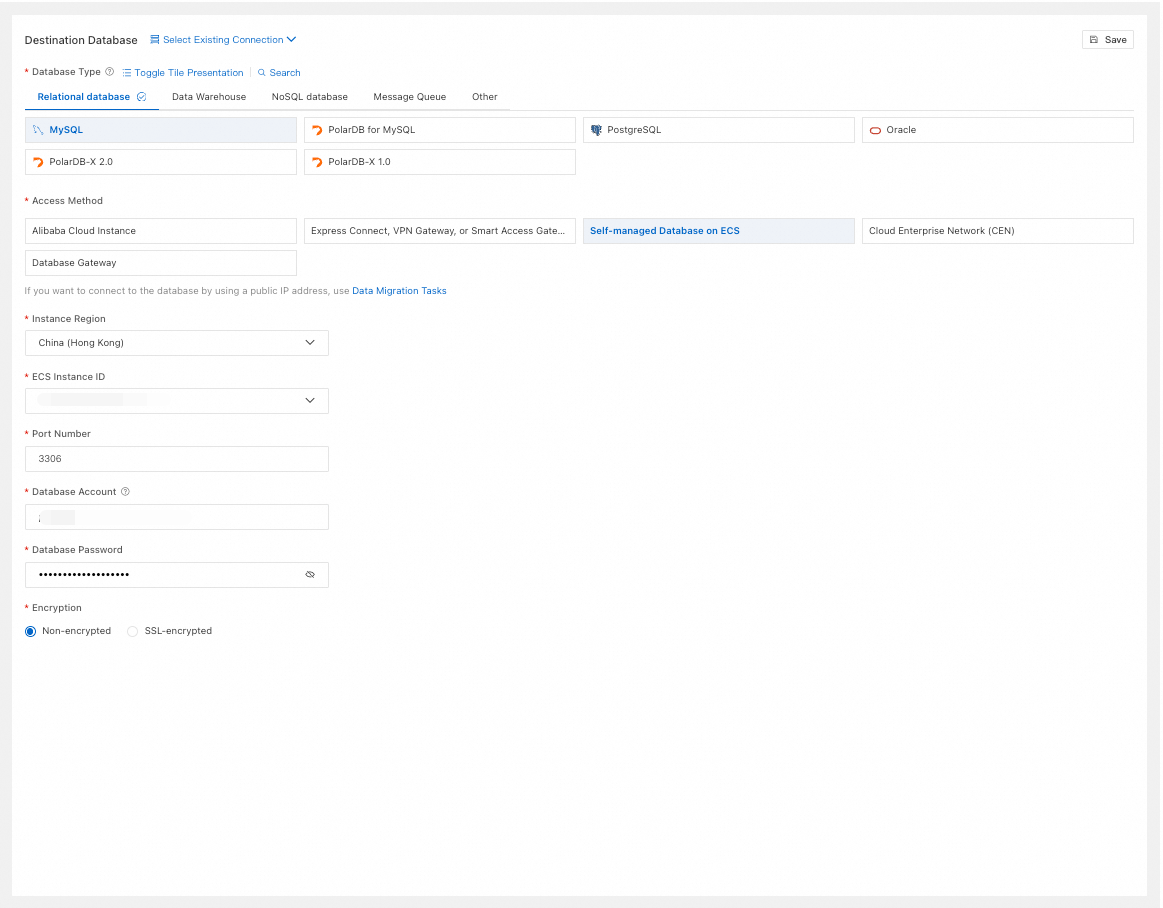
Access Method
Select Self-managed Database on ECS.
Instance Region
Select the region of the ECS instance.
ECS Instance ID
Select the ECS instance ID.
Port Number
Enter the port of the self-managed MySQL database on the ECS instance.
Database Account
Enter the account for the self-managed MySQL database.
Database Password
Enter the password for the database account.
Encryption
Select Non-encrypted or SSL-encrypted based on your setup. If the destination database uses SSL-encrypted, you must also upload the CA Certificate and enter the CA Key.
Cloud Enterprise Network (CEN)
Configuration
Description
Example Image
Select Existing Connection
If you want to use a database instance that has been added to the system (new or saved), select it from the drop-down list. The database information below will be auto-filled.
NoteIf you are in the DMS console, the configuration item is Select a DMS database instance..
If you have not added the database instance to the system or do not want to use an existing one, manually configure the database information below.
Database Type
Select based on your needs. This example uses MySQL.
Access Method
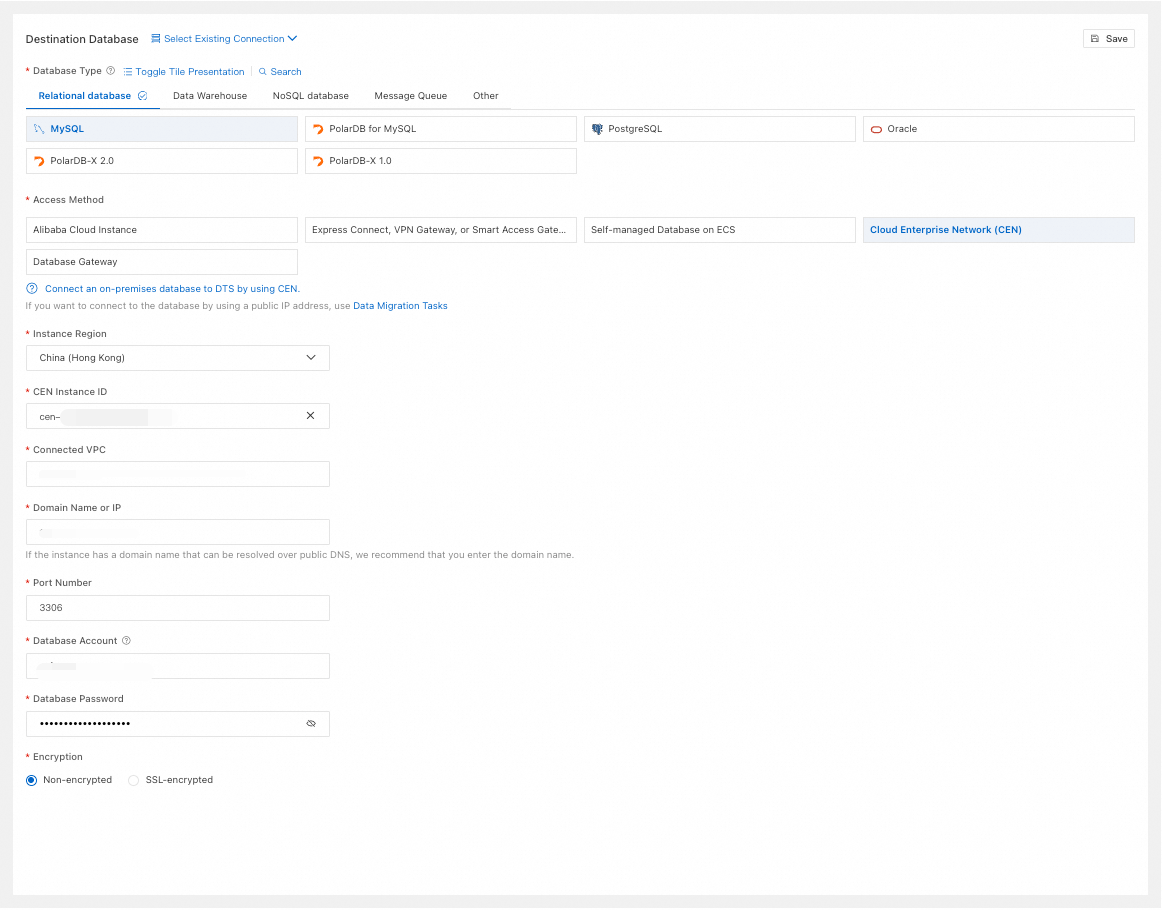
Select Cloud Enterprise Network (CEN).
Instance Region
Select the region of the destination database.
CEN Instance ID
Select the CEN instance ID.
Connected VPC
Select the VPC network in the CEN instance that is connected to the destination database.
Domain Name or IP
Enter the connection address of the destination database.
Port Number
Enter the port of the destination database.
Database Account
Enter the account for the destination database.
Database Password
Enter the password for the database account.
Encryption
Select Non-encrypted or SSL-encrypted based on your setup. If the destination database uses SSL-encrypted, you must also upload the CA Certificate and enter the CA Key.
Database Gateway
Configuration
Description
Example Image
Select Existing Connection
If you want to use a database instance that has been added to the system (new or saved), select it from the drop-down list. The database information below will be auto-filled.
NoteIf you are in the DMS console, the configuration item is Select a DMS database instance..
If you have not added the database instance to the system or do not want to use an existing one, manually configure the database information below.
Database Type
Select based on your needs. This example uses MySQL.
Access Method
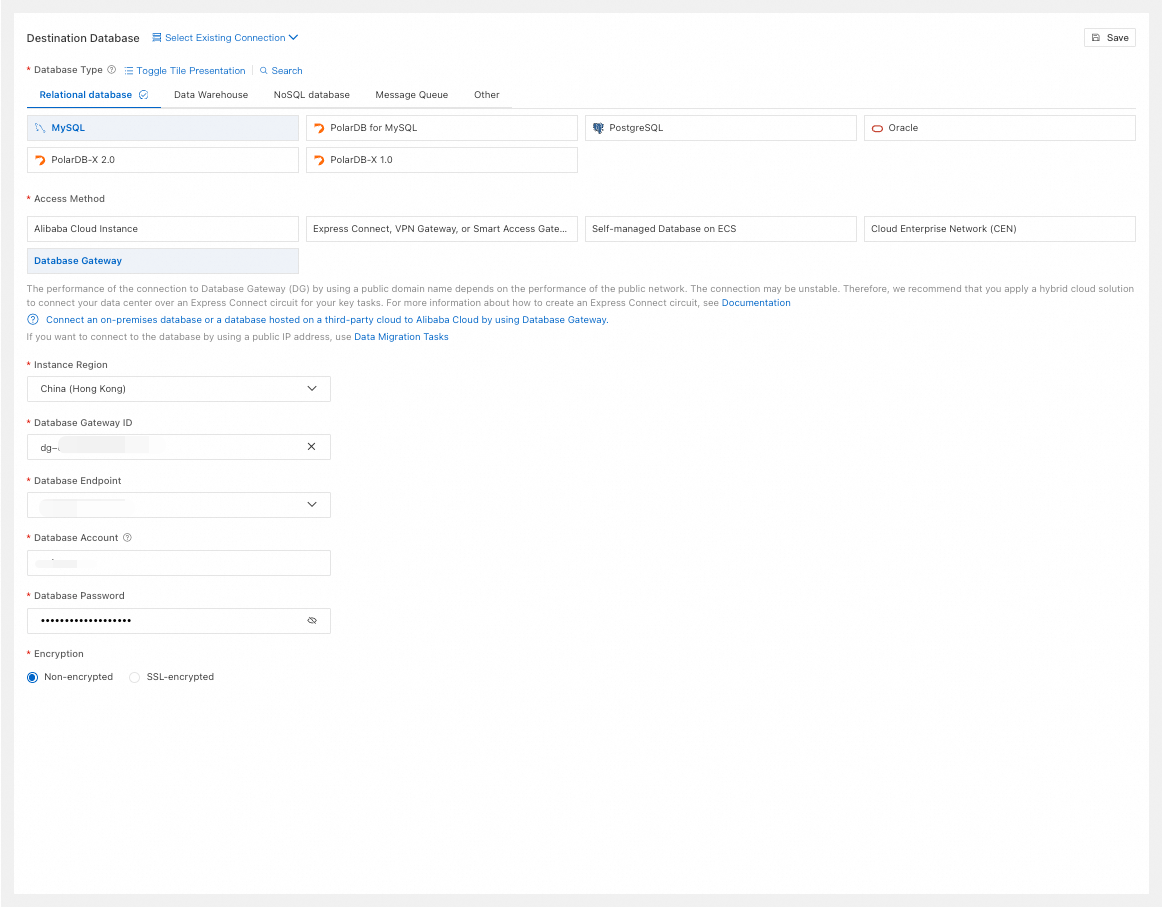
Select Database Gateway.
Instance Region
Select the region of the database gateway.
Database Gateway ID
Select the database gateway ID.
Database Endpoint
Select the database address under the database gateway.
Database Account
Enter the account for the destination database instance.
Database Password
Enter the password for the database account.
Encryption
Select Non-encrypted or SSL-encrypted based on your setup. If the destination database uses SSL-encrypted, you must also upload the CA Certificate and enter the CA Key.
After you complete the configuration, click Test Connectivity and Proceed to verify that DTS can connect to both the source and destination databases. If the CIDR Blocks of DTS Servers dialog box appears, add the displayed IP addresses to the security settings of your source or destination database. After you confirm the settings, click Confirm authorization and test link. If the connection test is successful, the system automatically proceeds to the object configuration page.
Step 3: Configure Synchronization Objects and Advanced Options
On the Configure Objects page, select the synchronization type, objects, and other settings. The available options vary based on the destination database type. Select your destination database type to view the relevant configurations.
MySQL
Configuration
Description
Example Image
Synchronization Types
Incremental Data Synchronization is always selected. By default, also select Schema Synchronization and Full Data Synchronization. After precheck, DTS initializes full data from the source instance in the destination cluster as the baseline for subsequent incremental synchronization.
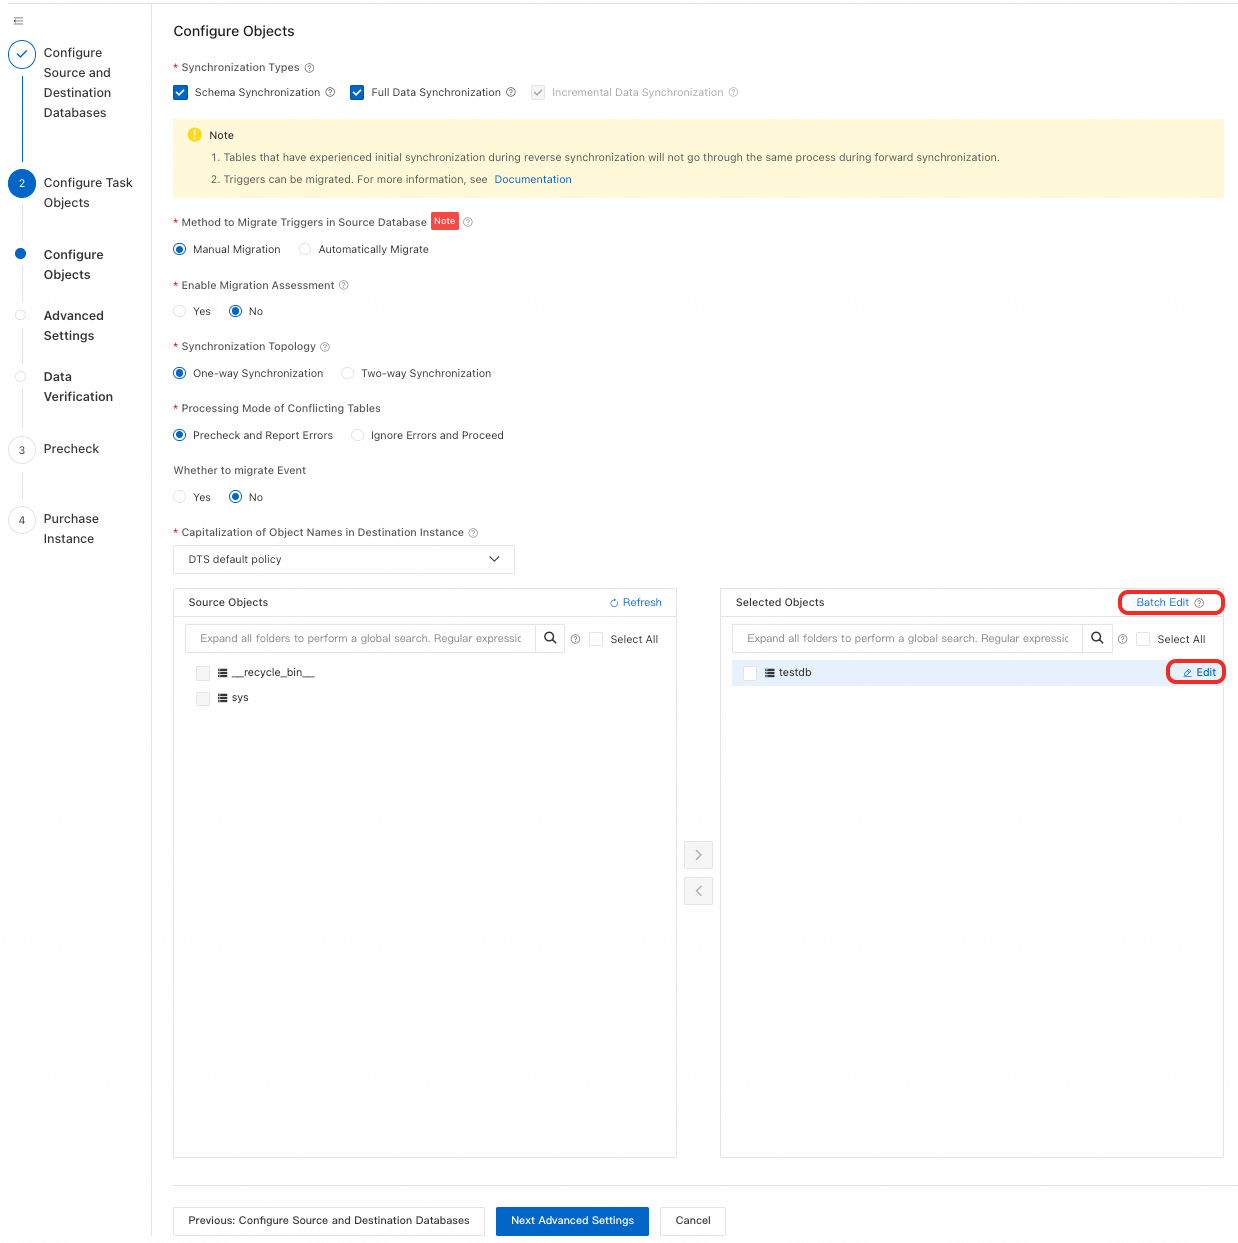
Method to Migrate Triggers in Source Database
Select how to synchronize triggers based on your setup. Skip this if your objects do not involve triggers. For more information, see Configure trigger synchronization or migration.
NoteAvailable only when Synchronization Types includes Schema Synchronization.
Enable Migration Assessment
Assess whether the source and destination database schemas (such as index length, stored procedures, and dependent tables) meet requirements. Select Yes or No as needed.
NoteAvailable only when Synchronization Types includes Schema Synchronization.
Selecting Yes may increase precheck time. You can view the Assessment Result during precheck. These results do not affect the precheck outcome.
Synchronization Topology
Select One-way Synchronization or Two-way Synchronization based on your business needs. Two-way Synchronization is supported only for specific source and destination combinations. For details, see Introduction to data synchronization topologies.
Enable Exactly-Once Write
If your objects include tables without primary keys or UNIQUE constraints, select Yes. For more information, see Synchronize tables without primary keys or UNIQUE constraints.
NoteAvailable only when Synchronization Topology is set to Two-way Synchronization.
Exclude DDL Operations
Select Yes: Do not synchronize DDL operations.
Select No: Synchronize DDL operations.
NoteAvailable only when Synchronization Topology is set to Two-way Synchronization.
To ensure stability of two-way synchronization, only the forward task (source to destination) lets you choose whether to synchronize DDL. The reverse task (destination to source) automatically filters DDL operations.
Global Conflict Resolution Policy
If conflicts occur, select a resolution strategy based on your business needs.
Overwrite (If a conflict occurs, the conflicting record in the destination instance is overwritten): Overwrite conflicting records on the destination database.
TaskFailed (If a conflict occurs, an error is reported and the task is stopped): Stop the synchronization task and mark it as failed. Manual intervention is required.
Ignore (If a conflict occurs, the conflicting record in the destination instance is used): Skip the current synchronization statement and keep the destination record.
NoteAvailable only when Synchronization Topology is set to Two-way Synchronization.
If the task pauses or restarts with delay, these strategies do not apply. DTS overwrites destination data by default during the delay period.
Processing Mode of Conflicting Tables
Precheck and Report Errors: Check if tables with the same name exist in the destination database. If none exist, the check passes. If any exist, the precheck fails and the task does not start.
NoteIf renaming or deleting the existing table is inconvenient, change the table name in the destination database. See Object name mapping.
Ignore Errors and Proceed: Skip the check for existing tables with the same name.
WarningSelecting Ignore Errors and Proceed may cause data inconsistency and business risks, such as:
If table schemas match and the destination has a record with the same primary or unique key value as the source:
During full synchronization, DTS keeps the destination record and skips the source record.
During incremental synchronization, DTS overwrites the destination record with the source record.
If table schemas differ, initialization might fail, only partial columns might sync, or synchronization might fail entirely. Use caution.
Whether to migrate Event
Select whether to synchronize events from the source database. If you select Yes, follow additional requirements. For more information, see Synchronize or migrate events.
Capitalization of Object Names in Destination Instance
Configure the case strategy for database, table, and column names in the destination instance. By default, select DTS default policy. You can also select Consistent with the source database or Consistent with the default policy of the destination database. For more information, see Case strategy for destination object names.
Source Objects
In the Source Objects box, click the objects to synchronize, then click
 to move them to the Selected Objects box.Note
You can select objects at the database, table, or column level. If you select tables or columns, other objects (such as views, triggers, and stored procedures) are not synchronized.
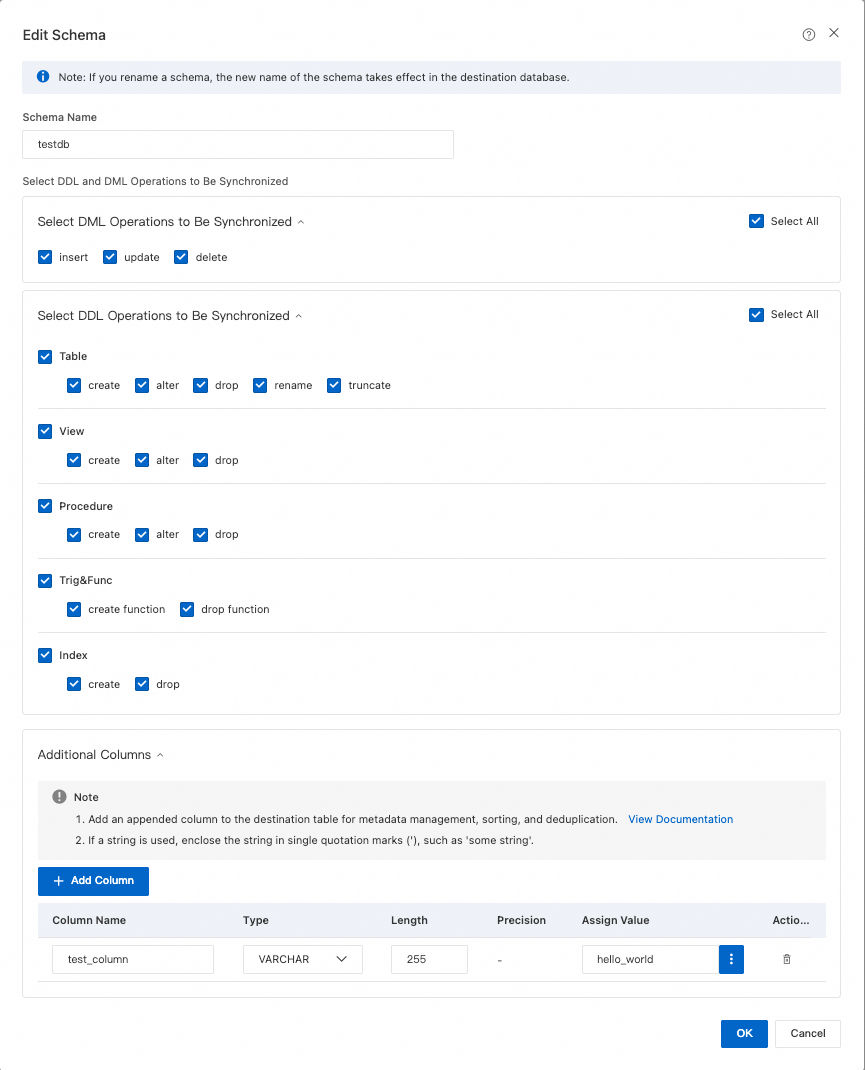
Selected Objects
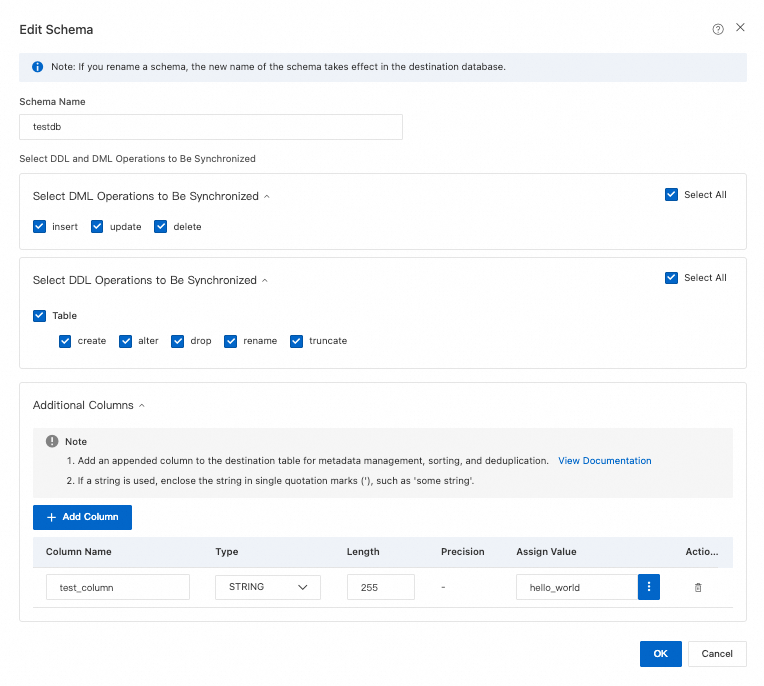
To rename a single object in the destination, right-click the object in Selected Objects and configure it. See Single object name mapping.
To rename multiple objects in the destination, click Batch Edit in the upper-right corner of the Selected Objects box. See Batch object name mapping.
NoteUsing object name mapping might cause dependent objects to fail synchronization.
To select SQL operations to synchronize at the database or table level, right-click the object in Selected Objects and choose the operations in the dialog box.
To set WHERE conditions for data filtering, right-click the table in Selected Objects and configure the filter conditions. See Set filter conditions.
Kafka
Configuration
Description
Example Image
Synchronization Types
Incremental Data Synchronization is always selected. By default, also select Schema Synchronization and Full Data Synchronization. After precheck, DTS initializes full data from the source instance in the destination cluster as the baseline for subsequent incremental synchronization.
NoteIf the destination Kafka instance uses Alibaba Cloud Instance as the Access Method, Schema Synchronization is not supported.
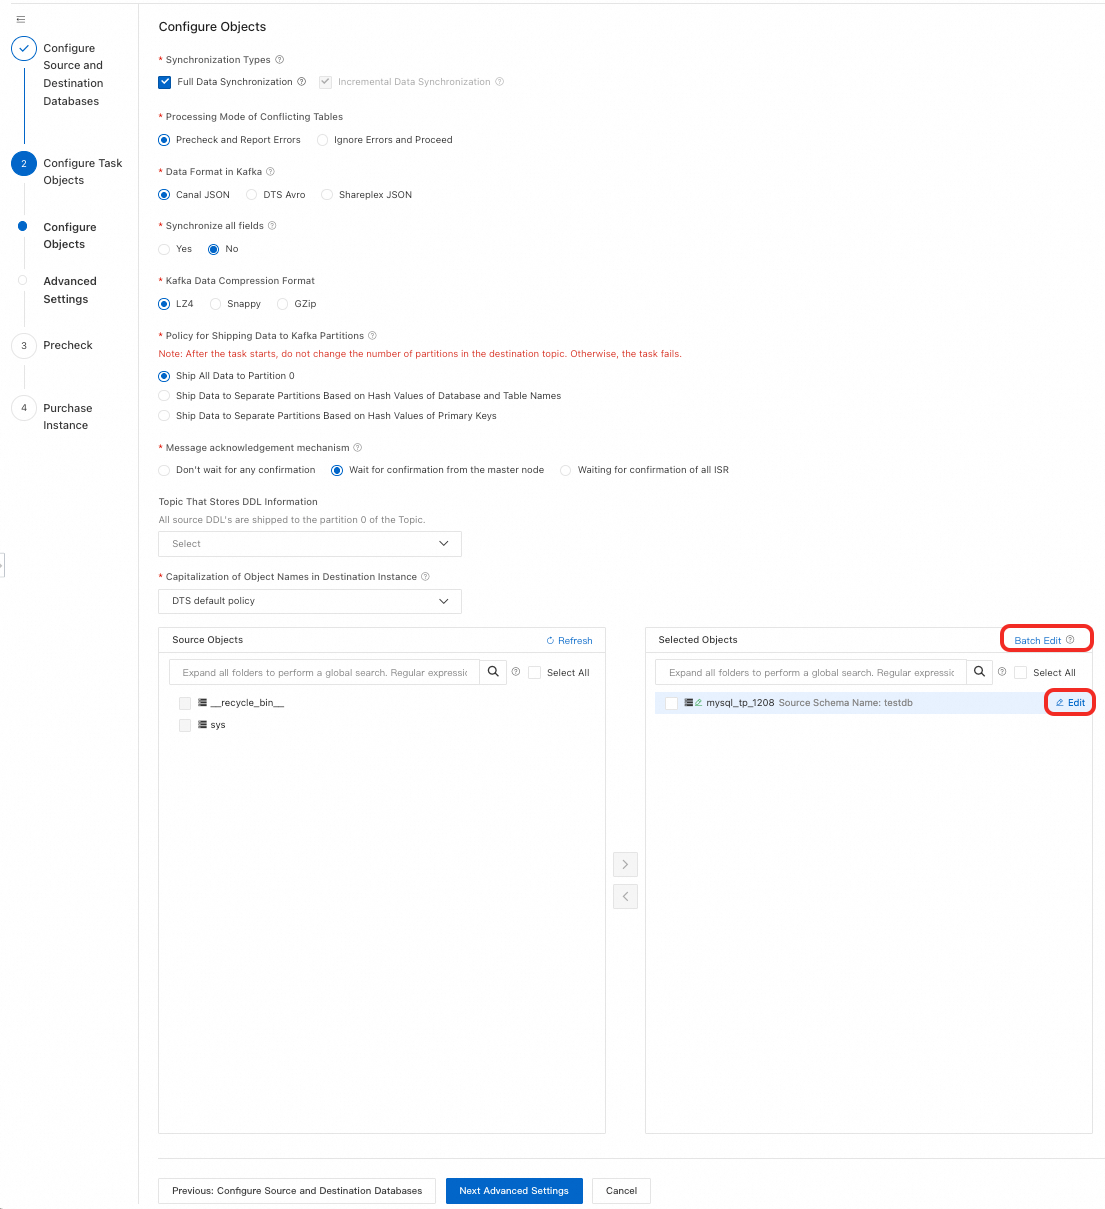
Processing Mode of Conflicting Tables
Precheck and Report Errors: Check if tables with the same name exist in the destination database. If none exist, the check passes. If any exist, the precheck fails and the task does not start.
NoteIf renaming or deleting the existing table is inconvenient, change the table name in the destination database. See Object name mapping.
Ignore Errors and Proceed: Skip the check for existing tables with the same name.
WarningSelecting Ignore Errors and Proceed may cause data inconsistency and business risks, such as:
If table schemas match and the destination has a record with the same primary or unique key value as the source:
During full synchronization, DTS keeps the destination record and skips the source record.
During incremental synchronization, DTS overwrites the destination record with the source record.
If table schemas differ, initialization might fail, only partial columns might sync, or synchronization might fail entirely. Use caution.
Data Format in Kafka
Select the data storage format for synchronization to Kafka.
If you select DTS Avro, parse data using the DTS Avro schema definition. See DTS Avro schema definition and DTS Avro deserialization example.
If you select Canal JSON, see Canal JSON description for parameter details and examples.
If you select Shareplex JSON, see Shareplex JSON for parameter details and examples.
Synchronize all fields
Select whether to synchronize all fields.
Kafka Data Compression Format
Select the compression format for Kafka messages.
LZ4 (default): Low compression ratio, high compression speed.
GZip: High compression ratio, low compression speed. Higher CPU consumption.
Snappy: Medium compression ratio and speed.
Policy for Shipping Data to Kafka Partitions
Select a strategy based on your business needs.
Message acknowledgement mechanism
Select a message acknowledgment mechanism based on your business needs.
Topic That Stores DDL Information
Select a topic from the drop-down list to store DDL information.
NoteIf not selected, DDL information is stored in the topic receiving data by default.
Capitalization of Object Names in Destination Instance
Configure the case strategy for database, table, and column names in the destination instance. By default, select DTS default policy. You can also select Consistent with the source database or Consistent with the default policy of the destination database. For more information, see Case strategy for destination object names.
Source Objects
In the Source Objects box, click the objects to synchronize, then click
to move them to the Selected Objects box.NoteYou can select objects at the database, table, or column level. If you select tables or columns, other objects (such as views, triggers, and stored procedures) are not synchronized.
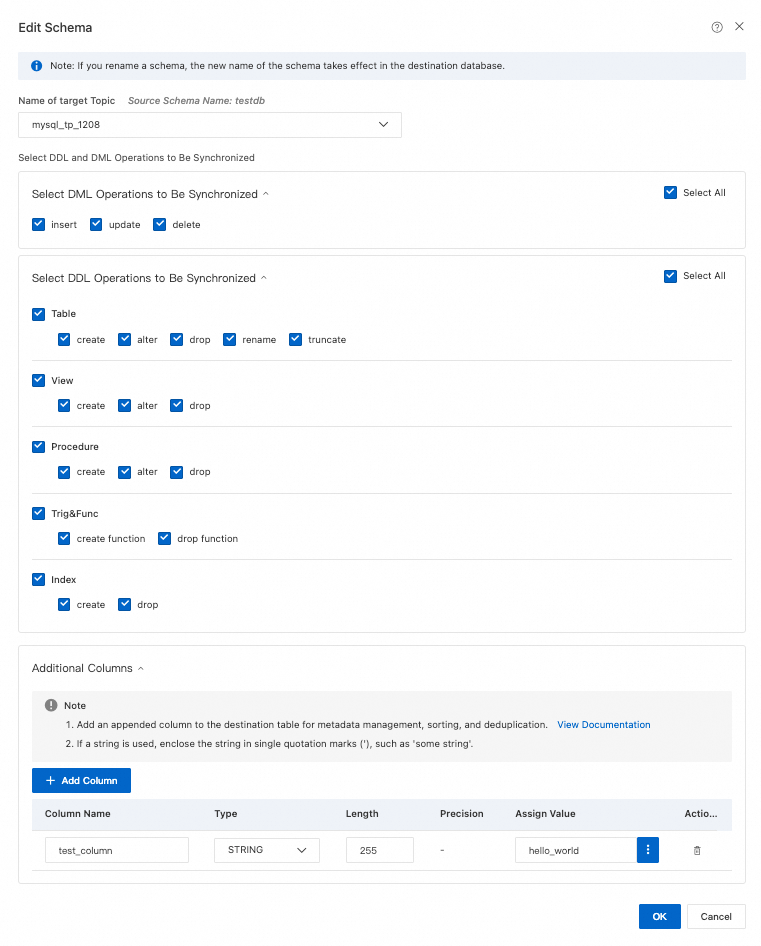
Selected Objects
No additional configuration is required for this example. You can use mapping to set the topic name in the destination Kafka instance, select DML and DDL operations or columns to synchronize, and more.
NoteTo select SQL operations to synchronize at the database or table level, right-click the object in Selected Objects and choose the operations in the dialog box.
Using object name mapping might cause dependent objects to fail synchronization.
AnalyticDB for MySQL 3.0
Configuration
Description
Example Image
Synchronization Types
Incremental Data Synchronization is always selected. By default, also select Schema Synchronization and Full Data Synchronization. After precheck, DTS initializes full data from the source instance in the destination cluster as the baseline for subsequent incremental synchronization.
NoteIf you select Full Data Synchronization, tables for which
CREATE TABLEstatements were executed are synchronized to the destination. This includes both the table schema and data.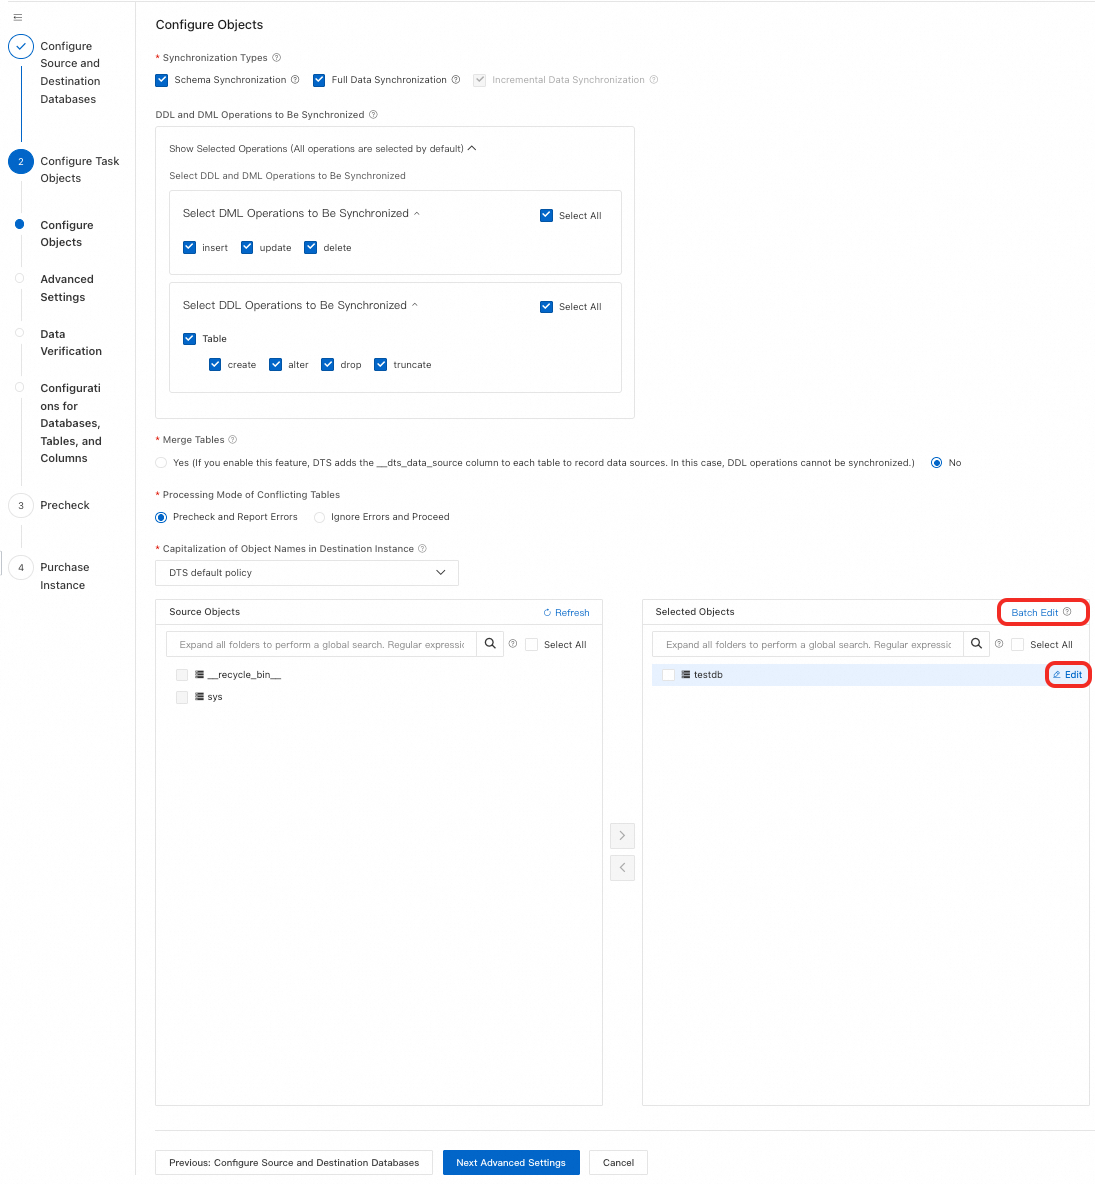
DDL and DML Operations to Be Synchronized
Select the DML and DDL operations to synchronize at the instance level. All operations are selected by default.
NoteTo select SQL operations at the database or table level, right-click the object in Selected Objects and choose the operations in the dialog box.
Merge Tables
Select whether to synchronize multiple tables that have identical schemas from the source database into a single table in the destination database.
Yes: In OLTP scenarios, sharding improves response speed. In OLAP scenarios, such as this destination, a single table can store massive amounts of data, which makes queries simpler. You can use the merge feature of DTS to combine multiple identically structured tables (shards) from the source database into one table in the destination database. For more information, see Enable multi-table merge.
NoteAfter you select multiple source tables, you can use object name mapping to assign them the same table name in the destination database. For more information, see Object name mapping.
DTS adds a
__dts_data_sourcecolumn of the text type to the destination table to store data sources. The values use the formatDTS instance ID:database name:schema name:table name, for example,dts********:dtstestdata:testschema:customer1.Multi-table merge applies at the task level. To merge some tables but not others, you must create two synchronization tasks.
WarningDo not perform DDL operations that change database or table schemas on the source database. This may cause data inconsistency or task failure.
No: This is the default option.
Processing Mode of Conflicting Tables
Precheck and Report Errors: Checks whether a table with the same name exists in the destination database. If a table with the same name does not exist, the precheck passes. If a table with the same name exists, the precheck fails and the data synchronization task does not start.
NoteIf you cannot delete or rename the table with the same name in the destination database, you can map it to a different table name. For more information, see Map table and column names.
Ignore Errors and Proceed: Skips the check for duplicate table names in the destination database.
WarningSelecting Ignore Errors and Proceed may cause data inconsistency and put your business at risk. For example:
If the table schemas are the same and a record in the destination database has the same primary key or unique key value as a record in the source database:
During full synchronization, DTS retains the record in the destination cluster. The corresponding record from the source database is not synchronized.
During incremental synchronization, the record from the source database overwrites the record in the destination database.
If the table schemas are different, initial data synchronization may fail. This can result in only partial column data being synchronized or a complete synchronization failure. Proceed with caution.
Capitalization of Object Names in Destination Instance
Configure the case strategy for database, table, and column names in the destination instance. By default, select DTS default policy. You can also select Consistent with the source database or Consistent with the default policy of the destination database. For more information, see Case strategy for destination object names.
Source Objects
In the Source Objects box, click the objects to synchronize, then click
to move them to the Selected Objects box.NoteYou can select objects at the database, table, or column level. If you select tables or columns, other objects, such as views, triggers, and stored procedures, are not synchronized.
If you select an entire database, the default behavior is as follows:
If the tables to be synchronized have primary keys (single or composite), DTS uses those columns as distribution keys.
If the tables lack primary keys, DTS generates an auto-increment primary key column, which may cause data inconsistency between the source and destination databases.
Selected Objects
To rename a single object in the destination database, right-click the object in the Selected Objects box and configure it. For more information, see Single object name mapping.
To rename multiple objects in the destination database, click Batch Edit in the upper-right corner of the Selected Objects box. For more information, see Batch object name mapping.
NoteTo select the SQL operations to synchronize at the database or table level, right-click the object in the Selected Objects box and choose the operations in the dialog box.
To set WHERE conditions for data filtering, right-click the table in the Selected Objects box and configure the filter conditions. For more information, see Set filter conditions.
Click Advanced Settings. Keep the default settings unless you have specific requirements.
NoteThe available options vary based on the destination database type. For the most accurate settings, refer to the console.
Configuration
Description
Example Image
Dedicated Cluster for Task Scheduling
By default, DTS schedules tasks on shared clusters. No selection is needed. For better stability, you can purchase a dedicated cluster to run DTS synchronization tasks. For more information, see What is a DTS dedicated cluster?.
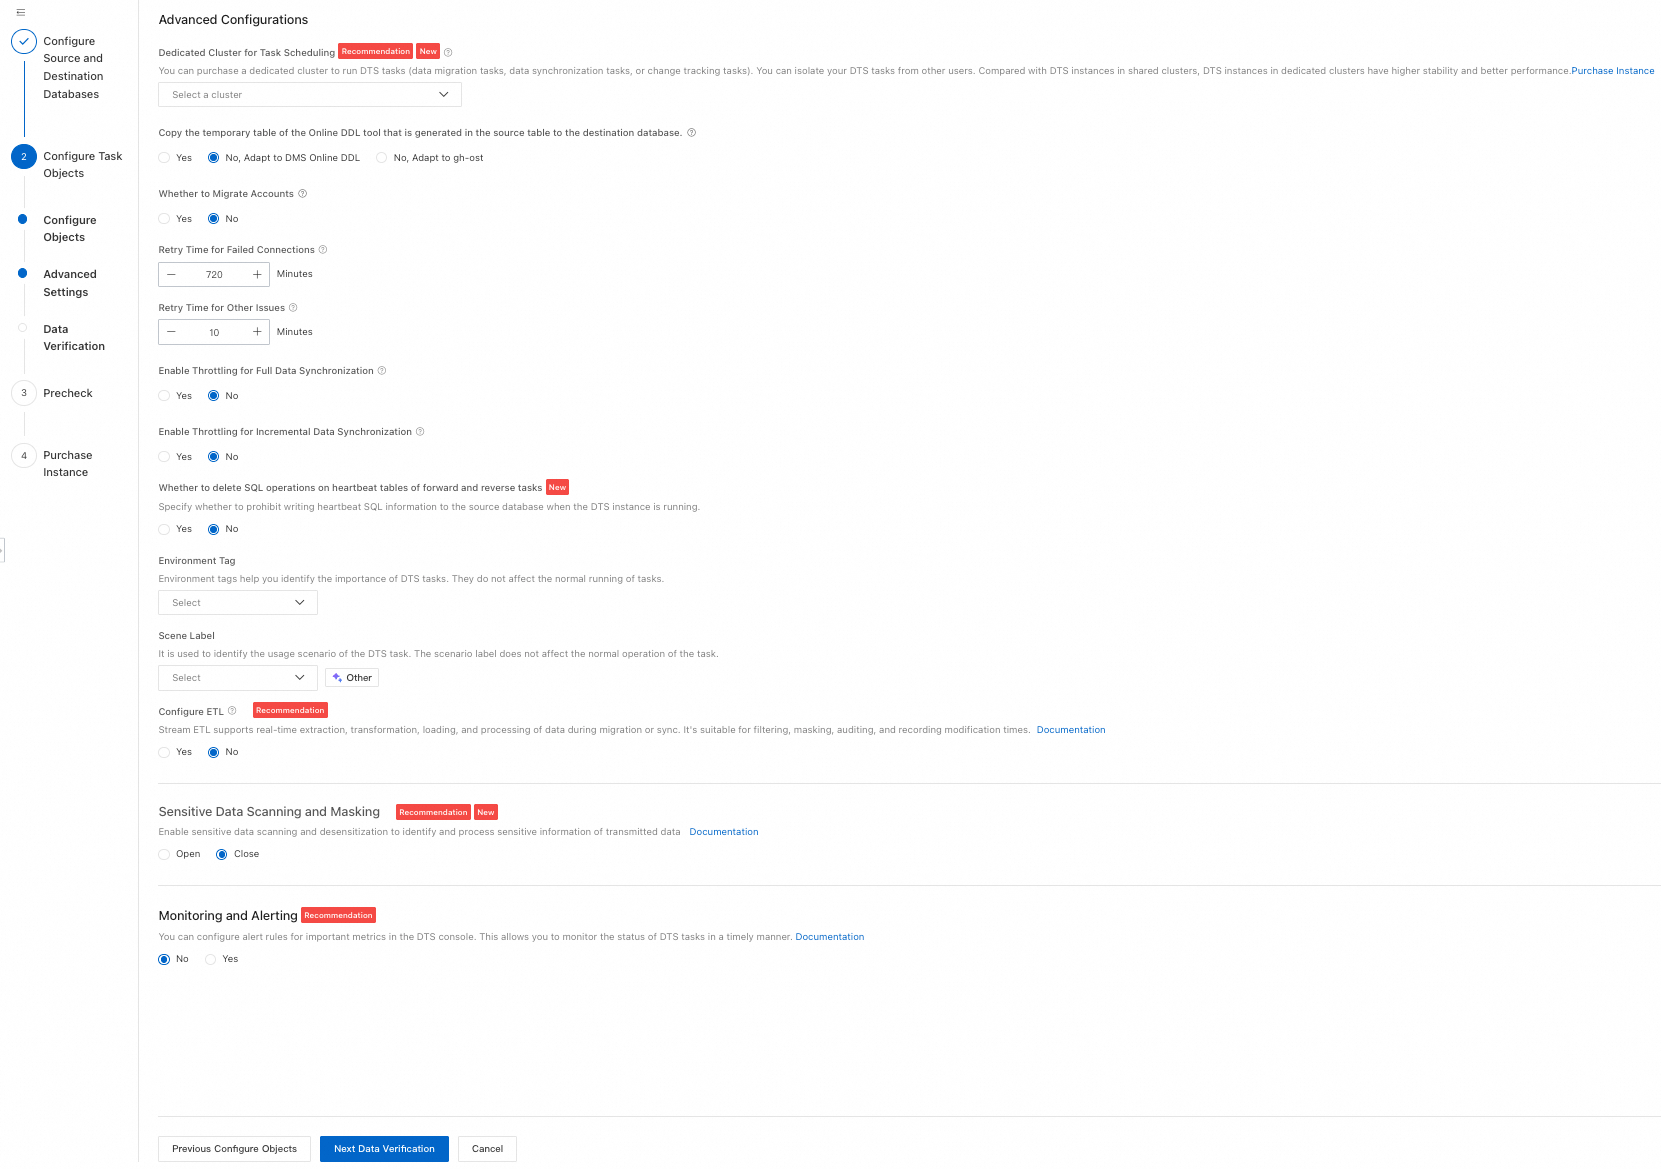
Copy the temporary table of the Online DDL tool that is generated in the source table to the destination database.
If the source database uses Data Management (DMS) or gh-ost for Online DDL changes, select whether to synchronize the temporary table data that is generated during Online DDL.
ImportantDTS tasks do not support Online DDL changes that use tools such as pt-online-schema-change. Using such tools causes the task to fail.
Processing varies by phase. Because the Schema Synchronization and Full Data Synchronization phases prohibit DDL operations that change schemas, they are not controlled by Online DDL policies.
Schema Synchronization: This phase is not controlled by the Online DDL policy. It creates the related temporary tables.
Full Data Synchronization: This phase is not controlled by the Online DDL policy. It does not include temporary tables in the full synchronization. Tables that match the following regular expressions are filtered out.
Incremental Data Synchronization: This phase is controlled by the Online DDL policy.
Yes: Synchronizes data changes from temporary tables that are generated during Online DDL, such as
_table_name_gho.No, Adapt to DMS Online DDL and No, Adapt to gh-ost: Filters out data changes from temporary tables that are generated by tools such as gh-ost (for example,
_table_name_gho) using regular expression rules.
Yes: Synchronizes temporary table data that is generated during Online DDL.
NoteLarge amounts of temporary table data may cause synchronization delays.
No, Adapt to DMS Online DDL: Does not synchronize temporary table data. Synchronizes only the original DDL statements that are executed using Data Management (DMS).
NoteThis approach locks tables in the destination database.
No, Adapt to gh-ost: Does not synchronize temporary table data. This option supports custom filter rules. DTS filters out temporary tables that are generated by tools such as gh-ost (for example,
_table_name_gho) using regular expression rules. You can modify the default regular expressions for shadow and useless tables as needed:Shadow tables:
^_(.+)_(?:gho|new)$Useless tables:
^_(.+)_(?:ghc|del|old)$
NoteThis approach locks tables in the destination database.
Whether to Migrate Accounts
Select whether to synchronize account information from the source database. If you select Yes, select the accounts to synchronize and confirm their permissions. For more information, see Migrate database accounts.
Retry Time for Failed Connections
After the synchronization task starts, if the connection to the source or destination database fails, DTS reports an error and immediately begins to retry the connection. The default retry duration is 720 minutes. You can customize the retry duration to a value in the range of 10 to 1440 minutes. We recommend that you set it to more than 30 minutes. If DTS reconnects within the set retry duration, the task resumes automatically. Otherwise, the task fails.
NoteFor multiple DTS instances that share the same source or destination database (such as DTS instance A and B), if instance A sets the retry duration to 30 minutes and instance B sets it to 60 minutes, the lower value (30 minutes) takes effect.
DTS charges for running tasks during retry periods. You can customize the retry duration based on your business needs or release DTS instances promptly after you release the source and destination database instances.
Retry Time for Other Issues
After the synchronization task starts, if non-connection issues occur, such as DDL or DML execution errors, DTS reports an error and immediately begins to retry. The default retry duration is 10 minutes. You can customize the retry duration to a value in the range of 1 to 1440 minutes. We recommend that you set it to more than 10 minutes. If DTS succeeds within the set retry duration, the task resumes automatically. Otherwise, the task fails.
ImportantThe value for Retry Time for Other Issues must be less than the value for Retry Time for Failed Connections.
Enable Throttling for Full Data Synchronization
During full synchronization, DTS consumes read and write resources from the source and destination databases, which can increase the database load. Based on your setup, you can choose whether to limit the full synchronization rate by setting Queries per second (QPS) to the source database, RPS of Full Data Migration, and Data migration speed for full migration (MB/s) to reduce pressure on the destination database.
NoteThis option is available only when Synchronization Types includes Full Data Synchronization.
You can also adjust the full synchronization rate after the instance starts running.
Enable Throttling for Incremental Data Synchronization
Based on your setup, you can choose whether to limit the incremental synchronization rate by setting RPS of Incremental Data Synchronization and Data synchronization speed for incremental synchronization (MB/s) to reduce pressure on the destination database.
Whether to delete SQL operations on heartbeat tables of forward and reverse tasks
Select whether to write heartbeat SQL information to the source database while the DTS instance is running.
Yes: Does not write heartbeat SQL information to the source database. The DTS instance may report latency.
No: Writes heartbeat SQL information to the source database. This may affect the physical backup and cloning features of the source database.
Environment Tag
Select an environment label to identify the instance as needed.
Scene Label
Select a scenario label to identify the instance as needed.
Configure ETL
Select whether to configure the ETL feature. For more information, see What is ETL?.
Yes: Configure ETL and enter data processing statements in the text box. For more information, see Configure ETL in DTS migration or synchronization tasks.
No: Does not configure ETL.
Sensitive Data Scanning and Masking
Enable sensitive data scanning and masking to identify and process sensitive information in the transmitted data. For more information, see Sensitive data scanning and masking.
Open
Close
Monitoring and Alerting
You can set alerts to notify contacts if the synchronization fails or if latency exceeds the specified threshold.
No: Does not set alerts.
Yes: Sets alerts. You must also configure alert thresholds and alert notifications. For more information, see Configure monitoring and alerts during task setup.
Step 4: (Optional) Configure Data Validation
If the destination database type supports data validation, click Data Verification to configure data validation. If it is not supported, proceed directly to Step 5: Precheck and Purchase.
Select a Data Verification Mode:
NoteFull Data Verification: Validates the data that is included in full synchronization tasks. If the instance does not have an incremental task, validation starts after the instance is created and the full data write is complete. If the instance has an incremental task, validation starts after the instance is created and the first incremental data write with zero latency is complete.
Incremental Data Verification: Validates the data in incremental synchronization tasks. Validation starts after the instance is created and the first incremental data write with zero latency is complete.
Schema Verification: Validates the schemas of objects. If the instance does not have an incremental task, validation starts after the instance is created and the schema and full data writes are complete. If the instance has an incremental task, validation starts after the instance is created and the first incremental data write with zero latency is complete.
Full Validation
If you select Full Data Verification, configure the parameters in the following table.
Parameter
Description
Example Image
Full Data Verification
Full field validation by row sampling: Configure a sampling percentage (10–100) to validate all fields in sampled data.
Verify based on the number of table rows: Validates row counts in full task data without checking actual data content.
NoteVerify based on the number of table rows is free. Full field validation by row sampling is billed based on actual validated data volume.
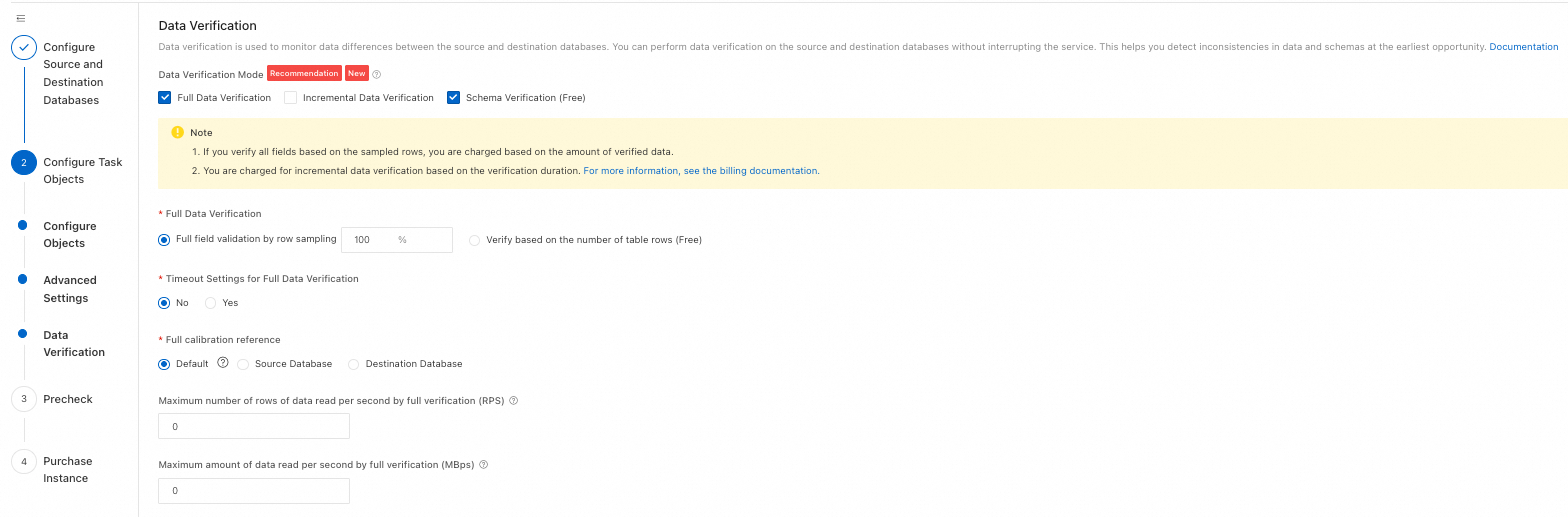
Timeout Settings for Full Data Verification
No: Full validation tasks do not end forcibly on timeout.
Yes: Set a delay time (1–72 hours) for ending full validation tasks. Timing starts when validation begins. If validation does not complete within the set time, it ends forcibly.
Full calibration reference
Default: Uses the union of source and destination databases as the baseline to validate data consistency.
Source Database: Uses the source database as the baseline to validate destination data consistency (ignores extra data in the destination).
Destination Database: Uses the destination database as the baseline to validate source data consistency (ignores extra data in the source).
Maximum number of rows of data read per second by full verification (RPS)
Full data validation consumes database read resources. Limit the validation rate (rows per second and data volume per second) to reduce database pressure.
NoteA value of 0 means no limit. If both Maximum number of rows of data read per second by full verification (RPS) and Maximum amount of data read per second by full verification (MBps) are 0, no rate limiting applies.
Maximum amount of data read per second by full verification (MBps)
Incremental Validation
If you select Incremental Data Verification, configure the parameters in the following table.
Parameter
Description
Example Image
Incremental Verification Benchmark
Select DML operations to validate based on your setup. Supports Source INSERT Operation, Source UPDATE Operation, and Source DELETE Operation.

Set Verification Objects: All objects are selected by default. You can remove the objects on the right that do not need to be verified..
Configure validation alerts: You can select and configure the parameters in the following table based on your business needs.
NoteYou can also set or modify data validation alerts after the DTS instance starts running.
Parameter
Description
Example Image
Full Data Verification Alert
No: Do not set alerts.
Yes: Set alerts. You must also select and configure alert rules:
Trigger alert when full validation task fails.
Set a data inconsistency threshold. Trigger alert when inconsistent data in full validation meets or exceeds the threshold.
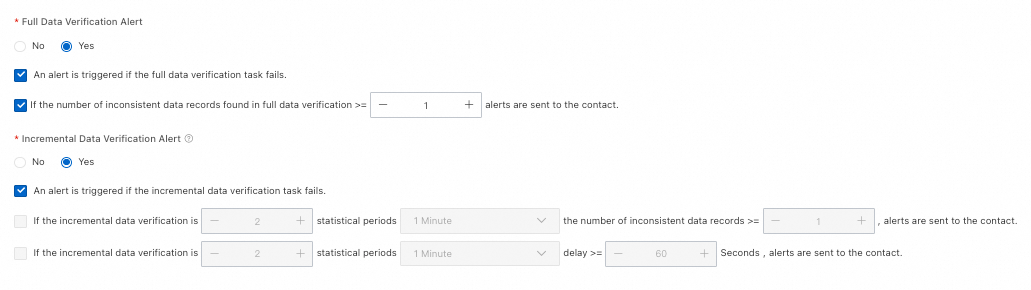
Incremental Data Verification Alert
No: Do not set alerts.
Yes: Set alerts. You must also select and configure alert rules:
Trigger alert when incremental validation task fails.
Set thresholds for inconsistent record count, statistical period, and number of periods. Trigger alert when inconsistent records meet or exceed the threshold for the specified number of consecutive periods.
Set thresholds for data latency, statistical period, and number of periods. Trigger alert when latency meets or exceeds the threshold for the specified number of consecutive periods.
NoteIf you set validation alerts and want to receive alert notifications, you must subscribe to alert messages in Cloud Monitor. For more information, see Set alert rules for DTS tasks in Cloud Monitor.
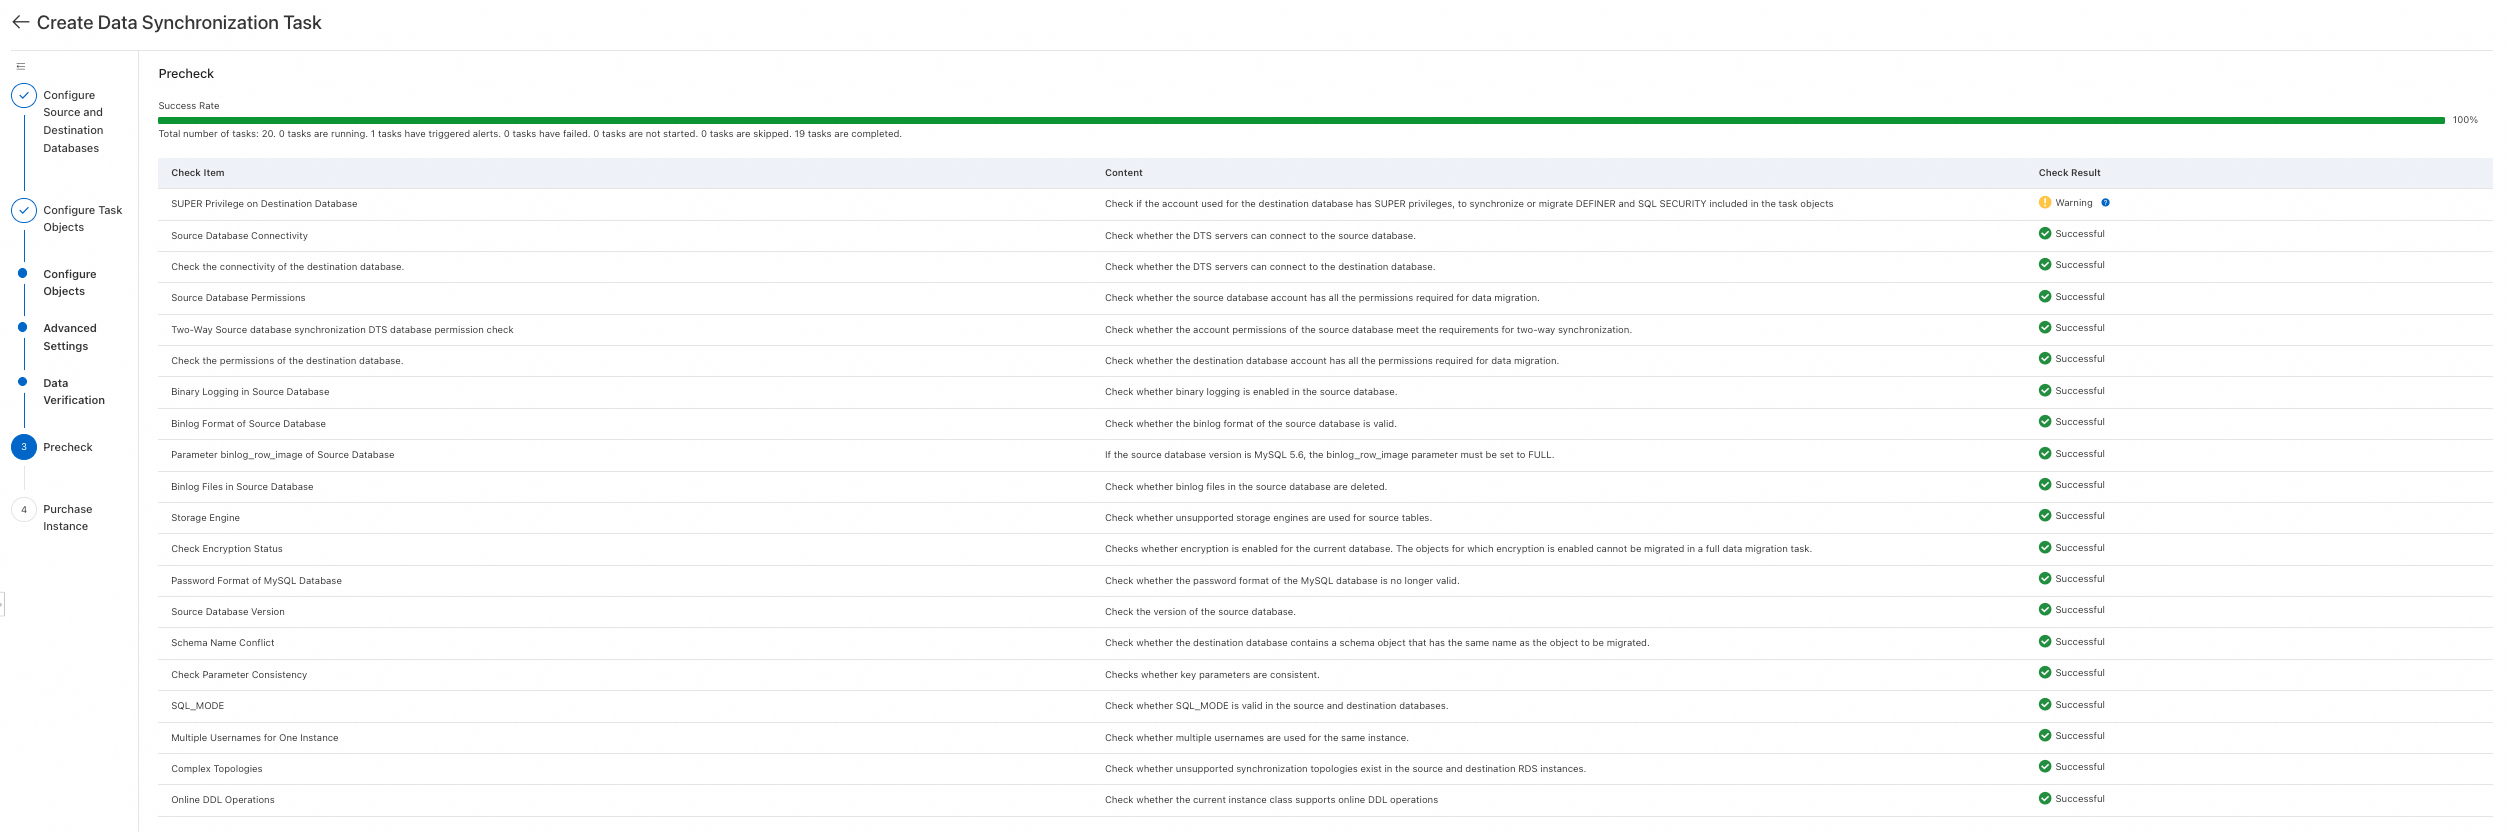
Step 5: Precheck and Purchase
Save the task and run the precheck. DTS verifies that the configurations, permissions, and network settings of the source and destination databases meet the synchronization requirements. After the precheck is successful, click Next: Purchase Instance.
To view the API parameters for configuring this instance, hover over the Next: Save Task Settings and Precheck button, and then click Preview OpenAPI parameters in the tooltip.
If you do not need to view the API parameters or have finished viewing them, click Next: Save Task Settings and Precheck at the bottom of the page.
NoteThe precheck runs before the synchronization task starts. The task can start only after the precheck is successful.
If the precheck fails, click View Details next to the failed item, fix the issue, and then rerun the precheck.
If the precheck shows warnings:
For items that cannot be ignored, click View Details, fix the issue, and then rerun the precheck.
For items that can be ignored, click Confirm Alert Details, then Ignore and OK, and then click Precheck Again to skip the warning item and rerun the precheck. Ignoring warning items may cause data inconsistency or other business risks.
On the purchase page, configure the billing method and link specification.
Billing Method: Supports Subscription, Pay-as-you-go, and Pay-as-you-go Serverless. For more information, see Billing methods.
Instance Class: The link specification determines the upper performance limit for incremental synchronization, which is measured in rows per second (RPS). Select a specification, such as
smallormedium, based on the frequency of data changes in the source database. For more information, see Specification description.After you complete the configuration, read and select the Data Transmission Service (Pay-as-you-go) Service Terms.
Click Buy and Start. In the OK dialog box, click OK to complete the purchase. The task starts automatically.

Step 6: (Optional) Configure Reverse Synchronization Task
Wait until the forward synchronization task completes initialization and its Status changes to Running.
Find the reverse synchronization task and click Configure Task.

Follow the steps above to configure the reverse synchronization task.
ImportantWhen you configure the reverse task, ensure that the source and destination instances are correct. The source instance for the reverse synchronization task is the destination instance from the forward task, and the destination instance for the reverse synchronization task is the source instance from the forward task. Carefully verify the instance details, such as the database name, account, and password.
The Instance Region for the source and destination databases in the reverse task cannot be modified. The reverse task requires fewer parameters than the forward task. For more information, refer to the console.
The Processing Mode of Conflicting Tables setting for the reverse task does not apply to tables that were synchronized to the destination by the forward task.
The reverse task does not support the synchronization of objects that were selected in the Selected Objects list of the forward task.
We do not recommend that you use mapping in the reverse task configuration, because it may cause data inconsistency.
When the Success Rate reaches 100%, click Back.
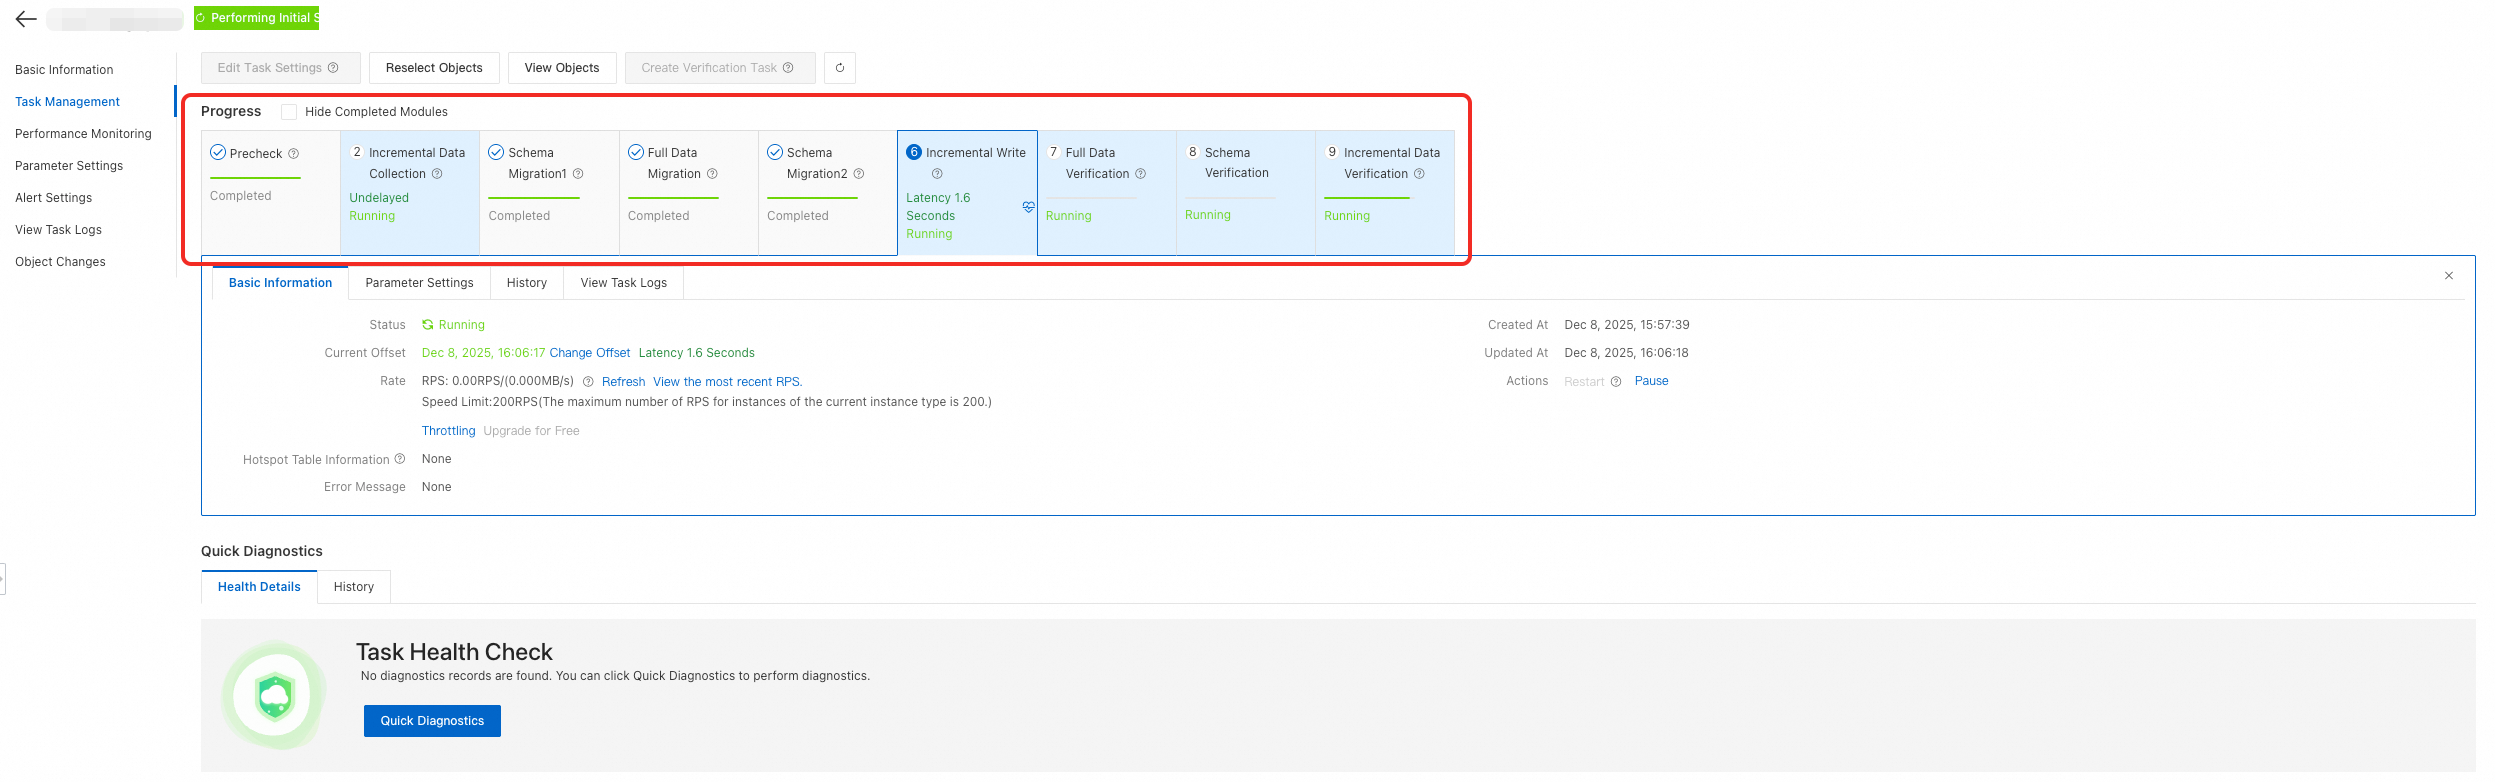
Step 7: Monitoring and Verification
After the task starts, the system automatically progresses through stages such as Incremental Data Collection, Schema Migration, Full Data Synchronization, Incremental Write, and Full Data Verification.
View Status: In the synchronization task list, you can check the current stage and running status. When the task enters the incremental synchronization stage and the latency stabilizes at the second level, the historical data synchronization is complete. DTS then begins to synchronize incremental data in real time.
Data Verification: You can view the data consistency results on the Check Details tab under Full Data Verification or Schema Verification.