To use an AWS database as the source or destination in a DTS task, connect it to Alibaba Cloud through a public IP address or an IPsec-VPN connection over VPC.
Connect over a public IP address
Enable public network access for the database on AWS. Then, based on your task type -- data synchronization, data migration, or data validation -- add the DTS server IP addresses to the database security settings, such as security group rules, firewalls, or whitelists.
Connect over a VPC
Example scenario
An enterprise has a VPC in the Alibaba Cloud Germany (Frankfurt) region and another in the AWS Europe (Frankfurt) region. This example connects the two VPCs through an IPsec-VPN connection using Alibaba Cloud VPN Gateway and AWS VPN.

Prerequisites
-
A VPC with ECS resources deployed in the Alibaba Cloud Germany (Frankfurt) region. Create a VPC with an IPv4 CIDR block.
-
A VPC with EC2 resources deployed in the AWS Europe (Frankfurt) region. AWS platform.
-
The CIDR blocks of the two VPCs do not overlap.
CIDR block planning
The CIDR blocks of the connected networks must not overlap.
VPC CIDR blocks
|
Resource |
VPC CIDR block |
Instance IP address |
|
Alibaba Cloud VPC |
Primary CIDR block: 10.0.0.0/16. vSwitch 1 CIDR block: 10.0.0.0/24, in Zone B. vSwitch 2 CIDR block: 10.0.10.0/24, in Zone C. |
ECS IP address: 10.0.0.223 |
|
AWS VPC |
Primary CIDR block: 192.168.0.0/16. Subnet CIDR block: 192.168.10.0/24, in Zone eu-central-1a. |
EC2 IP address: 192.168.10.113 |
BGP CIDR blocks for IPsec-VPN connections
Applies only to BGP dynamic routing. Skip if you use static routing.
Both tunnels on the Alibaba Cloud side must use the same Local ASN. The peer BGP autonomous system numbers (ASNs) for the two tunnels can differ, but we recommend using the same peer BGP ASN for both.
|
Resource |
IPsec-VPN connection name |
Tunnel |
BGP tunnel CIDR block |
BGP IP address |
BGP ASN (Local ASN) |
|
Alibaba Cloud VPN Gateway |
IPsec-VPN connection |
Primary tunnel |
169.254.116.208/30. The CIDR block of each tunnel must be unique within a VPN Gateway instance. |
169.254.116.210 |
65530 |
|
Standby tunnel |
169.254.214.96/30 |
169.254.214.98 |
|||
|
AWS virtual private gateway |
Site-to-Site VPN Connection 1 |
Tunnel 1 |
169.254.116.208/30 |
169.254.116.209 |
64512 |
|
Tunnel 2 |
The standby tunnel is not used. |
||||
|
Site-to-Site VPN Connection 2 |
Tunnel 1 |
169.254.214.96/30 |
169.254.214.97 |
||
|
Tunnel 2 |
The standby tunnel is not used. |
Configuration flow

Step 1: Create a VPN Gateway instance on Alibaba Cloud
Create a VPN Gateway instance on Alibaba Cloud. The system assigns two IP addresses for the IPsec-VPN connection with AWS.
-
Log on to the VPN Gateway console.
-
In the top navigation bar, select the region where you want to create the VPN gateway. The VPN gateway must be in the same region as the VPC.
-
On the VPN Gateways page, click Create VPN Gateway.
-
Configure the VPN Gateway with the following settings, click Buy Now, and complete the payment. Only parameters relevant to this example are listed. Use default settings for all others. Create and manage a VPN Gateway instance.
Parameter
Description
Example value
Instance Name
The VPN Gateway instance name.
Enter VPN Gateway.
Region
The deployment region.
Select Germany (Frankfurt).
Gateway Type
The gateway type.
Select Standard.
Network Type
The network type.
Select Public.
Tunnel
The tunnel mode for IPsec-VPN connections in the region: Dual-Tunnel or Single-tunnel. Create an IPsec-VPN connection.
Default: Dual-tunnel.
VPC
The VPC to associate with the VPN Gateway.
Select the VPC in the Germany (Frankfurt) region.
vSwitch
A vSwitch from the VPC. In dual-tunnel mode, specify two vSwitches. The system creates an ENI in each for VPC-to-IPsec traffic (one IP each). You cannot change the vSwitches after creation.
Select a vSwitch in the VPC.
vSwitch 2
A second vSwitch in a different zone for zone-disaster recovery. For single-zone regions, select two vSwitches in that zone.
Select the second vSwitch in the VPC.
IPsec-VPN
Toggle the IPsec-VPN feature.
Default: Enable.
SSL-VPN
Toggle the SSL-VPN feature.
Default: Disable.
-
Return to the VPN Gateway page. The instance status changes from Preparing to Normal within 1 to 5 minutes. The system assigns two IP addresses:
VPN Gateway instance name
VPN Gateway instance ID
IP address
VPN Gateway
vpn-gw8dickm386d2qi2g****
IPsec Address 1 (active tunnel address by default): 8.XX.XX.146
IPsec Address 2 (standby tunnel address by default): 8.XX.XX.74
Step 2: Deploy the VPN on AWS
Deploy the VPN on AWS to establish the IPsec-VPN connection. See the official AWS documentation for detailed operations.
Use static routing
-
Create two customer gateways on AWS, using the two Alibaba Cloud VPN Gateway IP addresses.

-
Create a virtual private gateway on AWS and attach it to the VPC connecting to Alibaba Cloud.

-
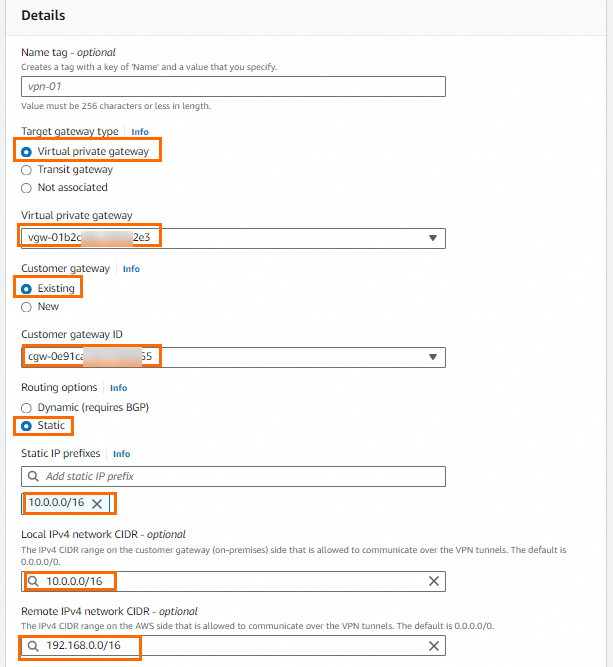
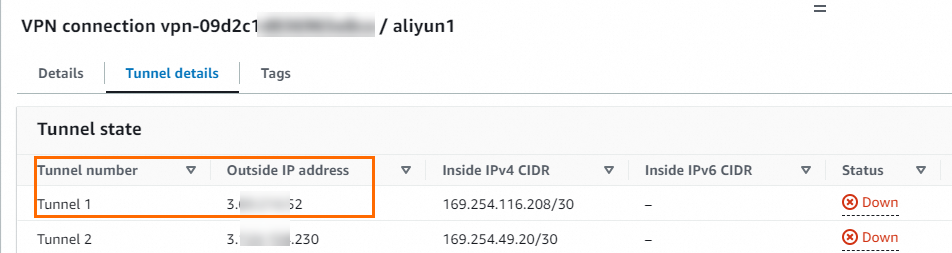
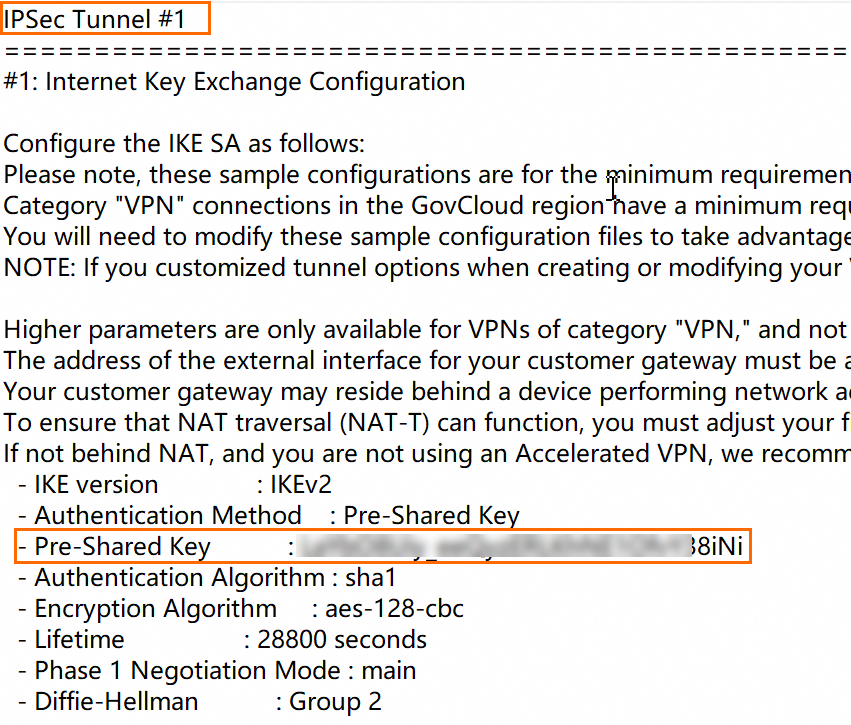
Create site-to-site VPN connections. The following figure shows the configuration of one connection. Tunnel options use default values. The other connection uses a different customer gateway with the same remaining settings. After the connections are created, view the tunnel address information. You need this information to create the IPsec-VPN connection on Alibaba Cloud. Outside IP addresses of Tunnel 1 for the two VPN connections:
ImportantBoth Alibaba Cloud and AWS IPsec-VPN connections support dual-tunnel mode. However, AWS associates both tunnels with the same customer gateway by default, while Alibaba Cloud assigns different IP addresses to each tunnel. To enable both tunnels, create two site-to-site VPN connections on AWS, each associated with a different customer gateway.
NoteLocal IPv4 Network CIDR must be the Alibaba Cloud VPC CIDR block, and Remote IPv4 Network CIDR must be the AWS VPC CIDR block.
Site-to-site VPN connection
Tunnel
Outside IP Address
Associated customer gateway IP address
Site-to-Site VPN Connection 1
Tunnel 1
3.XX.XX.52
8.XX.XX.146
Site-to-Site VPN Connection 2
Tunnel 1
3.XX.XX.56
8.XX.XX.74
-
Enable route propagation in the route table of the VPC associated with the virtual private gateway to automatically propagate VPN routes.

Use BGP dynamic routing
-
Create two customer gateways on AWS, using the Alibaba Cloud VPN Gateway IP addresses. Register the BGP ASN (65530) of the Alibaba Cloud IPsec-VPN connection.

-
Create a virtual private gateway on AWS, attach it to the VPC connecting to Alibaba Cloud, and set the BGP ASN to 64512.

-
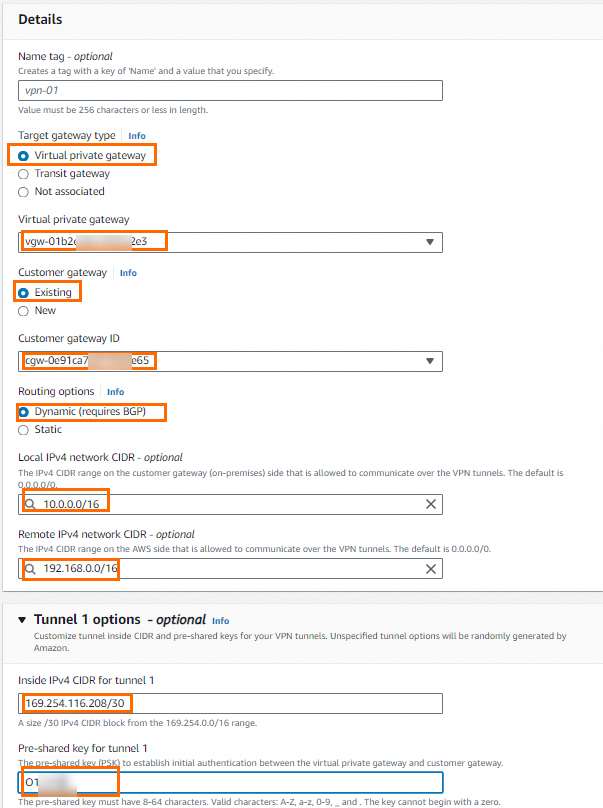
Create site-to-site VPN connections. The following figure shows the configuration for one connection. Settings not shown use default values. The other connection uses a different customer gateway, with Tunnel 1 Inside IPv4 CIDR set to 169.254.214.96/30 and the same remaining settings. After the connections are created, view the tunnel address information.
ImportantBoth Alibaba Cloud and AWS IPsec-VPN connections support dual-tunnel mode. However, AWS associates both tunnels with the same customer gateway by default, while Alibaba Cloud assigns different IP addresses to each tunnel. To enable both tunnels, create two site-to-site VPN connections on AWS, each associated with a different customer gateway.
NoteLocal IPv4 Network CIDR must be the Alibaba Cloud VPC CIDR block, and Remote IPv4 Network CIDR must be the AWS VPC CIDR block.
-
View the pre-shared key and BGP IP address for Alibaba Cloud. Download the VPN configuration file for the peer device (the Alibaba Cloud VPN gateway) from AWS. The file contains the pre-shared keys and BGP IP addresses for Alibaba Cloud configuration. For download instructions, see Download the configuration file. Select Generic for Vendor and IKEv2 for Internet Key Exchange (IKE) version.
NoteIf you specified a pre-shared key when creating the connection, you do not need to view it in the configuration file. If you used a system-generated key, find it in the configuration file. The pre-shared keys on the Alibaba Cloud and AWS sides must match.

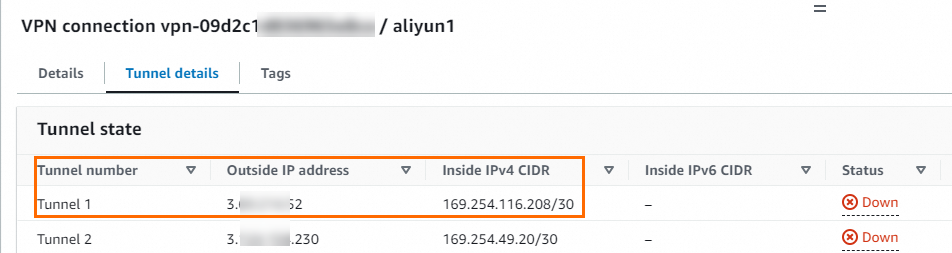
Outside IP addresses, BGP IP addresses, and associated customer gateway IP addresses for Tunnel 1 of the two connections:
Site-to-site VPN connection
Tunnel
Outside IP Address
AWS BGP IP address
Alibaba Cloud BGP IP address
Associated customer gateway IP address
Site-to-Site VPN Connection 1
Tunnel 1
3.XX.XX.52
169.254.116.209
169.254.116.210
8.XX.XX.146
Site-to-Site VPN Connection 2
Tunnel 1
3.XX.XX.56
169.254.214.97
169.254.214.98
8.XX.XX.74
-
Enable route propagation in the route table of the VPC associated with the virtual private gateway to automatically propagate VPN routes.
Step 3: Deploy the VPN Gateway on Alibaba Cloud
After configuring the VPN on AWS, deploy the VPN Gateway on Alibaba Cloud to complete the IPsec-VPN connection.
-
Create customer gateways.
-
Log on to the VPN Gateway console.
-
In the left-side navigation pane, choose Interconnections > VPN > Customer Gateways.
-
In the top navigation bar, select the region of the VPN gateway. The customer gateway must be in the same region.
-
On the Customer Gateways page, click Create Customer Gateway.
-
In the Create Customer Gateway panel, configure the following parameters, and then click OK. Create two customer gateways. Use the outside IP addresses of the tunnels from the AWS site-to-site VPN connections as the customer gateway IP addresses. Only the parameters relevant to this example are listed. For all other parameters, keep the default settings. For more information, see Customer gateways. > Important: Use only the outside IP address of Tunnel 1 from each AWS site-to-site VPN connection as the customer gateway address. The Tunnel 2 outside IP addresses are not used. After you create the IPsec-VPN connection, Tunnel 2 of each site-to-site VPN connection is not connected by default. | Parameter | Description | Customer Gateway 1 | Customer Gateway 2 | |---|---|---|---| | Name | Enter a name for the customer gateway. | Enter Customer Gateway 1. | Enter Customer Gateway 2. | | IP Address | Enter the outside IP address of the tunnel on AWS. | Enter 3.XX.XX.52. | Enter 3.XX.XX.56. | | ASN | Enter the BGP ASN of the AWS virtual private gateway. Required only for BGP dynamic routing. | Enter 64512. | Enter 64512. |
-
-
Create an IPsec-VPN connection.
-
In the left-side navigation pane, choose Interconnections > VPN > IPsec Connections.
-
On the IPsec Connections page, click Bind VPN Gateway.
-
On the Create IPsec-VPN Connection page, configure the parameters, and then click OK. | Parameter | Description | Example value | |---|---|---| | IPsec-VPN Connection Name | Enter a name for the connection. | Enter IPsec-VPN connection. | | Region | Select the region of the VPN gateway. The connection is created in the same region. | Select Germany (Frankfurt). | | Bind VPN Gateway | Select the VPN Gateway to associate. | Select the created VPN Gateway. | | Routing Mode | Select a routing mode. Destination Routing Mode: Routes traffic based on the destination IP address. Protected Data Flows: Routes based on source and destination IP addresses. | For static routing, select Protected Data Flows (recommended). Set Local Network to 10.0.0.0/16. Set Remote Network to 192.168.0.0/16. For BGP dynamic routing, select Destination Routing Mode (recommended). | | Effective Immediately | Yes: Negotiation begins immediately. No: Negotiation is triggered by traffic. | Select Yes. | | Enable BGP | Enable BGP for the connection. Disabled by default. | Keep the default. To use BGP dynamic routing, add the BGP configuration separately after connection creation. | | Tunnel 1 | Configure Tunnel 1 (active tunnel). Tunnel 1 is the active tunnel, and Tunnel 2 is the standby tunnel. This cannot be changed. | | | Customer Gateway | Select the customer gateway for the active tunnel. | Select Customer Gateway 1. | | Pre-Shared Key | Enter the authentication key for the active tunnel. The key must be 1 to 100 characters long and can contain digits, uppercase and lowercase letters, and the following special characters: `
~!@#$%^&*()_-+={}[]\|;:',.<>/? ``. If not specified, the system generates a random 16-character string. | The key must match the key for the connected AWS tunnel. | | Encryption Configurations | Configure IKE, IPsec, Dead Peer Detection (DPD), and NAT traversal. | Under IKE Configurations, set SA Life Cycle (seconds) to 28800 to match the AWS value. Under IPsec Configurations, set SA Life Cycle (seconds) to 3600 to match the AWS value. For all other parameters, use the default values. For more information, see IPsec-VPN connections (VPN Gateway). | | Tunnel 2 | Configure Tunnel 2 (standby tunnel). | | | Customer Gateway | Select the customer gateway for the standby tunnel. | Select Customer Gateway 2. | | Pre-Shared Key | Enter the authentication key for the standby tunnel. | The key must match the key for the connected AWS tunnel. | | Encryption Configuration | Configure IKE, IPsec, DPD, and NAT traversal. | Under IKE Configurations, set SA Life Cycle (seconds) to 28800 to match the AWS value. Under IPsec Configurations, set SA Life Cycle (seconds) to 3600 to match the AWS value. For all other parameters, use the default values. For more information, see IPsec-VPN connections (VPN Gateway). | > Important: The pre-shared key for each tunnel must match the key on its peer gateway device. Otherwise, the IPsec-VPN connection cannot be established. -
In the Created message, click Cancel.
-
-
Configure VPN gateway routes.
Use static routing
If you selected Protected Data Flows for Routing Mode, the system creates a policy-based route automatically in the Unpublished state. Publish the route to the VPC.
-
In the left-side navigation pane, choose Interconnections > VPN > VPN Gateways.
-
In the top navigation bar, select the region where the VPN gateway resides.
-
On the VPN Gateways page, click the ID of the target VPN gateway.
-
On the details page, click the Policy-based Route Table tab, find the route, and then click Advertise in the Actions column.
-
In the Advertise Route dialog box, click OK.
Use BGP dynamic routing
-
Add BGP configurations to the IPsec-VPN connection.
-
In the left-side navigation pane, choose Interconnections > VPN > IPsec Connections.
-
On the IPsec Connections page, click the ID of the IPsec-VPN connection.
-
In the IPsec Connections section, turn on Enable BGP. In the BGP Configuration dialog box, configure the following settings, and then click OK. | Parameter | Description | Example value | |---|---|---| | Local ASN | Enter the autonomous system number. | Enter
65530. | | Tunnel 1 | Add BGP configurations for the active tunnel. | | | Tunnel CIDR Block | Enter the CIDR block for the encrypted tunnel. | Enter169.254.116.208/30. | | Local BGP IP address | Enter the BGP IP address. Must be within the tunnel CIDR block. | Enter169.254.116.210. | | Tunnel 2 | Add BGP configurations for the standby tunnel. | | | Tunnel CIDR Block | Enter the CIDR block for the encrypted tunnel. | Enter169.254.214.96/30. | | Local BGP IP address | Enter the BGP IP address. Must be within the tunnel CIDR block. | Enter169.254.214.98. |
-
-
Enable automatic BGP route propagation.
-
In the left-side navigation pane, choose Interconnections > VPN > VPN Gateways.
-
On the VPN Gateways page, find the target VPN gateway. In the Actions column, choose
 > Enable Automatic BGP Propagation.
 -
In the Enable Automatic BGP Propagation dialog box, click OK.
-
-
Step 4: Test connectivity
After configuration, test the IPsec-VPN connection by accessing an AWS EC2 instance from an Alibaba Cloud ECS instance.
Verify that access control policies (network ACLs, security group rules) on both platforms allow inter-VPC communication.
-
Log on to an ECS instance in the Alibaba Cloud VPC. Select a remote connection method for an ECS instance.
-
Run the
pingcommand to verify connectivity with the AWS EC2 instance. Reply messages confirm the VPCs can communicate.ping <private IP address of the AWS EC2 instance>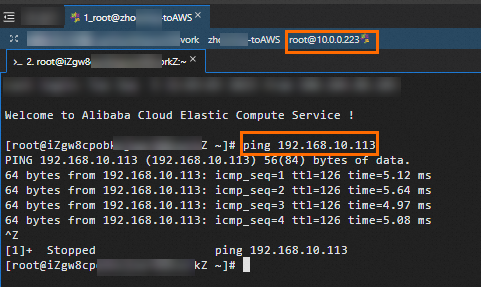
-
Test high availability. The dual-tunnel IPsec-VPN connection automatically switches traffic to the standby tunnel if the active tunnel fails.
-
Stay logged on to the ECS instance.
-
Run a continuous ping to the AWS EC2 instance: ``
ping <private IP address of the AWS EC2 instance> -c 10000`` -
Interrupt the active tunnel — for example, by modifying its pre-shared key on Alibaba Cloud to cause a key mismatch.
-
Verify that communication resumes after a brief interruption, confirming traffic switched to the standby tunnel. Monitor tunnel traffic on the Monitoring tab. Monitor an IPsec-VPN connection.
-
What to do next
After the VPN connection is established, configure DTS to use it for database access. Based on your task type -- data synchronization, data migration, or data validation -- add the DTS server IP addresses to the database security settings, such as security group rules, firewalls, and whitelists.
When creating a DTS instance over the VPN connection:
-
Access method: Select Express Connect, VPN Gateway, or Smart Access Gateway as the access method, depending on the DTS task type.
-
VPC: Select the Alibaba Cloud VPC connected to AWS through the VPN gateway.
-
Database address: Enter the private IP address of the AWS database, accessible through the VPN tunnel.
-
Security: Verify that the AWS security group rules allow inbound traffic from the Alibaba Cloud VPC CIDR block on the database port.